Yealink T42G User Manual
Hide thumbs
Also See for T42G:
- User manual (15 pages) ,
- Quick start manual (12 pages) ,
- Configuring (10 pages)
Table of Contents
Advertisement
Advertisement
Table of Contents

Related Manuals for Yealink T42G


Summary of Contents for Yealink T42G
-
Page 2: Table Of Contents
............................4 ............................5 ................. 5 Icon Instructions ..........................6 LED Instructions ..........................7 ......................8 ........................8 Backlight ............................8 Language ............................8 Time and Date ..........................9 .......................... 10 Volume ............................10 Ring Tones ..........................10 ......................11 Directory ............................. - Page 3 ..........................24 ..........................25 ......................26 ...................... 27 ........................... 27 ............................ 27 Busy Greetings ..........................27 No Answer Greetings ......................... 28 Extended Away Greetings ......................28 ..............29 ....................... 29 ......................... 29 ............................29 ............................. 29 ........................... 29 ......................29...
- Page 4 If this is the first time you are using the iiNet BizPhone Standard T42G handset, please refer first to the iiNet BizPhone T42G Quick Startup Guide to assemble and start up your handset. The BizPhone Quick Startup Guide is available on the BizPhone Resources page at www.iihelp.iinet.net.au/BizPhone_Support_Resources.
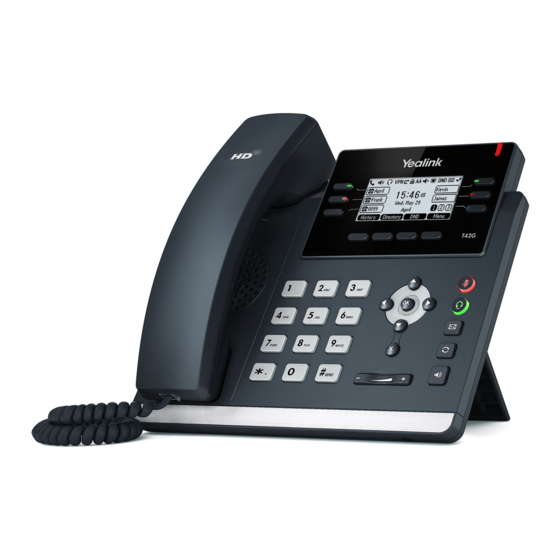
- Page 5 The image below shows the main hardware for the BizPhone Standard T42G IP Phone, including the LCD screen and the keypad. Hardware component instructions for the BizPhone Standard T42G IP phone are: Shows information about call, messages, soft keys, time, date and other relevant data: ...
-
Page 6: Icon Instructions
Confirms or rejects incoming calls Soft Keys Label automatically to identify their context-sensitive features. Icon Instructions Below are descriptions of the icons that may appear on the LCD screen: Network is unavailable Registered successfully Register failed Registering Hands-free speakerphone mode Handset mode Headset mode Voice Mail... -
Page 7: Led Instructions
Received Calls Place Calls LED Instructions Power Indicator LED Solid Red The phone is initialising Fast Flashing Red The phone is ringing Slow Flashing Red The phone has received a voicemail The phone is powered off or idle Line Key LED The line is seized Solid Green The line is in conversation... -
Page 8: Backlight
Backlight You can configure the backlight to adjust the brightness of the LCD screen. Backlight on the LCD screen can be configured with the following options: Always On: backlight is on permanently. 15s, 30s, 120s, 300s, 600s or 1800s: Backlight is turned off when the phone is inactive after the designed time (in seconds). -
Page 9: Time And Date
Time and Date The time and date are displayed on the LCD screen when the phone is idle. You can configure the time manually via the phone interface. To configure the time and date manually on your phone: Press Menu -> Settings -> Basic Settings -> Time & Date -> Manual Settings. Enter the specific time and date. -
Page 10: Volume
Volume You can press the volume key to adjust the ringer volume when the phone is idle. You can also press the volume key to adjust the receiver volume of currently engaged audio devices (handset, speakerphone or headset) when the phone is in use. To adjust the volume when the phone is idle: Press to adjust the olume. -
Page 11: Directory
Directory To view the directory on your phone: Press the Directory soft key when the phone is idle. The LCD screen displays the enabled list(s) in the directory. If there is only one list in the directory, press the Directory soft key to enter this list directly. Local Directory Adding Groups To add a group to a Local Directory:... - Page 12 Editing Groups To edit the group in the local directory: 1. Press the Directory soft key. The IP Phone enters the local directory directly as there is only Local Directory enabled in the directory by default. If the Local Directory is removed from the directory, press Menu → Directory → Local Directory to enter the Local Directory.
- Page 13 Adding Contacts Adding Contacts Manually To add a contact to a local directory manually: 1. Press the Directory soft key. The IP Phone enters the local directory directly as there is only Local Directory enabled in the directory by default. If the Local Directory is removed from the directory, press Menu →...
- Page 14 Editing Contacts To edit a contact in the local directory: 1. Press the Directory soft key. The IP Phone enters the local directory directly as there is only Local Directory enabled in the directory by default. If the Local Directory is removed from the directory, press Menu → Directory → Local Directory to enter the Local Directory.
- Page 15 The built-in phone directory can store names and phone numbers for a blacklist. You can store up to 30 contacts and add, edit, delete or even call a contact in the blacklist directory. Incoming calls from blacklist directory contacts will be rejected automatically. To add a contact to the blacklist directory manually: 1.
- Page 16 The T42G IP phone maintains call history lists of Placed Calls, Received Calls, Missed Calls and Forwarded Calls. Call history lists support up to 400 entries. You can view call history, place a call, add a contact or delete an entry from the call history list. The call history feature is enabled by default.
- Page 17 You can place a call in three ways using your Standard T42G IP phone: Using the handset. Using the speakerphone. Using the headset. You can place a call by dialling the number first, or search and dial from call history or local directory.
-
Page 18: Placing Calls From Local Directory
Placing Calls from Local Directory To place a call to a contact from the local directory: 1. Press the Directory soft key. The IP Phone enters the local directory directly as there is only Local Directory enabled in the directory by default. If the Local Directory is removed from the directory, press Menu →... -
Page 19: Answering When Not In Another Call
Answering when not in another call You can answer a call in three ways when you are not in another call using your Standard T42G IP phone: Using the handset. Using the speakerphone. Using the headset. To answer the call using the handset: Pick up the handset. - Page 20 To end a call: If you are using the handset, press the End Call soft key or hang up the handset. If you are using the headset, press the End Call soft key. If you are using the speakerphone, press or press the End Call soft key.
-
Page 21: Multiple Calls On Hold
You can place an active call on hold. Only one active call can be in progress at any time. Other calls can be made and received while placing the original caller on hold. When you place a call on hold, your BizPhone service may play music to the other party while waiting. -
Page 22: Static Forwarding
You can configure your phone to forward incoming calls to another party through static forwarding. You can also forward incoming calls while your phone is ringing (dynamic forwarding). Static Forwarding There are 3 types of Static Forwarding: Always Forward: Incoming calls are immediately forwarded. ... -
Page 23: Dynamic Forwarding
If you select No Answer Forward: Press , or the Switch soft key to select Enabled from the No Answer Forward field. Enter the destination number you want to forward all unanswered incoming calls to in the Forward to field. iii. - Page 24 You can transfer a call to another party in one of three ways: Blind Transfer: Transfer a call directly to another party without consulting. Semi-Attended Transfer: Transfer a call when the target phone is ringing. Attended Transfer: Transfer a call with prior consulting. To perform a blind transfer: 1.
- Page 25 You can enable or disable a call waiting on the phone. If the call waiting is enabled, you can receive another call while there is already an active call on the phone. Otherwise, another incoming call is automatically rejected by the phone with a busy message when there is an active call on the phone.
- Page 26 The T42G IP phone supports up to 3 parties (including yourself) in a conference call. To set up a conference call: 1. Place a call to the first party. 2. When the first party answers the call, press the Conf soft key to place a new call. The active call is placed on hold.
-
Page 27: Busy Greetings
Your Voice Mail is pre-configured and ready to use as soon as you receive your T42G handset. You can listen to voice mails that are stored in your voice mailbox. When receiving a new voice mail, the phone will play a warning tone, and the power indicator LED will slow flash red. The LCD screen will prompt that the phone received a new voice message and display an icon. -
Page 28: No Answer Greetings
No Answer Greetings No Answer Greetings are the greetings that callers will hear if you do not answer their calls. To record your No Answer Greetings: 1. Press to dial the Voice Portal and enter your Voice Portal passcode. Note: Your Voice Portal passcode is emailed to you with your BizPhone Service Completion Advice. - Page 29 212mm (W) x 189mm (D) x 175mm (H) * 54mm (T) HD voice: HD handset, HD speaker Wideband codec: G.722 Narrowband coded: G.711 (A/µ), G.723.1, G.729AB, G.726, iLBC DTMF: In-band, Out-of-band (RFC 2833) and SIP INFO Full-duplex hands-free speakerphone with AEC VAD, CNG, AEC, PLC, AJB, AGC 192x64-pixel graphical LCD with backlight LED for call and message waiting indication...
Need help?
Do you have a question about the T42G and is the answer not in the manual?
Questions and answers