Table of Contents
Advertisement
Quick Links
Advertisement
Table of Contents

Related Manuals for Xomax XM-DVBT2-01


Summary of Contents for Xomax XM-DVBT2-01
- Page 2 User manual Notice Warnings, Cautions and Notes Throughout the whole user manual, pay special attention to the following marks that indicate hazardous situations. • Warning Indicates a hazardous situation which could result in serious injury. • Caution Indicates a situation which could damage the equipment or other apparatus. •...
- Page 3 User manual This receiver has been manufactured to comply with international safety standards. Please read the following safety precautions carefully. Safety Instructions and Precautions 1. MAINS SUPPLY (12V) • Operate this product only from the type of power supply indicated on the marking label.
- Page 4 User manual • The product should not be exposed to liquid of any kind. In addition, no objects filled with liquid should be placed on the apparatus. 6. CLEANING • Disconnect the product from the wall outlet before cleaning. • Use a light damp cloth (no solvents) to dust the product. 7.
- Page 5 User manual • Unplug the product from the wall outlet and disconnect the antenna during a thunderstorm or when left unattended and unused for long periods of time. This will prevent damage to the unit due to lightning and power-surges. 11.
-
Page 6: Table Of Contents
User manual Contents 1 Before Using the Product………………………………..………………………………………………..……………………7 1.1 Accessories ................................ 7 1.2 Connector ................................8 1.3 Remote Control ..............................10 2 Setup………………………………………………………………………..……………………………………………………..13 2.1 Connecting the Antenna ............................ 13 2.2 Connecting the TV ............................14 2.2.1 Using HDMI Cable…………………………………………………………………………………………………...14 2.2.2 Using RCA Cable…………………………………………………………………………………………………….14 2.3 Powering On .............................. - Page 7 User manual 4.5 Option ................................25 4.6 System Setting ..............................26 4.7 USB………………………………………………………………………………………………………………………..26 5 Trouble Shooting………………………………………………………………………………………………………………...29 6 Technical Specifications……………………………………………………………………………………………………….30 7 Declaration of conformity………………………………………………………………………………………………………31...
-
Page 8: Before Using The Product
User manual Before Using the Product Accessories This section provides detailed instructions on the product and its accessories. -
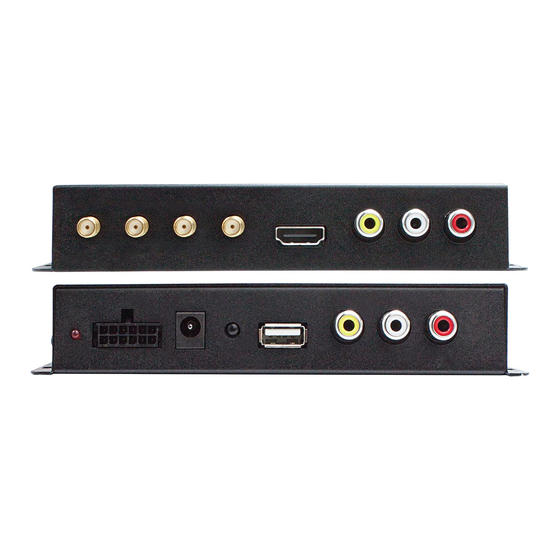
Page 9: Connector
User manual Connector... - Page 10 User manual 1. POWER LED The Power LED will turn red only when the receiver is in standby mode. The Power LED will turn green only when the receiver is in operation mode. 2. POWER In + IR + AV out Composite wires in port for Power (Battery +, GND-), Extend Infra-Red Remote Control Sensor, Audio + Video Output cable 3.
-
Page 11: Remote Control
User manual Remote Control... - Page 12 User manual Function Function When watching a program,change programs or Tums power ON/OFF, switch PR+,PR- AUX AV input move to the next higher or lower item in the menu When watching a program , When watching a adjust the volume or move to the program,mute the sound left or right item in the menu Enter number of the required...
-
Page 13: Setup
User manual Setup This chapter describes how to connect your receiver to the TV with the particular equipments for gaining optimum signal quality. The receiver provides various interfaces to connect to the TV or other devices. Select the most appropriate procedure depending on the equipment you have. -
Page 14: Connecting The Tv
User manual Connecting the TV 2.2.1 Using HDMI Cable The HDMI connection is recommended for Digital TV. In case the TV has a HDMI input connector, a special all-digital interface that provides the highest picture quality, connect the receiver to the TV with the HDMI cable. 2.2.3 Using RCA Cable Connect the receiver and the TV using an RCA cable. -
Page 15: Installation Wizard
User manual Installation Wizard If you are using the receiver at the first time or have restored the receiver to Factory Default, the Installation Guide Menu will appear on your TV screen. (1) [OSD Language]: Press RIGHT/LEFT key to select a language. (2) [Country]: Press RIGHT/LEFT key to select your country of residence. -
Page 16: Basic Operation
User manual Basic Operation Program Manage Settings To access the Menu, press the MENU button and select [Program] using the RIGHT/LEFT keys to navigate through the menu. The Menu provides options to adjust the Program Manage Settings. Select an option and press OK or RIGHT to adjust the setting. - Page 17 User manual Set Favorite Channels You can create a shortlist of favorite programs that you can easily access. Set Favorite TV or Radio program: 1. Select your desired channel then press the FAV button. A heart-shaped symbol will appear and the channel is marked as a favorite. 2.
- Page 18 User manual 3. Press OK to select your favorite channel. Delete a TV or Radio Program 1. Select the Program and then press the BLUE button. A warning message will appear. Press OK to delete the channel. 2. Repeat the previous step to select more channels to delete. Skip TV or Radio Channel 1.
- Page 19 User manual You can lock selected programs for restricted viewing. Lock a TV or Radio channel 1. Select the preferred channel then press the YELLOW button. A lock-shaped symbol is displayed. The channel is now marked as locked. 2. Repeat the previous step to select more channels. 3.
-
Page 20: Picture Setting
User manual [By Service Name] - Sort the channels in alphabetical order. [By Service ID] - Sort the channels according to the station. [By ONID] - Sort the channels according to ONID. (d) LCN (Logical Channel Number) Set LCN on or off. Picture Setting To access the menu, press MENU then select [Picture] using the RIGHT/LEFT key. -
Page 21: Channel Search
User manual This setting is to match the most common setting for HDMI. [480P]: for NTSC TV system []576P]: for PAL TV system [720P]: for NTSC or PAL TV system [1080I]: for NTSC or PAL TV system [1080p50Hz]: for NTSC or PAL TV system (b) TV Format If the picture does not appear to be correct you can change this setting. - Page 22 User manual UP/DOWN to select an option and RIGHT/LEFT to adjust the settings. Press EXIT to exit Menu. (a) Auto Search This option will automatically search for channels and save them once the scanning is complete. All previously saved channels and settings will be deleted. 1.
- Page 23 User manual (b) Manual Search This option allows you to scan for new channels without deleting previously saved channels and settings. 1. Select [Manual Search] then press OK or RIGHT. The channel search screen will appear. 2. Press the RIGHT/LEFT key to select the channel frequency. 3.
-
Page 24: Time Setting
User manual Time Setting To access the Menu, press MENU select [Time] using the RIGHT/LEFT keys. The Menu provides options to adjust the time settings. Press UP/DOWN to select an option and press RIGHT/LEFT to adjust the setting. Press EXIT to exit the menu (a) Time offset Select auto or manual for GMT offset adjustments. -
Page 25: Option
User manual (e)power on/of Option To access the Menu, press MENU and select [Option] using the RIGHT/LEFT keys. The menu provides options to adjust the OSD Language, Subtitle Language and Audio Language. Select an option and press RIGHT/LEFT to adjust the setting. Press Exit to exit the Menu. -
Page 26: System Setting
User manual System Setting To access the Menu, press MENU select [System] using the RIGHT/LEFT keys. The menu provides options to adjust the system settings. Press the UP/DOWN key to select an option and press RIGHT/LEFT to adjust the setting. Press EXIT to exit the Menu. (a) Set Password Set or change the password for locked programs. -
Page 27: Usb
User manual This option will delete all preset channels and settings. The Master unlock password is „888888‟. (c) Information View model, hardware and software information. (d) Software update (1)If the status is set 'ON ', it will scan new software from broadcast according to your preferred time in "Start time". - Page 28 User manual Multimedia When a USB device is attached you can select from the Music, Photo or Movie options in this menu using the RIGHT/LEFT keys and OK to select. If a USB device is not connected, the warning message "No USB device is Found" will appear. (b) Photo configure -Slide Time: adjust slide show interval to 1~8 seconds.
- Page 29 User manual [Discard]: Play picture in full screen mode. (c) Movie Configure: - Aspect Ratio: [Keep]: Play movie in its original aspect. [Discard]: Play movie in full screen mode. - Subtitle Specific: [Small]: Displays the subtitle as small mode. [Normal]: Displays the subtitle as normal mode. [Big]: Displays the subtitle as big mode.
-
Page 30: Trouble Shooting
User manual - We can‟t guarantee compatibility (operation and/or bus power) with all USB mass storage devices and assume no responsibility for any loss of data that may occur when connected to this unit. - With large amounts of data, it may take longer for the system to read the contents of a USB device. -
Page 31: Technical Specifications
User manual on the screen AV cable correctly The program is a radio program Press <TV/RADIO> key to shift into TV mode The battery is exhausted Change battery Remote control is not Remote control is not facing or Adjust the position of the Remote working close enough to the Set Top Box control and move closer to the... -
Page 32: Declaration Of Conformity
Declaration of conformity The manufacturer herewith declares the conformity ofthat product with the following directivesand standards: Low Voltage Directive 2006/95/EC EN 60065:2002+A1:2006 EMC Directive 2004/108/EC EN 55 013:2001+A1:2003+A2:2006 EN 55 020:2007 EN 61 000-3-2:2006 EN 61 000-3-3:2008 Model: XOMAX XM-DVBT2-01...
Need help?
Do you have a question about the XM-DVBT2-01 and is the answer not in the manual?
Questions and answers