Table of Contents
Advertisement
Thank you for purchasing one of our XOMAX products! We appreciate your confi-
i
Please read the following manual carefully before you install and use the unit.
Please save this manual in case you will need to clarify further possible ques-
tions regarding installation and usage of our product.
We are constantly trying to keep our online-library of user's manuals for our
products up-to-date. In case you miss some information or if something should
be unclear, please visit our homepage
version of user's manual or contact our customer service.
Please note: Any alterations and changes of technical data or/and design
due to technical update of some models need no advertisement.
We appreciate our environment, so to keep it safe and clean, we
do not print our manuals on paper but provide our products with
manuals in digital version created in *.pdf format.
You can find and download them anytime on our homepage
www.xomax.de/download, view them on your mobile devices and
print them for yourself if needed.
XOMAX
User's Manual
XM-CDB623
dence. Enjoy your brand new multimedia unit!
Version 1.1
Last update 25.04.2019
www.xomax.de/download
ENGLISH
for a current
Advertisement
Table of Contents

Related Manuals for Xomax XM-CDB623


Summary of Contents for Xomax XM-CDB623
- Page 1 XOMAX User's Manual XM-CDB623 Thank you for purchasing one of our XOMAX products! We appreciate your confi- dence. Enjoy your brand new multimedia unit! Please read the following manual carefully before you install and use the unit. Please save this manual in case you will need to clarify further possible ques- tions regarding installation and usage of our product.
-
Page 2: Table Of Contents
Thema: Table of contents Table of contents LED color settings ......14 Safety instructions and precau- Clock settings .......14 tions Handling by stop only ...... 4 Radio mode Installation ........4 Radio mode on ......15 Regular loudness ......4 Automatic station searching ....15 Repair of the unit...... - Page 3 Thema: Table of contents Start Bluetooth music ....18 Operate Bluetooth music ....18 Common solutions Disposal / recycling informa- tion Disposal of an old unit / battery ..21...
-
Page 4: Safety Instructions And Precautions
Thema: Safety instructions and precautions Safety instructions and precautions Regular loudness Remove transport securing screws (if available) Please set the loudness of the unit to Before using the optical drive, be the appropriate level so you were still sure to remove the two transport able to hear exterior noises especially locking screws marked with colored traffic warning signals. -
Page 5: Replacement Of Fuses
Thema: Safety instructions and precautions electric shock do not put the unit in to Replacement of fuses the moist environment (e.g. adverse weather conditions, inappropriate wet While replacing the fuse please make cleaning etc.) sure that the new fuse has the same properties as the old one, especially the amperage. -
Page 6: Installation
Thema: Installation Installation » The connection cables may not be Installation notes cutted or short-circuited. Otherwise the warranty becomes invalid. Here you can find relevant installation notes and common information. » Before the installation please make sure that your vehicle has the 12 Volt on-board power supply. - Page 7 Thema: Installation » Please ensure that the negative the unit please isolate the endings of speaker cable is in each case connected unused cables with the electrical tape with the negative speaker terminal of to prevent a short circuit. the ISO port. Do not ever connect the »...
-
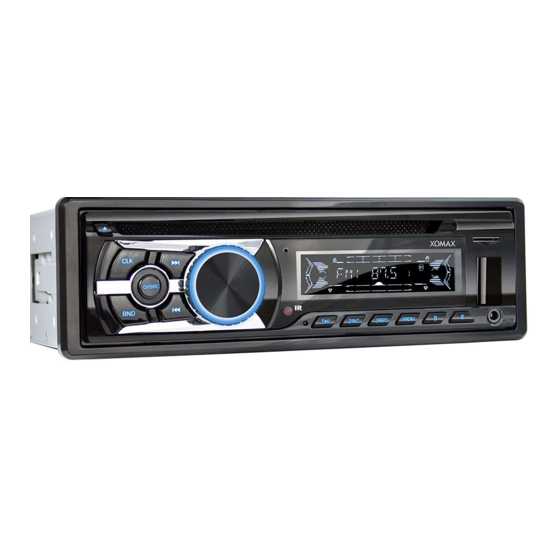
Page 8: Operating Elements Of The Unit
Thema: Installation Operating elements of the unit 1 CD media eject 7 Next track/Frequency band scan Press the button to eject the inserted [in play mode]: brief press: skip to the next track. long press: fast forward. CLK Clock settings [in radio- or play mode]: [in radio mode]: brief press:... - Page 9 Thema: Installation brief press: starts the automatic radio MIC Bluetooth microphone station search forwards. The microphone is used during hand- long press: switches to the manual free phone calling via Bluetooth. The frequency scan forwards. microphone should not be blocked to achieve the best possible sound quality.
- Page 10 Thema: Installation 6 Stored radio stations/10 tracks skip/Next folder stored radio station "6". [in radio mode]: [in play mode]: brief press: 10 tracks skip forwards. long press: skip to the next folder. AUX Auxiliary audio input 3,5 mm jack plug for connection with an external playback device such as MP3 player, smarthone, tablet PC etc.
-
Page 11: Usage Of The Remote Control
Thema: Installation 1. Remove the battery compartment: Usage of the remote control push it to the left first, then pull it out. Before the first usage please remove the isolation plate. 2. Remove the old battery and insert Aim the remote control at the IR the new one (CR-2025 Lithium). -
Page 12: Unit On/Off
Thema: Installation Unit on/off AUX input Press the button to turn the The AUX input is a 3,5 mm jack plug on ?/SRC unit on. the front operating panel. If the unit is already on, keep the Herewith you can connect the unit with button pressed for a couple of seconds on of the external playback devices: to turn it down. -
Page 13: Basic Functions
Thema: Basic functions Basic functions Equalizer on/off Mode choice (prompt " DSP OFF " on the screen) [in radio mode]: Set Distance/Local Press the button on the front ?/SRC Sensitivity panel to switch between the modes: (prompt " " on the screen) Radio Disc [in radio mode]: Stereo/Mono switch... -
Page 14: Led Color Settings
Thema: Basic functions You can also use for that the rotary knob Now turn the knob on the front panel to on the front panel. set the minutes. After the correct clock settings have LED color settings been made, wait about 5 seconds for the radio to save the settings and Press the volume knob till the prompt automatically return to the current... -
Page 15: Radio Mode
Thema: Radio mode Radio mode Radio mode on Switch the frequency bands To get to Radio mode press the Press the button on the front ?/SRC button several times till you see the panel to switch the frequency bands prompt " Radio "... -
Page 16: Playback Mode
Thema: Playback mode Playback mode panel to skip 10 tracks backwards or Switch to playback mode forwards. As soon as you either plug an USB flash drive or insert a micro SD card the Change folder unit's processor reads the data from the storage medium and the unit switches Press and hold the button on... -
Page 17: Bluetooth Connection
Thema: Bluetooth connection This function is available only during the Bluetooth connection MP3 files playback; the tags should be stored in these files first. Before the first usage of any Bluetooth function the unit should be connected LIED NAME.MP3 via Bluetooth with the device of your choice. -
Page 18: Hand-Free Phone Call
Thema: Hand-free phone call Hand-free phone call Bluetooth music Common information Common information This unit contains a Bluetooth feature The "Bluetooth music" feature allows to "hand-free phone call" which allows to play the music from the external device make your phone calls hand-free via of your choice (cellphone, smartphone, integrated microphone and loudspea- tablet PC) via car radio speakers. -
Page 19: Common Solutions
Common solutions Common solutions The following advices are generally valid and refer to diverse XOMAX models with the similar characteristics. Please note that some articles may refer not to your model exactly and may contain the describtion of features and functions that your model does not support. - Page 20 Thema: Common solutions Poor radio recep- For problem-solving regarding the radio reception it is tion: important to know the type of the antenna of your vehicle. The radio tuner finds no broadcaster or the Here are the possible solutions for each type of the antenna: reception is poor.
-
Page 21: Disposal / Recycling Information
Batteries that contain pollutants (e.g. Hg = mercury, Pb = lead, Cd = cadmium) are labelled with the symbol pictured above. At our place you can free dispose of the empty batteries purchased at our store. XOMAX in the world wide web XOMAX distribution worldwide Purchase XOMAX car radio online: XOMAX manufacturer's information: https://www.carmediashop.de...
Need help?
Do you have a question about the XM-CDB623 and is the answer not in the manual?
Questions and answers