GoPass AVL-900 User Manual
Hide thumbs
Also See for AVL-900:
- Troubleshooting (4 pages) ,
- Quick start manual (12 pages) ,
- Quick start manual (12 pages)
Table of Contents
Advertisement
Quick Links
Advertisement
Table of Contents

Related Manuals for GoPass AVL-900


Summary of Contents for GoPass AVL-900
- Page 1 GoPass Technology Corp. 17F., 866-1 Chung-Cheng Road, Chung Ho City, Taipei, Taiwan Tel: (886-2) 3234-8838 Fax: (886-2) 3234-9868 E-mail: support@gopasstech.com Website: http://www.gopasstech.com...
-
Page 2: Table Of Contents
Table of Contents I. Hardware Installation.................3 A. Working Directions ................3 B. System Introduction.................4 C. Wiring Installation................5 1. Product Parts List ..............5 2. Precaution before Installation ...........6 3. Panel Description ..............6 4. INSTALLATION.................7 5. Power Charging..............10 6. Wiring Description..............11 7. - Page 3 5. Setting of Magic e-Map............54 V. PC Track Installation ................56 1. Create a Virtual COM Port ............... 56 2. Install Gopass PC Track Software ............ 59 3. Send SMS Command Codes ............60 4. Check GPS Data In-flow..............63 VI.
-
Page 4: Hardware Installation
I. Hardware Installation A. Working Directions Thank you for your purchase of AVL-900 GPS/ GPRS Locator Tracker. In order to realize the full functions of this product, please read this manual carefully before starting to use the product. 1. This product can only be maintained and repaired by qualified professional service personnel. -
Page 5: System Introduction
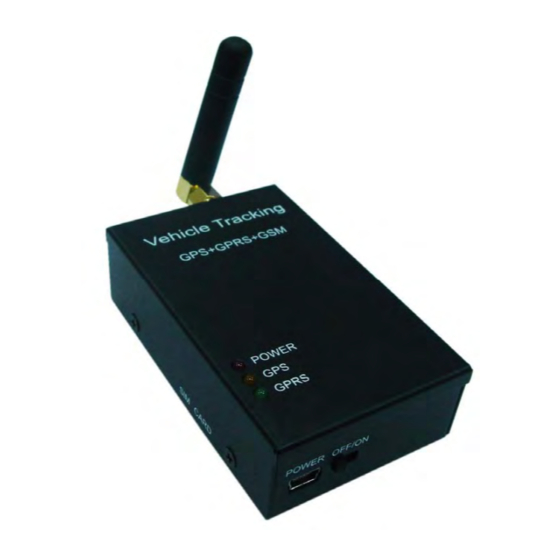
B. System Introduction AVL-900 is a high-tech product through cooperation with mobile operators. It combines GPS Global Positioning System and GSM/GPRS communication system, which can clearly inform you the position & situation of your car. GPS is the abbreviation for Global Positioning System, which is a product of the cold war between USA and USSR. -
Page 6: Wiring Installation
Wiring Installation 1. Product Parts List AVL Unit + GPRS Antenna GPS Antenna Microphone with Connecting Wire USB-Mini USB Adapting Cable Car Charger with USB Connector Car Charger Lighter Socket USB - RS232 3-in-1 Tracking... -
Page 7: Precaution Before Installation
2. Precaution before Installation Check if all the parts are included. Prepare a SIM card for GSM/ GPRS communication (It must have GPRS function). Use some other mobile phone to confirm that the PIN code has not been set, and that it can dial out and receive telephone calls without problem. Before install the SIM card, make sure to cut off power from the AVL unit. -
Page 8: Installation
4. INSTALLATION Step 1: Install GPRS Antenna * Connect the GPRS Antenna to the unit. * Fasten the connection by turning the screw in the bottom. Please do not swing round the antenna itself. Step 2: Install SIM Card (1) Unscrew and remove the back cover of your locator. (2) Push the holder top upward, as illustrated, to loose it. - Page 9 (4) Insert the SIM card by sliding it into the card holder slot, with the chip module facing to the connectors on PCB, as shown in the picture. (5) Flip down the holder top. (6) Push the holder top leftward, and let it snap in completely. (7) Put back the bottom cover and screw it up.
- Page 10 Step 3: Connect GPS Antenna GPS antenna is used to receive satellite signals in the sky. It should be positioned at a place where it will have an unobstructed view of the sky. The ideal location is top of the dashboard or close to the rear window of the car. GPS antenna can pick up signals through glass and plastic, but will not “see the sky”...
-
Page 11: Power Charging
5. Power Charging Note: Microphone jack will be LOCK once connecting to Vehicle Tracker. Method 1: While testing in the room, USB connects to the PC or Notebook directly. Method 2: Car charger connects to the car cigarette lighter directly. Method 3: Car charger connects to the car charger lighter socket. -
Page 12: Wiring Description
6. Wiring Description Connect the wiring correctly. The AVL unit should be connected to power source, after all the wiring work has been completed and checked. GPS antenna is used to receive satellite signals in the sky. It should be fixed to face the sky;... -
Page 13: Operating Instructions
200 meters. 5. Password Password is the key to operate AVL-900 GPS Tracker. It is a 4-digit data. The default password is “8888”. Be sure to change the password after the installation, and keep it firmly in mind. As well, Note: In order to protect your privacy, do not tell others the password, unless it is necessary. -
Page 14: Hardware Specifications
E. Hardware Specifications Dimensions 79.0 x 48.0 x 24.0 (mm) GSM/GPRS Module Siemens TC65 EGSM900:TX880-915MHz,RX 925-960MHz DCS1800:TX 1710-1785MHz,RX 1805-1880MHz Bandwidth GSM850:TX824-849MHz,RX 869-894MHz GSM1900:TX1850-1910MHz,RX 1930-1990MHz Maximum EGSM900、GSM850:33 dBm(2W) RF Output Power GSM1800、GSM1900:30 dBm(1W) Resistance 50Ω Transmission Speed Circuit switched 4.8/9.6 kbps GPS Module SiRF Star III Frequency... -
Page 15: Troubleshooting
F. Troubleshooting 1. After AVL-900 installed, why there is no response? Check the polarity of power connection to see if a wrong polarity is connected. Check the power is on or not. 2. Why does GSM fail to communicate? Check if the SIM card is opened Check whether the SIM car has password Check if the SIM card is correctly placed. - Page 16 5. Does the weather affect GPS operation? GPS system is able to overcome weather problem in its initial design. GPS satellite positioning signals consist of short waves; the transmission of short waves will not be affected by weather conditions. GPS signals may produce error factors during transmission, such as solar wind, earth rotation, variation of aerosphere density, building reflection, etc.
-
Page 17: Track Gps Location By Google Earth/Maps
*Note: If you do not have a PDA Phone to run our application software, please use a standard mobile phone to send SMS (short message) according to the attached "Command Codes List". II. Track GPS Location by Google Earth/Maps You can get the latitude & longitude data by sending “111#Password” SMS command Code to the GPS Tracker. - Page 18 3) Input the latitude/ longitude data (N24 10.9418', E120 36.8538') into the column of “Search” and click on search button, Google Earth will display the position map for you.
- Page 19 P.S. GPRMC Data Format: $GPRMC,204700,A,3403.868,N,11709.432,W,001.9,336.9,170698,013.6,E*6E $GPRMC 204700 3403.868 11709.432 001.9 336.9 170698 013.6 <1> <2> <3> <4> <5> <6> <7> <8> <9> <10> <11> <12> 1) UTC time:(hhmmss.sss) 2) Status of Position Fix: A = data available; V = data not available. 3) Latitude: (ddmm.mmmm)...
-
Page 20: Pda Virtual Com Port Installation
III. PDA Virtual COM Port Installation 1. Installation 1-1 Put the CD to the CD driver of your computer. Please select a proper driver according your PDA software system to install “PDA Track”. 1-2 Please press “NEXT” to continue the installation. - Page 21 PC. You can update or re-install it without using an original CD in the future. Also, If PDA is not available when installing it. GoPass PDA SMS Driver can be installed in your PDA automatically next time when PDA is connected.
- Page 22 1-5 The installation of PDA SMS Driver is completed. 1-6 Please install it in “Devise”, driver will be installed. (Note: the “Device” must be selected). Therefore, driver will be installed in System correctly. As a result, Windows can find it and start the driver properly.
- Page 23 1-7 After PDA installation is completed, click “Start” “Programs” “SMS Track” to set up the COM port. 1-8 After the execution of SMS Track, the following screen will prompt. Please click “Tools” “Install/Uninstall” to install the Virtual COM Port.
- Page 24 1-9 The following screen will prompt. The left column is for the name of the COM Port; the center column is to describe the status of the COM port; the right column is to show the name of COM Port Driver. We can find in the description column, some of the COM Ports are currently Empty, which means these COM ports have not yet been used by any other...
- Page 25 1-11 To restore it (COM3), please click “Restore 3 party Driver” button, infrared port (COM3), and “Restore” button. 1-12 Request for reboot if the installation is successful. Click “Yes” to restart a PDA. Or click “No” for not restart it. (P.S. You can reboot your cell phone in SMS Track at any time.)
- Page 26 1-13 The installation of Virtual COM Port is completed after restart. 1-14 Some software requests GPS data to be sent continually in order to work properly. Regarding this issue, we provide a Virtual sending function. Go to Tools→ “Driver Options”, to set the time interval of GPS returned message. (They system default is set at every 10 seconds.
- Page 27 1-15 The devices (AVL/ GPS-911) provided by GoPass need a password in order to make any commands. The default password is 8888. For frequent commands, please go to Tools “Default Password” to check “Enable default password”. Otherwise, it will request a password each time you make a command.
- Page 28 1-16 Go to Tools “Contact List”. Add name and Tel. After adding it, select the name you want to track, and click OK to close this screen. Then go to Track screen. ( Note: you can also key in any tel. # in the TEL column, which you like to track) 1-17 Send “Get...
-
Page 29: Un-Installation
2. Un-installation For un-installation, 2 programs need to be removed – i.e. PDA driver, and the setting tool. Please follow the below instructions to remove the programs. 2-1 Remove PDA Driver Run SMS Track program, select Tools “Install/Uninstall”. The screen will prompt. - Page 30 If you really do not want to keep SMS Track, please remove it as per the following guide lines. 2-2-1 Click “Remove Programs” from Setting of your PDA Phone ; select “Gopass Virtual COM Port Driver”; then click on “Remove” to remove the program...
-
Page 31: Pda Track Operation
This system was specially developed for GoPass GPS Trackers. With this application software, + GoPass GPS Tracker, + PDA Phone, you will be able to use your own mobile to track the position of your loved one without the need of a call center. - Page 32 2. Compatible software Compatible software are Microsoft Pocket Streets、Tomtom Route Planner、 Papago and Magic e-Map. (Pocket Streets) (Route Planner) (PAPAGO) (Magic e-Map)
-
Page 33: Operation
B. Operation 1. SMS Track [MAIN SCREEN] Basic Settings Track Position Phone Conversation Geo-fence (Park) Function SOS Help (not workable for AVL-900) Check SMS Messages Received Tools Installation Options Functions Functions List Help User’s Manual... -
Page 34: Tools
1-1 Tools [Install/Uninstall] 1. You can find in the description column, some of the COM Ports are currently Empty, which means these COM ports have not yet been used by any other device, and we can install the Virtual COM Port on these ports marked with “Empty”... - Page 35 If you want to remove the software from your device, you can tap “Uninstall” button for the removal. Please do reboot your device after the removal. If all the COM Ports have been used, and you can not find any “Empty” COM Port in the Description column, please select a device (COM Port) you will not use for the time being, and tab “Remove 3rd party...
-
Page 36: [Driver Options]
[Driver Options] Some mapping software requires GPS data to be received continuously, to meet the requirement, our driver can send GPS data to the mapping software virtually. Tap Tools→ “Driver Options” to set the time interval to send the GPS data to your mapping software virtually. -
Page 37: [Default Password]
[Default Password] Password is required to operate the GPS Tracker. You must add the password to your commands to have the GPS Tracker worked accordingly. The factory default password is “8888”. You can re-set the password in this screen. It is good to tick “Enable default password”, if you need to send commands constantly;... -
Page 38: [Contact List]
[Contact List] 1. Tap Tools Contact List… to bring up a name/ phone# list. You can view/ input here the SIM card numbers + the name of the holder of the GPS Trackers, which you want to track. To add a new person/ phone number to the list, please input “Name”... - Page 39 2. You can add up to 65,000 persons/ phone numbers to the contact list, but each time only one person/ phone number can be selected for tracking. Your command will be sent only to the selected person/ phone number. The selection can be changed by tapping the name/ phone number, and “Select”...
-
Page 40: Help
1-2 Help Tap “Help” - “Command Code” to view all the available command codes in SMS. Tap “Help” - “About” to check about the version and copyright of this program. 1-3 Functions The main functions provided by this program can be divided into 5 parts – i.e. General, Track, Phone, Park, and SOS, as illustrated below. -
Page 41: [General]
[General] 1. General 1 Set APN(Access Point Name): Please check with your mobile operator or the attached table for the data. (ID & Password is not a must). * This is for advanced users to do tracking via GPRS/ internet. For beginners, it is not necessary to bother about the set-up. - Page 42 3. General 3 Firmware update: To update the firmware via FTP. If you have your own FTP Server, you can save the new firmware in FTP Server for your customers to update the firmware. gis.gopass.com.tw 2100 Ex: IP Port User 1234 File /user/gopass/900s-v2.1.frn...
-
Page 43: [Track]
[Track] 1. Track SMS Get position (GPRMC): Send back GPS data in GPRMC format. These data will be sent automatically to the mapping software installed in your PDA. Run the mapping software to track the position/ movement of your car or loved one. Interval: The time interval in seconds to send back GPS position data. - Page 44 2. Track GPRS Set GIS Server parameters: Change IP/ Domain Name and Listen Port of the GIS Server (control center). 123.456.7.890 3000 Ex: IP Port This is for advanced users to do tracking via GPRS/ internet. It is required only if you want do the tracking via GPRS/ internet thru a web server or control center.
- Page 45 3. Track Phone When you make a phone call to the GPS Tracker, it will send back its position data after rings twice, before the phone call is answered. This screen is for you to make the relative settings. Set Phone-Track list: Set the phone number list, which can get the position data from the GPS Tracker.
- Page 46 4. Track Time Set Time Table: Set the time table for the GPS Tracker to call back every day. Sets: Set upto 5 different times for the GPS Tracker to call back. Switch: On / Off Get Time Table: Get the time table for the GPS Tracker to call back automatically every day.
-
Page 47: [Phone]
[Phone] 1. Phone Dial Button Set the first set phone number: Re-set the first set dial-out phone number. (can be without “Name”) Get the first set phone number: Get the number of the first set dial-out phone number. Set the second set phone number: Re-set the 2nd set dial-out phone number. -
Page 48: [Park]
[Park] 1. Park 1 Set Geo-Fence Phones: Set the phone numbers for the GPS Tracker to call back, when the vehicle/ object is moved beyond the geo-fence setting range. Get Geo-Fence Phones: Get the phone numbers for GPS Tracker to call back for Geo-fence (Park) function. - Page 49 3. Park 3 Geo-Fence alarm switch: Activate or disable Geo-fence Park Function. Switch: Off / On Set Geo-Fence notification mode: Set the mode for Geo-fence Park function. Mode: SMS/ TEL...
-
Page 50: [Message]
[Message] Device Response Messages: Check the messages sent back from the GPS Tracker. For example, it will send back some data as illustrated in the left screen, when you tap Track - Get position (X,Y) Clear: Clear the messages. OK: Exit. -
Page 51: Operation Instruction- Navigation Software Of Papago
2. Operation Instruction- Navigation software of PAPAGO After getting data of position by SMS Track, the virtual COM port will remember this position’s information. When opening any navigation software, a virtual COM port will find out a navigation software, requiring some data of GPS position. Then it will send the last obtained data to this software in order to show this software there is a real existing GPS. - Page 52 2-2 After GPS port is set, GPS will be in a positioning state. When opening GPS position, it will be in GPS state automatically: you can click either GPS buttons shown as below. -- As figure 40 and 41. 2-3 In a GPS state, you can get position information and GPS data, GPS data is obtained by SMS.
-
Page 53: Setting Of Microsoft Pocket Streets
3. Setting of Microsoft Pocket Streets 3-1 Setting of GPS parameter of Microsoft Pocket Streets is as figure 44 and 45. Please open Microsoft Pocket Streets. Program, click menu -> GPS -> Configure Receiver. The image of setting GPS port name will be appeared. Please choose the position of Virtual COM port you set. -
Page 54: Tomtom Route Planner Gps Setting
4. Tomtom Route Planner GPS Setting 4-1 As a below figure, the selection of setting GPS port of Tomtom: Menu -> properties…First, open parameter setting, choose GPS and start GPS by clicking “Use Global Positioning System.” Select 6 in COM port owing to our virtual COM Port driver is installed in COM 6. -
Page 55: Setting Of Magic E-Map
5. Setting of Magic e-Map 5-1 To set GPS parameter of e-Map is shown as a below figure 2.5.1. First, open e-Map grogram: click menu -> GPS -> GPS Setting. The image of GPS setting will appear as a figure 2.5.2. In figure 2.5.2, we cancel “Auto Scan,” and set our Virtual COM port name in the GPS Port. - Page 56 < Start GPS > < Searching> 5-3 You can see your GPS position in the main page as figure 54. Or choose menu -> GPS -> GPS State to observe current received data, as figure 55. < Position Successfully > <...
-
Page 57: Pc Track Installation
Real IP Address of If it is not the same as “Now IP Address” shown in Gopass Map, please your PC. take this IP; the data shown in “Now IP Address” is an internal IP. (*IP addresses like 192.x.x.x, 10.x.x.x, or the likes are internal/ virtual IP;... - Page 58 1-2 Connect the USB-RS232 adapting cable delivered with the device to the USB port & the RS232 port of your PC. 1-3 After connect the USB-RS2332 cable, please click “My computer” → “Properties” → “Hardware” → “Device Manager”; than check with the virtual COM port is on which port (ex.
-
Page 59: Install Gopass Pc Track Software
2. Install Gopass PC Track Software 2-1 Put the CD delivered with the tracker to the CD driver of your computer; click on “PC/Notebook Track” to install “Gopass PC Track” program into your computer. - Page 60 2-2 Click “Start” → “All Programs” →“Gopass PC Track” → “Gopass Map” to run the program you have just installed. The data of “Now IP Address” will be shown up, if your computer can link to internet. Then set up “Date Port” and “Baud Rate”...
-
Page 61: Send Sms Command Codes
3. Send SMS Command Codes 3-1 Please check with your mobile operator for the APN command codes; and send APN command codes to the SIM card of the tracker by your mobile via SMS 600#Password #APN#IP command code (ex. 600#8888#internet). - Page 62 3-2 Send the data of “Now IP Address” to the SIM card of the tracker by your mobile 999#Password#ServerIP#Port via SMS command code (ex. 999#8888#59.120.2.232#3000 ), so that the tracker knows to where it should send back the position data. (You will receive a SMS reply from the tracker confirming Server IP has been changed successfully in about 10 seconds - depends on the environment of your mobile operator.)
- Page 63 115#Password#XX 3-3 Send SMS command code (ex. 115#8888#20) to the SIM card of the tracker, to initiate its GPRS function, and set the time interval for the tracker to send back data. (You will receive a SMS reply from the tracker in about 10 seconds, confirming that update call center settings successfully.)
-
Page 64: Check Gps Data In-Flow
4. Check GPS Data In-flow 4-1 Click “Start” → “All Programs” →“Gopass PC Track” → “Gopass Map” to run the program. You will be able to see the GPS data flow-in. 59.120.2.232 COM1 4-2 Run the mapping software installed in your computer; set GPS Port to... -
Page 65: How To Set Up Ip Coordinate
VI. How to set up IP coordinate? Nowadays, lots of internet products around us such as Windows server, Linux iptable, IP share devices, firewall, etc… It takes a long time to go over each IP coordinate. Besides, each product provides its user manual, please refer to its user manual. - Page 66 3. The set-up connecting is as follows, fill out each blank as follows. Active Click (Check) Service Name PC01 Start Port 3000 End Port 3000 Server IP Address 192.168.1.34 Click “Apply” after set-up.
- Page 67 4. Then, your server “PC01” can connect with the real IP.
-
Page 68: Worldwide Apn (Access Point Name) List
VII. Worldwide APN List (Access Point Name) - Page 72 emome...
- Page 73 Export controls This device may contain commodities, technology or software subject to export laws and regulations from the US and other countries. Diversion contrary to law is prohibited. FCC / INDUSTRY CANADA NOTICE Your device may cause TV or radio interference (for example, when using a telephone in close proximity to receiving equipment).
- Page 74 Caution: The user that changes or modifications not expressly approved by the party responsible for compliance could void the user's authority to operate the equipment. Note: This equipment has been tested and found to comply with the limits for a Class B digital device, pursuant to Part 15 of the FCC Rules.
Need help?
Do you have a question about the AVL-900 and is the answer not in the manual?
Questions and answers