Intel FALCON 8+ Quick Start Manual
Hide thumbs
Also See for FALCON 8+:
- User manual (233 pages) ,
- Flight manual (147 pages) ,
- Manual (8 pages)
Table of Contents
Advertisement
Quick Links
Advertisement
Table of Contents

Related Manuals for Intel FALCON 8+


Summary of Contents for Intel FALCON 8+
- Page 1 INTEL® FALCON™ 8+ Unmanned Aircraft System QUICK START GUIDE...
- Page 2 ThAnK yoU foR PURChASInG ThE InTEl® fAlCon™ 8+ UnmAnnED AIRCRAfT SySTEm Congratulations on your new Intel® Falcon™ 8+ Unmanned • Operating the UAS: Safety precautions, pre-flight and Aircraft System (UAS). post-flight checks, and steps to get started – preparing, using and controlling the UAS.
- Page 3 UAS DESCRIPTIon What’s Inside the Package? When you unpack your Intel Falcon 8+ UAS for the first time, please make sure that all the items, which you specified in your purchase order, are included. Make sure the items are not damaged from shipment. If any of the items are missing or damaged, contact your dealer or contact the technical support team at Intel.
- Page 4 Intel Falcon 8+ UAS Case** This case is used for all necessary parts of your Intel Falcon 8+ UAS. Following the numbers, the slots contain: Intel Falcon 8+ UAV without payload and batteries Power supply units for charging the Intel Powerpack Batteries (optional) (6) Space for accessories, e.g.
-
Page 5: Main Components
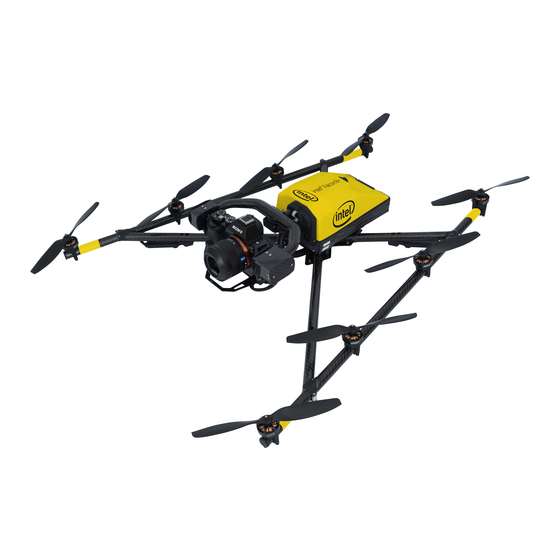
Figure 04 ** The images of the items above are for illustration purpose only, and the actual item(s) packed with your Intel Falcon 8+ UAS may differ from the one(s) depicted here depending on, for example, which payload you ordered. - Page 6 UAV with payload – bottom view: Payload Motor rails Center cross piece Carbon cross Landing feet Figure 06 Data Video Carbon cross with center cross piece, antenna arrangement: Data link antennas (2.4 GHz) and video link antennas (5.8 GHz) are integrated into the landing feet. They are diagonally arranged as shown in Figure 07.
- Page 7 UAV – front view: Hole for camera mount’s carbon rod Connector slot for payload adapter plug (see no. 2 in Figure 25) Retaining clip for payload adapter Cable tube containing cabling of antennas (for example) Fan for internal cooling behind slots Vibration dampers Figure 09 UAV –...
- Page 8 The Intel Cockpit Controller The Intel Cockpit Controller is the main control hub for the Intel Falcon 8+ UAV, and the attached payloads. It is designed to be carried and operated by one person, and displays all relevant flight information.
- Page 9 4 X USB 1 X HDMI* The USB port, labeled USB 1, can only be used to perform Intel Cockpit Controller firmware updates from a USB stick. The other USB ports can be used to connect the ICC, or USB sticks with pre-planned flight missions to be imported.
- Page 10 Figure 20 Touchscreen Tablet The touchscreen tablet is directly mounted onto the remote unit of the Intel Cockpit Controller, and cannot be removed. It is powered by the battery of the Intel Cockpit Controller. The touchscreen tablet serves as a video monitor, displays flight information, and gives access to extended functionality.
-
Page 11: Main Screen
Tapping that field will toggle the view between the video preview and a map view (in case a map has been loaded from an AscTec Navigator project). Please go to www.intel.com/Falconmanual to learn more about the AscTec Navigator. - Page 12 Intel Powerpack Battery The Intel Powerpack Battery powers the Intel Falcon 8+ UAV, and the Intel Cockpit Controller, combining efficiency with ease-of- use. The battery features automatic balancing, storage mode and charging. The intelligent Battery Management System (BMS), with a One-Button/Five-LEDs user interface, makes everyday battery handling easy.
- Page 13 Tools are not required to exchange camera mount. The Intel Falcon 8+ UAS automatically identifies the attached camera, and the menus on the Intel Cockpit Controller are changed accordingly.
- Page 14 When pulling R1, while holding B1, the camera can be tilted upwards accordingly in 45° increments. Sony Alpha 7R* The Sony Alpha 7R* has two main function dials that can be controlled through the Intel Cockpit Controller: The function of Dial 1 on the Sony A7R can be controlled by R2, Dial 1 when B2 is in position 1 (LED OFF).
- Page 15 If you notice anything unusual, please contact support through your dealer, if you purchased through a dealer; or support at Intel, if you purchased directly from Intel. You must follow these steps to complete a close UAS...
- Page 16 First Steps – Initial Setup When using the Intel Falcon 8+ UAS for the first time, some additional steps are required, which only need to be performed once. It may be necessary to repeat them only in rare occasions. In detail, these steps are: •...
- Page 17 The UAV is initialized when the gimbal starts automatically reacting to the movements of the UAV. It requires approximately 15 seconds to power ON, and is indicated by a triple beep from the Intel® Falcon™ 8+ UAV. Figure 30 Preparing the Intel Cockpit Controller...
- Page 18 Figure 35 First setup only. The first time the Intel Falcon 8+ UAV and the Intel Cockpit Controller are powered up, the Status Display will show the Start Screen, and it is necessary to set up the connection between UAV and Controller.
- Page 19 First setup only. The first time that a payload is connected with the Intel Falcon 8+ UAV, it is necessary to first perform a payload calibration, and then the compass calibration (strictly in that order). The Intel Falcon™ 8+ UAS will save the calibrations with that exact payload, and remember it the next time it is used.
-
Page 20: Magnetic Field Warning
(To be done outdoors, inflight) 1. Attach the payload to be calibrated. 2. Switch ON the payload, the Intel Falcon 8+ UAV and the Intel Cockpit Controller. 3. In the Status Display, navigate to ‘Settings’ > ‘Payload 3. Hover the Intel Falcon 8+ UAV in GPS-Mode around Calib.’... - Page 21 When the UAS has successfully initialized, an appropriate Link Loss Procedure must be selected each time the UAS is switched In case the connection between the Intel Cockpit Controller and the Intel Falcon 8+ UAV gets lost, the Link Loss Procedure is activated.
-
Page 22: Flight Modes
Flying in GPS-Mode is easiest, as it provides the highest level of automation. The flight modes can be selected with the two switches on the upper right of the Intel Cockpit Controller. • When the button GPS is pushed and is lit, GPS-Mode is active •... -
Page 23: Height-Mode
• Controlling the position and height has to be done manually by the pilot from the Intel Cockpit Controller • The inputs via the Intel Cockpit Controller control the roll and pitch angles and the thrust of the UAV o Roll and pitch angles are limited to 50°... -
Page 24: Pre-Flight Check
The end of the boot process is marked by a triple beep emitted by the Intel Falcon 8+ UAV. During booting, the Intel Falcon 8+ UAV does not need to stand still. It can be moved - for example, it can be started from a moving boat. -
Page 25: Taking Off
Choose the correct flight mode (usually GPS-Mode or Height-Mode). Switch the motors ON (with both hands). While the Intel Falcon 8+ UAV is on the ground with running motors, always keep the left con- trol stick in the fully downward position. - Page 26 • Thrust: Ascend or descend along the yaw axis Pitch Figure 48 Controlling the Intel Falcon 8+ UAV from the Intel Cockpit Controller The control mode is called Mode 2. In this mode: The left control stick controls The right control stick controls...
-
Page 27: Battery Warnings
There are several acoustic and visual warnings (visible at the bottom of the Status Display) which alert you to low battery charge, or empty battery: • First warning: ‘Battery weak, land soon’ and a vibration of the Intel Cockpit Controller. The audio warning is repeated every 20 seconds. -
Page 28: Post-Flight Check
Other names and brands may be claimed as the property of others. This publication is protected by copyright. No part of the publication may be used, reproduced, or translated, in any form, without the prior written consent of Intel Corporation.
Need help?
Do you have a question about the FALCON 8+ and is the answer not in the manual?
Questions and answers