hestan GES08 Installation Instructions Manual
Outdoor living
suite
Hide thumbs
Also See for GES08:
- Installation instructions manual (36 pages) ,
- Installation instructions manual (44 pages)
Advertisement
Quick Links
(WITH CUSTOMER-PROVIDED STONE TOP)
INSTALLATION INSTRUCTIONS
GES08, GESB08, GES12, GESB12
IMPORTANT - READ ALL INSTRUCTIONS BEFORE YOU BEGIN
THE INSTALLATION HEREIN SHOULD BE PERFORMED BY A QUALIFIED SERVICE TECHNICIAN
OR PROFESSIONAL OUTDOOR EQUIPMENT INSTALLER. MANY COMPONENTS ARE HEAVY AND
REQUIRE 2 OR 3 PERSONS TO UN-PACK AND SETUP THIS SUITE. FAILURE TO DO SO MAY RESULT
IN PERSONAL INJURY.
THE ELECTRICAL COMPONENTS SUPPLIED WITH THIS SUITE MUST BE INSTALLED BY A
LICENSED ELECTRICIAN AND CONNECTED IN ACCORDANCE WITH LOCAL CODES. THE SUITE
SHOULD BE CONNECTED TO A DEDICATED CIRCUIT BREAKER. ALL OUTLETS SUPPLIED WITH
THIS SUITE ARE GROUND FAULT CIRCUIT INTERRUPTER OUTLETS AND MUST BE PROPERLY
INSTALLED AND GROUNDED BY A LICENSED ELECTRICIAN TO GUARANTEE SAFE AND RELIABLE
OPERATION.
SOME PARTS INSIDE THE SUITE HAVE SHARP EDGES. CARE MUST BE TAKEN WHEN HANDLING
THE VARIOUS COMPONENTS TO AVOID PERSONAL INJURY. WEAR GLOVES WHEN HANDLING.
TOOLS REQUIRED:
Work gloves
Safety glasses
Power drill with masonry bits
Concrete / masonry anchors & hardware
Flat and Phillips screwdrivers
Socket wrench with 7/16" & 9/16" sockets and short extensions
Combination wrenches of 7/16" & 9/16" sizes
Level
AFTER INSTALLATION OF YOUR GRILL AND OTHER GAS-FIRED EQUIPMENT IN THIS
SUITE, READ THE MANUAL(S) PROVIDED WITH THOSE PRODUCTS CAREFULLY AND
COMPLETELY BEFORE USING YOUR GRILL TO REDUCE THE RISK OF FIRE, BURN
HAZARD, OR OTHER INJURY. KEEP THIS MANUAL FOR FUTURE REFERENCE.
OUTDOOR LIVING
SUITE
IF THE INFORMATION IN THE GAS-FIRED APPLIANCE MANUALS
ARE NOT FOLLOWED EXACTLY, A FIRE OR EXPLOSION MAY RESULT
CAUSING PROPERTY DAMAGE, PERSONAL INJURY, OR DEATH.
Flammable Gas - disconnect all propane or natural gas supplies to this unit
before servicing.
Electrical Parts & Components – disconnect all power supplies and
batteries before servicing.
©2017 Hestan Commercial Corporation
EN
1
Advertisement

Subscribe to Our Youtube Channel
Related Manuals for hestan GES08


Summary of Contents for hestan GES08
-
Page 1: Installation Instructions
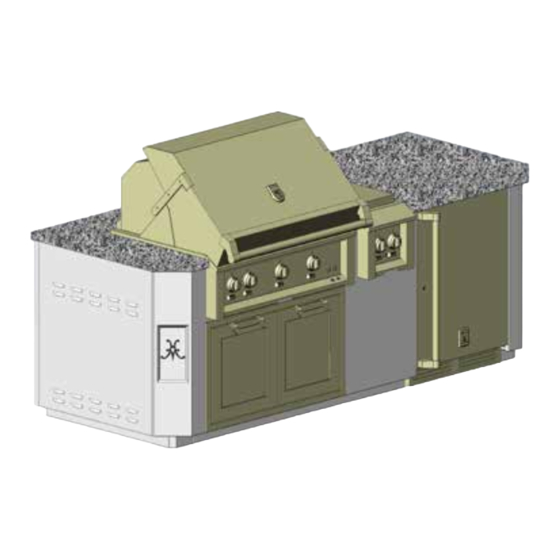
SUITE (WITH CUSTOMER-PROVIDED STONE TOP) INSTALLATION INSTRUCTIONS GES08, GESB08, GES12, GESB12 IMPORTANT - READ ALL INSTRUCTIONS BEFORE YOU BEGIN THE INSTALLATION HEREIN SHOULD BE PERFORMED BY A QUALIFIED SERVICE TECHNICIAN OR PROFESSIONAL OUTDOOR EQUIPMENT INSTALLER. MANY COMPONENTS ARE HEAVY AND REQUIRE 2 OR 3 PERSONS TO UN-PACK AND SETUP THIS SUITE. - Page 2 SUITE MODELS WITH CUSTOMER-PROVIDED TOP Below are representations of Hestan Outdoor Living Suites covered in this manual. Suite GES08 shown with: GABR36 Built-In Gas Grill ABG122 Double Side Burner AGAD36 Double Access Doors GRSR24 Outdoor Fridge STONE TOP NOT INCLUDED...
-
Page 3: Curb Installation
CURB INSTALLATION 1. The Hestan Outdoor Living Suite must be located on a level concrete or masonry patio surface, not on direct soil. A licensed plumber and electrician should run their service lines to the suite area prior to installation of the curb, in accordance with local codes. See dimensions below for recommended location. - Page 4 3. Use 2 each 3/8-16 x 5/8” long hex bolts to align and attach the back wall to the curb. Be careful the back wall does not tip over if the curb was not anchored down. Tighten all bolts. ©2017 Hestan Commercial Corporation...
- Page 5 5. Install remaining support walls as you did in step 4. Each wall is numbered and has a corresponding number on the curb and/or rear wall for ease of locating. (8 foot Outdoor Living Suite shown) Do not fully tighten bolts yet. ©2017 Hestan Commercial Corporation...
- Page 6 7. Install 2 corner assemblies (4 assemblies for suites with Bar Top). Use 1/4-20 x 1/2” long hex bolts and hex nuts where needed. Do not tighten until lift-off panels have been checked for proper fit (see Step 13). 1/4” BOLTS & NUTS HERE ©2017 Hestan Commercial Corporation...
- Page 7 ELECTRICAL ITEMS ELECTRICAL SUPPLY The Hestan Outdoor Living Suite is completely pre-wired for ease of installation. The suite will require a 20 amp supply (breaker) from the house main electrical panel. The licensed electrician will have to run the appropriate wire size and conduit for this application. Rigid or flexible conduit suitable for burial with water-tight connections are highly recommended from the house main electrical panel, to the suite.
- Page 8 ELECTRICAL ITEMS (continued) MAIN ELECTRICAL BOX SHOWING SUPPLY LINE ENTERING ON RIGHT SIDE OF BOX. ©2017 Hestan Commercial Corporation...
- Page 9 MAIN ELECTRICAL BOX COMPLETE GFCI OUTLET MAIN ELECTRICAL BOX WITH GFCI OUTLET OUTLET OUTLET 8 FOOT SUITE WITHOUT BAR SERVICE LINE IN GESS08, GESD08, GES08 GFCI OUTLET MAIN ELECTRICAL BOX WITH GFCI OUTLET OUTLET OUTLET 8 FOOT SUITE WITH BAR SERVICE LINE IN GESSB08, GESDB08, GESB08 ©2017 Hestan Commercial Corporation...
- Page 10 LINE IN GFCI OUTLET OUTLET MAIN ELECTRICAL BOX WITH GFCI OUTLET OUTLET OUTLET 12 FOOT SUITE WITH BAR SERVICE GESSB12, GESDB12, GESB12 LINE IN GFCI OUTLET WITH WEATHERPROOF COVER RIGHT SIDE OF SUITE (For Suite without Bar) ©2017 Hestan Commercial Corporation...
- Page 11 (does not apply to Suite with a bar). Line up and install 4 each #10 screws as shown here. Install the foam gasket, and weather-proof cover with the screws provided. ©2017 Hestan Commercial Corporation...
- Page 12 1/4” BOLTS & NUTS HERE 11. Install large front panel as shown using 1/4-20 x 1/2” long hex bolts and hex nuts where needed. (8 foot Outdoor Living Suite shown) 1/4” BOLTS & NUTS LOCATED UNDERNEATH ©2017 Hestan Commercial Corporation...
- Page 13 MOUNT GRILL ELECTRICAL BOX & LEFT PANEL 12. Mount the electrical box that came with your Hestan grill as shown and secure with #10 self-drilling screws provided. Use the provided Wire Harness Extension (p/n 009938) to connect the box to the grill wire harness.
- Page 14 INSTALL SUPPORT STRUCTURE AND TOP The Hestan Outdoor Living Suite DOES NOT include the stone countertop and plywood sub- structure. Template drawings are provided at the end of this manual with RECOMMENDED final stone dimensions. The stone installer will typically come out a few days prior to installation to go over the dimensions and make a physical template of the top before cutting the slab you have chosen.
- Page 15 BAR TOP INSTALLATION (FOR MODELS WITH BAR) HESTAN OUTDOOR LIVING SUITES WHICH FEATURE A BAR TOP (GESB08 & GESB12) FOLLOW THE SAME STEPS AS DESCRIBED EARLIER IN THIS MANUAL. STEPS UNIQUE TO THESE MODELS ARE DETAILED BELOW. BACK AND SUPPORT WALL ASSEMBLY 1.
- Page 16 4. While an assistant is holding the bar top in place, reach underneath and secure the top with 1/2” nuts and lock-washers provided. Then secure the large back panels with 1/4-20 x 1/2” long bolts and flat washers. The stone can then be installed with an adhesive provided by the installer. ©2017 Hestan Commercial Corporation...
-
Page 17: Gas Supply
NOTE: If your Suite is to be connected to a Whole-House LP Piped System, please read the GAS CONNECTIONS section of your Hestan Grill manual for information on this unique installation, and to contact Hestan Customer Service to order an LP Piped System Kit. - Page 18 The gas regulator is supplied with the grill & side burner. FLEX HOSE INTERPLUMB KIT & FITTINGS (SUPPLIED WITH SUITE) (SUPPLIED BY CUSTOMER) SHUT-OFF VALVE REGULATOR (SUPPLIED BY CUSTOMER) (SUPPLIED WITH GRILL) INCOMING GAS SERVICE ©2017 Hestan Commercial Corporation...
-
Page 19: Reference Photos
REFERENCE PHOTOS INCOMING GAS SUPPLY w/ SHUTOFF VALVE, REGULATOR, ELBOW & FLEX HOSE GRILL HARNESS EXTENSION P/N 009938 INCOMING ELECTRICAL SUPPLY ELECTRICAL AND GAS CONNECTIONS SUPPLIED BY CUSTOMER ©2017 Hestan Commercial Corporation... - Page 20 RECOMMENDED STONE DIMENSIONS ©2017 Hestan Commercial Corporation...
- Page 21 RECOMMENDED STONE DIMENSIONS (continued) ©2017 Hestan Commercial Corporation...
- Page 22 RECOMMENDED STONE DIMENSIONS (continued) ©2017 Hestan Commercial Corporation...
- Page 23 RECOMMENDED STONE DIMENSIONS (continued) ©2017 Hestan Commercial Corporation...
- Page 24 RECOMMENDED STONE DIMENSIONS (continued) ©2017 Hestan Commercial Corporation...
- Page 25 RECOMMENDED STONE DIMENSIONS (continued) ©2017 Hestan Commercial Corporation...
-
Page 26: Limited Warranty
Product; damage from service by someone other than an authorized agent or representative of the Hestan Commercial Service Network; normal wear and tear; damage from exposure of the Product to a corrosive atmosphere containing chlorine, fluorine, or any other damaging chemicals;... - Page 27 This warranty gives you specific legal rights, and you may also have other rights which vary depending on location. Any questions about this Limited Warranty may be directed to Hestan Commercial Corporationf at (888) 905-7463 ©2017 Hestan Commercial Corporation...
- Page 28 RETAIN THIS MANUAL FOR FUTURE REFERENCE Hestan Commercial Corporation 3375 E. La Palma Ave Anaheim, CA 92806 (888) 905-7463 ©2017 Hestan Commercial Corporation P/N 016178 REV A...
Need help?
Do you have a question about the GES08 and is the answer not in the manual?
Questions and answers