Table of Contents
Advertisement
Quick Links
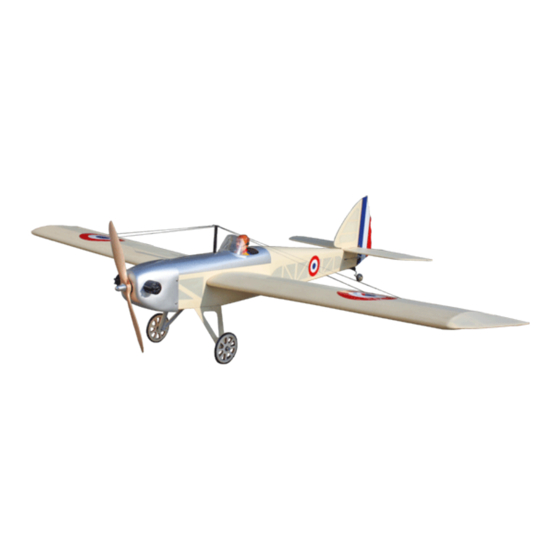
Amelia
Amelia
R/C Modellflugzeug in Holz-Fertigbauweise
Technische Daten
Spannweite:
Länge:
Gewicht:
R/C Funktionen:
Servos (empfohlen):
Antrieb „Standard" (empf.):
+Akku:
+Luftschraube:
Antrieb „Tuning" (empf.):
+Akku:
+Luftschraube:
Ergänzungen zu dieser Anleitung und neueste Infos unter:
www.pichler-modellbau.de/downloads
Latest Infos at: www.pichler-modellbau.de/downloads
1520mm
1080mm
ab 1450g (flugfertig)
Seiten-, Höhen-, Querruder, Gas
4 x Servo DS 3012 [# C4995]
Brushless Combo Set BOOST 25 [#C4390]
LiPo Akku RED POWER 2200 [#C2158]
11*7 [#C2840]
oder:
Brushless Combo Set BOOST 40 [#C2983]
LiPo Akku RED POWER 3200 [#C3164]
12*8 [#C2843]
Montageanleitung
Instruction Manual
Specifications
Wingspan:
Length:
Weight:
R/C Functions:
Servos (recommended):
„Standard" Power (rec.):
+Battery:
+Propeller:
„Tuning" Power (rec.):
+Battery:
+Propeller:
# C5103
95% PRE BUILT
ARF
ARF
ALMOST READY TO FLY
1520mm
1080mm
from 1450g (flight-ready)
Rudder, Elevator, Aileron, Speed Control
4 x Servo DS 3012 [# C4995]
Brushless Combo Set BOOST 25 [#C4390]
LiPo Battery RED POWER 2200 [#C2158]
11*7 [C2840]
or:
Brushless Combo Set BOOST 40 [#C2983]
LiPo Battery RED POWER 3200 [#C3164]
12*8 [#C2843]
Advertisement
Table of Contents

Related Manuals for Pichler AMELIA


Summary of Contents for Pichler AMELIA
- Page 1 # C5103 Instruction Manual Amelia Amelia R/C Modellflugzeug in Holz-Fertigbauweise 95% PRE BUILT ALMOST READY TO FLY Ergänzungen zu dieser Anleitung und neueste Infos unter: www.pichler-modellbau.de/downloads Latest Infos at: www.pichler-modellbau.de/downloads Technische Daten Specifications Spannweite: 1520mm Wingspan: 1520mm Länge: 1080mm Length:...
- Page 2 AMELIA Instruction Manual This instruction manual is designed to help you build a great flying aeroplane. Please read this manual thoroughly before starting assembly of your AMELIA. Use the parts listing below to identify all parts. WARNING. Please be aware that this aeroplane is not a toy and if assembled or used incorrectly it is capable of causing injury to people or property.
-
Page 3: Safety Precaution
AMELIA INSTRUCTION MANUAL SAFETY PRECAUTION. + This is not a toy + Be sure that no other flyers are using your radio frequency. + Do not smoke near fuel + Store fuel in a cool, dry place, away from children and pets. - Page 4 AMELIA Instruction Manual C/A glue 3) Using the thread as a guide and using masking tape, tape the servo lead to the end of the thread: carefully pull the thread out. C/A glue When you have pulled the servo lead out, re- move the masking tape and the servo lead from the thread.
-
Page 5: Installing The Aileron Linkages
AMELIA INSTRUCTION MANUAL Mark point Repeat the procedure for the other wing half. INSTALLING THE AILERON CONTROL HORN. 2mm X 20mm. 1) Using a ruler & pen to draw a straight line as below picture. Secure. Pen. INSTALLING THE AILERON LINKAGES. - Page 6 AMELIA...
- Page 7 INSTRUCTION MANUAL AMELIA Slide the cowl back over the engine and secure it in place using four wood screws. See picture below. 4. Install the muffler and muffler extension onto the engine and make the cutout in the cowl for muffler clearance. Connect the fuel and pressure lines to the carburetor, muffler and fuel filler valve.
-
Page 8: Horizontal Stabilizer
VINTAGE. Instruction Manual ELEVATOR INSTALLATION. SERVO INSTALLATION. 1. Install the rubber grommets and brass collets into the elevator servo. Test fit the servo Bottom side into the servo tray. 2. Mount the servo to the tray using the mounting screws provided with your radio sys- tem. - Page 9 INSTRUCTION MANUAL AMELIA C/A glue Remove covering C/A glue 1. Draw a center line onto the horizontal stabilizer. Then slide the horizontal into the fuselage. 4. When you are sure that everything is aligned correctly, mix up a generous amount of 30 minute epoxy.
-
Page 10: Elevator Pushrod Installation
AMELIA Instruction Manual C/A glue. Drill a hole 2mm diameter. C/A glue. Secure C/A glue. ELEVATOR PUSHROD INSTALLATION. Elevator and rudder pushrod install as same as the way of aileron pushrod. ELEVATOR CONTROL HORN INSTALLA- TION. M2 lock nut. Elevator control horn install as same as the way of aileron control horn. -
Page 11: Vertical Installation
AMELIA INSTRUCTION MANUAL C/A glue C/A glue VERTICAL INSTALLATION. Rudder servo install as same as method of elevator servo. See picture below: C/A glue... - Page 12 AMELIA Instruction Manual 2. Put the rudder into the fuselage as Remove covering same as picture below. 3. Mark the shape of the vertical on the left and right side of the rudder on to the hori- zontal stabilizer using a felt-tip pen.
- Page 13 INSTRUCTION MANUAL AMELIA C/A glue Secure C/A glue RUDDER PUSHROD INSTALLATION. RUDDER CONTROL HORN INSTALLA- Rudder pushrod install as same as the way TION. of aileron pushrod. Rudder control horn install as same as the M2 lock nut. way of aileron control horn. Please see pic- tures below.
- Page 14 Instruction Manual AMELIA Elevator pushrod. Secure Rudder pushrod. INSTALLING THE MAIN LANDING GEAR. PARTS REQUIRED Drill a hole 2mm diametter 3 x 12mm Mark point Secure...
- Page 15 INSTRUCTION MANUAL AMELIA C/A glue...
-
Page 16: Mounting The Tail Wheel Bracket
AMELIA Instruction Manual 2. Using a pen, mark the locations of the two mounting screws. Remove the tail wheel bracket and drill 1mm pilot holes at the loca- tions marked. Secure Mark point 3. Secure the tail wheel bracket in place using three 3mm x 15mm wood screws. -
Page 17: Wing Attachment
INSTRUCTION MANUAL AMELIA Battery INSTALLING THE RECEIVER AND BATTERY . 1. Plug the servo leads and the switch lead into the receiver. You may w ant to plug an aileron extension into the receiver to make plugging in the aileron servo lead easier when you are installing the wing . - Page 18 Instruction Manual AMELIA WING AT TACHMENT. See picture wing attach to fuselage. Wing bolt. Installing the fuselage hatch as same as pic- ture below. Wing bolt. C/A glue 3 x 15mm Secure...
- Page 19 VINTAGE. INSTRUCTION MANUAL BALANCING. 1) It is critical that your airplane be bal- anced correctly. Improper balance will cause 3 x 15mm your plane to lose control and crash. THE CENTER OF GRAVITY IS LOCATED 70MM BACK FROM THE LEADING EDGE OF THE WING.
-
Page 20: Pre-Flight Check
AMELIA Instruction Manual PRE-FLIGHT CHECK. 1) Completely charge your transmitter and receiver batteries before your first day of fly- ing. 2) Check every bolt and every glue joint in your plane to ensure that everything is tight and well bonded.
Need help?
Do you have a question about the AMELIA and is the answer not in the manual?
Questions and answers