Table of Contents
Advertisement
Advertisement
Table of Contents

Related Manuals for ALLEN & HEATH Xone:PX5


Summary of Contents for ALLEN & HEATH Xone:PX5
-
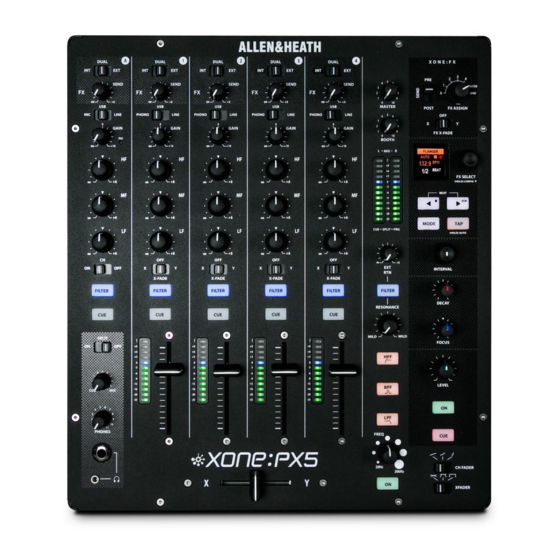
Page 1: User Guide
® ® USER GUIDE Publication AP10733_1 ALLEN&HEATH AP10733_1_XONE:PX5 User Guide... - Page 2 Page left intentionally blank. ALLEN&HEATH AP10733_1_XONE:PX5 User Guide...
-
Page 3: Warranty
Check with your Allen & Heath distributor or agent for any additional warranty information which may apply. If further assistance is required please contact Allen & Heath Ltd. Xone:PX5 complies with the European Electromagnetic Compatibility directives 2014/30/EU and the European Low Voltage directives 2014/35/EU. -
Page 4: Introduction
The cross-fader has three switchable curve settings for blending or scratching styles and can be easily replaced, or upgraded to the innoFADER Pro2 for ultimate cross-fader performance. No matter what your mixing style, the Xone:PX5 combines a modern approach to DJing with all the tools required for creating your own individual sound. -
Page 5: Table Of Contents
CONTENTS To ensure you get the maximum benefit from the mixer, please spend a few minutes familiarizing yourself with all of the controls and setup procedures outlined in this user guide. For further information, please refer to the additional details available on our website, or contact our Product Support team www.allen-heath.com/xonepx5 http://support.allen-heath.com... -
Page 6: Packed Items
PACKED ITEMS Check that you have received the following: Xone:PX5 mixer Safety Sheet Important ! Read this sheet BEFORE starting. Retain for future reference. Spare knobs and buttons Mains Lead Check that the correct mains plug is fitted. ALLEN&HEATH AP10733_1_XONE:PX5 User Guide... -
Page 7: Setup Examples
SETUP EXAMPLES - CLASSIC CLASSIC ANALOGUE MIX : VINYL ONLY CLASSIC DIGITAL MIX : CD / MEDIA PLAYER + HARDWARE FX MEDIA PLAYER (RCA) / EXT FX (SND-RTN) KEY: CABLE & CONNECTOR TYPES PHONO/LINE (RCA) (TYPE A-B) EXT FX (TRS, ¼” JACK) X:LINK (CAT-5, RJ-45) INSERT... - Page 8 SETUP EXAMPLES - ADVANCED ADVANCED HYBRID MIX : ANALOGUE + DIGITAL + MIDI SYNC + CONTROL VINYL & MEDIA PLAYER (RCA) / LAPTOP (USB) / EXT FX (INSERT + SND-RTN) / X:LINK (RJ-45) ‘FULLY LOADED’ HYBRID MIX : ANALOGUE + DIGITAL + HARDWARE FX + MIDI SYNC + CONTROL VINYL &...
-
Page 9: Rear Connectors
REAR CONNECTORS External Effects Connectors, EXT RTN / LINE/Hi-Z / FX SEND Balanced (TRS) 1/4” Jack. Connect external effects device outputs to EXT RTN inputs and use EXT RTN control to adjust FX signal level sent to main LR MIX or XONE:VCF. Set input impedance for external effects between LN (suitable for Line level inputs), or Hi-Z (suitable for guitar effects pedals and legacy hardware). - Page 10 REAR CONNECTORS continued X:Link Cat-5 Ethernet (RJ-45). Connect Xone:K Series Controllers to the Xone:PX5 mixer to expand software application MIDI control and to save using USB ports on your computer. BOOTH Outputs Balanced (TRS) 1/4” Jack. LINE level stereo output feed to DJ’s local monitor.
- Page 11 REAR CONNECTORS continued 14 15 USB 9-10 Send Select Switch Set CH9-10 USB SND to MST or FX to route LR MIX, or FX SEND output via USB. For pre-MASTER level stereo LR MIX recording to computer, or using FX SEND for software effects plug-ins.
-
Page 12: Mic / Usb / Line Input Channel A
MIC / USB / LINE INPUT CHANNEL A Channel FX Mode Select Switch Selects option for Channel FX SEND routing to; INT, EXT, or DUAL. For SEND to internal XONE:FX engine, external effects hardware connected via FX SEND / EXT RTN, or to both for simultaneous use with internal and external effects. -
Page 13: Phono / Usb / Line Input Channels
PHONO / USB / LINE INPUT CHANNELS 1 - 4 Channel FX Mode Select Switch Selects option for Channel FX SEND routing to; INT, EXT, or DUAL. For SEND to internal XONE:FX engine, external effects hardware connected via FX SEND / EXT RTN, or to both for simultaneous use with internal and external effects. - Page 14 PHONO / USB / LINE INPUT CHANNELS 1 - 4 X-FADE Assign Switch Use to assign the Channel to either X (left), or Y (right) side of the cross-fader, or direct to the MIX bus when OFF (centre), Channel FILTER Select Switch Press to route post-GAIN / post-EQ / post-FADER level Channel audio to the XONE:VCF.
-
Page 15: Cross-Fader
CROSS-FADER X-FADER Fade between audio from CH 1 - 4 assigned to the X (Left), or Y (Right) side of the cross-fader, typically to fade smoothly into a new music track, to creatively layer sounds, or for scratch and cut mixing. The cross-fader is a VCA (voltage controlled amplifier) control that also affects the level of signals routed via the XONE:VCF Ensure switches on channels you want to fade are set to X or Y as appropriate. -
Page 16: Headphone Section
HEADPHONE SECTION SPLIT Cue Switch Selects the way the CUE bus operates. Normally, pressing a Channel CUE switch overrides both left and right monitor program signals with the active CUE signal. With SPLIT set ON, the CUE bus overrides just the left channel, leaving the program in the right channel. -
Page 17: Master Section
MASTER SECTION MASTER Level Control A rotary MASTER control adjusts the level of the main, MASTER 1 and MASTER 2, rear panel outputs feeding the house sound system. This does not affect BOOTH output level or the meters. BOOTH Level Control Adjusts the level of the signal to the stereo BOOTH RCA output. -
Page 18: Voltage Controlled Filter Section
VOLTAGE CONTROLLED FILTER SECTION EXT RTN to FILTER Select Switch Press to route the EXT RTN input to the XONE:VCF, instead of directly into the main LR MIX, for extra versatility and creativity with your mixes. RESONANCE Control This produces the classic Xone:VCF filter sound by feeding some of the filter output back to its input. -
Page 19: Xone:fx Control Section Overview
XONE:FX CONTROL SECTION OVERVIEW FX ASSIGN Switch 7 position rotary selector used to assign the internal XONE:FX engine routing as Channel INSERT (CH A, CH 1 - 4), Master INSERT, or SEND / RETURN to LR MIX. Default position = SEND FX SEND PRE / POST Switch Used to configure Internal and External FX SEND from Channels to pre-FADER, or post-FADER levels. - Page 20 XONE:FX CONTROL SECTION continued XONE:FX INTERVAL Control Rotary control to adjust beat fraction of the currently selected XONE:FX Illuminates WHITE when active The last adjustment setting is saved globally for FX recall XONE:FX DECAY Control Rotary control to adjust time based parameters for the currently selected XONE:FX.
-
Page 21: Fx Library Reference
XONE:XCITE FX LIBRARY REFERENCE NAME FX1 PROGRAM FX2 PROGRAM BEAT INTERVAL DECAY FOCUS Stereo Beat Delay Time Delay MASIF-Q DELAY Time MS Delay Regen (Pre Delay Filters) Fraction Output Filters Stereo Beat Delay Time Delay PCM DELAY Compressor Time MS Delay Regen (Pre Delay Filters) Fraction... -
Page 22: Bpm Detection
Hold TAP for 3 seconds to reset BPM detection back to AUTO MIDI Clock Transmit The Xone:PX5 can generate internal MIDI clock signals which can be sent via USB to a DAW, or via the MIDI SYNC / OUT port to external hardware. -
Page 23: Xone:sync
Pressing the STOP button will stop playback. Sending External MIDI Clock via MIDI SYNC / OUT Connect the Xone:PX5 to your external device using a 5pin DIN MIDI cable. Ensure that your DAW is set-up to receive MIDI clock. Consult your software application documentation to find out how to do this. - Page 24 CONFIG menu. Continue to adjust the DIN offset until your external device is in sync with the Xone:PX5 BPM engine. NOTE: It is not possible to adjust the MIDI Clock offset via USB when synchronising external software. This is achieved through the software MIDI preferences.
- Page 25 Please consult your software application documentation for details on how to do this. Now, when you start your external DAW, the Xone:PX5 BPM engine will follow the tempo set in the DAW, and the XONE:FX engine will be in sync.
-
Page 26: Driver Installation (Pc)
® Microsoft Windows In order to access the soundcard channels on your Xone:PX5 you will need to install the dedicated Device Drivers, which can be downloaded from the Allen & Heath website: www.allen-heath.com/xonepx5 PLEASE FOLLOW INSTALL INSTRUCTIONS CAREFULLY NOTE: Please ensure you are logged on to the PC with Administrator access enabled. - Page 27 NOTE: It is possible to complete the Xone:PX5 Device Driver pre-installation process without connecting the Xone:PX5 mixer to your computer. In this case you are prompted to “...disconnect and reconnect the device to complete driver installation.” If the mixer cannot be connected, click Yes on the prompt to close the application.
-
Page 28: Usb Soundcard (Defaults)
USB SOUNDCARD — DEFAULT The Xone:PX5 includes a 20 Channel (5 Stereo IN / 5 Stereo OUT), 24Bit/96kHz, Hi-Speed USB internal soundcard. Mac USB Class Compliant CoreAudio CoreMIDI interface; No Driver installation is required for operation with Mac OS X. -
Page 29: Midi Control
MIDI is still a common interface used by most DAW software to allow remote control of various functions within the program. The Xone:PX5 has the ability to send and receive MIDI and features a total of 51 MIDI enabled controls;... - Page 30 MIDI CONTROL continued CHANNEL FX MODE SELECT SWITCHES FX MODE XONE:PX5 CHANNEL DUAL C#-2 CH16 < > CH16 D#-2 CH16 < > CH16 CH16 < > CH16 F#-2 CH16 < > CH16 G#-2 CH16 < > CH16 CHANNEL FILTER SELECT SWITCHES...
- Page 31 MIDI CONTROL continued CHANNEL CUE SELECT SWITCHES CHANNEL CUE SELECT SWITCHES XONE:PX5 CHANNEL CH16 CH16 F#-1 CH16 CH16 G#-1 CH16 XONE:FX CH16 XONE FILTER XONE FILTER FREQ A#-1 FILTER CH16 CH16 CH16 CH16 CH16 ALLEN&HEATH AP10733_1_XONE:PX5 User Guide...
- Page 32 MIDI CONTROL continued XONE:FX FX X-FADE PRE/ MODE POST XONE:FX CH16 CH16 CH16 CH16 CH16 CH16 < > CH16 ASSIGN SELECT INTERVAL DECAY FOCUS LEVEL CC10 CC11 XONE:FX CH16 CH16 CH16 CH16 CH16 CH16 ALLEN&HEATH AP10733_1_XONE:PX5 User Guide...
- Page 33 MIDI CONTROL continued XONE:SYNC BEAT LEFT BEAT RIGHT BEND LEFT BEND RIGHT STOP PLAY XONE:SYNC CH16 CH16 CH16 CH16 CH16 CH16 FADERS XONE:PX5 CHANNEL FADER CH16 CH16 CH16 CH16 X-FADER CH16 ALLEN&HEATH AP10733_1_XONE:PX5 User Guide...
- Page 34 MIDI CHANNEL CHANGE The Xone:PX5 DJ Mixer default MIDI Channel is 16. You can change MIDI channel by holding down the FX SELECT control to enter the CONFIG menu. Select CHANNEL and press the FX SELECT control. This will display the current MIDI Channel.
-
Page 35: Midi Note Implementation
MIDI NOTE IMPLEMENTATION TABLE Note Numbers Octave C# /Db D# / Eb F# / Gb G# / Ab A# / Bb 63 100 64 101 65 102 66 103 67 104 68 105 69 106 6A 107 6B 108 6C 109 6D 110 6E 111 6F 112 70 113 71 114 72 115 73 116 74 117 75 118 76 119 77 120 78 121 79 122 7A 123 7B 124 7C 125 7D 126 7E 127 7F DEC HEX DEC HEX DEC HEX DEC HEX DEC HEX DEC HEX DEC HEX DEC HEX DEC HEX DEC HEX DEC HEX DEC HEX Note... -
Page 36: Connecting X:link Controllers
Connect the Cat-5 Ethernet (RJ-45) patch lead, supplied with your Xone:K Series controller, to the X:LINK OUT socket of the controller. Connect the other end of the patch lead to the X:LINK socket on the rear panel of the Xone:PX5 NOTE:... -
Page 37: Timecode Setup - Traktor Scratch Pro 2
Connect turntables or CDJ media players to the LINE / PHONO Inputs on the Xone:PX5. Set the USB LN / PH switches on the Xone:PX5 rear panel for turntables or CDJ media players. E.g. Switch in to PH for use turntables. Switch out to LN for use with CDJ media players. - Page 38 Next, select the Output Routing dialogue Check, or select Mixing Mode > External. When connected, the Xone:PX5 internal soundcard input channels 1 - 8 default to; TRAKTOR Deck Layout: C-A-B-D Next, select the Input Routing dialogue ...
- Page 39 TIMECODE SETUP continued Select the Timecode Setup dialogue Change the Timecode inputs on the decks (A/B/C/D) from; Internal Playback to Scratch Control Select the Decks Layout dialogue In the section Platter / Scope, choose Scope for the Decks you want to control with timecode. ...
-
Page 40: Recording A Mix - Traktor Scratch Pro 2
RECORDING A MIX - TRAKTOR SCRATCH PRO 2 On the Xone:PX5 rear panel, set the USB 9-10 MST/FX switch to: MST. In Traktor, select the Input Routing dialogue. Set Input FX Send (Ext) to: L (Mono) 9: Analogue 9 / R 10: Analogue 10 ... -
Page 41: Block Diagram
BLOCK DIAGRAM ALLEN&HEATH AP10733_1_XONE:PX5 User Guide... -
Page 42: Specifications
SPECIFICATIONS Hardware Specification Output Levels; Nom / Max Master Mix + 4dBu +24dBu Master RCA -10dBV + 8dBV Booth 0dBu +18dBu FX Send 0dBu +18dBu Record RCA -10dBV + 8dBV Internal headroom Channels +18dB Frequency response Line in to master out +/-0.5dB from 20Hz to 30kHz Distortion Typically 0.01% @ 1kHz 0dBu Crosstalk... - Page 43 SPECIFICATIONS continued Model Xone:PX5 Type Analog Channels 4 + 1 3-band / Total Kill (CH 1- 4 + CH A) USB Soundcard 20 Channel (10 in / 10 out) USB2 / Class Compliant 24bit / 96kHz 1 x MIDI IN...
-
Page 44: Panel Drawings
PANEL DRAWINGS / WEIGHTS & DIMENSIONS XONE:PX5 UN-PACKED PACKED Height 110mm 4.3” 190mm 7.5” Width 320mm 12.6” 450mm 17.7” Depth 375.6mm 14.8” 530mm 20.9” Weight 5.2kg 11.5lbs 6.6kg 14.6lbs Top Panel View ALLEN&HEATH AP10733_1_XONE:PX5 User Guide... -
Page 45: Rear Panel View
PANEL DRAWINGS continued Rear Panel View IMPORTANT NOTE: Warning ! Do NOT cover louvres on Front or Side Panels ! Xone:PX5 is NOT compatible with standard Xone Series Rack Ear kits. Side View Front View ALLEN&HEATH AP10733_1_XONE:PX5 User Guide... -
Page 46: Filter Reference
FILTER REFERENCE The XONE:VCF Voltage Controlled Filter A Voltage Controlled Filter is an audio filter where the cut-off frequency is altered by a DC control voltage rather than a variable resistor. This produces a much wider operating range and more control over the filter response to create unlimited combinations of tonal effect. -
Page 47: Operating Levels
OPERATING LEVELS It is most important that the system level settings are correctly set. It is well known that many DJs push the level to maximum with meters peaking hard in the belief that they are getting the best from the system. THIS IS NOT THE CASE ! The best can only be achieved if the system levels are set within the normal operating range and not allowed to peak. -
Page 48: Earthing
EARTHING The connection to earth (ground) in an audio system is important for two reasons: SAFETY - To protect the operator from high voltage electric shock, AUDIO PERFORMANCE - To minimise the effect of earth (ground) loops which result in audible hum and buzz, and to shield the audio signals from interference. -
Page 49: Replacing The Faders
004-853X - XONE:PX5 XFDR SPARE The innoFADER Pro2, from Audio Innovate, is also fully compatible as a cross-fader upgrade for the XONE:PX5. For details of innoFADER Pro2 stockists, and setup and calibration options, please visit the innoFADER website: www.innofader.com ALLEN&HEATH... - Page 50 REPLACING THE FADERS continued [ii] Step 1: Ensure power switch on the mixer’s rear panel is turned OFF. Disconnect the mains cable from AC mains supply and mixer’s IEC socket. Step 2: Remove and retain 1 Torx screw securing, RECORD, RCA sockets to the rear panel ...
- Page 51 REPLACING THE FADERS continued Step 5: With care, unplug 4, grey, flat harnesses and 1, orange, wire-form connecting the main top panel PCBA to the PCBA fixed to base of the mixer chassis, following the order shown below; The top panel can now be lifted away and separated from the chassis. ...
- Page 52 REPLACING THE CROSS-FADER Step 6: To replace the cross-fader With care, disconnect the black wire-form connecting cross-fader to the main PCBA. Turn the top panel face up. Remove and retain 2 screws securing cross-fader tray to top panel Take the knob off the cross-fader shaft to remove the tray clear from the top panel ...
- Page 53 REPLACING THE CHANNEL FADER Step 7: To replace the channel faders Remove the cross-fader tray prior to replacing channel fader/s, as described in Step 6 above. Remove and retain 2 screws securing the channel fader PCBA. Turn the top panel over and slide the Channel Fader PCBA away from its connection to the main ...
- Page 54 For more information, please visit our website: www.allen-heath.com http://acctech.ru/cat/analogovye_mikshery/ ALLEN&HEATH AP10733_1_XONE:PX5 User Guide...
Need help?
Do you have a question about the Xone:PX5 and is the answer not in the manual?
Questions and answers