Table of Contents
Advertisement
Available languages
Available languages
Advertisement
Table of Contents

Related Manuals for Gram FD 410 SERIES


Summary of Contents for Gram FD 410 SERIES
- Page 1 SERIES / SERIE OPERATION MANUAL MANUAL DE UTILIZACION...
-
Page 2: Table Of Contents
INDEX English Safety information Installation Preparatory before using Storage Unfolding the package Packing list Installation of the balance Usage Conditions Installation sequence Install the balance with density measurement device Connect the Power Adaptor Install the External Facilities Preheat Time Adjust the Level Gauge Display description Keys description Calibration... - Page 3 Media parameters setup Additional functions Communication with a computer RS-232 Interface hardware Routine maintenance and troubleshooting Troubleshooting Clearance Clearing the stainless steel surface Safety check Troubleshooting Technical conditions Technical parameters Guarantee...
- Page 4 ÍNDICE Español Información de seguridad Instalación Antes de utilizar la balanza Entorno de la balanza Embalaje Lista de material Instalación de la balanza Condiciones de uso Montaje de balanza con vitrina Instalación del kit de densidad Conectar el adaptor Instalación de equipos externos Tiempo de Precalentamiento Nivelar la balanza Descripción del display...
- Page 5 Configuración de los parámetros de la media Funciones opcionales Comunicación a un ordenador Interface RS-232 Rutina de mantenimiento y solución de problemas Solución de averías Limpieza Limpieza de la superfiie de acero inoxidable Revisión de seguridad Solución de problemas Condiciones técnicas Parámetros técnicos Garantía...
-
Page 6: Safety Information
ENGLISH SAFETy INFORMATION • To avoid unnecessary damage to the balance, please pay attention to the following tips. • Please do not use this balance in dangerous area. • Only the trained technicians could operate this balance. • Please turn off the power of the balance before connect it or disconnect it with other facilities. -
Page 7: Preparatory Before Using
the power, put it or them in a safe place and do not use it or them before they are fixed. • This balance could only be connected to our accessories or optional fittings. We are not responsible for any modification the operator makes to our balance, including using the facilities and cable which are not supplied by us. -
Page 8: Packing List
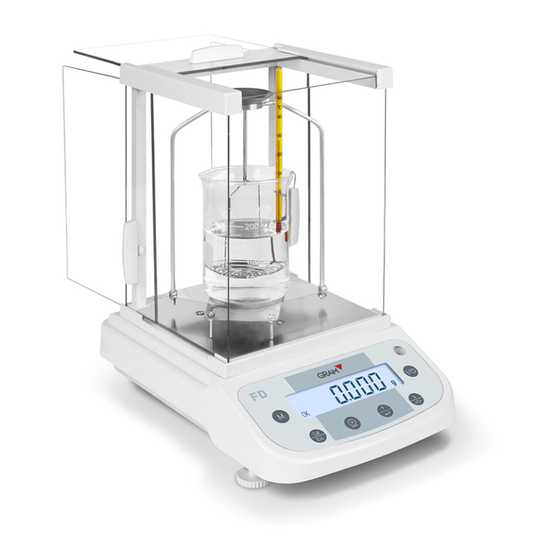
Packing list • The balance • Weighing pan • Pan support • Glass windshield • Density accesories • Power adapter • User manual wind shield weighing the balance adjustable feet Plan view pan support screw hole for wind shield display level gauge panel RS232 ports erial no. -
Page 9: Installation Of The Balance
INSTALLATION OF ThE bALANCE Put it in a proper place, please avoid the following situations: • Much heat and direct sunlight. • Air currents and vibrations. • Excessive moisture. Usage Conditions Please do not lay the balance in a quite damp palce for a long time. If the balance is transferred from a lower temperature environment to a higher temperature environment, please lay it there with power off foraround 2 hours. -
Page 10: Install The Balance With Density Measurement Device
Install the balance with density measurement device 1. Bracket 2. Beaker holder 3. Beaker 4. Convex holder (concave holder) 1. Put the bracket on the balance and adjust it to the right angle. 2. Put the beaker support and beaker onto the bracket in proper sequence. 3. -
Page 11: Preheat Time
Preheat Time To assure the measure accuracy, the balance must be preheated for 30 minutes before normal operation. Adjust the Level gauge Purpose: • Adjust the level gauge of the balance, the level gauge needs to be adjusted once its place is changed. -
Page 12: Keys Description
1. Weighing Units 2. Level Gauge 3. Weighing Mode Signs: Density: Density Measurement Mode Net: Tare Weight / Gross Weight / Net Weight 4. Capacity / Readability 5. OK indicator: stable display Display Information: OK - Reading shown is stable. Reading shown is given in grams. -
Page 13: Calibration
Tare key Power switch CALIbRATION Procedure 1. Adjust the level gauge and preheat it for 30 minutes. 2. Press key. 3. Press key, the balance will read its full range (e.g.200), press key repeateadly, it reads the calibration point within the range (e.g.200, 100, ...). -
Page 14: Solid / Liquid Density Measurement
4. Place the simple object in the container. 5. Print the weight value pressing the key. SOLID / LIqUID DENSITy MEASUREMENT Applied formula: Sample density = Weight in the air / (Weight in the air – Weight in the liquid) * Liquid density Test solid material density Because the buoyancy of the liquid density depends on the temperature,... - Page 15 CEnTIg (press key to Set liquid’s temperature increase,press key to reduce) number flickers 0.000g CEnTIg SHAPE Set media parameter COEFF (distilled water) 0.000g Put the measured sample onto 7.788g the upper plate Save sample’s weight in the air 7.788g Take off the sample 0.000g Test sample’s weight in the 6.889g...
-
Page 16: Test Liquid Material Density
Test liquid material density Step Procedure (Example) Key / Instruction Display Preheat the balance for 30 min Tare the balance 0.000g CEnTIg ShaPE Set sample state (liquid) SOLID LIQUID 0.000g CEnTIg SHAPE COEFF Set weight’s density, assume the weight’s density is 2.24g/ SET DP. -
Page 17: User Setups
Take off the weight 0.000g Test the weight’s weight in the 6.889g liquid Save the weight’s weight in the liquid and display the counted 0.98g/cm³ value Take off the weight and back to weighing state If necessary for repeating, please start the procedure from step 4. USER SETUPS The balance could be set up to meet individual requirement. -
Page 18: Set Baud Rate And Calibration Mode
Users can set up Line Feed for label printing. ※ Printing mode and line feed numbers set apart, after setting up printing mode, line feed numbers can be set. Please set up printing mode according to below steps: 1. Press the key, the display will show “PrInT”. -
Page 19: Restoring Factory Setup
3. Press key to enter into Baud Rate Setup Menu, “300” displayed. 4. Press key repeatedly till the baud rate you want displays, then press key for confirmation, after “PArITy” displays, set up Parity Check. key for choosing Parity Check, balance first displays “nOnE” 5. -
Page 20: Temperature Setup
4. Press key for confirmation, balance can be back to normal weighting mode. TEMPERATURE SETUP 1. Press key, “CEnTIg” displays. 2. Press key, default “20” temperature value displays (or the temperature value set last time displays). If the referential liquid’s measured temperature is lower than the displayed temperature, press key to reduce till the reading is same as the referential liquid’s measured temperature. -
Page 21: Media Parameters Setup
please continue to step (4). key, “LIqUID” displays, then press 4. Press key for confirmation. MEDIA PARAMETERS SETUP key, “CEnTIg” displays. 1. Press key repeatedly till “COEFF” displays. 2. Press 3. Press key, the parameters set last time displays, for example: 1. 4. -
Page 22: Communication With A Computer
1. Open the bottom cover of the balance (please lay the side of the balance downwards to open the bottom cover, do not make the upside down) 2. To use the hook in the accessories: screw the hook clockwise in the bottom tapped hole. - Page 23 T – : deduct the tare weight C – : calibration with external standard weight P – : print function # - # : immediate print When the balance is connected with a computer, it is suggested that immediate print (#) be used. In response to this command the balance will transmit whatever number or message appears on the balance display.
-
Page 24: Rs-232 Interface Hardware
RS-232 INTERFACE hARDwARE This balance adopts the transmit and receive lines of standard RS-232. The data format is: 1 start bit. 8 data bits include parity. 1 stop bit. The instruction to connect the balance to external device is as follows: Pin description 2 –... -
Page 25: Routine Maintenance And Troubleshooting
ROUTINE MAINTENANCE AND TROUbLEShOOTINg Troubleshooting Only the trained professionals are allowed to do repair work. There is a risk for the user if non-professionals do the repair. Clearance • Turn off the balance and unplug the data cables. • Avoid the liquid into the balance. •... -
Page 26: Safety Check
Note: After remove the weighing pan and the pan support, avoid any liquid or solid pellet into the installation hole. Safety check If the balance could not work normally: • Cut off the power immediatelly, keep and do not use it again. •... - Page 27 Refer to calibration section, NOCAL Calibration is unresponsive. check if it is the right calibration weight. Lack of data or wrong data Refer to user manual. UNAbLE with which the balance could not perform the function. Unstable the ambient Put the balance in another environment (excessive UNSTAbLE place.
-
Page 28: Technical Conditions
TEChNICAL CONDITIONS AC power, voltage, AC frequency output: AC-DC Adapter, input 220V/110V, 7.5V (+15% to -20%) 48-60Hz Power consumption: Maximam=16W, average=8W work temperature range: +10ºC to +30ºC (50º F to 86º F) Temperature range allowed: +5ºC to +40ºC (41º F to 104º F) The balance could assure the normal work: +5ºC (41º... -
Page 29: Guarantee
This scale is guaranteed for one year from the delivery date. The guarantee covers any fabrication defect of the material. During this period gRAM PRECISION, SL, covers the manpower and the spare parts necessary for the reparation of the scale. -
Page 30: Información De Seguridad
ESPAÑOL INFORMACIóN DE SEgURIDAD Para evitar daños innecesarios a la balanza, por favor preste mucha atención a los siguientes consejos: • No utilizar la balanza en áreas peligrosas. • Desconectar la balanza de la red antes de conectarla o desconectarla en otras instalaciones. -
Page 31: Antes De Utilizar La Balanza
• Si la instalación o el cable de corriente tienen daños aparentes, por favor desconectar la balanza de la red, situarla en un lugar seguro y no utilizarla hasta que la instalación de la misma sea segura. • La balanza solo puede ser conectada a nuestros accesorios o piezas opcionales. -
Page 32: Lista De Material
Lista de material • Balanza • Plato de pesada • Soporte del plato • Vitrina de cristal • Accesorios calculo densidad • Adaptador de red • Manual de instrucciones wind shield weighing the balance adjustable feet Plan view pan support screw hole for wind shield display... -
Page 33: Instalación De La Balanza
INSTALACIóN DE LA bALANZA Instalar la balanza en un lugar apropiado, evitar las siguientes situaciones: • Altas temperaturas y rayos solares directos. • Corrientes de aire y vibraciones. • Excesivo nivel de humedad Condiciones de uso • No dejar la balanza en un lugar muy húmedo durante mucho tiempo. Si la balanza es transportada de un lugar con bajas temperaturas a un lugar con altas temperaturas, por favor dejar la balanza en el nuevo lugar sin conectarla a la red durante 2 horas... -
Page 34: Conectar El Adaptor
Conectar el adaptor • Conectar el adaptador a la balanza. • Conectar el adaptador a la toma de red. Instalación de equipos externos Asegurarse de apagar la balanza antes de conectarla o desconectarla a equipos externos como una impresora u ordenador. Tiempo de Precalentamiento Para asegurar la exactitud en las lecturas, la balanza debe ser precalentada durante 30 minutos antes de utilizarla. -
Page 35: Descripción Del Display
DESCRIPCIóN DEL DISPLAy 1. Unidades de pesada 2. Nivel de burbuja 3. Modos de Pesaje: Density: Modo determinación de la densidad. Net: Tara / Peso bruto / Peso neto. 4. Capacidad / Resolución 5. Indicador OK : lectura estable OK - Lectura estable. -
Page 36: Descripción De Las Teclas
DESCRIPCIóN DE LAS TECLAS Tecla de acceso al Menu de configuración Tecla de calibración / ajuste Tecla de impresión / salida Tecla Modo / confirmación Tecla de Tara Tecla de encendido / apagado CALIbRACIóN Procedimiento 1. Nivelar la balanza ajustando el nivel de burbuja y precalentar la balanza durante 30 minutos. -
Page 37: Pesaje Básico
7. Pulsar la tecla de , el display mostrará el mensaje ACAL. 8. Cuando la calibración ha finalizado, el display mostrará el peso de la pesa de calibración. PESAjE báSICO Función de tara 1. Colocar el recipiente sobre el plato de pesada. 2. - Page 38 Paso Ejemplo de procedimiento Tecla / Instrucción Display Instalar el kit de densidad (ver página 31) Precalentar la balanza durante 30 minutos Poner a cero la lectura del 0.000g display pulsando la tecla Tara CEnTIg ShaPE Predeterminar el tipo de la muestra (en este caso, sólido) SOLID 0.000g...
-
Page 39: Densidad De Líquido
Guardar el peso en el aire 7.788g Retirar la muestra del plato 0.000g Sumerger la muestra en el 6.889g líquido Guardar el peso en el líquido y 1.221g/cm³ visualizar el valor Salir del modo densidad 0.000g Densidad de líquido Paso Ejemplo de procedimiento Tecla / Instrucción Display... - Page 40 CEnTIg SHAPE COEFF Configurar la densidad. densidad es 2.24g/cm³ (si la SET DP. densidad es desconocida, ver apartado A para determinar SET .DP (dos veces) la densidad 1.00 2.24 (repetir) 2.24 parpadeará 0.000g Colocar el objeto en el plato 7.788g superior Guardar el resultado del peso 7.788g...
-
Page 41: Configuración De Parámetros
Medición de densidad en diferentes temperaturas (ºC) T/ºC 0,99973 0,99972 0,99971 0,99970 0,99969 0,99968 0,99967 0,99966 0,99965 0,99964 0,99963 0,99962 0,99961 0,99960 0,99959 0,99958 0,99957 0,99956 0,99955 0,99954 0,99953 0,99951 0,99950 0,99949 0,99948 0,99947 0,99946 0,99944 0,99943 0,99942 0,99941 0,99939 0,99938 0,99937 0,99935... - Page 42 (INSTANT): impresión pulsando la tecla (INTERVAL): impresión con tiempo predeterminado. Procedimiento , el display visualizará “PrInT”. 1. Pulsar la tecla 2. Pulsar la tecla para acceder al menu de configuración, el display mostrará el mensaje “STAbLE”. 3. Pulsar la tecla para seleccionar el modo de impresión deseado.
-
Page 43: Configuración De La Velocidad De Transmisión Y Modo De Calibración
CONFIgURACIóN DE LA VELOCIDAD DE TRANSMISIóN y MODO DE CALIbRACIóN 1. Pulsar la tecla para acceder al modo de configuración. 2. Pulsar la tecla repetidamente hasta visualizar el parámetro “bAud”. para acceder al parámetro, el display mostrará “300”. 3. Pulsar la tecla 4. -
Page 44: Configuración De La Iluminación Del Display
CONFIgURACIóN DE LA ILUMINACIóN DEL DISPLAy , el display mostrará “PrInT”. 1. Pulsar la tecla repetidamente hasta visualizar “bLghT”, pulsar la 2. Pulsar la tecla tecla para confirmar, el display mostrará “1 nIn” lo cual indica que la iluminación del display se apagará en 1 minuto. 3. -
Page 45: Configuración De Los Parámetros De La Media
PREDETERMINAR EL TIPO DE MUESTRA (sólido o líquido) Antes de realizar una medición de densidad, se deberá configurar el estado del objeto: 1. Pulsar la tecla hasta visualizar “CEnTIg”. 2. Pulsar la tecla , el display mostrará “ShAPE”. 3. Pulsar la tecla , el mensaje “SOLID”... -
Page 46: Funciones Opcionales
el parámetro del líquido en “1” (agua destilada). b. Cuando se trata de una medición de densidad de un líquido, el usuario puede elegir el peso cómo la medición del sólido, mesurando inicialmente su densidad y seguidamente introduciendo el valor de la densidad del mismo. -
Page 47: Comunicación A Un Ordenador
COMUNICACIóN A UN ORDENADOR Las funciones de las teclas de la balanza pueden ser utilizadas via RS-232. Están disponibles los siguientes comandos: U – : Conversión unidades de pesada. T – : Función tara. C – : Calibración con una pesa de calibración externa. P –... -
Page 48: Interface Rs-232
Carácter de estabilidad, corresponde al símbolo OK del display de la balanza. S significa que la lectura es estable, un espacio significa que la lectura es inestable. Carácter de retorno. Carácter de avance de líneas, indica el avance de línea. INTERFACE RS-232 Esta balanza adopta la transmisión y recepción de líneas del RS-232 estándar El formato de datos es:... -
Page 49: Rutina De Mantenimiento Y Solución De Problemas
Recomendamos que la longitud del cable sea de 15 metros, la impedancia de carga del equipo conectado sea entre 3000 y 7000 ohms con no más de 2500 pf de capacidad en paralelo. RUTINA DE MANTENIMIENTO y SOLUCIóN DE PRObLEMAS Solución de averías Unicamente los profesionales cualificados pueden realizar la reparación de la balanza. -
Page 50: Revisión De Seguridad
de secar la balanza con aire. Si fuese necesario, untar la superficie de acero inoxidable con un aceite especial como protección adicional. Revisión de seguridad Si la balanza no funciona correctamente: • Desconectarla de la red inmediamente, y mantenerla fuera de uso. •... -
Page 51: Condiciones Técnicas
Ver la sección de calibración NOCAL La calibración no responde. y comprobar que la pesa de calibración es la adecuada. Falta de datos o datos UNAbLE erróneos en el momento de Lea el manual de usuario. conectar la balanza. El entorno de la balanza es Situar la balanza en un inestable. -
Page 52: Parámetros Técnicos
Rango temperatura de trabajo: +10ºC a +30ºC (50º F a 86º F Rango temperatura permitido: +5ºC a +40ºC (41º F a 104º F) La balanza puede asegurar un trabajo normal: +5ºC (41º F) a +40ºC (104º F) PARáMETROS TéCNICOS Modelo FD410 Capacidad 410 g... -
Page 53: Garantía
Esta balanza está garantizada contra todo defecto de fabricación y de material, por un periodo de 1 año a partir de la fecha de entrega. Durante este periodo, gRAM PRECISION, SL, se hará cargo de la reparación de la balanza. - Page 54 NOTES...
- Page 55 NOTES...
- Page 56 001/08072016 gram Precision S.L. Travesía Industrial, 11 · 08907 Hospitalet de Llobregat · Barcelona (Spain) Tel. +34 902 206 000 · +34 93 300 33 32 Fax +34 93 300 66 98 gram.es comercial www.gram.es...
Need help?
Do you have a question about the FD 410 SERIES and is the answer not in the manual?
Questions and answers