Advertisement
Quick Links
Advertisement

Related Manuals for AURATON 3013


Summary of Contents for AURATON 3013
- Page 1 3013 AURATON 3013...
- Page 2 Congratulations on purchasing a temperature controller based on cutting-edge technological solutions. AURATON 3013 FrostGuard function Protects your room against freezing. Option to temporarily reduce the programmed temperature For maximum 12 hours. Holiday mode Up to eight days of temperature different than programmed.
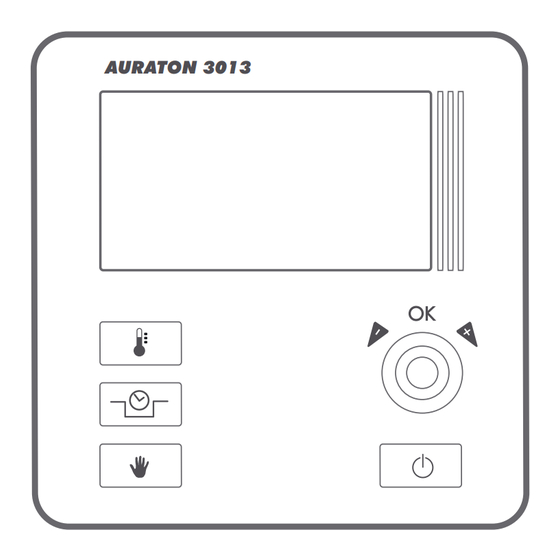
- Page 3 Description of AURATON 3013 temperature controller The front panel of the enclosure includes a backlit LCD display, four function buttons and temperature setting knob with OK button. LCD display AURATON 3013 temperature setting button knob with integrated OK button manual...
- Page 4 Display 1. Temperature In normal mode, the controller displays the temperature in the room in which it is installed. 2. Battery low ( ) This symbol appears when the battery voltage has dropped below the acceptable level. Replace the battery ASAP. NOTE: to maintain the settings the battery replacement should last less than 30 seconds.
- Page 5 4. Temperature unit ( Shows that the temperature is displayed in degrees Celsius. 5. Manual mode symbol ( Indicates the manual (holiday) mode temperature setting. 6. Indicator that the temporary temperature reduction is programmed ( Indicates that the user has programmed the temporary temperature reduction mode.
- Page 6 Selecting a correct location for the AURATON 3013 temperature controller Location can significantly affect the controller operation. Controller located in a place with no air circulation or exposed to direct sunlight may not work correctly. Install the controller on the internal wall of the building (partition wall), in a place with air circulation.
- Page 7 Connecting the leads to AURATON 3013 To connect the leads remove the front panel as shown below: The lead terminals are on the controller's back wall, under the plastic cover. screw cover...
- Page 8 Fastening the controller on the wall The battery compartment is located inside the controller, in the front part of the enclosure. To place the batteries remove the front panel as shown in the section ”Connecting the leads to AURATON 3013".
- Page 9 , o b s e r v i n g the polarity. Placing the front panel: NOTE To fasten the AURATON 3013 controller to the wall: 1. Remove the controller front panel (as shown in the section ”Connecting the leads to 3013").
- Page 10 3. Place the expansion plugs into the drilled holes (plugs are included in the kit). 4. Fasten the rear panel to the wall using the screws included in the kit. 5. Replace the front panel. NOTE: In case of wooden wall you don't have to use expansion plugs. Just drill the 2.7 mm dia holes (instead of 6 mm) in screw the bolts directly into the wood Placing the front panel: NOTE...
-
Page 11: Setting The Temperature
First start of the controller After a correct placement of batteries in the compartment all segments will appear on the display for a second (display test), followed by the software version number (e.g. F02). The current temperature in the room will be displayed after a moment. - Page 12 2. Turn the knob clockwise or anticlockwise to set desired temperature in the room with the 0.2°C accuracy. Confirm your choice by pressing the button The controller will revert to the normal operation mode. Setting the temporary temperature reduction mode If for any reason you want to have the temperature in the room reduced every day at the same time, then you can reduce it temporarily by maximum 5°C.
- Page 13 3. The hour field on the display will go into the edit mode and will start flashing. Use the knob again to set the number of hours during which the reduced temperature will be on. You can set from 1 to 12 hours.
-
Page 14: Setting The Manual Mode
Setting the manual mode If you want to suspend the normal or reduced temperature for some time, use the manual mode for maximum 8 days. To enter the manual mode: 1. Press the button. The display will show the hand symbol ( ), and the tempera- ture display segment will go into... - Page 15 The days are added and subtracted automatically when you exceed 24 hours. You can sent maximum 7 days and 24 hours. Confirm your choice by pressing button. NOTE: The manual mode is not automatically repeated. When the set time elapses, the controller reverts to previous temperature programs: normal and temporary temperature reduction, if the latter has been programmed.
- Page 16 The set temperature display segment will flash after pressing this button. The function is active in all controller operation modes. FrostGuard function The AURATON 3013 controller features a special FrostGuard function which prevents freeze damage to your room. The function is activated when the controller is off.
- Page 17 Notes You can switch on and off the controller any time by briefly ź pressing the button. The first pressing of any function button always turns the display ź backlight on, only the second pressing activates a given function. During programming, failure to press any button for 10 seconds ź...
-
Page 18: Technical Specification
Technical specification Operating temperature: 0 – 45°C Temperature measurement range: 0 – 35°C Temperature control range: 7 – 35°C Hysteresis: ±0,2°C Default temperature setting: 20°C Additional function: FrostGuard Operation cycle: daily Operation status indication: Maximum load current ~ 16A 250VAC on relay contacts: Power supply: 2x AAA 1.5V... - Page 20 www.auraton.pl...
Need help?
Do you have a question about the 3013 and is the answer not in the manual?
Questions and answers