
Related Manuals for boso CA01


Summary of Contents for boso CA01
- Page 1 medicus Gebrauchs- anweisung User Instructions Mode d’emploi Manuale di istruzioni Manual del Usuario...
-
Page 2: Table Of Contents
Table of contents Product features ............................................. Contents of package ........................................Quick guide ..............................................Introduction ..............................................Blood pressure values ........................................Systolic and diastolic blood pressure value ....................... WHO blood pressure cut-off values ............................Starting up ..............................................Inserting batteries ......................................Battery status ........................................ - Page 3 Table of contents Measuring your blood pressure ..................................Interrupting a measurement ................................Measurement display ........................................Mains operation ........................................... Error messages ............................................Cleaning and Disinfection ......................................Warranty ................................................ Customer service / Disposal ....................................Technical data ............................................Calibration checks - Testing instructions (for trained specialist staff only) ..................................
-
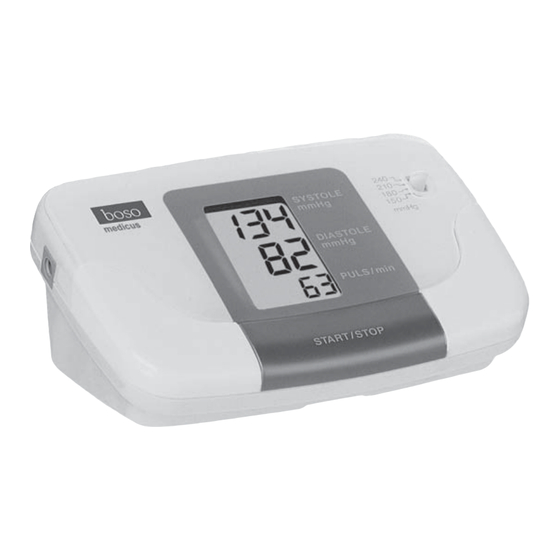
Page 4: Product Features
Product features Mains connector pressure selector switch START/STOP button Cuff connector LCD display Battery status display see page 43 Measurement in progress see page 52... -
Page 5: Contents Of Package
Contents of package CERTIFICATE OF WARRANTY 1 Warranty certificate 1 boso medicus GARANTIE-URKUNDE blood pressure monitor Diese Garantie-Urkunde ist nur gültig in Verbindung mit einem Kaufbeleg. This warranty certificate is valid only in combination with a proof of purchase (invoice). -
Page 6: Quick Guide
Quick guide ➡ Insert batteries, ensure correct position- This quick guide does not replace the detailed information on the use and ing (P. 42) safety of the blood pressure monitor fea- ➡ Connect cuff to monitor (P. 46) tured in the user instructions. ➡... -
Page 7: Introduction
We are delighted that you have decided operated correctly. to purchase a boso blood pressure mon- In these user instructions, „➡“ means an action by the user. itor. The boso brand is synonymous with... - Page 8 (see page 62). The boso medicus blood pressure monitor is suitable for patients of all ages with an upper arm circumference of be-tween 22 and 48 cm. The monitor is not suitable for neonatals.
-
Page 9: Blood Pressure Values
Blood pressure values ● Diastolic (lower) blood pressure: To determine the blood pressure, two val- ues need to be measured: This is present when the heart muscle ex- pands and fills with blood again. ● Systolic (upper) blood pressure: This is produced when the heart muscle Blood pressure measurement values are contracts and blood is forced into the expressed in mmHg (mm of mercury). - Page 10 Blood pressure values Whether medical treatment is necessary than at the doctor’s. The German depends not only on the blood pressure, Hypertension League has therefore defi- but also on the patient’s risk profile. ned lower cut-off values for home measu- Please contact your GP if one of the val- rements: ues (systole, diastole) consistently exceeds...
-
Page 11: Starting Up
Starting up The device must be installed and put into Never mix old and new batteries or operation in accordance with the instruc- different makes. tions in this manual. If the batteries are not inserted cor- rectly, the monitor will not work and this may cause the batteries to heat up and leak, damaging the monitor. -
Page 12: Battery Status
Starting up The monitor has a battery status display Care for the environment (see P. 35) Do not dispose of used batteries and Flashing! No further charger units in domestic waste. measurements possible. You can take these to collection sites for Replace battery. -
Page 13: General Instructions For Self-Measurement
General instructions for self-measurement 1. Fluctuations in blood pressure are quite 4. Incorrect measurements can also occur normal. Even when measurements are in patients with a weak pulse (possibly repeated, there can be marked differ- in patients wearing a pacemaker, for ex- ences. - Page 14 General instructions for self-measurement To do this, measure the blood pressure first in both arms and thereafter always from the arm with the higher blood pressure.
-
Page 15: Preparing To Measure Your Blood Pressure
(See illustration 2). the following cuff types. These should be chosen according to the upper arm cir- cumference printed on them. Type Order number circumference CA01 22 – 32 cm 143-4-760* CA02 32 – 48 cm 143-4-757 * Cuff supplied as standard. - Page 16 Preparing to measure your blood pressure ➡ Set the pressure selector switch ‘DRUCKVORWAHL’ to the desired cuff pressure which should be at least 30 to 40 mmHg higher than the systolic (upper) blood pressure reading. If you are not sure of this value, set the selec- tor switch to 150 mmHg for the first measurement.
-
Page 17: Attaching The Cuff
Preparing to measure your blood pressure Observe the following instructions Attaching the cuff when measuring your blood pressure: The measurement should be taken from Avoid smoking or drinking coffee the bare upper arm. for one hour before measuring In the case of tightly fitting outer your blood pressure. - Page 18 Preparing to measure your blood pressure During the measurement, medical ap- paratus that are being used on the same Marking arm at the same time, may malfunction. The cuff must not be too tight. There 2-3 cm should be enough space to fit roughly two Illustration 4 fingers between arm and cuff.
- Page 19 Preparing to measure your blood pressure ➡ Place your arm with the cuff attached Check that the air tube is not kinked during the measurement. This could cause on the table, holding it relaxed and slightly bent so that the cuff is level congestion of the blood flow and sub- with your heart.
-
Page 20: Measuring Your Blood Pressure
Measuring your blood pressure ➡ Start the measurement with the All the items on the LCD display appear START/STOP button briefly to indicate that the monitor is now ready for use (see illustration 6). Now hold the arm absolutely still and do not talk. -
Page 21: Interrupting A Measurement
Measuring your blood pressure The unit now inflates the cuff to the prese- During the measurement phase, the fall- lected cuff pressure. The rise in pressure in ing pressure and the symbol are indi- the cuff is indicated on the digital display. cated on the display. -
Page 22: Measurement Display
Measurement display As soon as the unit registers the first beats, The measured blood pressure values the symbol blinks in time with the pulse (systole, diastole, pulse) are displayed (see rhythm and an acoustic signal can be illustration 8). heard. The end of the measurement is indicated by a long beeping sound.At the same time, the built-in solenoid valve opens automa-... - Page 23 Measurement display Blood pressure is a dynamic parameter and Allow at least two minutes be- can be affected by the patient’s position, tween measurements. e.g. sitting, standing, lying, moving, before or during the measurement, physical con- ➡ If no further measurement is required, dition (stress, disease, etc.).
-
Page 24: Mains Operation
Mains operation The mains connection socket is located at the rear of the monitor. Where required, use only the boso power supply unit (order number 410-7-150). This power supply unit produces a rectified output of the correct polarity. Other com-... -
Page 25: Error Messages
Error messages If any problems occur during the measurement, the display will show an error message instead of a blood pressure reading. Meaning of error messages: Fehlerursache für Err-Anzeige Fehlerbehebung Inflation pressure inadequate after Select the next higher pressure two attempts to inflate setting No pulses were detected that Check the positioning of the cuff... -
Page 26: Cleaning And Disinfection
Cleaning and Disinfection Warranty Cleaning Monitor: Warranty: Use a soft, dry cloth to clean your monitor. For details of the warranty conditions, please consult the warranty certificate Cleaning Cuff: supplied. Small stains on the cuff can be removed A claim under the warranty will only be carefully with a proprietary washing-up accepted if the warranty certificate, liquid. -
Page 27: Customer Service / Disposal
Customer service Disposal Customer service: Do not dispose of monitors and bat- Warranty and repair work must be under- teries in the domestic waste. taken by trained and authorised personnel. Do not modify this equipment without aut- At the end of its lifespan, the monitor must horization of the manufacturer. -
Page 28: Technical Data
Technical data Measurement principle: oscillometric Measurement range: 40 to 280 mmHg, 40 to 200 pulses/min. Cuff pressure: 0 to 320 mmHg Display: Operating conditions: environmental temperature +10°C to +40°C Relative humidity 15 to 85% Storage conditions: environmental temperature -10°C to +60°C Relative humidity 15 to 85% Power supply: DC 6 V (4 x 1.5 V Mignon IEC LR 6 alkaline manganese... - Page 29 Technical data Battery check: symbol display in LCD window Weight: 400 g without batteries Dimensions (WxHxD): 165 mm x 70 mm x 110 mm Classification: Protection class II ( Type BF ( Protection against solid IP20 objects: Clinical test Accuracy complies with the requirements (DIN 58130): of EN 1060 Part 3 Maximum deviation of cuff ±...
- Page 30 Technical data Applicable standards: EN 1060, Part 1: “Non-invasive sphygmomanometers – General requirements” and Part 3: “Supplementary requirements for electro-mechanical blood pressure measuring systems”.
-
Page 31: Calibration Checks - Testing Instructions
Calibration checks - Testing instructions (for trained specialist staff only) Calibration checks – every 2 years at the Note: latest – must be performed by the follow- a) When the pressure in measurement ing institutions or persons: mode increases above 320 mmHg, the –... - Page 32 Calibration checks - Testing instructions (for trained specialist staff only) Testing 5.) Perform the usual tests for – tolerance testing of the pressure 1.) Switch off the unit. – reading. – leak testing of the pressure circuit 2.) Set the pressure preselector switch to –...
- Page 35 0124 BOSCH + SOHN GmbH u. Co. KG Bahnhofstraße 64 D-72417 Jungingen T + 49 (0) 74 77 92 75-0 F + 49 (0) 74 77 10 21 E zentrale@boso.de Internet: www.boso.de...
Need help?
Do you have a question about the CA01 and is the answer not in the manual?
Questions and answers