Table of Contents
Advertisement
Quick Links
Advertisement
Table of Contents

Related Manuals for Costar Video Systems DirectIP NVR


Summary of Contents for Costar Video Systems DirectIP NVR
- Page 1 Network Camera Installation Manual...
-
Page 2: Safety Symbols
Before reading this manual This is a basic installation manual for use of a network camera. Users who are using this product for the first time, as well as users with experience using comparable products, must read this manual carefully before use and heed to the warnings and precautions contained herein while using the product. -
Page 3: Safety Precautions
Before reading this manual Safety Precautions WARNING RISK OF ELECTRIC SHOCK DO NOT OPEN WARNING: TO REDUCE THE RISK OF ELECTRIC SHOCK, DO NOT REMOVE COVER (OR BACK). NO USER-SERVICEABLE PARTS INSIDE. REFER SERVICING TO QUALIFIED SERVICE PERSONNEL. Important Safeguards 1. -
Page 4: Fcc Compliance Statement
FCC Compliance Statement THIS EQUIPMENT HAS BEEN TESTED AND FOUND TO COMPLY WITH THE LIMITS FOR A CLASS A DIGITAL DEVICE, PURSUANT TO PART 15 OF THE FCC RULES. THESE LIMITS ARE DESIGNED TO PROVIDE REASONABLE PROTECTION AGAINST HARMFUL INTERFERENCE WHEN THE EQUIPMENT IS OPERATED IN A COMMERCIAL ENVIRONMENT. -
Page 5: Table Of Contents
Table of Contents Part 1 – Introduction ......... 6 Product Features . -
Page 6: Part 1 - Introduction
Part 1 – Introduction Product Features • Supports 4-stage video compression rate and multiple compression resolutions • Two-way audio communication support for remote This camera is an IP-based network camera that audio dialog compress and transmit video over ethernet. • Video stream buffering to counter pre-/post-event You can use the INIT program to change network buffering and network delays for improved network camera settings or the INEX Basic program to manage... - Page 7 Part 1 – Introduction • Easy network access via UPnP (Universal Plug and • Multiple event detection modes Play) function and embedded mDNS (Multicast DNS) • Includes a motorized focus and zoom lens protocol • Backup storage on a microSD memory card as •...
-
Page 8: Accessories
Part 1 – Introduction Accessories Upon purchasing the product, check inside the box to make sure all the following accessories are included. External appearances and colors of the accessories may vary depending on the model. Network Camera Ferrite Core Mounting Bracket Camera Sun Shield Quick Guide Screws (4 ea.) -
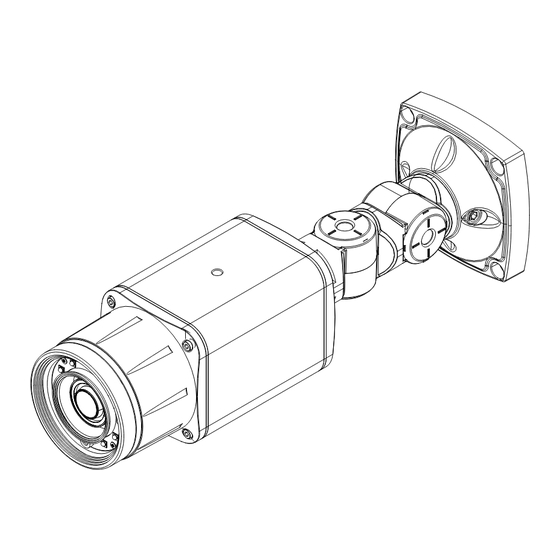
Page 9: Overview
Part 1 – Introduction Overview Product color and design may vary depending on the model. Body • Lens Motorized lens is installed. • IR LED A sensor in the bottom middle monitors lighting levels and activates the IR LED during low-lighting conditions. -
Page 10: Cable
Part 1 – Introduction Cable • To remove/insert the SD memory card or perform the factory reset, make sure that the lens side's cover is joined properly when screwing it. Otherwise, the IP66 level is not guaranteed. For more information, contact your product retailer. - Page 11 Part 1 – Introduction • Network Port • Alarm in Connect an alarm-in device to this port. Connect a Connect a network cable with an RJ-45 connector to mechanical or electrical switch to the IN and GND this port. If using a PoE switch, you can supply power (ground) connectors.
-
Page 12: Factory Reset
Part 1 – Introduction Factory Reset • Check your local laws and regulations on making video or audio recordings. The user will be held liable for any violation of the law. (Article 25-5 Only use the factory reset button to restore the camera of the Personal Information Protection Act: to its factory default settings. -
Page 13: Inserting A Sd Memory Card
Part 1 – Introduction Installation Cover the lens bottom's cover and tighten the screws clockwise. Installation of this product does not require the use of special tools. For more information on other devices comprising the overall system, refer to their respective installation manuals. -
Page 14: Dimensions
Part 1 – Introduction Installation Screw the camera sun shield to the camera using the screw and rubber provided with the camera. Screw the mounting bracket to the wall or ceiling by • Check the wall or ceiling to see if it needs to be using screws provided with the camera. -
Page 15: Part 2 - Camera Connection
Part 2 - Camera Connection Use the camera by connecting to DirectIP™ NVR or non DirectIP™ NVR, VMS such as iNEX Basic. With DirectIP™ NVR-based Layout Audio In Sensor In Audio Out Power Alarm Out Network Camera Power Monitor Out Network Remote Monitoring DirectIP™... -
Page 16: With Non Directip™ Nvr-Based Layout
Part 2 - Camera Connection With non DirectIP™ NVR-based Layout Sensor In Alarm Out Audio In Network Camera Audio Out Network Micro SD Memory Card Remote Monitoring (INEX Basic or WebGuard) Remote Recording (INEX Basic) Control the camera over the network from software installed on a computer. Ideal for using the camera over the network from a remote location. -
Page 17: Part 3 - Appendix
Part 3 - Appendix Troubleshooting Problem Check The main unit won't turn • Check the power cable connection. • Check the power outlet. I can't see Live videos. • Check the camera's power status. • Check the network connection status of the computer and the network camera. Images are blurry. -
Page 18: Specifications
Part 3 - Appendix Specifications These product specifications may change without prior notice. Video Image Sensor 1/3" CMOS Max. Resolution 1920 x 1080 Scanning Mode Progressive Scan Lens type Motorized Vari-focal Focal Length f=9 - 22mm Aperture F1.5 - 2.8 Iris Control P-Iris Angular Field of View... - Page 19 Part 3 - Appendix Supported DirectIP 1920x1080, 1280x720, 704x480, 640x360, 352x240 Resolution Non DirectIP 1920x1080, 1280x720, 704x480, 640x360, 352x240 Multi-Video DirectIP Quadruple Streaming Non DirectIP Quadruple Ethernet RJ45(10/100/1000BASE-T) Edge Storage** (Optional) (micro SD/SDHC/SDXC memory card (class 6 or higher, max. 128GB) ** An SLC (Single Level Cell) or MLC (Multi Level Cell) card by SanDisk or Transcend is recommended to ensure stable recording performance.
Need help?
Do you have a question about the DirectIP NVR and is the answer not in the manual?
Questions and answers