Table of Contents
Advertisement
Available languages
Available languages
Quick Links
Advertisement
Table of Contents

Related Manuals for Bresser FlipMe


Summary of Contents for Bresser FlipMe
- Page 1 FlipMe Art. No. 80-10040 Art. No. 80-10041 Art. No. 80-10042 BEDIENUNGSANLEITUNG ..2 INSTRUCTION MANUAL ..14 MODE D’EMPLOI ....26 HANDLEIDING ....38 INSTRUCCIONES DE USO ... 50 ISTRUZIONI PER L’USO ..62...
-
Page 2: Zu Dieser Anleitung
Zu dieser Anleitung Ausgelaufene Batteriesäure kann zu Ver- Lesen Sie vor der Benutzung des Geräts ätzungen führen! Vermeiden Sie den Kon- aufmerksam die Sicherheitshinweise und takt von Batteriesäure mit Haut, Augen und die Bedienungsanleitung. Schleimhäuten. Spülen Sie bei Kontakt mit Bewahren Sie diese Bedienungsanleitung für der Säure die betroffenen Stellen sofort mit die erneute Verwendung zu einem späteren... -
Page 3: Vor Dem Gebrauch
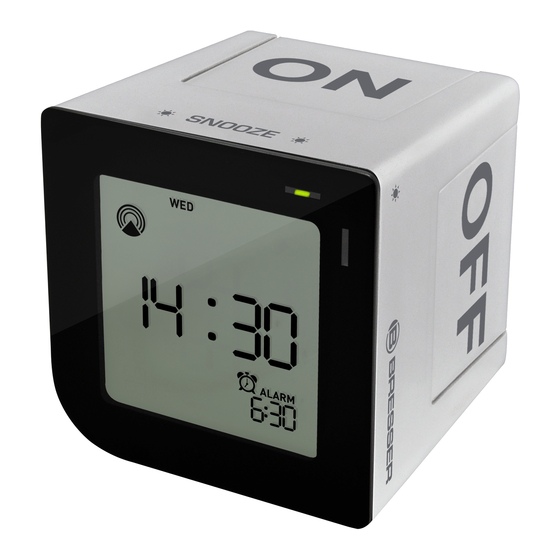
Lieferumfang HINWEIS! Bauen Sie das Gerät nicht auseinander! Funkwecker, Bedienungsanleitung, Es wer- Wenden Sie sich im Falle eines Defekts an Ih- den 2x Batterien vom Typ AA benötigt (nicht ren Fachhändler. Er nimmt mit dem Service- im Lieferumfang enthalten). Center Kontakt auf und kann das Gerät ggf. VOR DEM GEBRAUCH zwecks Reparatur einschicken. - Page 4 PRODUKTÜBERSICHT A. Alarm “ON/ ” Schiebeplättchen oder B. Alarm “OFF/X” Schiebeplättchen C. Berührungstaste Schlummermodus/Hintergrundbeleuchtung...
- Page 5 D. Taste [SET] E. Taste (▲) NACH OBEN F. Taste (▼) NACH UNTEN G. Anzeigeleuchte: Alarm an/aus SIZE AA 1.5V SIZE AA 1.5V Stärke des Signals ANZEIGE STEHT FÜR Symbol der Atomuhr Funksignal nicht defi nierte Daten Funksignal schwach (blinkt auf) Sommerzeit Kein Empfang (kein Symbol)
- Page 6 FUNKTIONSTASTEN • Einstellung der Weckzeit wenn der Alarm auf “ON / ” eingestellt ist. Halten Sie A. Alarm “ON / ” Schiebeplättchen “SET” 4 Sekunden lang gedrückt. Durch das beidseitig bedruckte Plättchen ▲ mit den Aufdrucken “ON / ” können Sie E.
-
Page 7: Einstellen Der Uhrzeit
EINSTELLEN DER UHRZEIT Empfangsqualität verbessert. Es reicht aus, Sobald Sie die Batterien korrekt eingelegt ha- wenn pro Tag ein Signal empfangen wird, um ben, schaltet sich die LCD-Anzeige ein und die Genauigkeit der Uhr bei max. 1 Sekun- Datum und Uhrzeit werden folgendermaßen de Abweichung zu halten. - Page 8 Symbol. Wenn das Signal zur Einstellung der Stärke des Signals Symbol Uhrzeit nach 8 Minuten noch nicht empfan- der Atomuhr gen wurde, können Sie die Uhrzeit manuell einstellen. nicht defi nierte Daten (blinkt auf) Empfang des Funksignals dauerhaft abstellen und neu aktivieren (kein Symbol) Kein Empfang ▼...
-
Page 9: Einstellen Der Weckzeit
▲ DATUM UND UHRZEIT: MANUELLE zum Einstellen NACH OBEN ( ) oder NACH ▼ EINSTELLUNG UNTEN ( ) und bestätigen Sie mit [SET]. Rollen Sie den Wecker auf die Seite “OFF / X”. Die rote Anzeige leuchtet für 3 Sekunden auf. AUSWAHL DES ANZEIGEFORMATS MIT 12 ODER 24 STUNDEN ▲... - Page 10 ▼ oder NACH UNTEN ( ) ein und drücken Sie Bei Drücken der Taste “SNOOZE/LIGHT” anschließend die Taste [SET]. schaltet sich der Alarm ab und die Hinter- grundbeleuchtung leuchtet für 5 Sekunden auf. Die Anzeige für die Alarmwiederholung blinkt auf. Nach 5 Minuten ertönt der Alarm erneut.
-
Page 11: Spezifikationen
SPEZIFIKATIONEN Wecker • Funkgesteuerte Einstellung der Uhrzeit (DCF) • Anzeigeformate mit 12/24 Stunden auswählbar • Mit Anzeige der Sommerzeit • Wahlweise Anzeigeformat Datum/Monat oder Monat/Datum • Anzeige Wochentag • Ein- und Ausschalten des Alarms durch Rollen • Berührungstaste für Schlummermodus/ Licht •... -
Page 12: Wartung / Reinigung
Wartung/Reinigung Batterien und Akkus dürfen nicht im Trennen Sie das Gerät vor der Reinigung von Hausmüll entsorgt werden. Sie sind zur der Stromquelle (Batterien entfernen)! Rückgabe gebrauchter Batterien und Akkus Reinigen Sie das Gerät nur äußerlich mit gesetzlich verpfl ichtet und können die Batteri- einem trockenen Tuch. -
Page 13: Eg-Konformitätserklärung
EG-Konformitätserklärung Garantie & Service Die reguläre Garantiezeit beträgt 2 Jahre Hiermit erklärt Bresser GmbH, und beginnt am Tag des Kaufs. Um von einer dass sich dieses Gerät: verlängerten, freiwilligen Garantiezeit wie auf dem Geschenkkarton angegeben zu profi tie- FlipMe ren, ist eine Registrierung auf unserer Websi- Art.Nr.: 80-10040 / Art.Nr.: 80-10041 /... -
Page 14: General Warnings
About this Instruction Manual membranes. In the event of contact, rinse the These operating instructions are to be affected region immediately with a plenty of considered a component of the device. water and seek medical attention. Please read the safety instructions and the operating instructions carefully before use. -
Page 15: Scope Of Delivery
Scope of delivery NOTE! Do not disassemble the device. In the event Alarm Clock, Operating instructions, 2x AA of a defect, please contact your dealer. batteries required (not included with delivery). The dealer will contact the Service Centre BEFORE YOU BEGIN and can send the device in to be repaired, if necessary. -
Page 16: Product Overview
PRODUCT OVERVIEW A. Alarm “ON/ ” slide plate B. Alarm “OFF/X” slide plate C. Touch key SNOOZE/LIGHT... - Page 17 D. [SET] button E. UP (▲) button F. Down (▼) button G. Alarm on/off indicator light SIZE AA 1.5V SIZE AA 1.5V Atomic Time INDICATOR STANDING FOR Icon Reception Strength Radio Signal Undefi ned data Weak Radio Signal (Flashing) Summer time indication No Reception (No icon) PM (12 hr display only)
-
Page 18: Function Keys
▲ FUNCTION KEYS E. UP ( ) button • Increase the date, time and alarm during A. Alarm “ON / ” slide plate setting. Double-sided printing slide plate “ON / ” • Switch between 12 hour or 24 hour display allows you to select the alarm “ON”... -
Page 19: Setting The Time
SETTING THE TIME reception is suffi cient enough to keep the Once the battery is installed properly, the clock accuracy within 1 second. LCD will turn on, the time & date will be 1 Make sure the unit is positioned at 2 meters DATE 1 MONTH THU 0:00 and the alarm (8 feet) distance from any interference source time will be 6:00. - Page 20 If the time signal has not been received in 8 Atomic Time Icon minutes, you may set the time manually. Reception Strength How to permanently stop or revive Undefi ned data the Radio Controlled Time (Flashing) ▼ Press and hold DOWN ( ) button for 3 (No icon) No Reception...
- Page 21 Press and hold the [SET] button, the date will HOW TO SET THE ALARM TIME ▲ ▼ fl ash, press the UP ( ) or DOWN ( ) button Roll the clock to “ON / ” side, green indica- and then [SET] button to go to next step to tor will appear for 3 seconds.
-
Page 22: Specifications
USING THE ALARM AND SNOOZE SPECIFICATIONS Roll the clock to “ON / ” or “OFF / X” side to turn on/off the alarm. If the alarm is on, the Clock alarm icon will appear. The green indica- • Radio Controlled time (DCF) tor light will fl... - Page 23 NOTES on Cleaning Before cleaning the device, disconnect it from the power supply (remove batteries)! Only use a dry cloth to clean the exterior of the device. To avoid damaging the electronics, do not use any cleaning fl uid. Protect the device from dust and moisture.
-
Page 24: Ec Declaration Of Conformity
DISPOSAL EC Declaration of Conformity Dispose of the packaging materials Bresser GmbH declares that the properly, according to their type, such as device: paper or cardboard. Contact your local waste- disposal service or environmental authority for FlipMe information on the proper disposal. - Page 25 You can consult the full guarantee terms as well as information on extending the guar- antee period and details of our services at www.bresser.de/warranty_terms.
-
Page 26: Consignes Générales De Sécurité
A propos de ce manuel sation de l’appareil doit se faire exclusivement Le présent mode d‘emploi doit être comme décrit dans ce manuel, faute de quoi considéré comme faisant partie un RISQUE d’ELECTROCUTION peut exis- intégrante de l’appareil. Avant d’utiliser ter! L’écoulement de l‘électrolyte d’une batte- l’appareil, veuillez lire attentivement les rie peut entraîner des blessures par brûlure... -
Page 27: Avant De Commencer
Volume de livraison REMARQUE! Ne pas démonter l’appareil! En cas de dé- Radio-réveil, mode d’emploi, des piles de faut, veuillez vous adresser à votre revendeur type 2x AA sont nécessaires (non incluses à spécialisé. Celui-ci prendra contact avec le la livraison). service client pour, éventuellement, envoyer AVANT DE COMMENCER l’appareil en réparation. -
Page 28: Aperçu Du Produit
APERÇU DU PRODUIT A. Plaque coulissante pour alarme “ON/ ” B. Plaque coulissante pour alarme “OFF/X” C. Touche tactile RÉPÉTITION D’ALARME/LUMIÈRE... - Page 29 D. Bouton [SET] E. Bouton HAUT (▲) G. Témoin lumineux d’alarme F. Bouton BAS (▼) marche/arrêt SIZE AA 1.5V SIZE AA 1.5V Force de réception de TÉMOIN SIGNIFICATION Icône l’heure atomique Signal radio Données non défi nies Signal radio faible (Clignotement) Indication de l’heure d’été...
-
Page 30: Touches De Fonction
▲ TOUCHES DE FONCTION E. Bouton HAUT ( • Pour augmenter la date, l’heure et l’heure A. Plaque coulissante pour alarme “ON / ” d’alarme durant le réglage Plaque coulissante à double face “ON / ” • Pour alterner entre le format d’affi chage 12 qui permet de sélectionner l’aspect de heures et 24 heures l’alarme “ON”... -
Page 31: Réglage De L'heure
RÉGLAGE DE L’HEURE et la réception du signal radio peut s’amélio- Une fois la pile insérée convenablement, rer. Une seule réception par jour suffi t pour l’écran LCD s’allumera, l’heure et la date affi - conserver une heure exacte à 1 seconde cheront 1 DATE 1 MOIS JEU 0:00 et l’heure près. - Page 32 Si le signal horaire n’a pas été capté au bout Force de réception Icône de 8 minutes, vous pouvez régler le temps de l’heure atomique manuellement. Données non défi nies Comment arrêter l’heure radio-com- (Clignotement) mandée de façon permanente ou la remettre en marche (Pas d’icône) Pas de réception...
- Page 33 COMMENT RÉGLER MANUELLE- le bouton SET pour régler à l’heure exacte. MENT LA DATE ET L’HEURE Basculez le réveil sur le côté “OFF / X”, le témoin lumineux rouge s’allumera pendant 3 secondes POUR SÉLECTIONNER LE FORMAT D’AF- FICHAGE 12 HEURES OU 24 HEURES ▲...
-
Page 34: Spécifications
gler l’heure d’alarme souhaitée. rage s’allumera pendant 5 secondes, l’indi- cation de répétition d’alarme se mettra alors à clignoter. L’alarme se déclenchera de nouveau après 5 minutes. Si l’alarme n’est pas éteinte, elle s’arrêtera automatiquement de sonner après 2 minutes. Pour mettre en marche l’alarme, gardez RÉTROÉCLAIRAGE l’appareil sur le côté... - Page 35 Horloge • Heure radio-commandée (DCF) • Format d’heure 12/24 • Avec indication de l’heure d’été • Jour/Mois ou Mois/Jour • Jour de la semaine • Bascule du réveil pour l’allumer/l’éteindre • Touche tactile Répétition d’alarme/ Lumière • Alarme en crescendo avec la possibilité de répéter 7 fois son déclenchement Alimentation 2 piles AA (LR6) de 1,5V (non incluses)
- Page 36 REMARQUE concernant le appareils électriques et électroniques et ses nettoyage transpositions aux plans nationaux, les Avant de nettoyer l’appareil, veuillez le couper appareils électriques usés doivent être de son alimentation électrique (batteries)! collectés séparément et être recyclés dans le Ne nettoyez l’appareil que de l’extérieur respect des réglementations en vigueur en en utilisant un chiffon sec.
-
Page 37: Déclaration De Conformité Ce
Garantie et Service DÉCLARATION DE CONFORMITÉ CE La durée normale de la garantie est de 2 ans Bresser GmbH déclare que à compter du jour de l’achat. Afi n de pouvoir l’appareil: profi ter d’une prolongation facultative de la garantie, comme il est indiqué sur le carton FlipMe d’emballage, vous devez vous enregistrer sur... -
Page 38: Over Deze Handleiding
Over deze handleiding zuur kan tot corrosieve brandwonden leiden! Deze gebruiksaanwijzing maakt deel uit Vermijd contact van het batterijzuur met de van het apparaat. Lees vóór het eerste huid, ogen en slijmvliezen. Spoel de getrof- gebruik van het apparaat de veiligheidsinstruc- fen lichaamsdelen bij contact met het zuur ties en de gebruiksaanwijzing aandachtig door. -
Page 39: Voor U Begint
Inbegrepen in de levering: OPMERKING! Neem het toestel niet uit elkaar! Neem bij wekker, gebruikshandleiding. 2x Type AA bat- defecten a.u.b. contact op met de verkoper. terijen vereist (niet inbegrepen). Deze zal contact opnemen met een service- VOOR U BEGINT center en kan het toestel indien nodig voor reparatie terugsturen. - Page 40 PRODUCTOVERZICHT A. Alarm “ON/ ” glijplaat B. Alarm “OFF/X” glijplaat C. toets SNOOZE/LIGHT...
- Page 41 D. [SET] knop E. UP (▲) knop F. Down (▼) knop G. Alarm on/off controlelampje SIZE AA 1.5V SIZE AA 1.5V sterkte atoomtijd INDICATOR STAAT VOOR Icoon ontvangst Radiosignaal Undefi ned data Zwak radiosignaal (Knippert) Indicatie zomertijd Geen ontvangst (Geen icoon) PM (alleen bij 12hr weergave) Geen ontvangst gedurende de laatste 24 uur...
- Page 42 ▲ BEDIENINGSTOETSEN E. UP ( ) knop • Pas de datum, tijd en alarm naar boven aan A. Alarm “ON / ” glijplaat tijdens instellen Tweezijdig bedrukte glijplaat “ON / ” laat • Schakel tussen weergave in 12 of 24 uur u de “ON”...
-
Page 43: De Tijd Instellen
DE TIJD INSTELLEN keer daags ontvangst is voldoende om de Als de batterij correct is geplaatst zal de LCD klok tot op 1 seconde accuraat te laten lo- aangaan; de tijd & datum staan ingesteld op pen. 1 DATE 1 MONTH THU 0:00 en het alarm staat op 6:00. - Page 44 het torenicoon verdwijnen. sterkte atoomtijd Icoon Als u na 8 minuten geen tijdsignaal ontvangen ontvangst heeft kunt u de tijd handmatig instellen. Ongedefi niëerde data De radio-gestuurde tijd permanent (Knippert) uitschakelen of weer inschakelen (Geen icoon) Geen ontvangst ▼ Houd de DOWN ( ) knop 3 seconden in- gedrukt om het radiosignaal te activeren.
- Page 45 DATUM EN TIJD HANDMATIG INSTELLEN Rol de klok naar de „OFF /X“ kant - het rode lampje zal 3 seconden branden. DE WEERGAVE IN 12 OF 24 uur INSTELLEN ▲ Druk op de UP ( ) knop om te schakelen tussen de 12 uur en 24 uur weergave.
- Page 46 alarm gaat na 5 minuten weer af. Als het alarm niet uitgeschakeld wordt zal het na 2 minuten automatisch stoppen. ACHTERGRONDVERLICHTING Om het alarm in te schakelen laat u het toe- stel op de „ON / “ zijde liggen met het Druk zachtjes op de „SNOOZE/LIGHT“...
- Page 47 SPECIFICATIES Klok • Radio-gestuurde tijd (DCF) • Tijdweergave in 12/24 uur • Met indicatie zomertijd • Weergave in DATUM/MAAND of MAAND/ DATUM • Datum van de week • Alarm aan/uit rollen • Snooze/Light toets • Steeds harder afgaand alarm met max. 7 keer snooze-functie Stroomvoorziening 2 AA (LR6) 1.5V batterijen (vereist)
- Page 48 TIPS voor reiniging Batterijen en accu’s mogen niet worden Koppel toestel weggegooid in de vuilnisbak. U bent stroomvoorziening (batterijen verwijderen) wettelijk verplicht om gebruikte batterijen in te voordat u het reinigt! Reinig het toestel alleen leveren. U kunt de gebruikte batterijen in onze uitwendig met een droge doek.
-
Page 49: Eg-Conformiteitsverklaring
Garantie & Service EG-CONFORMITEITSVERKLARING De reguliere garantieperiode bedraagt 2 Hierbij verklaard Bresser GmbH, jaar en begint op de dag van aankoop. Om dat dit apparaat: gebruik te maken van een verlengde vrijwil- lige garantieperiode zoals aangegeven op FlipMe de geschenkverpakking is aangegeven dient Art.No.: 80-10040 / Art.No.: 80-10041 /... -
Page 50: Sobre Este Manual
Sobre este manual ELÉCTRICA. Si se derrama el ácido de las pi- El presente manual de instrucciones se las, este puede provocar abrasiones Evite el debe considerar parte integrante del apa- contacto del ácido de las baterías con la piel, rato. -
Page 51: Contenido De La Entrega
Contenido de la entrega ¡NOTA! No desmonte el aparato. En caso de que Reloj despertador, instrucciones de uso. exista algún defecto, le rogamos que se Se precisan pilas 2x del tipo AA (no inclui- ponga en contacto con su distribuidor auto- das). - Page 52 SINOPSIS DEL PRODUCTO A. Placa deslizante de alarma “ON/ ” B. Placa deslizante de alarma “OFF/X” C. Tecla táctil SNOOZE/LIGHT...
- Page 53 D. Botón [SET] E. Botón ARRIBA (▲) F. Botón ABAJO (▼) G. Luz indicadora de alarma on/off SIZE AA 1.5V SIZE AA 1.5V Intensidad de recepción INDICADOR SIGNIFICA Icono de hora atómica Señal de radio Datos no defi nidos Señal de radio débil (parpadeante) Indicación del horario de verano Sin recepción...
-
Page 54: Teclas De Función
▲ TECLAS DE FUNCIÓN E. Botón ARRIBA ( • Aumentar la fecha, la hora y la alarma du- A. Placa deslizante de alarma “ON / ” rante el ajuste La placa deslizante impresa por ambos • Cambiar entre el formato de visualización lados “ON / ”... -
Page 55: Ajuste De La Hora
AJUSTE DE LA HORA recepción diaria basta para mantener la pre- Una vez que la pila esté correctamente ins- cisión del reloj en el margen de un segundo. talada, el LCD se encenderá, la fecha y hora Asegurarse de que la unidad está situada a serán 1 DÍA 1 MES JUE 0:00 y la hora de 2 metros de distancia de cualquier fuente de alarma serán las 6:00. - Page 56 Si la señal horaria no se recibe el el plazo Intensidad de recepción Icono de 8 minutos, podrá ajustar la hora manual- de hora atómica mente. Datos no defi nidos Cómo detener permanentemente o (parpadeante) reactivar la hora con radiocontrol Sin recepción (ningún icono) ▼...
- Page 57 SELECCCIONAR EL FORMATO DE VISUA- LIZACIÓN DE 12 O 24 HORAS ▲ Al pulsar el botón ARRIBA ( ), el formato de visualización cambiará entre los de 12 y 24 horas. Mantener pulsado el botón [SET]; la fecha CÓMO AJUSTAR LA HORA DE ALARMA ▲...
-
Page 58: Luz De Fondo
Para conectar la alarma, mantenga la unidad Si no se desconecta la alarma, esta se deten- en el lado “ON / ” con el icono de alarma drá automáticamente a los 2 minutos. visible. También puede girar la unidad a LUZ DE FONDO “OFF / X”... -
Page 59: Especificaciones
ESPECIFICACIONES Reloj • Hora con radiocontrol (DCF) • Formato de 12/24 horas • Con indicador del horario de verano • Formato Día/Mes o Mes/Día • Día de la semana • Alarma giratoria on/off • Tecla de repetición/luz • Alarma en crescendo con un máx. de 7 repeticiones Alimentación Dos pilas tamaño 2 AA (LR6) de 1,5 V... - Page 60 ELIMINACIÓN violación de la Directiva en materia de los Elimine los materiales de embalaje residuos domésticos- pilas y baterías-). Las separados tipos. Obtendrá pilas y baterías que contienen productos información sobre eliminación tóxicos están marcados con un signo y un reglamentaria proveedores símbolo químico.
- Page 61 El período regular de garantía es dos anos ini- Unión Europea (CE) ciándose en el día de la compra. Para bene- Por la presente Bresser GmbH, fi ciarse de un período de garantía más largo declara que esta unidad (Estación y voluntario tal y como se indica en la caja Meteorológica:...
-
Page 62: Informazioni Sul Presente Manuale
Informazioni sul presente manuale La fuoriuscita dell’acido della batteria può Questo manuale d’uso va considerato causare corrosione! Evitare che l’acido del- parte integrante dell’apparecchio. la batteria entri in contatto con pelle, occhi Prima di usare l’apparecchio, leggere con at- e mucose. In caso di contatto con l’acido, tenzione le indicazioni di sicurezza e il manuale sciacquare immediatamente le parti interes- d’uso. -
Page 63: Accessori In Dotazione
Accessori in dotazione NOTA! Non smontare l’apparecchio! In caso di gua- Sveglia radiocontrollata, istruzioni per l’uso. sto, rivolgersi al proprio rivenditore specializ- Sono necessarie 2x pile di tipo AA (non com- zato. Egli provvederà a contattare il centro di prese in dotazione). assistenza e se necessario a spedire l’appa- PRIMA DI INIZIARE recchio in riparazione. -
Page 64: Descrizione Generale Del Prodotto
DESCRIZIONE GENERALE A. Piastra scorrevole DEL PRODOTTO allarme “ON/ ” Oppure B. Piastra scorrevole allarme “OFF / X” C. Tasto touch SNOOZE/ILLUMINAZIONE... - Page 65 D. Pulsante [SET] E. Pulsante SU (▲) F. Pulsante GIÚ (▼) G. Spia allarme attivo/inattivo SIZE AA 1.5V SIZE AA 1.5V Potenza di ricezione SPIA INDICA Icona dell‘orario atomico Segnale radio Dati non defi niti Segnale radio debole (Lampeggiante) Indicazione ora legale Assenza di ricezione (Nessuna icona) PM (visualizzazione solo a 12 ore)
-
Page 66: Tasti Funzione
TASTI FUNZIONE ▲ E. Pulsante SU ( A. Piastra scorrevole allarme “ON / ” • Increase the date, time and alarm during La piastra scorrevole con scritta “ON / ” setting. sui due lati consente di impostare la visua- • Switch between 12 hour or 24 hour display lizzazione dell‘indicazione “ON”... -
Page 67: Impostazione Dell'orario
IMPOSTAZIONE DELL’ORARIO ricezione del segnale orario potrebbe miglio- Una volta installata correttamente la batteria, rare. Una singola ricezione giornaliera è suffi - il display LCD si accederà visualizzando l’ora ciente a mantenere la precisione dell’orologio e la data GIORNO 1 MESE 1 GIO 0:00 e l’o- nell’ambito di 1 secondo. - Page 68 Se il segnale orario non viene ricevuto entro Potenza di ricezione Icona 8 minuti, è possibile impostare l’orario ma- dell‘orario atomico nualmente. Dati non defi niti Come disattivare o riattivare in modo (Lampeggiante) permanente l’orario radiocontrollato Assenza di ricezione (Nessuna icona) Temere premuto per 3 secondi il pulsante ▼...
- Page 69 SELEZIONE DEL FORMATO DI VISUALIZ- ZAZIONE ORARIO A 12 O 24 ORE ▲ Premendo il pulsante SU ( ) si alternerà il formato di visualizzazione tra quello a 12 e a 24 ore Tenere premuto il pulsante [SET], la data lam- ▲...
- Page 70 RETROILLUMINAZIONE Per attivare l’allarme, tenere l’unità sul lato “ON / ” con l’icona dell’allarme visibile. Sfi orare delicatamente il tasto “SNOOZE/ Oppure scorrere l’unità sul lato “OFF / X” per LIGHT”, la retroilluminazione si attiva per cir- disattivare l’allarme. ca 5 secondi. UTILIZZO DELL’ALLARME E DELLO SNOOZE Girare l’orologio sul lato “ON / ”...
- Page 71 SPECIFICHE Orologio • Orario radiocontrollato (DCF) • Formato a 12/24 ore • Con indicazione dell’orario legale • Formata Data/Mese o Mese/Data • Giorno della settimana • Scorrimento interruttore allarme on/off • Tasto touch Snooze/Light • Allarme crescente con massimo 7 attiva- zioni della funzione snooze Potenza Richiede 2 batterie AA (LR6) da 1,5V...
- Page 72 NOTE per la pulizia Le batterie normali e ricaricabili devono Prima di procedere con la pulizia, stacca- essere correttamente smaltiti come sta re l’apparecchio dalla sorgente di corrente previsto dalla legge. È possibile tornare batte- (rimuovere le batterie)! Pulire l’apparecchio rie inutilizzati presso il punto di vendita o ce- soltanto con un panno asciutto.
-
Page 73: Dichiarazione Di Conformità Ce
Garanzia e assistenza Dichiarazione di conformità CE La durata regolare della garanzia è di 2 anni Per la presente Bresser GmbH, e decorre dalla data dell‘acquisto. Per gode- afferma che questa unità: re di un‘estensione volontaria della garanzia come descritto sulla confezione regalo, è ne- FlipMe cessario registrarsi nel nostro sito Web. - Page 76 Bresser GmbH Gutenbergstr. 2 · DE-46414 Rhede Germany www.bresser.de · service@bresser.de...
Need help?
Do you have a question about the FlipMe and is the answer not in the manual?
Questions and answers