Advertisement
Available languages
Available languages
Table of Contents
Advertisement
Table of Contents

Related Manuals for Sunjoy L-GG001PST-F


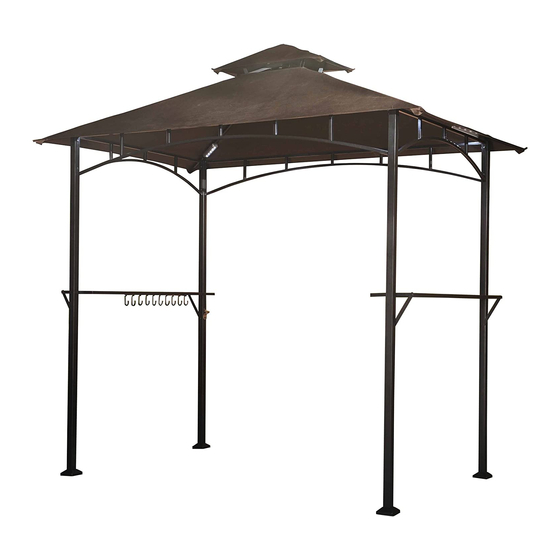
Summary of Contents for Sunjoy L-GG001PST-F
- Page 1 Assembly Instruction LED Lighted Grill Gazebo L-GG001PST-F...
- Page 2 IMPORTANT: 1. When installing and assembling your gazebo, it is recommended that two or more adults are involved. 2. Do not use the gazebo during an electrical storm, as there is a remote chance of getting struck by lightning. 3. Do not climb on top of the gazebo. Falling off the gazebo can result in serious injury, possibly even death. 4.
-
Page 3: Parts List
Parts List Post (1) Post (2) Post (3) Big Beam Big Connector Small Beam Long Screen Short Screen Glass Panel Glass Panel Hook rack Bolt I Bolt II Big Canopy Small Canopy Hook LED Light Batteries 7#... - Page 4 Fig.1: Attach the Long Screen (E) and the Short Screen (F) to Post (A1, A2, A3) with the Bolt (I). Fig.2: Attach the Big Beam (B) to the Big Connector (C), then attach the Hook (H) to the Big Connector (C). Fig.3: Insert the connector of the Big Beam (B) into the intubation tube of Post (A1, A2, A3), then put the Big Canopy (J) on big top, do not fully spread.
-
Page 5: Hardware Pack
Hardware Pack 2 Φ6X180MM Floor Nail 8PCS Fig.7: Extend the Big Canopy (J) onto the big top by fixing the canopy at four corners of top. Fig.7-1: Attach the Hook (H) to Glass Panel (G2) with the Bolt (II). Fig.8: Insert the Glass Panel (G1,G2) into the Post (A1, A2, A3), then attached them tightly with the Bolt (I). -
Page 6: Instrucciones De Montaje
Instrucciones de montaje Cenador grill con iluminación LED L-GG001PST-F... - Page 7 IMPORTANTE: 1. Se recomienda que participen dos o más adultos en la instalación y el montaje del cenador. 2. No utilice el cenador durante una tormenta eléctrica, ya que existe una remota posibilidad de ser alcanzado por un rayo. 3. No se suba a la parte superior del cenador. Caerse del cenador puede causar daños graves e incluso provocar la muerte.
-
Page 8: Lista De Piezas
Lista de piezas Poste (1) Poste (2) Poste (3) Viga mayor Conector principal Viga menor Pantalla larga Pantalla corta Panel de vidirio 1 Panel de vidirio 1 Estante con gancho Tornillo I Tornillo II Toldo mayor Toldo menor Gancho Luz LED Baterías 7 #... - Page 9 Figura 1: Coloque la pantalla larga (E) y la pantalla corta (F) a los postes (A1, A2, A3) con el tornillo (I). Fig.2: Fije la viga mayor (B) al conector principal (C). A continuación, una el gancho (H) al conector (C). Fig.3: Inserte el conector de la viga principal (B) en el conducto de los postes (A1, A2, A3).
- Page 10 Paquete de herramientas Φ6X180MM Anclajes al 8 piezas suelo Fig.7: Despliegue el toldo mayor (J) en la parte superior mediante la fijación del toldo a las cuatro esquinas de la parte superior. Fig.7-1: Fije el gancho (H) al panel de vidrio 1 (G1) con el tornillo (II). Fig.8: Inserte el panel de vidrio (G1, G2) en los postes (A1, A2, A3) y luego fíjelos firmemente con el tornillo (I).
Need help?
Do you have a question about the L-GG001PST-F and is the answer not in the manual?
Questions and answers