Table of Contents
Advertisement
Quick Links
Advertisement
Table of Contents

Subscribe to Our Youtube Channel
Related Manuals for VTL S-400 II series


Summary of Contents for VTL S-400 II series
- Page 1 S-400 Series II Reference Stereo Amplifier O w n e r ’ s M a n u a l...
- Page 2 VTL. Version History: Version 1.0 August 26, 2014 Part Number: OM-S-400 Copyright © 2014 by VTL Amplifiers Inc. All rights reserved. 4774 Murrieta Street, Suite 10 Chino, CA 91710, USA Phone 909.627.5944 • Fax 909.627.6988 Email: mail@vtl.com •...
-
Page 3: Table Of Contents
TABLE OF CONTENT ..................................1 CHAPTER 1 ................................1 NTRODUCTION Symbol Conventions used in this guide............................4 Electrical Safety Notice ................................4 Water and Moisture ..................................4 Location and Ventilation ................................4 Servicing ....................................... 5 Operational Warnings .................................. 5 ..................................7 CHAPTER 2 ................................ - Page 4 ....................47 ARE AND AINTENANCE OF YOUR AMPLIFIER Break In Period ..................................47 Tube Life..................................... 47 Changing Tubes..................................48 Changing the Screen, Plate, Logic, B+ Input, Filament Fuses ....................51 Cleaning ..................................... 52 Troubleshooting..................................52 ..................................55 CHAPTER 5 ................................55 PECIFICATIONS ..................................
-
Page 5: Chapter 1
From all of us at VTL, we are proud to offer our S-400 Series II Reference power amplifier – the ultimate expression of everything we know about power amplifier design, designed to deliver the most advanced technology and thinking in power amplifier design today. - Page 6 • The Reference amplifier should deliver a new sonic standard worthy of its marque as a member of the VTL Reference family – it should provide unsurpassed sound quality into real-world loads, as well as excellent measurements on the test bench •...
- Page 7 Tube life is dramatically extended by optimized operating voltages and timed, low current inrush limiting, with low idle current draw on all stages. An ever-warm position further lowers idle current and keeps all voltages present to keep the circuit warm when not in use. Comprehensive fault sensing monitors internal and external conditions, protects the circuits, and alerts the user under any adverse conditions.
-
Page 8: Symbol Conventions Used In This Guide
Symbol Conventions used in this guide Certain symbols are used in this owner’s manual to draw your attention to important points being discussed. For your own safety and that of your equipment you should note and heed the warnings that follow these symbols. -
Page 9: Servicing
Please consult your authorized VTL dealer or the VTL factory customer support department if you have any questions on the fully balanced connection of the amplifier. - Page 10 Do not attempt to disassemble the amplifier chassis or remove any covers from the amplifier. Always consult with your VTL authorized dealer or the VTL factory support department before attempting any service work on any VTL unit. Do not touch the tubes after the amplifier is turned on. Tubes can get very hot while the amplifier is operating.
-
Page 11: Chapter 2
C H A P T E R Getting Started Before starting This amplifier is shipped with one stereo in each crate. Inside the crate the amplifier is wrapped in thick plastic. The plastic is not strong enough to support the unit, and may tear if you try to lift the unit out of the box with it. - Page 12 1 set of four spiked feet for each amp • This Owner’s Manual, Quick Reference Sheet, VTL Quality Assurance and test printout, and a VTL product warranty registration card (The following sets of instructions apply to both crates from this point on.)
- Page 13 Look through the top cover and check to see that the tubes appear properly seated in their sockets, and that no tubes are white on top. Contact your VTL dealer immediately if any physical damage is detected.
-
Page 14: Changing Top Cover Screws
Changing Top Cover Screws When the amplifier is first shipped from the factory, the top cover is installed with locking screws. These screws can be removed and replaced once the amplifier is setup in the listening area so that the top cover can be removed easily without any hand tools. -
Page 15: Quick Start
Locations of the Top Cover Screws on the back and side of the Amplifier Opening the protective cover can expose potentially lethal voltages. Be sure to remove the top cover screws when the amplifier is turned off, and do not allow any part of your body or hanging jewelry to touch the inside of the amplifier. - Page 16 Please consult your authorized VTL dealer or the VTL factory customer support department if you have any questions on the fully balanced connection of the amplifier.
- Page 17 If you are connecting to the power amplifier using single-ended interconnects, connect the preamplifier’s RCA/single- ended channel output to the amplifier’s single-ended input, making sure the left channel of the preamplifier is connected to the left amplifier, and so on. Step 4: Connect the amplifier to the AC outlet Before connecting to the AC, make sure that the Power rocker switch on the back of the amplifier is turned OFF.
- Page 18 Check that modes are the same on all channels, and that all channels are in phase (ie both showing the INVERT indication on the front panel, or both not showing the INVERT indication, depending upon the preamplifier used.) Congratulations! You have just completed the Quick Start section for your new amplifier’s operation.
-
Page 19: Chapter 3
C H A P T E R Operating the Amplifier Rear panel controls and connections There are two main panel areas on the back panel of the amplifier chassis: • The top rear panel is the Input/Output interface panel and also contains the DC rail fuses. •... - Page 20 Please consult your authorized VTL dealer or the VTL factory customer support department if you have any questions on the fully balanced connection of the amplifier.
-
Page 21: Rear Panel Functions
VTL equipment with balanced connectors observes the US standard of pin 2 positive. Please note that all VTL products are designed to work in 0 or positive phase when in Phase 0 mode, and the amplifier should be set to the Phase 0 mode when using a VTL preamplifier in the system. -
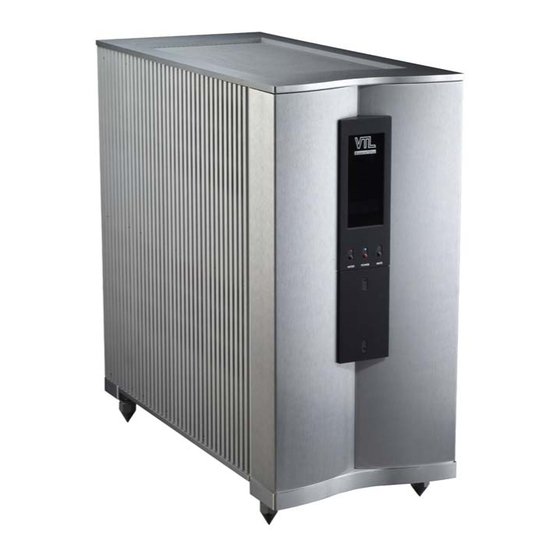
Page 22: Front Panel Controls And Indicators
(INVERTed). To switch to Phase 0 (Normal) and set the amplifier to phase correct from input to output, lift the Phase switch up. The front panel light is off when set to Phase 0 (Normal). Front panel controls and indicators Front Panel Controls There are three visible buttons on the front panel which can perform the most common control functions for the amplifier. -
Page 23: Ac Voltage Setting
Please contact your authorized VTL dealer or the VTL factory if the AC voltage is flashing on the front panel display. -
Page 24: Ac Power Source
30A line be installed for each power amplifier, with a minimum of 20A required for each amplifier. We recommend that you consult your authorized VTL dealer or a licensed electrician on the installation of a dedicated line and grounding requirements, as different local codes may apply to your location. See the Specifications in chapter 5 for the power consumption requirements of this amplifier. - Page 25 In this case please refer to the Fault Indications section in this chapter and contact your authorized VTL dealer or the factory for assistance.
- Page 26 7. If using the front panel POWER button, when the amplifier is in standby mode, (as indicated by the steady blue ---- on the display window) turn on the amplifier by pressing and releasing the red POWER button once. The blue POWER light starts blinking as the amplifier goes through its countdown and power up sequence.
-
Page 27: Ground Loop Hum
If a ground loop hum comes from the system after installation and power up the amplifier should immediately be turned off and the VTL dealer or the VTL factory should be contacted. Caution: Under no circumstances should any attempt be made to lift or defeat any grounds on any electrical equipment plugged into the AC, as these grounds are installed for safety. -
Page 28: Muting The Amplifier
NOTE: It can take up to 8 minutes to complete the mode change process, during which time the user may safely power the amplifier off if necessary. The mode that the amplifier will re-power up in will depend on how far into the changeover process it got before the power was shut off. RS-232 commands: >MODE TET for tetrode mode, and >MODE TRI for triode mode. - Page 29 deck next to the tube that caused the fault shutdown, to make diagnosis and tube replacement easy. The new tube is then automatically re-biased to the prescribed level on the next power up, requiring a minimum level of user knowledge about the operation of the amplifier. Looking down at the deck of the amplifier through the top cover, there is a green LED visible next to and behind each 6550/KT-88 output tube.
- Page 30 applied and tube LEDs are on steady. and the autobias is holding the bias settings steady. Amplifier is in idle mode and tube LEDs are The autobias is changing the tube bias settings to flickering on and off intermittently. the optimum setting. Music signal is applied and tube LEDs are all The autobias is out of circuit to allow the output off.
-
Page 31: Using The Df Switches
Using the DF switches The variable DF is an adjustable Damping Factor control that allows the user to adjust the output impedance of the amplifier. The two DF switches, one per channel, are located on the deck of the amplifier below the 12BH7 tubes. Please remove the top cover of the amplifier to access the switches. - Page 32 LOW DF setting 2. MED: Both switches are forward towards the front panel. This setting allows for better loudspeaker control and may be the most suitable for wide range of speaker types. MED DF Setting 3. HI: Both switches are towards the back of the amplifier. Best loudspeaker control, but may have some impact on sound quality.
-
Page 33: Remote Control And Communications
HI DF Setting Remote Control and Communications Using a 12V trigger to power the amplifier on or off This amplifier is equipped with a 12V (AC or DC) input that can be used to power the amplifier on or off, if the rear AC rocker switch is in the ON position. -
Page 34: Using The Amplifier With Rs232 Control
Once the remote interface is properly installed in your system, many of the remote functions can be accessed from a standard remote system. Currently the remote commands used by the matching TL7.5 preamplifier will access the following command functions: Power On/Off (rocker Power switch on the back of the amplifier must be up in the On position) Mute On/Off Tetrode/Triode mode switching Further remote commands are available with additonal programming, but since the IR port is only one... - Page 35 For muting the power up {ON|OFF} countdown >TUBEFLT For querying tube fault status, and [CLEAR] to clear a tube fault >VTL Returns factory contact info Contact VTL: Email: mail@vtl.com Tel. 909-627-5944 Fax. 909-627-6988 >VERSION Returns the version number of the main display software. >VIEWERR...
-
Page 36: Diagnostic And Programming Functions
In all cases all of these functions are accessible remotely, and your authorized VTL installer dealer can perform them for you, either locally in your system or remotely. - Page 37 RS-232: >COUNTDN ON (Function only available during power countdown sequence) Suppress normal Press the MUTE button while Top deck LEDs toggle between on Output tube LED holding down the TUBE BIAS and off. activity button to turn the LEDs off. Note: Only normal bias activity is Function turns off RS-232: >BIASLEDS OFF...
-
Page 38: Basic Diagnostic Functions
Basic Diagnostic functions The following basic diagnostic functions are for checking some operating parameters of the amplifier, if desired. These parameters do not need to be checked for the proper operation of the amplifier, as the amplifier continuously self-monitors and shuts down automatically in the event of any fault condition. Diagnostic Function Procedure Indication... - Page 39 RS-232 command: >TUBETIME CLEAR Display AC Voltage In Standby mode, pressing the and AC Setting AC Voltage button displays the AC voltage setting of the Indicates both the AC amplifier (as preset by the voltage setting of the factory) in the Display Window. amplifier as well as the AC line voltage input to RS-232 command: >ACINPUT...
- Page 40 powered on again. Under normal operation the heat sink should not reach 50 degrees C unless there is inadequate ventilation or very high power requirements for extended time periods. (See Fault Indications later in this chapter.) S-400 Amplifier Owner’s Manual...
-
Page 41: Advanced Functions And Diagnostics
Advanced Functions and Diagnostics These functions are for checking the condition of the output tubes, to determine life left. These critical functions are necessary for the continued optimum performance of this amplifier, and if the user is not comfortable operating them then the installer dealer or technician can perform these functions either locally or remotely. - Page 42 Note that there are two sizes of needed. Contact your are not part of the amplifier’s fuses in the amplifier. Remove authorized VTL dealer or protection circuitry, but are just the fuse to be tested from its the VTL factory for...
-
Page 43: Fault Indications
Please send the contents of display a list of the RS-232 >VIEWERR command to your commands. VTL dealer so that he/she can help you diagnose the cause of Then enter the >VIEWERR the fault. Please copy and paste command into the the contents of the >VIEWERR... -
Page 44: Inverted Phase
conditions, and the amplifier may change its status in response to the new condition. In other cases the fault will need to be attended to by the user or the dealer’s technician. In all cases the fault will be detected and the amplifier self-protected before any damage can occur. -
Page 45: Tube Red Fault
Green TUBE indicators, unit in operate mode Check the output tube LED indicator on the amplifier deck to locate the tube that has the non-critical fault and follow the procedure described in Chapter 4 to replace that output tube. TUBE red Fault Where an output tube draws excessive current and cannot be controlled by the autobias system the amplifier needs to be shut down and the faulty tube indicated on the front panel. -
Page 46: Heat Fault
Remove the front panel Diagnostic cover and locate the buttons labeled TUBE LIFE and TEMP/RESET by looking at the flashing LEDs that show the buttons to be pressed to clear the fault. Hold down both buttons at the same time for 15 seconds until the front panel fault indicators turn off. Located on the top rear panel of the amplifier are two rail fuses that act as a failsafe and will open if for some reason the fault sensing system does not catch the faulty tube before it draws excessive current. -
Page 47: Power Faults
After the internal temperature of the amplifier goes back to the acceptable range (below 50 degrees C) the Heat LED turns off automatically, and the front panel displays the standby mode indication, a steady ----, indicating that the unit can be re-powered. POWER faults There are three different power faults: External Power supply faults (AC power), internal power supply faults not requiring service and internal power supply faults requiring service. -
Page 48: Tube Service Reminder
2. Over Voltage fault: An over voltage fault indicates a permanent fault condition for which the amplifier has to be shut down to protect itself. In this condition the front panel red POWER light is flashing and the display indicates a flashing ----, indicating that the amplifier cannot be re-powered, and must be referred to a technician for service before re-power is allowed. -
Page 49: Powering The Amplifier Off
Powering the amplifier off You may keep your VTL amplifier in the Standby mode and your source components on permanently if you prefer to keep the source components warm. If you prefer to keep all your equipment off when not in use, then it is best to follow the correct turn off sequence to avoid power off thumps through the system. - Page 50 If using a central remote control system connected to the RS-232 port then issue the Power off command. The unit immediately begins power down and displays ---- and discharges high voltage power supplies. Last used modes are saved for next power up RS-232 command: >POWER OFF To avoid unplanned power ups turn the rear panel power rocker switch to OFF position if you don’t plan to use the amplifier for an extended period of time.
-
Page 51: Chapter 4
Tube Life Your VTL amplifier has been designed to ensure long tube life. Total tube life lasts on the average about 3000 hours (3 to 5 years under normal use.) Your amplifier is designed with a logic controlled automatic tube biasing and fault sensing system and two manual diagnostic mechanisms, i.e. -
Page 52: Changing Tubes
Read the following procedures before changing tubes in your amplifier. If you do not feel comfortable doing the procedure yourself, please contact your authorized VTL dealer or the VTL factory service department and request the service to be performed by a trained technician. - Page 53 For the dealer’s service technician only Opening the protective cover: Re-tubing your VTL amplifier requires removal of the covers, which can expose potentially lethal voltages. Be sure to only touch the tubes themselves, and do not allow any part of your body or hanging jewelry to touch the inside of the amplifier.
- Page 54 If the socket appears loose and not making contact with any or all of the tube pins, contact VTL for help. For the larger Power tubes, there is a locating pin in the middle of the tube (8 pin octal tubes).
-
Page 55: Changing The Screen, Plate, Logic, B+ Input, Filament Fuses
If the socket appears loose and not making contact with any or all of the tube pins, please contact VTL for help. 7. Replacing the protective cover: the top cover slowly back onto the top of the... -
Page 56: Cleaning
Consult your dealer or the VTL factory and inform them of the fuse problem. Cleaning Your VTL amplifier can be dusted occasionally with a damp non-abrasive cloth. You should not use any solvents for cleaning the front panel, as this can damage the lettering and the finish. Troubleshooting 1. - Page 57 Check the fuses in the rear panel Fuse tester, and replace the blown one and try to re-power. If the problem persists then contact your authorized VTL dealer or the factory.
- Page 58 be rectified internally and requires repair by a service technician. After repair the technician will also reset the processor so that the unit can be powered up again. S-400 Amplifier Owner’s Manual...
-
Page 59: Chapter 5
C H A P T E R Specifications Vacuum Tube Complement 12 x 6550 or KT-88, 2 x 12AT7, 2 x 12BH7 Output Power Tetrode 300W, Triode 150W 20 Hz – 20kHz, into 5 ohm load T.H.D. 20 Hz – 20 kHz @ 300W Tetrode <... - Page 60 Crate Dimensions: 33 x 28 x 42 inches S-400 Amplifier Owner’s Manual...
-
Page 61: Warranty
This warranty is provided by the dealer where the unit was purchased, and by VTL Amplifiers Inc. Under the terms of the warranty defective parts will be repaired or replaced without charge, excepting the cost of tubes. A six-month warranty on tubes is available with the correct recording of the serial number of the amplifier on your warranty registration card and mailing it with your purchase receipt to VTL. -
Page 62: Appendix
A P P E N D I X Appendix I: Quick Reference - Summary of indicators Indicators and displays: Off: No display Standby, not ready for power up: Slow flashing ----, relevant red LEDbar and relevant diagnostic LED lit (see Fault section) Standby, ready for power up: Steady ---- with no other lights lit Triode mode: Red MODE light... - Page 63 Reset stored bias values (during standby mode only) with retube by holding down BIAS and RESET buttons for 15 seconds until clear response (--) from display. • Temperature display (Operate mode only): Press TEMP/RESET button to show temperature for 2 seconds.
-
Page 64: Appendix Ii: Individual Tube Hour Log
Appendix II: Individual tube hour log This sheet may be used for logging individual tube hours if the user should require to. Note the position number and total time on first installation of the tube. To find the amount of time that tube has been in the amplifier for then subtract that number from the current total time. -
Page 65: Warranty Registration
VTL dealer regarding product registration and warranty procedures. To obtain valid US warranty service, please fill out the enclosed VTL Warranty Registration card and mail it to the following address with a copy of your original bill of sale within the first thirty days of purchase:...
Need help?
Do you have a question about the S-400 II series and is the answer not in the manual?
Questions and answers