
Related Manuals for TESTO 176


Summary of Contents for TESTO 176
- Page 1 176 · Datenlogger Bedienungsanleitung testo 176 · Data loggers Instruction manual testo 176 · Enregistreur de données Mode d'emploi...
- Page 2 Deutsch ....................... 3 English ......................31 Français ......................59...
-
Page 3: Table Of Contents
1 Inhalt Pos: 1 /TD/Überschriften/1. Inhalt @ 0\mod_1177587817070_6.doc @ 1241 @ 1 @ 1 Inhalt Inhalt ......................3 Sicherheit und Umwelt ................4 2.1. Zu diesem Dokument ..............4 2.2. Sicherheit gewährleisten ..............5 2.3. Umwelt schützen ................5 Leistungsbeschreibung ................6 3.1. -
Page 4: Sicherheit Und Umwelt
2 Sicherheit und Umwelt Pos: 2 /TD/Überschriften/2. Sicherheit und Umwelt @ 0\mod_1173774719351_6.doc @ 290 @ 1 @ 1 Sicherheit und Umwelt Pos: 3 /TD/Überschriften/2.1 Zu diesem Dokument @ 0\mod_1173775252351_6.doc @ 344 @ 2 @ 1 2.1. Zu diesem Dokument Pos: 4 /TD/Sicherheit und Umwelt/Zu diesem Dokument/Verwendung/Verwendung (Standard) @ 0\mod_1173775068554_6.doc @ 335 @ 5 @ 1 Verwendung >... -
Page 5: Sicherheit Gewährleisten
Daten vorgegebenen Parameter. Wenden Sie keine Gewalt an. Pos: 8 /TD/Sicherheit und Umwelt/Sicherheit gewährleisten/testo 174-175/spannungsführende Teile 175-176 @ 7\mod_1282811328700_6.doc @ 71292 @ @ 1 > Messen Sie mit dem Gerät niemals an oder in der Nähe von spannungsführenden Teilen! -
Page 6: Leistungsbeschreibung
Pos: 16 /TD/Überschriften/3.1 Verwendung @ 0\mod_1176211016437_6.doc @ 693 @ 2 @ 1 3.1. Verwendung Pos: 17 /TD/Leistungsbeschreibung/Verwendung/testo 176 @ 6\mod_1278332087294_6.doc @ 63254 @ 5 @ 1 Die Datenlogger testo 176 dienen zum Speichern und Auslesen von Einzelmesswerten und Messreihen. Messwerte werden mit testo 176 gemessen, gespeichert und über das USB-Kabel oder die SD-Karte an den PC übertragen, wo sie... -
Page 7: Technische Daten
3 Leistungsbeschreibung Pos: 18 /TD/Überschriften/3.2 Technische Daten @ 0\mod_1176211088437_6.doc @ 702 @ 2 @ 1 3.2. Technische Daten Pos: 19 /TD/Leistungsbeschreibung/Technische Daten/testo 176 T1 @ 6\mod_1278341497598_6.doc @ 63328 @ 5 @ 1 testo 176 T1 (0572 1761) Eigenschaft Werte Messgröße Temperatur (°C/°F) - Page 8 Internetseite www.testo.com/warranty Normen 2014/30/EU, EN 12830 Pos: 21 /TD/Leistungsbeschreibung/Technische Daten/testo 176 T3 @ 6\mod_1278341475870_6.docx @ 63286 @ 5 @ 1 Bitte beachten Sie, dass bei diesem Gerät nach EN 12830 eine regelmäßige Überprüfung und Kalibrierung gemäß EN 13486 (Empfehlung: jährlich)
- Page 9 1s – 24h (frei wählbar, für Online-Messung 2s – 24h) Schnittstelle Mini-USB, SD-Kartenschacht Speicherkapazität 2 Millionen Messwerte Garantie 24 Monate, Garantiebedingungen: siehe Internetseite www.testo.com/warranty EG-Richtlinie 2014/30/EU Pos: 22 /TD/Leistungsbeschreibung/Technische Daten/testo 176 T4 @ 6\mod_1278341547926_6.docx @ 63392 @ 5 @ 1...
- Page 10 1s – 24h (frei wählbar, für Online-Messung 2s – 24h) Schnittstelle Mini-USB, SD-Kartenschacht Speicherkapazität 2 Millionen Messwerte Garantie 24 Monate, Garantiebedingungen: siehe Internetseite www.testo.com/warranty EG-Richtlinie 2014/30/EU Pos: 23 /TD/Leistungsbeschreibung/Technische Daten/testo 176 H1 @ 6\mod_1278341570278_6.docx @ 63424 @ 5 @ 1...
- Page 11 1s – 24h (frei wählbar, für Online-Messung 2s – 24h) Schnittstelle Mini-USB, SD-Kartenschacht Speicherkapazität 2 Millionen Messwerte Garantie 24 Monate, Garantiebedingungen: siehe Internetseite www.testo.com/warranty EG-Richtlinie 2014/30/EU Pos: 24 /TD/Leistungsbeschreibung/Technische Daten/testo 176 H2 @ 6\mod_1278341606049_6.docx @ 63456 @ 5 @ 1...
- Page 12 1s – 24h (frei wählbar, für Online-Messung 2s – 24h) Schnittstelle Mini-USB, SD-Kartenschacht Speicherkapazität 2 Millionen Messwerte Garantie 24 Monate, Garantiebedingungen: siehe Internetseite www.testo.com/warranty EG-Richtlinie 2014/30/EU Pos: 25 /TD/Leistungsbeschreibung/Technische Daten/testo 176 P1 @ 6\mod_1278341642475_6.docx @ 63488 @ 5 @ 1...
- Page 13 3 Leistungsbeschreibung testo 176 P1 (0572 1767) Eigenschaft Werte Messgröße Temperatur (°C/°F), Feuchte (%rF, %RH, °Ctd ), barometrischer Druck (mbar, hPa, psi, inH2O) 2 NTC-Temperatursensoren extern oder Fühlertyp 2 kapazitive Feuchtesensoren extern 1 Absolutdrucksensor intern Messbereich 600 mbar bis 1100 mbar -20 bis +70 °C...
- Page 14 3 Leistungsbeschreibung Pos: 26 /TD/Leistungsbeschreibung/Technische Daten/Hinweis Batteriestandzeit @ 6\mod_1274958762415_6.doc @ 62010 @ 5 @ 1 Batteriestandzeit In den Programmierfenstern der Software erhalten Sie typische Richtwerte zur voraussichtlichen Lebensdauer der Batterie. Diese wird auf Basis folgender Faktoren errechnet: • Messtakt • Anzahl angeschlossener Fühler Da die Batteriestandzeit noch von vielen weiteren Faktoren abhängig ist, sind die berechneten Daten nur Richtwerte.
-
Page 15: Erste Schritte
Der Datenlogger wird mit eingelegter Batterie (Typ TL-5903) ausgeliefert. Auf dem Display des Datenloggers wird angezeigt. Pos: 30 /TD/Erste Schritte/testo 175_176/Datenlogger an PC anschließen Hardware @ 6\mod_1275476329286_6.doc @ 62372 @ 2 @ 1 4.2. Datenlogger an PC anschließen Für testo Comfort Software Basic 5: Die Software ist als kostenloser registrierungspflichtiger Download im Internet erhältlich: www.testo.com/download-center. - Page 16 3. Schraube an der rechten Seite des Datenloggers lösen. 4. Deckel öffnen. 5. USB-Kabel in den Mini-USB-Anschluss (1) schieben. 6. Datenlogger konfigurieren, siehe separate Bedienungsanleitung testo Comfort Software. Pos: 31 /TD/Produktbeschreibung/Übersicht/testo 176/Anzeige- und Bedienelemente, Display @ 6\mod_1278341804354_6.doc @ 63521 @ 1252 @ 1...
-
Page 17: Anzeige- Und Bedienelemente
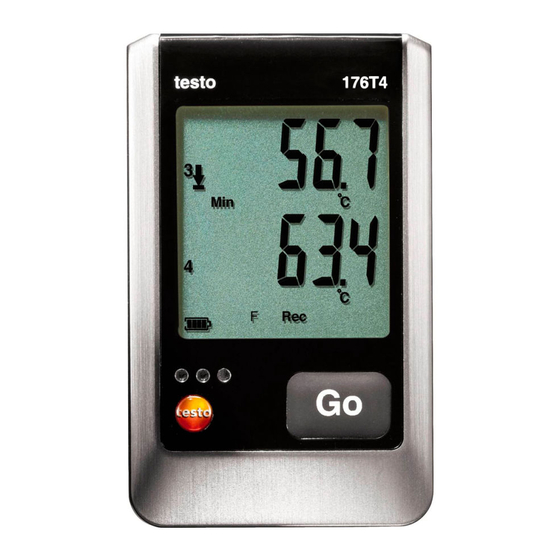
0 °C (ca. 2 Sekunden bei -10 °C, ca. 6 Sekunden bei -20 °C). Dies hat auf die Messgenauigkeit keinen Einfluss. testo 176 T2, testo 176 T4, testo 176 H1, testo 176 P1 1 Messwert Kanal 1, 2, 3 (je nach Anzahl Kanäle und Ansicht) 2 Einheiten Kanal 1, 2, 3 (je nach Anzahl Kanäle und Ansicht) - Page 18 5 Anzeige- und Bedienelemente 6 Aktueller Zwischenmesswert, wird im Display angezeigt, aber nicht gespeichert (Act) 7 Messprogramm ist beendet (End), Messprogramm läuft (Rec) 8 Warten auf Start des Messprogramms (Wait), Startkriterium Formel programmiert (F) 9. Startkriterium Datum/ Uhrzeit programmiert 10 Batteriekapazität Symbol Kapazität >151 Tage...
-
Page 19: Led
Tastendruck Grüne LED blinkt Gerät befindet sich im Wait-Modus. dreimal bei Tastendruck Rote, gelbe und Batterie wurde eingelegt, Kondensator grüne LED blinken befindet sich im Ladezustand. nacheinander Pos: 32 /TD/Produktbeschreibung/Übersicht/testo 176/Tastenfunktionen @ 8\mod_1297252482510_6.doc @ 76898 @ 255 @ 1... -
Page 20: Tastenfunktionen
5 Anzeige- und Bedienelemente 5.3. Tastenfunktionen Eine detaillierte Darstellung der Displayanzeigen finden Sie unter Menüübersicht, Seite 22. ✓ Gerät befindet sich im Betriebszustand Wait und Startkriterium Tastenstart ist programmiert. > [GO] ca. 3 Sekunden lang drücken, um das Messprogramm zu starten. -
Page 21: Produkt Verwenden
6 Produkt verwenden Pos: 33 /TD/Überschriften/6. Produkt verwenden @ 0\mod_1173774928554_6.doc @ 326 @ 1 @ 1 Produkt verwenden Pos: 34 /TD/Erste Schritte/testo 175_176/Fühler anschließen 176 @ 8\mod_1297247379135_6.doc @ 76865 @ @ 1 6.1. Fühler anschließen Beachten Sie beim Anschluss von Fühlern an den Datenlogger und an die Messstellen die folgenden Punkte: >... -
Page 22: Menüübersicht
Menüübersicht In der Menüübersicht sind beispielhaft die Displayansichten des Datenloggers testo 176 T2 dargestellt. Die Datenlogger testo 176 T1, testo 176 T3, testo 176 H2 haben kein Display. Das Display muss eingeschaltet sein, damit die entsprechenden Anzeigen im Display dargestellt werden. - Page 23 6 Produkt verwenden Wait-Modus (Wait): Startkriterium ist programmiert, aber noch nicht erfüllt ① Letzter ② Oberer Alarmwert Messwert Startkriterium Startkriterium Startkriterium Formel Tastenstart / PC- Datum/Uhrzeit Start ③ Unterer Alarmwert ④ Batteriekapazität in Tagen (siehe Abbildung ① Wait-Modus) Letzter Messwert Messwert wird nicht gespeichert...
- Page 24 6 Produkt verwenden Rec-Modus (Rec): Startkriterium wurde erfüllt, Datenlogger speichert Messwerte ab End-Modus (End): Messprogramm beendet (Stoppkriterium erreicht – bis Speicher voll oder Anzahl Werte) je nach Programmierung ① Letzter Messwert ② Höchster Messwert ③ Niedrigster Messwert ④ Oberer Alarmwert ⑤...
-
Page 25: Wandhalterung Montieren
1. Datenlogger in die Wandhalterung schieben (1). 2. Sicherungsstift (2) durch die Löcher der Wandhalterung schieben. 3. Schloss (3) am Sicherungsstift befestigen. 4. Schlüssel abziehen (4). Pos: 39 /TD/Produkt verwenden/testo 176/Daten auslesen @ 6\mod_1278341937514_6.doc @ 63554 @ 255 @ 1... -
Page 26: Daten Auslesen
2. Schraube an der rechten Seite des Datenloggers lösen. 3. Deckel öffnen. 4. USB-Kabel in den Mini-USB-Anschluss (1) schieben. 5. Datenlogger auslesen und ausgelesene Daten weiterbearbeiten, siehe separate Bedienungsanleitung testo Comfort Software. Über SD-Karte Soll ein Datenlogger im Rec-Modus ausgelesen werden, kann der Datenlogger während des Auslesevorgangs... -
Page 27: Produkt Instand Halten
Bedienungsanleitung testo Comfort Software. Pos: 40 /TD/Überschriften/7. Produkt instand halten @ 0\mod_1173789831362_6.doc @ 395 @ 1 @ 1 Produkt instand halten Pos: 41 /TD/Produkt instand halten/testo 175_176/Batterie wechseln 176 @ 7\mod_1290084989939_6.doc @ 73248 @ 2 @ 1 7.1. Batterie wechseln Durch den Batteriewechsel wird das laufende Mess- programm gestoppt. -
Page 28: Gerät Reinigen
11. Datenlogger neu konfigurieren bzw. die alte gespeicherte Konfiguration aufspielen, siehe separate Bedienungsanleitung testo Comfort Software. Der Datenlogger ist wieder einsatzbereit. Pos: 42 /TD/Produkt instand halten/testo 174-neu/Gerät reinigen @ 5\mod_1267614722447_6.doc @ 59662 @ 2 @ 1 7.2. Gerät reinigen ACHTUNG Beschädigung des Sensors! -
Page 29: Tipps Und Hilfe
Tipps und Hilfe Pos: 44 /TD/Überschriften/8.1 Fragen und Antworten @ 0\mod_1177402017078_6.doc @ 1091 @ 2 @ 1 8.1. Fragen und Antworten Pos: 45 /TD/Tipps und Hilfe/Fragen und Antworten/testo 176 @ 6\mod_1275474843210_6.doc @ 62243 @ @ 1 Frage Mögliche Ursachen / Lösung FULL erscheint auf dem SD-Karte hat nicht genügend freien... -
Page 30: Zubehör Und Ersatzteile
Pos: 46 /TD/Überschriften/8.2 Zubehör und Ersatzteile @ 0\mod_1177402058734_6.doc @ 1100 @ 2 @ 1 8.2. Zubehör und Ersatzteile Pos: 47 /TD/Tipps und Hilfe/Zubehör und Ersatzteile/testo 176 @ 6\mod_1275474784091_6.doc @ 62179 @ @ 1 Beschreibung Artikel-Nr. Wandhalterung (schwarz) mit Schloss... -
Page 31: Contents
1 Contents Contents Contents ....................31 Safety and the environment ..............32 2.1. About this document ..............32 2.2. Ensure safety ................. 33 2.3. Protecting the environment ............33 Specifications ..................34 3.1. Use ....................34 3.2. Technical data ................35 First steps .................... -
Page 32: Safety And The Environment
2 Safety and the environment Safety and the environment 2.1. About this document > Please read this documentation through carefully and familiarize yourself with the product before putting it to use. Pay particular attention to the safety instructions and warning advice in order to prevent injuries and damage to the products. -
Page 33: Ensure Safety
> testo 176 T3 testo 176 T4: The maximum permissible difference in potential between the sensor inputs is 50 V. Take this into account when using surface sensors with non-isolated thermocouple. -
Page 34: Specifications
With its external sensor connections (thermocouples type T, type K and type J) and its robust metal housing the testo 176 T3 is able to perform parallel temperature measurements on up to four measuring locations under extreme conditions. -
Page 35: Technical Data
Standards 2014/30/EC, EN 12830 Pos: 20 /TD/Leistungsbeschreibung/Technische Daten/testo 176 T2 @ 6\mod_1278341523355_79.docx @ 63361 @ 5 @ 1 Please note that, according to EN 12830, this instrument must be regularly checked and calibrated as specified in EN 13486 (recommendation: every year) - Page 36 Standards 2014/30/EC, EN 12830 Pos: 21 /TD/Leistungsbeschreibung/Technische Daten/testo 176 T3 @ 6\mod_1278341475870_79.docx @ 63287 @ 5 @ 1 Please note that, according to EN 12830, this instrument must be regularly checked and calibrated as specified in EN 13486 (recommendation: every year)
- Page 37 2s – 24h)) Interface Mini-USB, SD card slot Memory capacity 2 million readings Warranty 24 months, terms of warranty: see website www.testo.com/warranty EC Directive 2014/30/EC Pos: 22 /TD/Leistungsbeschreibung/Technische Daten/testo 176 T4 @ 6\mod_1278341547926_79.docx @ 63393 @ 5 @ 1...
- Page 38 2s – 24h)) Interface Mini-USB, SD card slot Memory capacity 2 million readings Warranty 24 months, terms of warranty: see website www.testo.com/warranty EC Directive 2014/30/EC Pos: 23 /TD/Leistungsbeschreibung/Technische Daten/testo 176 H1 @ 6\mod_1278341570278_79.docx @ 63425 @ 5 @ 1...
- Page 39 3 Specifications testo 176 H1 (0572 1765) Feature Values Measurement Temperature (°C/°F) and humidity (%rF, parameter %RH, °Ctd, g/m³, WB) Sensor type 2 NTC temperature sensors external or 2 capacitive humidity sensors external Measurement range 0 to 100 %rF (non-dewing) -20 to +70 °C...
- Page 40 3 Specifications Pos: 24 /TD/Leistungsbeschreibung/Technische Daten/testo 176 H2 @ 6\mod_1278341606049_79.docx @ 63457 @ 5 @ 1 testo 176 H2 (0572 1766) Feature Values Measurement Temperature (°C/°F) and humidity (%rF, parameter %RH, °Ctd, g/m³, WB) Sensor type 2 capacitive humidity sensors external Measurement range 0 to 100 %rF (non-dewing) -20 to +70°C...
- Page 41 3 Specifications Pos: 25 /TD/Leistungsbeschreibung/Technische Daten/testo 176 P1 @ 6\mod_1278341642475_79.docx @ 63489 @ 5 @ 1 testo 176 P1 (0572 1767) Feature Values Measurement Temperature (°C/°F), humidity (%rF, %RH, parameter °Ctd, g/m³), barometric pressure (mbar, hPa, psi, inH2O) Sensor type...
- Page 42 3 Specifications Feature Values Warranty 24 months, terms of warranty: see website www.testo.com/warranty EC Directive 2014/30/EC Battery life The programming windows of the software provide you with typical guide values for the expected lifetime of the battery. This lifetime is calculated on the basis of the following factors: •...
-
Page 43: First Steps
The software is available in the Internet as a free download requiring registration: www.testo.com/download-center. The instructions for the installation and operation of the software can be found in the testo Comfort Software Basic 5 instruction manual, which can be downloaded together with the software. -
Page 44: Display And Control Elements
Comfort Software. Display and control elements 5.1. Display The data loggers testo 176 T1, testo 176 T3, testo 176 H2 have no display. The display function can be switched on/off via the testo Comfort Software. Depending on the operating status, various information may be shown in the display. - Page 45 5 Display and control elements testo 176 T2, testo 176 T4, testo 176 H1, testo 176 P1 1 Measurement value channel 1, 2, 3 (depending on number of channels and view) 2 Units channel 1, 2, 3 (depending on number of channels and...
- Page 46 5 Display and control elements 10 Battery capacity Icon Capacity > 151 days < 150 days < 90 days < 60 days < 30 days > Read out data and change battery (see Replacing the battery, page 55). 11 Lower alarm value displayed channel (2, 3, 4): •...
-
Page 47: Led
5 Display and control elements 5.2. Representation Explanation Red LED flashes once Remaining battery capacity has dropped every 10 seconds below 30 days Red LED flashes twice Remaining battery capacity has dropped every 10 seconds below 10 days Red LED flashes three Battery is empty: times every 10 seconds Red LED flashes three... -
Page 48: Key Functions
5 Display and control elements 5.3. Key functions A detailed representation of the screen displays can be found under Menu overview, page 50. ✓ Instrument in operating status Wait and start criterion Button start programmed. > Press [GO] for approx. 3 seconds to start the measurement program. -
Page 49: Using The Product
> Ensure correct positioning of the sensor to avoid disturbing influences affecting the measurement. > testo 176 T2, testo 176 T3, testo 176 T4, testo 176 H1, testo 176 H2, testo 176 P1: Make sure that you connect the configured (with the testo Comfort Software) sensors to the individual connections. -
Page 50: Menu Overview
The menu overview shows exemplary display representations of the data logger testo 176 T2. The data loggers testo 176 T1, testo 176 T3, testo 176 H2 have no display. The display must be switched on to be able to show the corresponding indications. - Page 51 6 Using the product Wait-Mode (Wait): Start criterion is programmed, but not yet fulfilled. ① Last ② Upper alarm value reading Start criterion Start criterion key Start criterion Formula start / PC start Date/Time ③ Lower alarm value ④ Battery capacity in days (see Fig.
- Page 52 6 Using the product Rec-Mode (Rec): Start criterion was fulfilled, data logger saves readings End-Mode (End): Measurement program finished (stop criterion reached – memory full or number of readings) depending on programming ① Last reading ② Highest reading ③ Lowest reading ④...
-
Page 53: Mounting The Wall Bracket
6 Using the product 6.4. Mounting the wall bracket The scope of delivery does not include mounting materials (e.g. screws, wall plugs). ✓ The data logger has been removed from the wall bracket. 1. Position the wall bracket at the desired place. 2. - Page 54 4. Plug the USB cable into the Mini USB port (1). 5. Reading out data logger and processing of read out data, see separate operating instructions testo Comfort Software. Via SD card If a data logger is to be read out in Rec-mode, the data...
-
Page 55: Maintaining The Product
7 Maintaining the product Maintaining the product 7.1. Replacing the battery The battery change stops the currently running measuring program. However, stored measurement data are preserved. 1. Read out stored measurement data, see Reading out data, page 53. ✓ If it is no longer possible to read out the saved measurement data because the battery capacity is too low: >... -
Page 56: Cleaning The Instrument
9. Connect the data logger to the PC with a USB cable. 10. Start testo Comfort Software and set up a connection to the data logger. 11. Reconfigure the data logger or load the old, saved configuration, see separate operating instructions testo Comfort Software. -
Page 57: Tips And Assistance
> Contact your dealer or the Testo Customer Service. If you have any questions please contact your local dealer or the Testo Customer Service. You find contact data on the back of this document or in the Internet under www.testo.com/service-contact. -
Page 58: Accessories And Spare Parts
0554 1703 Mini USB cable to connect the data logger 0449 0047 testo 176 to the PC SD card to read out the data ligger 176 0554 8803 Battery TL-5903 AA-battery 0515 1760 CD testo Comfort Software Basic 5 (if free-of-... -
Page 59: Sommaire
1 Sommaire Sommaire Sommaire ....................59 Sécurité et environnement ..............60 2.1. Concernant ce document .............. 60 2.2. Assurer la sécurité ................. 61 2.3. Protéger l'environnement ............... 61 Description ..................... 62 3.1. Utilisation ..................62 3.2. Caractéristiques techniques ............63 Prise en main .................. -
Page 60: Sécurité Et Environnement
2 Sécurité et environnement Pos: 2 /TD/Überschriften/2. Sicherheit und Umwelt @ 0\mod_1173774719351_201.doc @ 293 @ 1 @ 1 Sécurité et environnement Pos: 3 /TD/Überschriften/2.1 Zu diesem Dokument @ 0\mod_1173775252351_201.doc @ 347 @ 2 @ 1 2.1. Concernant ce document Pos: 4 /TD/Sicherheit und Umwelt/Zu diesem Dokument/Verwendung/Verwendung (Standard) @ 0\mod_1173775068554_201.doc @ 338 @ 5 @ 1 Utilisation >... -
Page 61: Assurer La Sécurité
Ne faites pas usage de la force. Pos: 8 /TD/Sicherheit und Umwelt/Sicherheit gewährleisten/testo 174-175/spannungsführende Teile 175-176 @ 7\mod_1282811328700_201.doc @ 71294 @ @ 1 > Ne jamais mesurer avec cet appareil sur ou à proximité de pièces sous tension ! -
Page 62: Description
Grâce aux raccords externes pour capteurs (thermocouples de type T, K et J) et à son boîtier métallique robuste, le testo 176 T3 permet de procéder en parallèle à des mesures sur jusqu'à quatre points de mesure, dans des conditions extrêmes. -
Page 63: Caractéristiques Techniques
3 Description Pos: 18 /TD/Überschriften/3.2 Technische Daten @ 0\mod_1176211088437_201.doc @ 705 @ 2 @ 1 3.2. Caractéristiques techniques Pos: 19 /TD/Leistungsbeschreibung/Technische Daten/testo 176 T1 @ 6\mod_1278341497598_201.doc @ 63330 @ 5 @ 1 testo 176 T1 (0572 1761) Propriété Valeurs Grandeur Température (°C / °F) - Page 64 Normes 2014/30/UE, EN 12830 Pos: 21 /TD/Leistungsbeschreibung/Technische Daten/testo 176 T3 @ 6\mod_1278341475870_201.docx @ 63288 @ 5 @ 1 Veuillez prendre note que, conformément à EN 12830, un contrôle et un étalonnage réguliers de cet appareil selon EN 13486 (recommandation une fois...
- Page 65 Mini USB, fente pour carte SD Capacité mémoire 2 millions de valeurs Garantie 24 mois, conditions de garantie : cf. site Internet www.testo.com/warranty Directive CE 2014/30/UE Pos: 22 /TD/Leistungsbeschreibung/Technische Daten/testo 176 T4 @ 6\mod_1278341547926_201.docx @ 63394 @ 5 @ 1...
- Page 66 Mini USB, fente pour carte SD Capacité mémoire 2 millions de valeurs Garantie 24 mois, conditions de garantie : cf. site Internet www.testo.com/warranty Directive CE 2014/30/UE Pos: 23 /TD/Leistungsbeschreibung/Technische Daten/testo 176 H1 @ 6\mod_1278341570278_201.docx @ 63426 @ 5 @ 1...
- Page 67 3 Description testo 176 H1 (0572 1765) Propriété Valeurs Grandeur Température (°C/°F) et humidité (%Hr, %RH, °Ctd g/m³, WB) Type de capteur 2 sondes de température NTC externes ou 2 capteurs d'humidité capacitifs externes Plage de mesure 0 à 100 %Hr (sans rosée) -20 à...
- Page 68 3 Description Pos: 24 /TD/Leistungsbeschreibung/Technische Daten/testo 176 H2 @ 6\mod_1278341606049_201.docx @ 63458 @ 5 @ 1 testo 176 H2 (0572 1766) Propriété Valeurs Température (°C/°F) et humidité (%Hr, %RH, Grandeur °Ctd g/m³, WB) Type de capteur 2 capteurs d'humidité capacitifs externes Plage de mesure 0 à...
- Page 69 3 Description Pos: 25 /TD/Leistungsbeschreibung/Technische Daten/testo 176 P1 @ 6\mod_1278341642475_201.docx @ 63490 @ 5 @ 1 testo 176 P1 (0572 1767) Propriété Valeurs Grandeur Température (°C/°F), humidité (%Hr, %RH, °Ctd, g/m³), pression atmosphérique (mbar, hPa, psi, en H2O) Type de capteur 2 sondes de température NTC externes ou...
- Page 70 3 Description Propriété Valeurs Garantie 24 mois, conditions de garantie : cf. site Internet www.testo.com/warranty Directive CE 2014/30/UE Pos: 26 /TD/Leistungsbeschreibung/Technische Daten/Hinweis Batteriestandzeit @ 6\mod_1274958762415_201.doc @ 62013 @ 5 @ 1 Durée de vie des piles Dans les fenêtres de programmation du logiciel, vous recevez des valeurs indicatives typiques concernant la longévité...
-
Page 71: Prise En Main
(type TL-5903). s'affiche à l'écran de l'enregistreur de données. Pos: 30 /TD/Erste Schritte/testo 175_176/Datenlogger an PC anschließen Hardware @ 6\mod_1275476329286_201.doc @ 62374 @ 2 @ 1 4.2. Raccorder l'enregistreur de données au PC Pour testo Comfort Software Basic 5 : Le logiciel est disponible gratuitement sur le site : www.testo.com/download-center. - Page 72 4. Ouvrir le couvercle. 5. Insérer le câble USB dans le port mini USB (1). 6. Configurer l'enregistreur de données, voir mode d'emploi spécifique testo Comfort Software. Pos: 31 /TD/Produktbeschreibung/Übersicht/testo 176/Anzeige- und Bedienelemente, Display @ 6\mod_1278341804354_201.doc @ 63523 @ 1252 @ 1...
-
Page 73: Affichage Et Éléments De Commande
à -10 °C, env. 6 secondes à -20 °C). Cela n'influence pas la précision de la mesure. testo 176 T2, testo 176 T4, testo 176 H1, testo 176 P1 1 Valeur des canaux 1, 2, 3 (en fonction du nombre de canaux et de l'aperçu) - Page 74 5 Affichage et éléments de commande 3 Valeur des canaux 2, 3, 4 (en fonction du nombre de canaux et de l'aperçu) 4 Unités des canaux 1, 2, 3 (en fonction du nombre de canaux et de l'aperçu) 5 Nombre de valeurs enregistrées avec violation du seuil d'alarme (Log) 6 Valeur de mesure intermédiaire actuelle, s'affiche à...
-
Page 75: Del
5 Affichage et éléments de commande 15 Seuil d'alarme inférieur pour le canal affiché (1, 2, 3) : • clignote : le seuil d'alarme programmé s'affiche. • allumé : le seuil d'alarme programmé a été sous-passé. 16 Numéro du canal (1, 2, 3) 17 Seuil d'alarme supérieur pour le canal affiché... -
Page 76: Fonctions Des Touches
Pos: 32 /TD/Produktbeschreibung/Übersicht/testo 176/Tastenfunktionen @ 8\mod_1297252482510_201.doc @ 76900 @ 255 @ 1 5.3. Fonctions des touches Une représentation détaillée des affichages figure sous Vue d'ensemble du menu, page 78. -
Page 77: Utilisation Du Produit
Pos: 33 /TD/Überschriften/6. Produkt verwenden @ 0\mod_1173774928554_201.doc @ 329 @ 1 @ 1 Utilisation du produit Pos: 34 /TD/Erste Schritte/testo 175_176/Fühler anschließen 176 @ 8\mod_1297247379135_201.doc @ 76867 @ @ 1 6.1. Raccordement des capteurs Observer les points suivants au moment de raccorder les capteurs à... -
Page 78: Programmer L'enregistreur De Données
Le manuel pour l'installation et la manipulation du logiciel figure dans le mode d'emploi testo Comfort Software Basic 5 pouvant être téléchargé avec le logiciel. Pos: 36 /TD/Produkt verwenden/testo 176/Menüübersicht @ 7\mod_1290084422722_201.doc @ 73217 @ 2 @ 1 6.3. Vue d'ensemble du menu Dans la vue d'ensemble du menu, les affichages à... - Page 79 6 Utilisation du produit Mode Wait (Wait) : le critère de départ est programmé, mais pas encore rempli. ① Dernière ② Seuil d'alarme supérieur valeur Critère de départ Critère de départ Critère de départ Formule Démarrage par Date/heure touche / Démarrage par ③...
- Page 80 6 Utilisation du produit Mode Rec (Rec) : le critère de départ est satisfait, l'enregistreur mémorise les valeurs Mode End (End) : le programme de mesure est terminé (critère d'arrêt atteint – jusqu'à ce que la mémoire soit pleine ou jusqu'à atteindre un certain nombre de valeurs), en fonction de la programmation ①...
-
Page 81: Montage Du Support Mural
2. Faire glisser la goupille de sécurité (2) à travers les trous du support mural. 3. Fixer le cadenas (3) à la goupille de sécurité. 4. Retirer la clé (4). Pos: 39 /TD/Produkt verwenden/testo 176/Daten auslesen @ 6\mod_1278341937514_201.doc @ 63556 @ 255 @ 1 6.6. Lecture des données Par câble USB 1. - Page 82 6 Utilisation du produit 4. Insérer le câble USB dans le port mini USB (1). 5. Consulter l'enregistreur de données et éditer les données consultées : voir manuel d'utilisation séparé. testo Comfort Software. Par carte SD Si un enregistreur de données doit être consulté en mode...
-
Page 83: Entretien Du Produit
7 Entretien du produit Pos: 40 /TD/Überschriften/7. Produkt instand halten @ 0\mod_1173789831362_201.doc @ 398 @ 1 @ 1 Entretien du produit Pos: 41 /TD/Produkt instand halten/testo 175_176/Batterie wechseln 176 @ 7\mod_1290084989939_201.doc @ 73250 @ 2 @ 1 7.1. Remplacement de la pile Le programme de mesure en cours s'arrête quand vous... -
Page 84: Nettoyer L'appareil
11. Reconfigurer l'enregistreur de données ou rétablir l'ancienne configuration enregistrée, voir manuel d'utilisation séparé testo Comfort Software. L'enregistreur de données est prêt à l'emploi. Pos: 42 /TD/Produkt instand halten/testo 174-neu/Gerät reinigen @ 5\mod_1267614722447_201.doc @ 59664 @ 2 @ 1 7.2. Nettoyer l'appareil ATTENTION Endommagement du capteur ! >... -
Page 85: Conseils Et Dépannage
Conseils et dépannage Pos: 44 /TD/Überschriften/8.1 Fragen und Antworten @ 0\mod_1177402017078_201.doc @ 1094 @ 2 @ 1 8.1. Questions et réponses Pos: 45 /TD/Tipps und Hilfe/Fragen und Antworten/testo 176 @ 6\mod_1275474843210_201.doc @ 62245 @ @ 1 Question Causes possibles / Solution FULL s'affiche à... -
Page 86: Accessoires Et Pièces De Rechange
Pos: 46 /TD/Überschriften/8.2 Zubehör und Ersatzteile @ 0\mod_1177402058734_201.doc @ 1103 @ 2 @ 1 8.2. Accessoires et pièces de rechange Pos: 47 /TD/Tipps und Hilfe/Zubehör und Ersatzteile/testo 176 @ 6\mod_1275474784091_201.doc @ 62181 @ @ 1 Description N° article Support mural (noir) avec cadenas 0554 1703 Câble mini USB pour connecter l'enregistreur... - Page 88 SE & Co. KGaA Postfach 1140, 79849 Lenzkirch Testo-Straße 1, 79853 Lenzkirch Telefon: (07653) 681-0 Fax: (07653) 681-100 E-Mail: info@testo.de Internet: http://www.testo.com 0970 1760 de en fr 05 Vol1...
Need help?
Do you have a question about the 176 and is the answer not in the manual?
Questions and answers