Table of Contents
Advertisement
Quick Links
Advertisement
Table of Contents

Related Manuals for Channel Vision SI-8000


Summary of Contents for Channel Vision SI-8000
- Page 1 SI-8000 IP Door Station Quick Start Guide...
-
Page 2: Table Of Contents
Table of Contents Introduction Dimensions ............... Basic Network Connections ..........RJ-45 Pinout ..............Pre-install Volume Adjustment .......... 1. Detect & Verify Network Settings ........1-1. Search for devices with CVT upgrade tool ....... 1-2. Getting to a command prompt in Windows …....1-3. -
Page 3: Dimensions
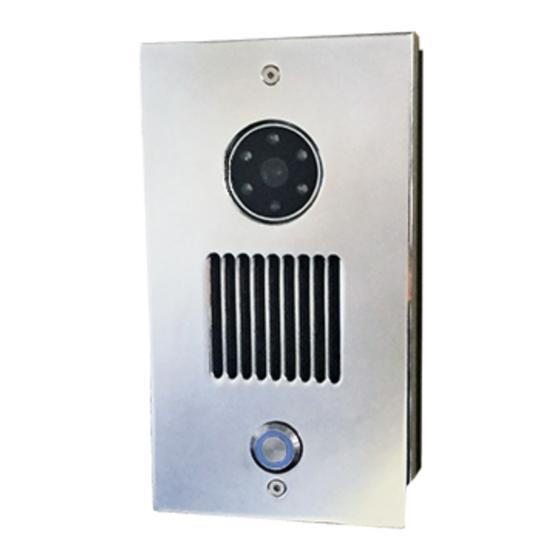
Front plate dimensions and features Mounting Hole LEDs Camera Speaker Microphone Doorbell Button Mounting Hole Flush mount box dimensions 2.5 ” deep... - Page 4 Basic network setup RJ45 Pin out - T-568B Adjusting the volume Be sure to adjust the volume before mounting the SI-8000...
- Page 5 1-1. Connect your IP door station to your PoE switch or router(if using optional 12vDC power supply) via cat5e or cat6, then launch the Channel Vision IP upgrade tool. Click on the search button to find the IP address of your door station. 192.168.1.199 by default.
- Page 6 1-3. Once In the command prompt you will type “ipconfig” and press enter to find the IP information of your LAN (your IP address, Subnet mask, IP address of your router) Make sure you write down your IP address, your subnet mask and your ●...
-
Page 7: Accessing And Configuring The User Interface
Note: Do not proceed to step 3 until you have verified your computer and door station are on the same network 2. Accessing and configuring the user interface 2-1. Open an internet explorer Web browser, type the IP address of your door station into the address bar at the top and press enter to access the user interface. -
Page 8: Lan Settings
2-3. LAN settings IP: must be a unique IP address with the first three octets (192.168.1.x) matching the first three octets of your Gateway address. The last octet (x) can be any number between 2 and 254 as long as no other device on the network is assigned to that address. Mask: The default mask is 255.255.255.0 Most simple networks that don't require more than 254 usable IP addresses will use this mask by default. -
Page 9: Device Settings
2-4. Device Settings BuildNo: Building number. Must match your indoor monitor. UnitNo: Unit number. Must match your indoor monitor. Floor: Floor number. Must match your indoor monitor. RoomNo: Room Number. Must match your indoor monitor. No: Unique number for the outdoor panel (can be any number between 1 & 9). You can have a maximum of 9 door stations for one house. -
Page 10: Access Settings
2-5: Access Settings Unlock timeout: Time delay in seconds from when you activate the door unlock to when it triggers the strike. You can choose 1- 9 seconds. Unlock delay: Amount of time in seconds the door lock stays open. You can choose 0 – 9. Elev refer: It is reserved for high rise buildings. -
Page 11: Sip Settings
2-6: SIP Settings(found under VOIP tab) SIP enable: Leave the box unchecked. Proxy: URL of your SIP proxy server/server. Realm: URL of your SIP Authentication server. Outbound: URL of your outbound proxy server. Stun IP: URL of the STUN server. Stun Port: Port used to setup phone calls to a VOIP provider outside the local network. -
Page 12: Forward Account Settings
Forwarding to multiple devices The SI-8000 can forward a call to multiple devices; either one at a time or all at once. to enter two accounts, all you have to do is separate the two with a semi-colon and ●... - Page 13 2-7: Forward Account Settings cont. one by one or all at once...
-
Page 14: External Module Settings
2-8: External Module Settings Voice GW: used to connect to an off-site SIP service. Note: Any time you change your settings, you must click the submit button before leaving the page. 2-9: Advanced Settings Note: Any time you change your settings, you must click the submit button before leaving the page. -
Page 15: Logout
2-10: Default This is where you go to reset the unit to default settings, restore from backup, or backup your current settings. Note: Any time you change your settings, you must click the submit button before leaving the page. 2-11: Logout Note: Any time you change your settings, you must click the submit button before leaving the page. -
Page 16: Package Contents
SI-8000 Specifications 350MHz CPU: DDR2 (1GB x 2) RAM: 16GB Flash: PoE 802.3af / 12vDC(optional) Power: IP66 IP Rating: Rated power: 2.5W Standby power consumption: -40°C ~ +70°C Operating temperature: 20% ~ 93% Relative humidity: 1.4 lbs Weight: Height = 8”... -
Page 17: Rear Connections
Rear Connections Volume Adjustment...
Need help?
Do you have a question about the SI-8000 and is the answer not in the manual?
Questions and answers