Auerswald COMfortel 2500 User Manual
Auerswald system telephones user manual
Hide thumbs
Also See for COMfortel 2500:
- Commissioning instructions (36 pages) ,
- Quick operating manual (2 pages) ,
- Commissioning instructions (36 pages)
Table of Contents
Advertisement
Quick Links
Advertisement
Table of Contents

Related Manuals for Auerswald COMfortel 2500


Summary of Contents for Auerswald COMfortel 2500
-
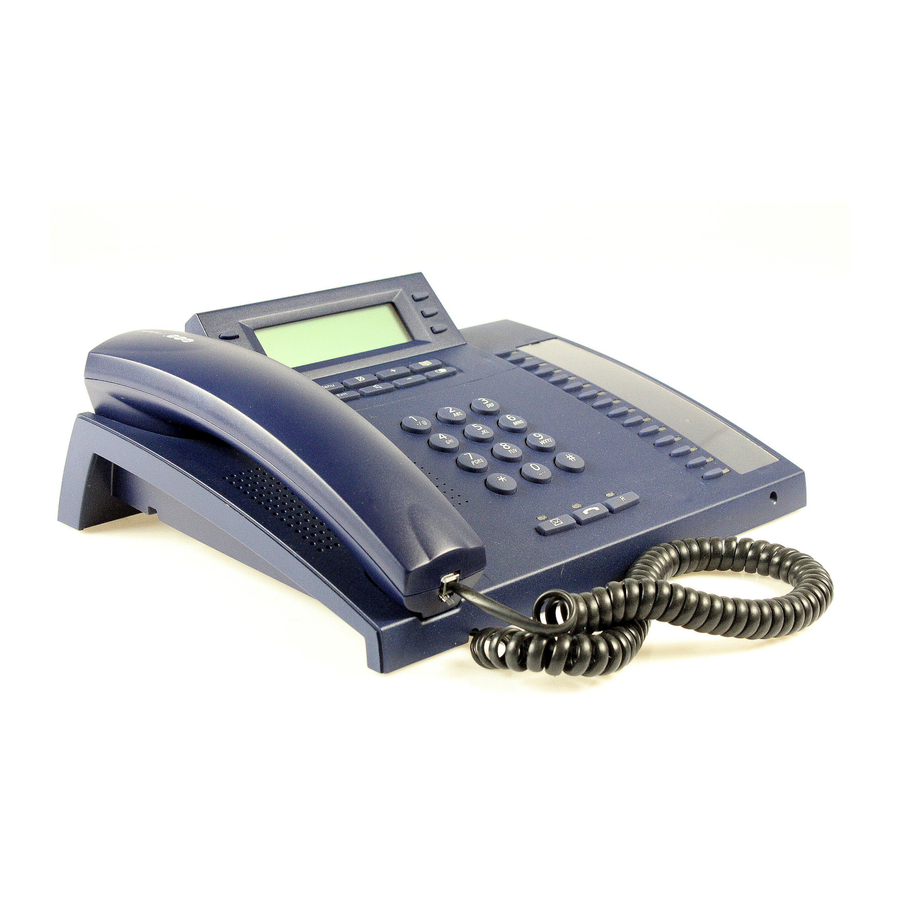
Page 1: System Telephones
User Manual System Telephones COMfortel 2500 COMfortel 1500... -
Page 2: Symbols Used In The Manual
General limitation of legal responsibility and application Auerswald products are not designed or intended for use in any life-saving and/or life support application and/or nuclear facility. When using our products for such applications a written agreement by Auerswald for each individual case is necessary in advance. -
Page 3: Table Of Contents
Pic. 2: Connection to the PBX... 16 Mandatory Settings ... 16 Connection and Mounting of the Key Extension COMfortel Xtension30 (COMfortel 2500) 17 Pic. 3: Connection and Mounting of the Key Extension COMfortel Xtension30... 18 Connect the Headset ... 18 Pic. - Page 4 Muting the Microphone ... 40 Pic. 16: Mute a Call ... 41 Make Calls via Headset with the COMfortel 2500 ... 41 Make Calls via Headset with the COMfortel 1500 ... 41 Pic. 17: Headset Operation with Handsfree Operation and Speaker Mode (Overview) . 42 Pic.
- Page 5 The Query Call... 69 Pic. 22: Display Options for two Conversations ... 69 Switch between Call Partners (Alternation) ... 70 Finish one of both Calls ... 71 Connect both Call Partners... 71 Call internal a 3rd Subscriber and transfer it to the active Call Partner ... 72 Talk to both Subscribers at the same Time (Conference) ...
- Page 6 Contents Use of the Telephone and PBX System... 94 Delete Data ... 94 Delete Call Charges ... 94 Pickup ... 95 Switch on/off Headset Operation ... 97 Telephone Lock... 98 Ringer Signal... 99 Switch on/off acoustic Ringer Signal... 99 Signal Calls via flashing Display Backlight (Ringer Signal/Light)... 100 Subscriber Function of the PBX...
- Page 7 Select Type of Headset... 158 Switch on/off Quick Remote Access to the Voicemail Centre 461.2... 158 Display Settings ... 159 Configure the Display Light (only COMfortel 2500) ... 159 Set Brightness (only COMfortel 2500) ... 159 Set the Contrast ... 160 Configure the Time Format ...
- Page 8 PC Connection and Installation of the Software... 175 Make a Connection between Telephone/PBX and PC ... 175 Connection to the USB Interface of a PC (COMfortel 2500 only) ... 176 Pic. 31: Plug in the USB cable ... 176 Installation of the Drivers and the PC Software... 177 Pic.
- Page 9 Set Repetition Delay Time for the Message Forwarding ... 215 Store the Data (Backup) on the SD Card ... 216 Configure Backup ... 216 Execute Backup (COMfortel 2500 -> SD Card) ... 217 Restore the Backup (SD Card-> COMfortel 2500) ... 217 Configure Automatic Backup ... 218 SD Card...
-
Page 10: Introduction
NTRODUCTION Dear Customers! The manual in your hand describes the operation of the system telephones COMfortel 2500 and COMfortel 1500 in detail. In order to get certain information quickly and to the point, the manual will offer you different helps and guide lines:... -
Page 11: Usage And Functionality
– The telephone must not be used in wet environments (bath rooms). Usage and Functionality The system telephones COMfortel 2500 and COMfortel 1500 are designed for the connec- tion to the following Auerswald PBX systems: COMpact 2204 USB COMpact 2206 USB... -
Page 12: Features
They can be adapted to your personal requirements with the bundled PC software or via the comfortable menu. The modular design of the COMfortel 2500 allows the expansion with up to three key expan- sion modules COMfortel Xtension30 that can be connected on the left or right side of the tel- ephone at your choice. - Page 13 Memo pad function to record telephone numbers during a call (memo) Touch-tone dialling during a call Dial preparation/dialling correction 16 (COMfortel 2500) or 8 (COMfortel 1500) ringer melodies, with the enclosed software an own melody may be created Speaker listening/handsfree operation/microphone mute...
-
Page 14: Features Available For Release In The Upgrade Centre
Please observe the following security advice. Single release for all features is necessary. Inserting a standard SD card (not in the scope of delivery; see Only available on the COMfortel 2500. page 20) is necessary. -
Page 15: First Use Of The Telephone
First Use of the Telephone COMfortel 2500: If you like to connect the key expansion module COMfortel Xtension30, read chapter Connection and Mounting of the Key Extension COMfortel Xtension30 (COMfor- Advice tel 2500) on page 17 For commissioning of the system telephone, the Auerswald PBX must be connected to the 230-V mains supply. -
Page 16: Pic. 2: Connection To The Pbx
Important tion in the display if a PBX change should be done (see also COMfortel 2500: If no wall-mount power supply is needed (no expansion COMfortel Xtension30 is connected), the bridge plug has to be put into the jack Mandatory Settings When performing a first time connection to the PBX, the user language and a valid subscriber (MSN) has not yet been entered into the system telephone. -
Page 17: Connection And Mounting Of The Key Extension Comfortel Xtension30 (Comfortel 2500)
Advice the menu key (see Connection and Mounting of the Key Extension COMfortel Xtension30 (COMfortel 2500) Before you re-assemble, disconnect the telephone from the PBX and (if already existing) the wall-mount power supply from the 230-V mains power. -
Page 18: Pic. 3: Connection And Mounting Of The Key Extension Comfortel Xtension30
10. Turn the telephone around again. Connect the Headset The COMfortel 2500 supports the operation of cable connected headsets as well as wireless headsets (Headsets with a DHSG interface e.g. by GN Netcom or Plantronics). The headset Advice... -
Page 19: Pic. 4: Connection Of A Headset To The Comfortel 2500
To be able to make calls via headset, you have to activate the headset operation. Switch on/off Headset Operation Important Pic. 4: Connection of a Headset to the COMfortel 2500 Insert lettering Label page 229 of these instructions you find some lettering label papers to cut out and to label by hand. -
Page 20: First Operation Of The Answering Machine (Only Comfortel 2500)
First Operation of the Answering Machine (only COMfortel 2500) First Operation of the Answering Machine (only COMfortel 2500) The COMfortel 2500 can be expanded with the function COMfortel Voicemail (answering machine, backup etc.) by inserting a standard SD card and the release in the Upgrade Centre (chargeable). -
Page 21: Upload Standard Announcements With Comfortel Set
Buy the Function COMfortel Voicemail in the Upgrade Centre After inserting the SD card the SD card functions (e.g. answering machine) are released for 30 days one-time. To use the functions after this time a chargeable release of the function COMfortel Voicemail via Upgrade Centre is necessary. - Page 22 Introduction First Operation of the Answering Machine (only COMfortel 2500) Perform the release in the Upgrade Centre as follows: 1. Review the 12-digit serial number of the telephone in the information menu and write it down. information The serial number of the tele- phone will be displayed.
- Page 23 / check out”. 11. The selected item is shown in the basket. If you do not like to change anything, click on the button “Pro- ceed ...”. 12. Follow the additional instructions. First Operation of the Answering Machine (only COMfortel 2500) Introduction...
-
Page 24: Enter The Release Code Into The Telephone
Introduction First Operation of the Answering Machine (only COMfortel 2500) 13. The code necessary for the release is shown to you right after purchase “Release code”. If your E-mail address is known to the Upgrade Centre, you will receive the order confirmation via E-mail again. -
Page 25: Display-Driven Usage Of The Telephone
16 characters each (when entering telephone numbers the character size is reduced to display more characters). On both sides there is place for up to four (COMfortel 2500) or three (COMfortel 1500) icons that display the function of the softkeys next to them (see Exceptions: In the second level menu/function level (after pressing the key used. -
Page 26: Pic. 8: Control Elements
25): – COMfortel 2500: 5 lines – COMfortel 1500: 3 lines Softkeys (status dependent keys): – COMfortel 2500: four on each side – COMfortel 1500: three on each side Menu key: – opens the main menu (see the idle state or already open menu Exit key: –... -
Page 27: Table 1: Character Codes Of The Keypad
Table 1: Character Codes of the Keypad Capital Characters A B C 2 Ä Æ Å Ç D E F 3 É G H I J K L 5 M N O 6 Ö Ø P Q R S 7 ß T U V 8 Ü... - Page 28 Introduction Display-driven Usage of the Telephone Table 2: Icons in the Display Delete single entries of the caller, calls or redial list. Delete all entries of caller, calls or redial list. Open extended presentation of the displayed contact. Open an existing contact for editing/deletion. Add/change a business telephone number of the contact.
- Page 29 Table 2: Icons in the Display Move the cursor to the left. Delete last character in front of the cursor. The whole entry is deleted by holding the key (2 seconds). Return to the idle state. Scroll function display in the display bottom line to the next function.
- Page 30 Introduction Display-driven Usage of the Telephone Table 2: Icons in the Display Move the cursor to the left. Delete the last character in front of the cursor. Holding the key (2 sec.) deletes the whole entry. Switch to large characters for the next char- acter during character entry.
- Page 31 Start the playback of the recording. Delete the recording. Reactivate the deactivated answering machine. Deactivate the activated answering machine. Display only: Data transfer between SD card and PC. Voicemail Functions (with Voicemail Centre 461.2) Skip the currently heard recording.
-
Page 32: Pic. 9: Display Options In The Idle State
Time Information: – Day of the week – Date – Calendar Week – Time Information about the subscriber (only COMfortel 2500): – Name of the PBX subscriber – Internal telephone number of the PBX subscriber second level calls list project... -
Page 33: Pic. 10: Display Options In The Main Menu (After Pressing The Menu Key)
Pic. 10: Display Options in the Main Menu (after Pressing the Menu Key) functions information define keys settings select menu Function Menu; Pic. 11 on page 34 Selection list* in the Information menu: – Version telephone (page – Version PBX (page 185) –... -
Page 34: Pic. 11: Function Menu
Introduction Display-driven Usage of the Telephone Pic. 11: Function Menu Selection list* in the Function Menu: – Boss/Secretary function off – Call Deblocker – Call Forwarding Subscriber – Call Restrictor (page – Call waiting (page – Caller list (page – Calls list (page –... -
Page 35: Pic. 12: Key Programming Menu
Pic. 12: Key Programming Menu Press the key to be defined Select the level to be selected ( ): – First level – Second level Selection list* in the Key programming menu: – Boss key (page 141) – Boss/Secretary function off –... -
Page 36: Pic. 13: Settings Menu
Introduction Display-driven Usage of the Telephone Pic. 13: Settings Menu Selection List* in the Settings Menu: – Synchronization – Answering machine – Backup – User settings – Display – Default settings – Lists – Signalling – Blocking Selection List* for Signalling: –... - Page 37 – additional ** Selection List* for Backup: – Automatic (page 218) – Configuration (page 216) – COMfortel 2500 -> SD-Card – SD-Card -> COMfortel 2500 – additional ** Selection List* for User settings: – Keys 2nd level (page 163) – Macro display...
-
Page 38: Make A Call
Make a Call AKE A Telephone with Comfort Handsfree Operation In case of handsfree operation the loudspeaker and the microphone are switched on in the device. This way you can make a call although you do not have any free hand. Besides this another person in the room can take part in the call. -
Page 39: Pic. 14: Handsfree Operation And Speaker Mode (Overview)
Pic. 14: Handsfree Operation and Speaker Mode (Overview) Idle State Dial telephone number and press loudspeaker key Dial telephone number and press hook key Handsfree Operation Normal Call Handsfree Operation Speaker Mode Press loudspeaker key Hold the loudspeaker key Press the loudspeaker key (Receiver is off-hook) Press loudspeaker key Press hook key... -
Page 40: Finish A Call Without Hanging Up The Receiver
Make a Call Telephone with Comfort Finish a Call without hanging up the Receiver If you like to finish the current call and like to start another call right after, you do not have to hang up the receiver. If you press the hook key, the telephone returns to the idle state in spite of the picked up receiver and you can start a new call. -
Page 41: Pic. 16: Mute A Call
Normal Call Microphone is switched off Make Calls via Headset with the COMfortel 2500 In order to be able to make calls via headset, the headset operation must be activated (see page 97). In headset operation you can start calls from the idle state by simply pressing the hook key (see Pic. -
Page 42: Pic. 17: Headset Operation With Handsfree Operation And Speaker Mode (Overview)
Make a Call Telephone with Comfort Idle State Normal Headset Call Handsfree Operation Speaker Mode Pic. 17: Headset Operation with Handsfree Operation and Speaker Mode (Overview) Dial telephone number and press hook key Dial telephone number and press loudspeaker key Hold the loudspeaker key Press loudspeaker key Press loudspeaker key... -
Page 43: Pic. 18: Headset Operation With The Receiver (Overview)
Normal Headset Call Handsfree Operation Speaker Mode Listen-in with the Receiver Handsfree Operation Idle State (Receiver is picked up) Pic. 18: Headset Operation with the receiver (Overview) Pick up the receiver –> Listen-in with the receiver Pick up the receiver –> Listen-in with the receiver Pick up the receiver –>... -
Page 44: Inbound Call
Make a Call Inbound Call Inbound Call Pic. 19: Display Options for an inbound Call Softkeys: – : Scroll in the function list – : Select displayed function Information on a call: – Caller or call type (in case of special call e.g. -
Page 45: Your Own Telephone Rings - Accept The Call
With the function Pickup you can take inbound calls to other telephones on your own tele- phone (see page If your system telephone is called with the InterCom function, the system telephone takes the “call” automatically after a short ringer tone. The announcement or the handsfree operation is limited to 120 seconds for security reasons to prevent an abuse of this function (e.g. -
Page 46: Your Own Telephone Rings - Put The Caller On Hold
Make a Call Inbound Call Your own Telephone rings - Put the Caller on Hold You get a call but you cannot talk to the caller in this mo- ment. hold incoming You can hear the internal dial tone. The caller on hold listens to the Music on Hold. -
Page 47: Call Waiting - Accept The Second Call
Call Waiting – Accept the second Call During a conversation you get a call. You are connected with the caller. Your previous call part- ner is listening to the Music on Hold. If you like to prevent the knocking in your telephone, you can deactivate/switch off the knock- ing (Call Waiting) via menu of the system telephone Advice If you hang up the receiver first to finish the current call, your telephone will start to ring and... -
Page 48: Answering Machine Has Accepted The Call - Take The Call Over
A telephone next to you rings. internal number You are connected to the caller. only with COMfortel 2500 and inserted SD card. After 30 days a chargeable release of the function COMfortel Voicemail is necessary via Upgrade Centre (see Pick up the receiver. Press the... -
Page 49: Your Own Telephone Rings (Door Call) - Accept The Call And Open The Door
If you press the ation function is started too. Advice If you like to take calls directed to another group, dial the Pickup for the group telephone number. If there is a name to the internal telephone number, it will be displayed as soon as this tele- phone number has completely been entered. -
Page 50: Door Call Waiting - Open The Door Without Taking The Call
Make a Call Inbound Call Door Call Waiting – Open the Door without taking the Call You can handle the door Call Waiting during a call like any external subscriber in general. That means you are able to take the call to reject it or to ignore it. Additionally you are able to handle the door opener if you do not like to interrupt your call, but to open the door for the visitor. -
Page 51: Dialling A Telephone Number
Dialling a Telephone Number If you have already picked up the receiver at the moment of dialling, the dialled telephone number will immediately be dialled. The dial preparation - dial first and pick up the receiver later - allows to check the entered telephone number and make corrections before the connection will be made. -
Page 52: Dial With Dial Preparation
Make a Call Dialling a Telephone Number Dial with Dial Preparation telephone number The subscriber is called. During the telephone number entry you can make corrections. Move the cursor to the left and right by pressing the Advice softkey. You can copy a telephone number of the dial preparation directly into the telephone book by pressing the softkey (see If you like to quit the menu without dialling the input telephone number, press the exit key. -
Page 53: Transfer Certain Telephone Numbers (Msn)
Transfer certain Telephone Numbers (MSN) The presentation of the MSN is activated (LED glows) telephone number The subscriber is called If you have a “dark glasses” symbol on your display (sunglasses tion is currently suppressed. Press the softkey next to the sunglasses to disable the suppres- Advice sion. -
Page 54: Select A Certain Voip Account
Make a Call Dialling a Telephone Number The subscriber is called. You can use this function only if your network provider supports the ISDN feature “Calling Line Identification Restriction (CLIR)” on your exchange line. Important The activation of the number suppression exists until the This softkey can be switched off with the configuration programme COMset of the PBX. -
Page 55: Split Call Charges By Selecting The Exchange Line
Split Call Charges by selecting the Exchange Line telephone number The subscriber is called via the selected exchange line. Requirement for this exchange line selection is that your PBX has several ISDN connections. You can also use the special access number of the PBX (see manual of the PBX) instead of Advice the function key like from any other telephone. -
Page 56: Dial A Number With A Direct Exchange Line Telephone
Make a Call Dialling a Telephone Number Dial a Number with a Direct Exchange Line Telephone If your telephone is configured as a direct exchange line telephone (with the configuration programme COMset), you will hear the external dial tone right after picking up the receiver. In order to call an external connection, you have to dial the external telephone number with- out the exchange line access number “0”. -
Page 57: Outbound Call
Outbound Call Pic. 20: Display Options for outbound Calls Softkeys: – : Scroll in the function list – : Select displayed function Information on the call: – Subscriber or group (in case of a membership in a group) – Called partner –... -
Page 58: The Called Telephone Is Busy - Start Automatic Recall
Make a Call Outbound Call The called Telephone is busy – Start automatic Recall The subscriber called by you is busy. If the recall has been activated, you get the message “recall ac- tivated”. As soon as the subscriber is not busy anymore, you are called by the central office/ PBX. -
Page 59: Nobody Takes The Call On The Called Telephone - Start Recall
Nobody takes the Call on the called Telephone - Start Recall Nobody takes the call on the called telephone. If the recall has been activated, you get the message “recall ac- tivated”. As soon as the telephone was used, you would be called by the central office/PBX. -
Page 60: Start Power Dialling If Automatic Recall Is Not Possible
Make a Call Outbound Call Start Power Dialling if automatic Recall is not possible If the called subscriber is busy, but an automatic recall is not possible, you are able to activate the function “power dialling” instead. Then the system telephone will try to reach the corre- sponding subscriber every 10 seconds. -
Page 61: The Called Internal Subscriber Has Do-Not-Disturb Enabled - Priority Call
The called internal Subscriber has Do-not-Disturb enabled – Priority Call Do-not-Disturb is active on the telephone you called and you hear the busy tone but you ur- gently want to get the called person on the phone. priority call Now the subscriber is called. The Query Call is busy/does not answer –... -
Page 62: In The Call
Make a Call In the Call In the Call Pic. 21: Display Options in the Call wk 03 Mo 16.Jan 12:44 call partner charges Functions: – Start recall (page – Start transfer – Start Pickup (page – Assign project number –... -
Page 63: View Information On A Call
During an existing connection you can send DTMF signals with the keypad (tones according to the dual-tone multi-frequency standard), e.g. to control an answering machine. The dialled digits are presented in the display. If there is a bigger quantity of DTMF signals that you often... -
Page 64: Start A Second Call (Query)
Make a Call In the Call Start a second Call (Query) You are in a call. query transfer You are hearing the internal dial tone. Your previous call partner is on Hold in the PBX and is hearing the Music on Hold. -
Page 65: Put An External Call Partner Into The Waiting Loop
internal called further on. If he takes the call, the connection will be es- tablished. You can also wait to hang up until you will have talked to the internal subscriber (Transfer with announcement). Advice If the called subscriber does not take the call, the call will return to your own telephone after 60 seconds (your telephone rings). -
Page 66: Another Internal Telephone Rings - Pickup The Call
Make a Call In the Call The external call partner con- tinues to hear the Music on Hold. As soon as the internal subscriber finished the previ- ous call, he is called again. If he accepts the call, he will be connected to the waiting caller. -
Page 67: Schedule A Call To The Current Call Partner (Reschedule Call)
This way you can also start a call take-over from telephones or answering machines where this is permitted. (see manual of the PBX). COMpact 5010/5020 VoIP and COMmander Basic.2/Business: Depending on the authoriza- tion assigned to your telephone, you will be able to do pickup for any available telephones, for telephones within your group or not at all. -
Page 68: Enter Memo (Telephone Number Notice)
Make a Call In the Call Enter Memo (Telephone Number Notice) You have a call and like to note a telephone number. telephone number Retrieve Memo (Telephone Number Notice) You can delete the telephone number by pressing the After taking over to the dial preparation you can dial the telephone number by taking the Advice receiver or enter the number directly into the telephone book by pressing the page... -
Page 69: The Query Call
The Query Call Pic. 22: Display Options for two Con- versations wk 03 Mo 16.Jan 12:44 Functions: – Finish active call – Connect call partners – Connect active call to third call partner – Start conference – Return from conference to alternation –... -
Page 70: Switch Between Call Partners (Alternation)
Make a Call The Query Call During a query you are talking to a call partner while your previous call partner is put on hold in the COMmander Basic and listens to the Music on hold. You are starting a query call by calling a query subscriber, a pickup, or accepting a waiting caller. -
Page 71: Finish One Of Both Calls
Finish one of both Calls You are in a query conversa- tion. The active call partner is marked with , the waiting call partner is marked with of the name or the telephone number. name or number curr.call canc. Then you are in a single call with the previously waiting call partner. -
Page 72: Call Internal A 3Rd Subscriber And Transfer It To The Active Call Partner
Make a Call The Query Call Call internal a 3rd Subscriber and transfer it to the active Call Partner You are in a query conversa- tion. The active call partner is marked with , the waiting call partner is marked with of the name or the telephone number. -
Page 73: In A Conference
In a Conference In a conference call you talk to two subscribers at the same time. By pressing the you can switch over from one subscriber to the other. The functions available in the bottom display for only one of both subscribers, always refer to the subscriber marked with of the name or the telephone number. -
Page 74: Finish The Call With One Of The Call Partners
Make a Call In a Conference Finish the Call with one of the Call Partners You are in a conference. The subscriber active for the next function is marked with front of the name or the tele- phone number. name or number terminate Then you have an individual call with the other call partner. -
Page 75: Telephone Book And Lists
The telephone book of the COMfortel 1500 offers a memory for up to 400 entries, the tele- phone book of the COMfortel 2500 800 entries (telephone number, macros and comments). Up to four entries may be assigned to one name (contact). -
Page 76: Pic. 23: Display Options (After Pressing The Telephone Book Key)
Telephone Book and Lists Telephone Book Pic. 23: Display Options (after pressing the Telephone Book Key) phone book new contact no. entr. /800 phone book new contact no. entr. /400 Information: – Number of existing entries / max. number of entries Pic. -
Page 77: Pic. 25: Extended Presentation
Pic. 25: Extended Presentation phone book name business mobile-business private name business mobile-business Information on the contact: – Name – Telephone number – Comment phone book edit name business mobile-business phone book name business Information on the contact: – Name –... -
Page 78: Pic. 27: New Entry
Telephone Book and Lists Telephone Book Pic. 27: New Entry phone book name business mobile-business private phone book business mobile-business Information on the contact: – Name – Telephone number (in case of several entries for this contact the last dialled or entered telephone number) Dial from the Telephone Book standard... -
Page 79: Create A New Contact
the requested telephone number and pick up the receiver. The now dialled telephone number is now the standard telephone number after this call. To get faster to the requested contact, you can enter the first letter with the keypad (see also page 78). -
Page 80: Edit/Delete Contact
Telephone Book and Lists Telephone Book Edit/delete Contact edit contact Please enter the external telephone number always with the exchange line access number “0”. (Exceptions: Direct Exchange Line Telephone; see Important In case of the entry of several telephone numbers or call macros the last created or changed entry is used as standard telephone number. -
Page 81: Create A Call Macro
interface of the PBX (internal telephone number with COMset, short-code dialling numbers with COMtools). Create a Call Macro new contact name macro telephone number Please enter the external telephone number always with the exchange line access number “0”. (Exceptions: Direct Exchange Line Telephone; see Important Telephone Book and Lists Press the telephone book key to switch from... -
Page 82: Copy Telephone Numbers Out Of The Dial Preparation
Telephone Book and Lists Telephone Book You can also create this call macro also as a new entry for an already existing contact (see Kapitel Edit/delete Contact auf Seite Advice Copy Telephone Numbers out of the Dial Preparation If you like to enter telephone numbers out of different lists (caller list, calls list, redial list) into the telephone book, you will be able to copy them directly via dial preparation. -
Page 83: Enter Comment To A Contact
Enter Comment to a Contact edit contact comment text When scrolling in the telephone book of COMfortel 2500 it is displayed if a comment is avail- able for the contact. By pressing the Advice Press the telephone book key to switch from the menu to the telephone book. -
Page 84: Redial List
Telephone Book and Lists Redial List Redial List The redial list keeps 30 most recently used numbers. If there are more than 30 calls of differ- ent telephone numbers, the oldest one will be written over. The numbers are saved with these information: Number of dial operations, date and time of the dial operation (multiple dial operations: date/time of the most recent dialling). -
Page 85: Pic. 28: Display Options In The Redial List
By pressing the redial list. Advice On the COMfortel 1500 you can delete the displayed entry or the whole redial list by pressing softkey and the following selection of the displayed entry or of the whole list. If you like to prevent that a lot of useless entries will be taken into the list, you can configure the list for the calls to be taken You can also delete the whole redial list via the function menu “delete data”... -
Page 86: Dial From The Calls List
Telephone Book and Lists Calls List Dial from the Calls List calls list The last made call is displayed. The subscriber is called. Additional functions in the calls list, see You can also open the calls list via the function menu (see Advice You can also configure the calls list on a freely programmable function key the calls list is opened by simply pressing this key. -
Page 87: Pic. 29: Display Options In The Calls List
Pic. 29: Display Options in the Calls List calls list caller MSN dialled called partner 16.01.06 12:40 calls list called partner 16.01.06 12:40 Softkeys in an overview: – : Scroll in the overview – : Display entry Caller List The caller list of the telephone saves the telephone numbers of the calls which were not answered. -
Page 88: Dial From The Caller List
Press the softkey in front of the selection caller list to open the caller list (is skipped if the other lists are empty or if there is no answering machine; see Use the entry you require. Pick up the receiver. -
Page 89: Delete Entries In The Caller List
Press the caller list to open the caller list (is skipped if the other lists are empty or if there is no answering machine). Press the entry. softkey and confirming the following question you can delete the whole (page 173). -
Page 90: Scheduled Calls List
Telephone Book and Lists Scheduled Calls List Scheduled Calls List This function will remind you on a date or a call. The telephone allows you to schedule up to 16 incidents. Configure a scheduled Call If you like to be remembered to make a call, you will be able to configure a scheduled call with your telephone. -
Page 91: Edit Or Delete Scheduled Calls In The List
If you like to be remembered simply to a date/appointment instead of a call, select “just a reminder” after the date entry. In this case there will be no telephone number entry but only an information entry. Edit or delete scheduled Calls in the List time date telephone number... -
Page 92: You Get A Scheduled Call With Dial Preparation
Telephone Book and Lists Scheduled Calls List You get a scheduled Call with Dial Preparation If you configured a scheduled call with dial preparation for a call partner, your telephone will ring at the corresponding date and show you the configured telephone number and the name. Now you are able to make the call immediately as described in the following (by simply pick- ing up the receiver or taking over of the telephone number into the dial preparation). -
Page 93: You Get A Scheduled Call (Reminder Only)
You get a scheduled Call (Reminder only) If you configured a scheduled call for your telephone, it would ring at the configured time and will show you the entered information. You can simply confirm the call (then it will be deleted) or if you like to be remembered later again, you can postpone it. -
Page 94: Use Of The Telephone And Pbx System
Use of the Telephone and PBX System PBX S SE OF THE ELEPHONE AND YSTEM Some of the described functions are only offered in the telephone if the function is available in the PBX and has been properly configured and the necessary authorization for the use of these functions has been assigned. -
Page 95: Pickup
Use the Function via Function Menu: functions del.call charge ...delete? Pickup With the function pickup you can take over the inbound calls of the other telephones to your own telephone. Use the Function via Function Menu: A telephone next to you rings. functions pickup internal number... - Page 96 Use of the Telephone and PBX System Pickup Assign Key: define keys function key..level pickup Use Function via Key: You can open the function menu for the function “Pickup” (s. a.) by pressing the key. LED Signalling next to the Key: none You can also open the function menu for the function “Pickup”...
-
Page 97: Switch On/Off Headset Operation
Switch on/off Headset Operation If you connected and selected (see switch between receiver and headset operation. Use the Function via Function Menu: functions headset The icon marks the current setting. Assign Key: define keys function key ..level headset The current settings for the key assignment is shown on the display. -
Page 98: Telephone Lock
Use of the Telephone and PBX System Telephone Lock Telephone Lock With the telephone lock telephone can be locked against unauthorized use. The following functions are still available after the activation of this function: Switch off the telephone lock (by pressing the Start emergency calls (only manual dialling) Accept inbound calls Use the Function via Function Menu:... -
Page 99: Ringer Tone
Ringer Signal The system telephone signals inbound calls as follows: Acoustic ringer signal (the telephone rings in the configured ringer melody; Display message (text) Flashing LED on top of the hook key Display backlight Flashing display backlight Switch on/off acoustic Ringer Signal If the surrounding must not be disturbed by the ringing of the telephone, you can switch off the ringer signal. -
Page 100: Signal Calls Via Flashing Display Backlight (Ringer Signal/Light)
Use of the Telephone and PBX System Ringer Signal The current settings for the key assignment is shown on the display. Use Function via Key: By pressing the key the acoustical ringer signal is switched on, off or over. By pressing the key during an inbound call the acoustic ringer signal is immediately switched on, off or over for this call. - Page 101 Assign Key: define keys function key ..level ringer backlight The current settings for the key assignment is shown on the display. Use Function via Key: By pressing the key, the flashing display backlight is switched on, off or over. LED Signalling next to the Key: The flashing display light is switched off and the acoustical ringer signal is switched on.
-
Page 102: Subscriber Function Of The Pbx
Use of the Telephone and PBX System Subscriber Function of the PBX Subscriber Function of the PBX Switch on/off Call Waiting If you like to prevent the Call Waiting function in your telephone (see able to disable the Call Waiting via menu of the system telephone. Use the Function via Function Menu: functions call waiting... -
Page 103: Switch On/Off Do-Not-Disturb
Switch on/off Do-not-Disturb If you do not like to be called by anybody, you will be able to block your system telephone for internal and external calls with the function “Do-not-Disturb service”. Then a caller will get the busy signal. In case of emergency you can be reached with a priority call by an internal sub- scriber. -
Page 104: Call Deblocker
Use of the Telephone and PBX System Subscriber Function of the PBX Deactivate Do-not-Disturb for certain Persons (Call Deblocker – inbound) If you like to be reachable for certain persons with the activated “Do-not-Disturb”, it will be possible to enter their external telephone number into a list with the PC software of the PBX. This list is valid for all subscribers and you are able to activate or deactivate it for your tele- phone if necessary. -
Page 105: Call Restrictor
Protection against certain Person’s Calls (Call Restrictor - inbound) If you do not like to be called by certain persons, you are able to enter their external telephone numbers into a list with the PC software of your PBX. This list is valid for all subscribers and you are able to activate or to deactivate it for you telephone if necessary. -
Page 106: Room Monitoring
Use of the Telephone and PBX System Subscriber Function of the PBX Room Monitoring If you like to monitor the acoustics of a room e.g. in order to check whether your toddler sleeps, you will be able to use the function “room monitoring”. The telephone in the room will have to be properly configured for this function. -
Page 107: Redirect The Telephone (Subscriber Call Forwarding)
Redirect the Telephone (Subscriber Call Forwarding) Thanks to the subscriber call forwarding (CF) you are able to redirect internal and external calls from your telephone to other internal and external connections. You or your substitute will be able to take these calls with another telephone. The subscriber call forwarding will let you or your substitute be always available under your telephone number although you are not able to take calls with your original telephone. - Page 108 Use of the Telephone and PBX System Subscriber Function of the PBX Assign Key: define keys function key ..level Call fwd.: scr The current settings for the key assignment is shown on the display. Use Function via Key: By pressing the key the Subscriber Call Forwarding is switched on, off or over to the config- ured target.
-
Page 109: Redirect Your Calls To Another Telephone (Follow-Me)
Please enter the external telephone numbers always with an exchange line access number “0”. (Exception: Direct Exchange Line Telephone; see A subscriber forwarding call is not effective for inbound group calls. If you like to prevent that Important your telephone rings for group calls, you will have to log out of this group group numbers are to be redirected, please refer to the manual of the PBX. - Page 110 Use of the Telephone and PBX System Subscriber Function of the PBX Assign Key: define keys function key ..level Follow-me Use Function via Key (only in the idle State of the Telephone): Open the function menu for the function “Follow-me” (s. a.) by pressing the key. Exception: A key assigned with “Deactivate all”...
-
Page 111: Forward The Connection (Msn/Ddi Call Forwarding)
Forward the Connection (MSN/DDI Call Forwarding) If you like to be always reachable for external connections - even away from home -, you can use the MSN/DDI Call Forwarding. With the MSN/DDI Call Forwarding you can forward calls for your external telephone num- bers (dialled by an external caller) to other external connections. - Page 112 Use of the Telephone and PBX System Forward the Connection (MSN/DDI Call Forwarding) Assign Key: define keys function key ..level MSN/DDI CF The current settings for the key assignment is shown on the display. Use Function via Key: By pressing the key the MSN/DDI Call Forwarding is switched on, off or over to the configured target.
- Page 113 PBX) instead of the MSN/DDI Call Forwarding. This way a forwarding is also possible to internal telephones, e.g. to the colleague’s telephone or to the answering machine. Use of the Telephone and PBX System Forward the Connection (MSN/DDI Call Forwarding)
-
Page 114: Switch The Configurations Of The Pbx Manually (Day, Night Etc.)
Use of the Telephone and PBX System Switch the Configurations of the PBX manually (Day, Night etc.) Switch the Configurations of the PBX manually (Day, Night etc.) It is possible to programme different configurations for day, night with the configuration pro- gramme of the PBX. -
Page 115: Door And Relay Functions Of The Pbx
LED Signalling next to the Key (only for defined Assignment): green The configuration defined for the key is switched on. The configuration defined for the key is not switched on. Door and Relay Functions of the PBX Use the Door Terminal The functions described in the following are only available with at least one door terminal con- nected to your PBX (see manual of the PBX). -
Page 116: Switch Relay Internally
Use of the Telephone and PBX System Door and Relay Functions of the PBX Assign Key: define keys function key ..level door function The current settings for the key assignment is shown on the display. Use Function via Key: General assigned key (only during the idle state of the telephone): By pressing the key the function menu for “door functions”... - Page 117 Use the Function via Function Menu: functions relay The icon marks the current setting. Assign Key: define keys function key ..level relay The current settings for the key assignment is shown on the display. Use Function via Key: By pressing the key the relay is switched on, off or over.
-
Page 118: Number Memory And Busy Status Overview
Use of the Telephone and PBX System Number Memory and Busy Status Overview Number Memory and Busy Status Overview Key for Exchange Line Selection and Busy Status Overview With a key correspondingly programmed an exchange line selection can be started. The LED near the key informs you on the corresponding S Assign Key: define keys... -
Page 119: External Msn
Key for Presentation of a MSN With a correspondingly configured key you can select which MSN (own external telephone number) should be presented for an exchange line call. The selected MSN is used for the call started after the key is pressed. Assign Key: define keys function key ... -
Page 120: Key For Presentation Of An Msn And Busy Status Overview
Use of the Telephone and PBX System Number Memory and Busy Status Overview Key for Presentation of an MSN and Busy Status Overview With a key correspondingly configured a selection of the MSN (own external number) and a selection of the exchange line can be started. The LED near the key informs you on the cor- responding S port/bundle busy status. -
Page 121: Function Key To Select A Voip Account
Function Key to select a VoIP Account An external call can be started with a corresponding defined key via a certain VoIP account. The corresponding LEDs inform you about the current busy status. Assign Key: define keys function key .. -
Page 122: Speed Dialling
Use of the Telephone and PBX System Number Memory and Busy Status Overview Speed Dialling The speed dialling enables the configuration of a function key with up to 20 digits. The speed dialling key can be used to save internal and external telephone numbers as well as program- ming sequences of the PBX. -
Page 123: Macro Key
Exception: If the assigned telephone number is an internal telephone number and if this one is currently called, a pickup of this call is offered. After picking up the receiver: By pressing the key the telephone number assigned to this key is dialled. - Page 124 After pressing the macro key the telephone switches to handsfree operation. Z300 The telephone dials the telephone number 300 (e.g. answering machine). The telephone waits for the connection. After the connection has been established the telephone waits for another 2 seconds.
-
Page 125: Project Assignment
At the beginning of a macro no pauses can be entered. The maximum length of the pause may be 5 seconds. This restriction is not valid for the com- mand “wait for a connection”. If there is a macro on both levels of a function key, the LED control will also be done by the macro on the second level. - Page 126 Use of the Telephone and PBX System Project Assignment Assign Key: define keys function key ..level project The current settings for the key assignment is shown on the display. Use Function via Key: Generally assigned key: By pressing the key the function menu “Project number” (s. a.) opens.
-
Page 127: Announcement/Intercom Via System Telephone (Intercom)
Announcement/Intercom via System Telephone (InterCom) This function enables the announcement to a system telephone from any internal telephone without actively being taken by anyone (e.g. in a doctor’s office). The caller can also order the system telephone to activate the microphone additionally to the loudspeaker (handsfree operation). - Page 128 Use of the Telephone and PBX System Announcement/Intercom via System Telephone (InterCom) Assign a Key with the Function “InterCom Authorization”: define keys function key ..level InterCom (Auth) The current settings for the key assignment is shown on the display.
-
Page 129: Outbound Intercom Calls With The System Telephone
Outbound InterCom Calls with the System Telephone For outbound InterCom Calls to other system telephones a key can be assigned on the sys- tem telephone to simplify the function. Assign a Key with the Function “InterCom”: define keys function key .. -
Page 130: Announcement Via Loudspeaker
Use of the Telephone and PBX System Announcement via Loudspeaker Announcement via Loudspeaker This function enables an announcement via loudspeaker system or an amplified loudspeaker connected to the audio output of the PBX (e.g. in a department store/supermarket). A previ- ously configured telephone number has to be called by an internal telephone. -
Page 131: Control The Voicemail Centre 461/461.2
Control the Voicemail Centre 461/461.2 If you have one or several Voicemail Centre 461/461.2 (special accessory by Auerswald) connected to your PBX, the interrogation/operation of the available mailboxes on the device can be made via the second level (softkey system telephone. - Page 132 The complete description of the installation and operation can be learned from the following manuals: For the Voicemail Centre 461.2 the “Manual for Operation with Auerswald PBX sys- tems” or for the Voicemail Centre 461 from the corresponding “Operation Manual”.
-
Page 133: Group Functions Of The Pbx
Group Functions of the PBX The PBX is able to manage groups (teams) additionally to the internal subscribers. Subscrib- ers can be members of multiple groups. These groups can be used in order to reach the inter- nal subscribers of certain departments (e.g. support, marketing, sales). Your membership in a group does not mean that you are always called when your group is called. - Page 134 Use of the Telephone and PBX System Group Functions of the PBX Assign Key: define keys function key ..level group The current settings for the key assignment is shown on the display. Use Function via Key: By pressing the key the telephone is logged in or out of the group configured for the key. LED Signalling next to the Key: green The telephone is logged into the group.
-
Page 135: Log The Telephone Out Of All Groups
Log the Telephone out of all Groups If the telephone is logged into several groups at the same time, it can be logged out of all of these groups at the same time. Use the Function via Function Menu: functions log out all grp. -
Page 136: Switch On/Off Announcement Before Answering For A Group
Use of the Telephone and PBX System Switch on/off Announcement before Answering for a Group You can store the Announcement before Answering as WAV file in the PBX or record it via telephone (see manual of the PBX). Assign Key: define keys function key ... - Page 137 on busy (The caller only hears the announcement, if all members of the group are busy.) always (The caller always hears the announcement.) You can configure in the configuration manager of the PBX if the telephones should ring already during the announcement for the variant “always” and if the caller should hear the Music on Hold after the announcement.
-
Page 138: Transfer Of An Exchange Line Access
Use of the Telephone and PBX System Transfer of an Exchange Line Access Transfer of an Exchange Line Access An authorized telephone e.g. the telephone reception can assign another internal telephone with the exchange line authorization needed for an outbound call for a short period of time. This makes sense e.g. -
Page 139: Boss/Secretary Function
Boss/Secretary Function This function protects the boss’ telephone against direct calls by forwarding them to the sec- retary. The essential difference in comparison with the call forwarding is the fact that the boss’ telephone can still be called by the secretary’s telephone and the secretary can transfer important calls to the boss’... - Page 140 Use of the Telephone and PBX System Boss/Secretary Function LED Signalling next to the Secretary Key: red (flashing) A call is forwarded to the corresponding secretary. By pressing the key you can start a pickup. The corresponding secretary is not reachable. A caller is hearing the busy tone now, unless Call Waiting is activated at the secretaries telephone.
-
Page 141: Boss Key
Use the Function on the Secretary Telephone Assign a Key on the Secretary Telephone: define keys function key ... first level boss key The current settings for the key assignment is shown on the display. Use the Function via Boss Key on the Secretary Telephone: If a forwarded call on the secretary telephone is accepted on the telephone, the call can be treated as usual. -
Page 142: Switch Off Boss/Secretary Function For All Secretary Telephones At The Same Time
Use of the Telephone and PBX System Boss/Secretary Function Switch off Boss/Secretary Function for all Secretary Telephones at the same Time With this function the boss/secretary function can also switched off for several secretary tel- ephones at the same time without pressing all secretary keys individually. Use the Function via Function Menu (only on the Boss Telephone): functions >... -
Page 143: Waiting Field
(COMset) of the PBX. Consult the manual of the PBX. The operation of the Waiting Field is done via one or serval phones. System telephones COMfortel 1500/2500 as well as COMfort 2000 plus can be selected as Waiting Field receptions and configured as follows: Select one or several ration programme/manager (COMset) of the PBX. -
Page 144: Accept External Calls In The Waiting Field
Use of the Telephone and PBX System Waiting Field Accept External Calls in the Waiting Field Waiting Field keys have to be programmed on the Waiting Field receptions selected for the operation of the Waiting Field to control and handle exchange line calls. During the configu- ration each Waiting Field key is assigned to one S the keys are allocated dynamically. - Page 145 Use Function via Key: By pressing the key the caller signalled on the key can be put into the Waiting Field or a con- nection with the caller can be done from the Waiting Field. The reaction after pressing the key depends on the actual status - shown via the LED next to the key.
-
Page 146: Accept Internal Calls In The Waiting Field
Use of the Telephone and PBX System Waiting Field pressing the exit key. The LED glows red now and the display is in the idle state. Now you can start a call as usual (e.g. select a telephone number from the telephone book. In case of ongoing conversations inbound public exchange line calls will be signalled with flashing LEDs and additionally with an advice tone - if activated (see several active Waiting Field receptions a caller put into the Waiting Field is also signalled via... -
Page 147: Activate/Deactivate Waiting Field Reception
yellow An internal subscriber is on Hold in the Waiting Field. Information on the waiting caller are shown on the display. (If additional Waiting Field Receptions are activated, the waiting call is not sig- nalled to these) By pressing the key once, a connection is established to the waiting caller. An internal subscriber is on Hold in the Waiting Field. - Page 148 Do-no-Disturb are switched off. After the deactivation of the Waiting Field reception (on the telephone) these functions (e.g. a Call For- warding to the answering machine) are possible again. The corresponding function (except parallel call) has to be activated again.
-
Page 149: Hotel Functions For Reception And Room Telephones
Hotel Functions for Reception and Room Telephones The hotel function enables the comfortable room and call data management if the PBX is used in a hotel. The scope of functions can be divided into three main areas. Hotel Reception Telephone: information functions via display and LEDs on the Xtension module. -
Page 150: Hotel Room
Use of the Telephone and PBX System Hotel Functions for Reception and Room Telephones Define Room Keys on the Reception Telephone: define keys function key ..level hotel room The current settings for the key assignment is shown on the display. - Page 151 LED Signalling next to the Room Key: red (flashes) The room telephone is currently ringing. By pressing the key you can start a pickup. The room telephone is in a telephone conversation. green (flashes) You have been called from the room telephone and the call has not been accepted.
-
Page 152: Check Out
Use of the Telephone and PBX System Hotel Functions for Reception and Room Telephones The icon marks the current setting. time The Guest leaves (Check Out) After selection of the function check out – provided charges occurred and a printer is con- nected - you are asked whether you like to have a print-out of the final invoice. - Page 153 If there are call charges and a printer is connected, you are asked if you like to get a print- out of the total invoice. print-out? The print-out is executed. print-out OK? After the end of the “check out” all room data are initialized, the call charge meter and also the call data are deleted.
-
Page 154: Operate A Hotel Room Telephone
Use of the Telephone and PBX System Hotel Functions for Reception and Room Telephones Operate a Hotel Room Telephone The advantage of a system telephone compared with the use of an analogue or standard ISDN telephones is e.g. the remote controlled delete function when checking out the guest (privacy protection), the various comfort functions and specifically configured function keys. -
Page 155: Configuration Of The Telephone
The system telephones COMfortel 1500 and COMfortel 2500 offer both 15 freely program- mable function keys. If the system telephone COMfortel 2500 has been expanded with key extension modules COMfortel Xtension30 (up to 3 modules are possible), 30 function keys per module are available. - Page 156 Configuration of the Telephone Key Programming input field opens where you can enter a 20-digit telephone number. Then the current setting is shown on the display. [project number] Press the softkey in front of the setting. If there is a list of project numbers available, it opens and the requested project number can be selected by pressing the of the selection.
-
Page 157: Basic Settings
[language]: Selects one of the languages as display language. Basic Settings -Bus of your Auerswald PBX page 33 and the follow- softkey to complete the entry. page 33 and the... -
Page 158: Select Type Of Headset
Configuration of the Telephone Basic Settings Select Type of Headset If a headset has been connected, the type of headset in use has to be configured. settings def.settings headset type The icon marks the current setting. Switch on/off Quick Remote Access to the Voicemail Centre 461.2 Compared to the Voicemail Centre 461 the Voicemail Centre 461.2 supports a quicker remote access. -
Page 159: Display Settings
The Voicemail Centre 461.2 has to use at least the firmware version 2.02 for the support of this function. Display Settings Configure the Display Light (only COMfortel 2500) You can adapt the display backlight to the requirements of your work place. settings... -
Page 160: Set The Contrast
Configuration of the Telephone Display Settings settings display brightness (...) If you have switched off the display backlight completely (see out effect. Important Set the Contrast settings display contrast Configure the Time Format settings display time format Open the settings menu for the setting “bright- ness”... -
Page 161: Set The Date Format
In the idle state of the COMfortel 1500 the year is presented with 4-digits (e.g. 03.06.2006). In the idle state of the COMfortel 2500 the month is presented with three letters and there is no year (e.g. 03.Jun). -
Page 162: Menu Definition
Configuration of the Telephone User Settings User Settings Configure Macro Display settings user settings macro display The icon marks the current setting. Configure Menu Selection You can adapt the function menu (see use some of the available functions, you can disable the others to reduce the menu selection. The fading out only concerns the function menu. -
Page 163: Keys 2Nd Level
The icon marks an activated selection. The icon marks a deacti- vated selection. Configure the Reachability of the second Key Level The freely programmable function keys can have two functions each (on 2 levels). Here you can configure how the activation of the second level of the function keys will happen. The mode “Activation with shift key”... -
Page 164: Configure The Speed Dialling Keys
Configuration of the Telephone Configure Number Blocking Configure the Speed Dialling Keys For all speed dialling keys programmed on function keys (see pressing in the idle state if automatic off-hook should be enabled (when using the headset) or switched to handsfree operation. settings user settings speed dial.key... -
Page 165: Configure Function Lock
Configure Function Lock The functions that can be selected in the function menu (see menu (see page 35) can be blocked against unauthorized use. The display of these blocked functions in the selection list requires the entry of the corresponding PIN after selection of “additional”... -
Page 166: Configure Settings Lock
Configuration of the Telephone Configure Number Blocking Configure Settings Lock The settings selectable in the configuration menu (see unauthorized use. The display of these blocked settings in the selection list needs the entry of the corresponding PIN after selection of “additional” at the end of the selection list. settings blocking settings lock... -
Page 167: Configure/Change The User Pin
Configure/change the User PIN settings blocking User PIN ****** ****** You can delete the PIN by not entering any PIN in both menus but by only pressing the softkey. Advice Signalling Configure LED Signalling for Messages In the idle state the LED near the message key shows the condition of the caller list: LED flashes: In the list are new entries that have not yet been viewed. -
Page 168: Configure Led And Tone Signalling For Call Waiting
Configuration of the Telephone Signalling The icon marks the current setting. Configure LED and Tone Signalling for Call Waiting In this menu can be set whether an inbound call will be signalled during a call by a tone and/ or a LED or only via display message. settings signalling call wait.tone... -
Page 169: Configure Headset Ringer
settings signalling attention tone The icon marks an activated selection. The icon marks a deacti- vated selection. Configure Headset Ringer In the headset operation (headset is activated; see possible: 1. Ringing in the loudspeaker (like with the receiver operation) 2. Ringing in the loudspeaker + short attention tone in the headset 3. -
Page 170: Configure Ringer Melodies And Volume
Configure Ringer Melodies and Volume To identify different call types there are 16 (COMfortel 2500) or 8 (COMfortel 1500) ringer melodies. You can edit or overwrite these ringer melodies with the PC programme COMfortel Melody (see These defined ringer rhythms can be assigned to the different type of calls, callers or call des- tinations. -
Page 171: Ringer Melody
Priority list for external calls: 1. Ringer melody defined in the telephone book if the caller can be identified in the telephone book 2. For the call type “Call Deblocker” defined ringer melody if the caller has been identified as part of a Call Deblocker in case of activated Do-no-Disturb 3. -
Page 172: Change Ringer Volume Automatically
Configuration of the Telephone Signalling You hear the displayed ringer melody in the configured vol- ume. It is possible to configure a ringer melody for InterCom calls. But pay attention that it will be played for a maximum of 1 second before the telephone takes the call automatically. Advice The here defined ringer melodies are not valid if “single tone”... -
Page 173: Configure Lists
Configure Lists Calls/Conversations to be taken over into the Calls Lists If you like to prevent that a lot of useless entries will be taken into the lists, you can configure the lists for the calls to be taken over. The following calls/conversations are for selection – if it makes sense in the context –... -
Page 174: Telephone Numbers To Be Displayed In The Telephone Book
Configuration of the Telephone Configure Lists Telephone Numbers to be displayed in the Telephone Book If you like to prevent that unwanted entries are shown in the telephone book, you can restrict the display of the different telephone number types. The following types can be selected: Emergency call numbers (emergency call numbers configured in the PBX) Internal numbers (internal telephone numbers configured in the PBX) Telephone book of the PBX (telephone book entries/short-code dialling numbers config-... -
Page 175: Pc Connection And Installation Of The Software
1st option : The access to the telephone is done via the USB interface of a system tele- phone connected to the PBX the telephone via USB. (How to connect the COMfortel 2500 to the PC is described on page 176.) 2nd option: The access to the telephone is done with an ISDN PC-controller (CAPI 2.0) or... -
Page 176: Connection To The Usb Interface Of A Pc (Comfortel 2500 Only)
2000 and Windows XP to support you with the installation of the necessary driver (see ter Installation of the Drivers and the PC Software on page suitable driver for the device, insert the CD (Auerswald Mega Disk) into the CD ROM drive and enter the directory “<CD drive>\driver\” as target. -
Page 177: Installation Of The Drivers And The Pc Software
Install the PC Programmes manually The installation assistant will be started automatically after having finished the USB driver installation of the Auerswald Mega Disk and enables the installation of the PC programmes and drivers belonging to the device. If the assistant does not start automatically or for the COMfortel 1500, start the PC pro- grammes as described in the following. -
Page 178: Comfortel Set And Comfortel Melody
PBX correctly. If you have already stored a configuration on your PC, you can open it by pressing the button “open” and selecting from “file”. Only COMfortel 2500. interface” in... -
Page 179: Tips For Comfortel Set
Switch on/off functions: A square displays a switch field. An empty square means “off” or “no”; a little hook means “on” or “yes”. The switch over happens by simply clicking on it with the left mouse key. Only COMfortel 2500. PC Connection and Installation of the Software COMfortel Set and COMfortel Melody of the system telephone first. -
Page 180: Backup Data Or Transfer It To Other Telephones
If you like to save the configuration and/or other data and settings, you can create a backup file of your telephone same or to any other system telephone COMfortel 1500/2500. You can select the requested areas (such as e.g. configuration, telephone book or melodies). -
Page 181: Service Functions
ERVICE UNCTIONS Start an Automatic Firmware Update An update of the firmware of the telephone e.g. could make sense if additional features are offered. Contact your dealer whether an update is a benefit for you. Or stay informed about improvements in the telephone software - on our homepage in the Internet. The version number of the software in your telephone can be viewed as described in the Information on Telephone and PBX on page If the update is started as described in the following, the telephone will be connected to the... -
Page 182: Distribute Firmware
PBX, the manual firmware update has to be done on a COMfortel 1500 and on a COMfortel 2500. Then the distribution of the firmware can be started from both telephones. If there are older system telephones (COMfort 1000, COMfort 1200 and COMfort 2000 plus), an addi- tional manual firmware update will be necessary for them, too. -
Page 183: Return To The Default Factory Settings
Return to the Default Factory Settings If necessary, you can reset up your telephone to the default factory setting. On the display appears a con- firmation message. The telephone is reset to the default factory settings. Then the language has to be selected again and the internal telephone number of the telephone MSN) has to be entered. -
Page 184: Select Pbx
Service Functions Select PBX Select PBX The configuration of the telephone depends on the connected PBX. If the setting is changed here (instead of COMpact 5010 VoIP, COMpact 5020 VoIP, COMmander Basic.2 or COM- mander Business another PBX is selected or vice versa) – after confirmation of the new PBX on the display –... -
Page 185: View Information On Telephone And Pbx
View Information on Telephone and PBX You can view important information on your telephone with the following information function. information Service Functions View Information on Telephone and PBX Open the information menu (You will find help page 33 and the following). Use the softkeys to browse to the option you require:... -
Page 186: Remote Programming
Sequence of the Remote Programming for the Service Technician The necessary hardware is a PC connected with a COMfortel 2500 on an internal S your PBX or alternatively an ISDN PC-controller operated on an internal S public telephone network. The necessary software consists of the configuration software COMfortel Set and the CAPI 2.0 driver for the system telephone or ISDN PC-controller. -
Page 187: Technical Data
Safety Make sure that the power consumption of the terminals on the internal S the Auerswald PBX do not exceed the listed values in the following table. If you like to con- Advice nect more than the here stated number of system telephones COMfortel 1500/2500, you have to operate some of the COMfortel 2500 with the wall-mount power supply COMfortel XT-PS (type number 809). -
Page 188: Data For The Connection Of A Headset
45 dB (COMfortel Pinout of the Headset Jack fortel 2500) max. number of COMfortel 1500 and COMfortel 2500 without wall- mount power supply 6 (2 per port) 6 (2 per port) 4 (2 per port) 12 (2 per port) 16 (2 per port) -
Page 189: Tam Readiness
TAM readiness assigned to the key is switched on. TAM readiness assigned to the key is switched off. Only on COMfortel 2500 with SD card. After 30 days a chargeable release of the function COMfortel Voicemail is necessary via Upgrade Centre (see Open the function menu for the function “TAM... -
Page 190: Answering Machine List
(without pressing the softkey). The latest recording will be played first. Only on COMfortel 2500 with SD card. After 30 days a chargeable release of the function COMfortel Voicemail is necessary via Upgrade Centre (see softkey (see Pic. -
Page 191: Dial From The Answering Machine List
Press the message key to switch from the idle state to the list selection. Press the softkey to the left of the option TAM List to open the answering machine list (is skipped if the other lists are empty). Scroll with the requested recording. -
Page 192: Pic. 33: Display Options In The Tam List
Configure and use the Answering Machine Answering Machine List Pic. 33: Display Options in the TAM List TAM List caller MSN dialled called partner 4 16.05.07 12:44 Information on the recording: – Caller – MSN dialled (for external call) – Called partner –... -
Page 193: List Of Voice Memos
..level TAM voice memo Only on COMfortel 2500 with SD card. After 30 days a chargeable release of the function COMfortel Voicemail is necessary via Upgrade Centre (see Configure and use the Answering Machine page 193). -
Page 194: Listen To The Recordings (Voice Memos)
Configure and use the Answering Machine List of Voice Memos Use Function via Key (only in the idle State of the Telephone): By pressing the key in the idle state of the telephone the recording of a voice memo will be started. -
Page 195: Pic. 35: Display Options In The List Of Voice Memos
Pic. 36: During the Playback TAM voice memo No. 1/5 00:08 16.05.07 12:44 Information on the recording: See above Configure and use the Answering Machine Softkeys: – : Delete displayed recording – : Start replay of the recording – : Scroll to the next (older) recording –... -
Page 196: Accepting Call
The following entries are possible: 0...99: call acceptance time 0-99 Only on COMfortel 2500 with SD card. After 30 days a chargeable release of the function COMfortel Voicemail is necessary via Upgrade Centre (see Open the settings menu for the setting “accepting call”... -
Page 197: Configure The Maximum Recording Time
Advice Switch on/off the Listen in In this menu you can configure if during the call acceptance of the answering machine the loudspeaker of the telephone has to be switched on to listen in to the caller. Configure and use the Answering Machine Open the settings menu for the setting “record-... -
Page 198: Listen In
Switch on/off Automatic Playback In this menu you can configure if the playback of new recordings starts automatically after you have opened the answering machine list or the list of voice memos or only after pressing softkey. settings answer.machine... -
Page 199: Create And Edit Announcements
If new announcements are “broken” or incomplete during playback, the SD card may be too fragmented. To make enough space for later recordings, delete the recordings that you do Only on COMfortel 2500 with SD card. After 30 days a chargeable release of the function COMfortel Voicemail is necessary via Upgrade Centre (see... -
Page 200: Edit Or Delete Existing Announcement In The List
Configure and use the Answering Machine Create and edit Announcements not need anymore or store them on your PC (see card reader the SD card can also be defragmented via PC. For each announcement a WAV file is stored on the SD card. The WAV files can be trans-... -
Page 201: Assignment Of Announcements
- key. Only on COMfortel 2500 with SD card. After 30 days a chargeable release of the function COMfortel Voicemail is necessary via Upgrade Centre (see Only available when operated on the PBX systems COMpact 5010 VoIP, COMpact 5020 VoIP, COM- mander Basic.2 and COMmander Business. -
Page 202: Table 3: Priority List For External Calls
Configure and use the Answering Machine Assignment of Announcements Table 3: Priority List for External Calls 1. Announcement assigned to the call type “Deblocker calls” if the caller can be identified as a part of the Call Deblocker in case of an activated Do-no-Disturb. -
Page 203: Change Announcement Assignment
The announcement name with creation date and time is dis- played. Configure and use the Answering Machine page 201). Open the function menu for the function “TAM announcement” (You will find help on and the following). - Page 204 Configure and use the Answering Machine Assignment of Announcements Assign Key: define keys function key ..level TAM announcement The current settings for the key assignment is shown on the display. Use Function via Key: Generally assigned key (only during the idle state of the telephone): By pressing the key, the function menu for the function “TAM announcement”...
-
Page 205: Tam Automatic
You can also switch on/off the automatic via remote access (see The announcement assignment switched on with the function automatic can be overridden Advice via function menu or function key (see Configure and use the Answering Machine Assignment of Announcements page 201). -
Page 206: Call Recording
The current settings for the key assignment is shown on the display. Only on COMfortel 2500 with SD card. After 30 days a chargeable release of the function COMfortel Voicemail is necessary via Upgrade Centre (see Open the function menu for the function “TAM automatic call recording”... -
Page 207: Call Recording
(flashes) The current call is recorded. Configure and use the Answering Machine page 221). The recordings are collected in the answering machine list page Open the key programming menu for the func- tion “TAM call recording” (You will find help on... -
Page 208: Switch On/Off The Call Recording Info Tone
Then you can stop the recording by select- softkey. page 221). The recordings are collected in the answering machine list page Open the settings menu for the setting “call recording tone” (You will find help on and the following). -
Page 209: Configure The Remote Access
Only on COMfortel 2500 with SD card. After 30 days a chargeable release of the function COMfortel Voicemail is necessary via Upgrade Centre (see When operated on the PBX systems COMpact 5010 VoIP, COMpact 5020 VoIP, COMmander Basic.2 and COMmander Business the user PIN has to be assigned in the configuration manager of the PBX. -
Page 210: Switch On/Off The Remote Access Toll Saver (And Quick Remote Access)
But if there are no new messages, the call acceptance time is extended by 10 seconds (approx. 2 ringback tones) compared with the defined call accept- ance time. If the answering machine has taken the call, you can start with the remote access imme- diately (se page settings answer.machine... -
Page 211: Enter Quick Access Telephone Numbers
If you like to be informed by the answering machine away from home way as soon as a new message has been recorded, configure the message forwarding. The message forwarding Only on COMfortel 2500 with SD card. After 30 days a chargeable release of the function COMfortel Voicemail is necessary via Upgrade Centre (see Configure and use the Answering Machine Open the settings menu for the setting “quick... -
Page 212: Answering Machine - Switch On/Off Message Forwarding
After the playback of the new message, a remote access can be started within 30 seconds (without PIN entry; see Answering Machine – Switch on/off Message Forwarding If you have configured message forwarding leave your home). -
Page 213: Configure Announcement For Message Forwarding
The announcements available in the announcement list have to be copied with the PC pro- gramme COMfortel Set to the SD card first (se Advice page 199). Configure and use the Answering Machine page 221). Open the settings menu for the setting “for- warding announcement” (You will find help on page 33 and the following). -
Page 214: Configure Target For The Message Forwarding
Configure and use the Answering Machine Configure Message Forwarding Configure Target for the Message Forwarding Here you can enter the external telephone number that will be used as target to forward the messages. settings answer.machine forward.target telephone number Please enter the external telephone numbers always with an exchange line access number “0”. -
Page 215: Configure Repetitions For The Message Forwarding
The following entries are possible: 1...9: 1-9 minutes settings answer.machine fwd.repet.time time in minutes Configure and use the Answering Machine Open the settings menu for the setting “for- warding repetitions” (You will find help on page 33 Enter the number of repetitions. number Press the Open the settings menu for the setting “for-... -
Page 216: Store The Data (Backup) On The Sd Card
The icon marks a deacti- vated selection. Only on COMfortel 2500 with SD card. After 30 days a chargeable release of the function COMfortel Voicemail is necessary via Upgrade Centre (see page page 217). Open the settings menu for the setting “config- uration”... -
Page 217: Execute Backup (Comfortel 2500 -> Sd Card)
Execute Backup (COMfortel 2500 -> SD Card) If you like to start the backup manually, follow these instructions: settings Backup > CF2500 - The backup will be started. Restore the Backup (SD Card-> COMfortel 2500) If you like to restore the backup, follow these instructions:... -
Page 218: Configure Automatic Backup
An SD already used for other applications can be formatted in the telephone wit FAT16. An SD card previously formatted with FAT32 will be reformatted. Only on COMfortel 2500 with SD card. After 30 days a chargeable release of the function COMfortel Voicemail is necessary via Upgrade Centre (see Open the settings menu for the setting “auto-... -
Page 219: Check Sd Card
After inserting the SD card for the first time the necessary directory structure will be created on the SD card. The tones used by the answering machine will also be created then. Advice Announcements are not available after inserting the SD card. Individual announcements... -
Page 220: Data Transfer Between Pc And Sd Card
Only on COMfortel 2500 with SD card. After 30 days a chargeable release of the function COMfortel Voicemail is necessary via Upgrade Centre (see For the support of the function COMfortel Set with SW version 1.9 or newer is necessary. -
Page 221: Table 6: Functions Of The Remote Access
If you have made a mistake when entering the user PIN, you can restart by entering again. Advice Only on COMfortel 2500 with SD card. After 30 days a chargeable release of the function COMfortel Voicemail is necessary via Upgrade Centre (see Configure and use the Answering Machine (page 209). - Page 222 Configure and use the Answering Machine Make a Remote Access Correct entries are confirmed with a positive confirmation tone (6 short tones) and wrong entries with a negative confirmation tone (3 long tones). In case of an activated remote access toll saver change.
-
Page 223: Index
COMmander Basic) ... 135 assign key (COMpact 5010/5020 VoIP, COMmander Basic.2/ Business) ... 136 Announcements assign (answering machine) .. 201 record (answering machine) .. 199 Answering machine answering machine list ... 190 automatic ... 205 automatic call recording ... 206 automatic playback ... - Page 224 Index Call Deblocker inbound ... 104 Call forwarding ... 107 subscriber/telephone ... 107 Call forwarding (MSN/DDI) ... 111 Call macro configure ... 81 Call recording automatic ... 206 info tone ... 208 listen to recordings (answering machine list) ... 190 use ...
- Page 225 Inbound call ...44 display options ...44 hold the caller ...46 Inbound external call reject ...45 Information menu ...33 Installation answering machine ...20 Installation of the software ...177 InterCom make a call ...93 InterCom authorization ...127 Introduction ...10 Key extension module connect ...17...
- Page 226 Index Key programming menu ... 35 Keypad layout ... 26 Keys ... 26 Labels insert ... 19 LED signalling configure ... 167 LEDs ... 26 Lighting ... 159 Listen in ... 197 Listen to recordings (answering machine list) ... 190 Lists ...
- Page 227 Reception telephone use ... 149 Record voice memo ... 193 Recording time ... 197 Redialling ... 84 automatic (Power Dialling) ... 60 delete entries ... 84 display options ... 85 select call types ... 173 Reject caller ... 45 Relay remote switching ...
- Page 228 Index Telephone ... 38 accept the call ... 45 in a conference ... 73 in a Query ... 69 in the call ... 62 reject call ... 45 Telephone book ... 75 comment ... 83 create call macro ... 81 create new contact ...
-
Page 229: Lettering Labels
Lettering Labels...
Need help?
Do you have a question about the COMfortel 2500 and is the answer not in the manual?
Questions and answers