Table of Contents
Advertisement
Advertisement
Table of Contents

Related Manuals for MAJORITY BAR-DAB-WDN


Summary of Contents for MAJORITY BAR-DAB-WDN
- Page 1 Majority Barton DAB / DAB+ / FM Radio BAR-DAB-WDN User Guide...
-
Page 2: Table Of Contents
Contents Controls and Functions ............. What’s in the box? ................. Instruction Guide ................Basic Operation ................DAB Radio ..................Set Up of the DAB Radio Preset Stations ......FM Radio ................... Set Up of the FM Radio Preset Stations ... -
Page 3: Controls And Functions
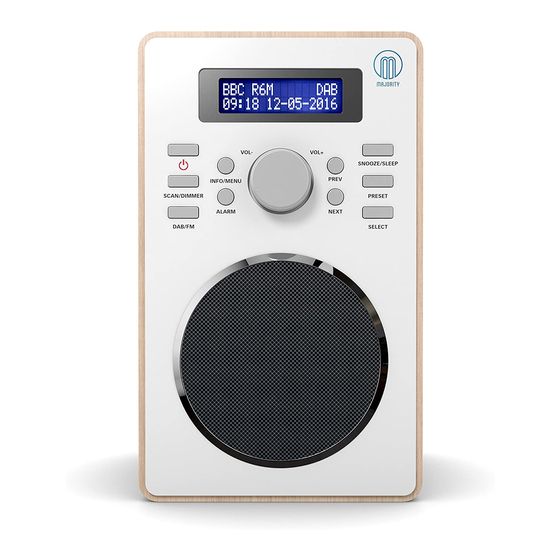
Controls and Functions Front View 1. Power/Standby 8. Display Screen 2. Info/Menu 9. Snooze/Sleep 3. Scan 10. Previous 4. Alarm 11. Preset 5. DAB/FM 12. Next 6. Volume -/+ 13. Select 7. Speaker... -
Page 4: Back View
Controls and Functions Back View 14. Off/On 15. DC IN 5V, 1A Power Connector 16. Earphone Jack 17. Antenna... -
Page 5: What's In The Box
What’s in the box? Majority Barton DAB/DAB+/FM Radio Clock UK Standard Plug DC 5V,1A Power Supply User Guide... -
Page 6: Instruction Guide
Instructions Guide Please note all (Ref.) refer to Page 1 Controls and Functions mapping guide. Basic Operation Plug the connector into the side of the system labelled DC 5V (Ref.15) and the power supply into the mains. Ensure the antenna (Ref.17) is extended as far as possible so that you can rotate it which will enable you to get the best signal you can. -
Page 7: Dab Radio
Instructions Guide DAB / DAB+ Radio Press the ‘DAB/FM’ button (Ref.5) to switch to DAB Radio. On first use it will automatically scan all stations and save them. Fully extend the antenna (Ref.17). To auto scan, press the ‘Scan’ button (Ref.3) and then release. This will start scanning up the frequency band and store all stations that have a good signal. -
Page 8: Set Up Of The Dab Radio Preset Stations
Instructions Guide How to store a preset station Up to 10 stations can be set. To store a station that you are currently playing: Press and hold ‘Preset’ button (Ref.11). “<1: (Empty)” will show on the display. Press ‘Prev’ button (Ref.10) or ‘Next’ (Ref.12) to change the “<1” to the number you want to store the station as. -
Page 9: Fm Radio
Instructions Guide FM Radio Press the ‘DAB/FM’ button (Ref.5) multiple times to switch between DAB and FM. The first time you do this, the FM frequency “87.5 MHz” will be displayed on the screen. Fully extend the antenna (Ref.17). To auto scan, press and release the ‘Scan’ button (Ref.3). This will then start scanning up the frequency band and play the first station it finds with good signal. - Page 10 Instructions Guide FM Scan Setting Choose between scanning strong and weak signals (All) or only the strong stations (Only). Press and hold the ‘Info/Menu’ button (Ref.2).To make your choice, use the ‘Prev’ or ‘Next’ buttons (Ref.10/12) to choose your option. Choose “FM Scan Setting”...
-
Page 11: Set Up Of The Fm Radio Preset Stations
Instructions Guide How to store a preset station Up to 10 stations can be set. To store a station that you are currently playing: Press and hold ‘Preset’ button (Ref.11). “<1: (Empty)” will show on the display. Press ‘Prev’ button (Ref.10) or ‘Next’ (Ref.12) to change the “<1” to the number you want to store the station as. -
Page 12: Station Information For Dab And Fm Radio
Instructions Guide Station information for DAB Radio DAB / DAB+ radio Press the ‘Info/Menu’ button (Ref.2) repeatedly to show the different programme information. Bit Rate: The data rate which the signal is being transmitted. Bit Error Rate (BER): Provide details of the signal error rate. Channel and Frequency: Displays the station’s transmission channel number and frequency. - Page 13 Instructions Guide Station information for FM Radio FM Radio Press the ‘Info/Menu’ button (Ref.2) repeatedly to show the different programme information. Signal Strength: Displays a signal bar with the strength of the current station. Time and Date: Displays the time and the date. Frequency: Displays the station’s transmission frequency.
-
Page 14: Clock And Date Setting
Instructions Guide Manually Setting the Time The time will automatically update after the fist use of DAB Radio. However, you can still set the time manually. Ensure the unit is turned on. Press and hold the ‘Info/Menu’ button (Ref.2). To make your selection, use the ‘Prev/Next’ buttons (Ref.10/12) to choose your option. - Page 15 Instructions Guide Manually Setting the Date The date can be changed after changing the time. The year will flash on the display screen. Press the ‘Prev’ (Ref.10) or ‘Next’ (Ref.12) buttons until the required year is displayed. To confirm the year, press the ‘Select’ button (Ref.13). The month will flash on the display screen.
-
Page 16: Dual Alarm Setting And Alarm Snooze
Instructions Guide Dual Alarm Setting Press the ‘Alarm’ button (Ref.4) once for Alarm 1 or twice for Alarm 2. Press the ‘Select’ button (Ref.13) to confirm. To turn the Alarm on or off, press ‘Next’ (Ref.12) so that “ON” is flashing and press the ‘Select’ button (Ref.13) to confirm. The hour digits for the alarm will flash. - Page 17 Instructions Guide To turn off Alarm 1 or Alarm 2 Press the ‘Alarm’ button (Ref.4) once for Alarm 1 or twice for Alarm 2. Press the ‘Select’ button (Ref.13) to confirm. To turn the Alarm on or off, press ‘Next’ (Ref.12) so that “OFF” is flashing and press the ‘Select’...
-
Page 18: Other Functions
Instructions Guide Other Functions Sleep Setting This enables you to programme the radio to switch off at a specific time, up to 120 minutes from activation. Press the ‘Snooze/Sleep’ button (Ref.9). Choose from OFF/5 mins/15mins/30mins/45mins/60mins/ 90mins or 120mins using the ‘Prev’ or ‘Next’ buttons (Ref.10/12). When your choice is displayed press the ‘Select’... - Page 19 Instructions Guide System Reset Press and hold the ‘Info/Menu’ button (Ref.2). Use the ‘Prev’ or ‘Next’ buttons (Ref.10/12) to highlight “Factory reset” and press the ‘Select’ button (Ref.13). The display screen will show “Factory reset”. Use the ‘Next’ button (Ref.12) to choose “Yes” . Press the ‘Select’ button (Ref.13) to confirm.
-
Page 20: Technical Specifications
Instructions Guide Technical Specifications In-built battery Power supply: FM(87.5MHz – 108MHz Mode: DAB/DAB+ 174-240MHz Earphone jack Output Connector: Integral telescopic aerial Aerial: Power Supply and Batteries The unit is powered and charged by UK Standard Plug DC 5v. Warranty All products come with a standard 12 month warranty. All www.majorityradios.co.uk items must be registered on the warranty to be valid. -
Page 21: Troubleshooting Guide
Troubleshooting Guide Observation Potential cause/solution No sound The station is not tuned in. Fine tune the station. The volume is set to a low position. Increase the volume. Headphones may be connected. Disconnect the headphones. Buttons are not Turn off the unit and turn on after a few seconds. working FM: Static sound Signal reception is low. -
Page 22: Important Safety Information
Safety Information ADDITIONAL WARNINGS 1. Read these instructions. 2. Keep these instructions. Instructions are also The apparatus shall not be exposed to dripping or available for download at www.majorityradios.co.uk splashing and no objects filled with liquid, such as 3. Heed all Warnings vases, shall be places on the apparatus. - Page 23 ffiAJORITY www.majorityradios.co.uk...
Need help?
Do you have a question about the BAR-DAB-WDN and is the answer not in the manual?
Questions and answers