Table of Contents
Advertisement
Advertisement
Table of Contents

Related Manuals for TRIMOS V3


Summary of Contents for TRIMOS V3
- Page 1 USER’S MANUAL V3 / V4 750 50 0045 03...
- Page 3 Dear customer, congratulations for choosing a TRIMOS measuring instrument. For more than 40 years, our products have built up an excellent reputation in terms of quality, accuracy and longevity. For full satisfaction with the present product, we recommend to read this user’s manual carefully.
-
Page 4: Table Of Contents
User's Manual CONTENTS Safety regulations ............................ 3 Important information ........................3 Security symbols ........................... 3 General warnings .......................... 3 Instrument description ..........................4 Instrument ............................5 Interfaces/connectors ........................5 Display ............................5 Keyboard ............................5 Setting up ..............................6 Packing list ............................. 6 Setting-up ............................ -
Page 5: Safety Regulations
Important information In order to prevent any damages due to wrong manipulation, please carefully read the following instructions. TRIMOS will not accept any responsibility in case of damages caused by inadequate use not in line with the present manual. Security symbols... -
Page 6: Instrument Description
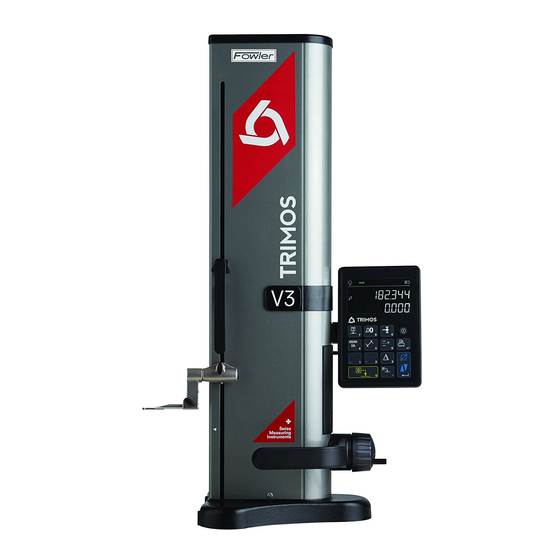
User's Manual INSTRUMENT DESCRIPTION 21 22 23 24 25 26 27 28 29 30 31 750 50 0045 03... -
Page 7: Instrument
V3 / V4 Instrument Upper probe holder (V4) Screw for the adjustment of the floating probe suspension Handle for carriage displacement Transport safety screw for locking of probe suspension (chromium plated) Lower probe holder Insert holder Measuring insert Operating handle for the displacement of the instrument Base with air cushion system for instrument displacement (V4) 10. -
Page 8: Setting Up
User's Manual SETTING UP Packing list The standard packing of the instrument includes the following elements: Instrument with display unit and measuring insert holder Measuring insert Setting gauge Charging unit User’s manual Calibration certificate While unpacking, carry the instrument by lifting if by its displacement handle (8) and body. In NO case should the instrument be carried by the handle for carriage displacement (3). -
Page 9: Setting-Up
V3 / V4 Setting-up After unpacking, prepare the instrument as follows: Clean the pads positioned underneath the base using a clean cloth, slightly dampened with alcohol. Position the instrument with care on a clean measuring plate. Slide the measuring insert into the holder and lock it, using the knob. -
Page 10: Getting Started
User's Manual GETTING STARTED 4.1 Setting into operation Switch on the instrument by pressing button On/Off during 2 seconds. All segments of the display will light Switch off the instrument by pressing the same button > 2 s until the instrument turns off. The display will ask for the reference position. - Page 11 V3 / V4 Use the setting gauge supplied with the instrument to carry out this operation. Note: A different setting gauge may be used. In this case, its dimension must be configured in the set-up menu (§ 8). Move the measuring insert downwards (use the...
-
Page 12: Main Functions
User's Manual MAIN FUNCTIONS Selection of height and diameter / centerline measurements Height To select the functions of height measurements or diameter/centreline distances, press the Function key The corresponding symbol will be displayed. diameter / centerline Height measurements H1 = Height measurement downwards ( H2 = Height measurement upwards ( H12 = Chain dimensions 750 50 0045 03... -
Page 13: Diameter And Centerline Measurements
V3 / V4 Select height measurement mode. Set the display at zero or at a preset value with the measuring insert probing a reference surface (see § 5.11 and § 5.4.2). Probe the surface to be measured downwards or upwards. The probing indicator will display the progression of the measuring force application. - Page 14 User's Manual Set the display at zero or at a preset value on a reference surface (see § 5.11 and § 5.4.2). Select the diameter / centerline mode by pressing Function key 3a. Internal diameter : Position the measuring insert into the bore and set it on the lower profile as near as possible to the reversal point (1).
-
Page 15: References
V3 / V4 References 5.4.1 Selection of references The use of references allows a parallel measurement starting from different points of origin (=references). The current reference is mentioned at the top left hand side of the display. For reference change, press reference key and enter the reference number. -
Page 16: Selection Of The Measuring Unit
User's Manual 5.7 Selection of the measuring unit Measurements can be performed either in mm or in inch. To mm/in change the unit, press the key. The active unit is displayed below the probing indicator. Note: It is possible to lock in the required measuring unit (§ 8). 5.8 Measuring in Min / Max / Delta mode Delta Max = Measurement of maximum value (... - Page 17 V3 / V4 5.8.1 Measuring in Min or Max mode Select Min or Max function. The corresponding indicator shows the activated mode. Probe the surface to be measured and displace the insert or the piece along the part to be analysed. The 1st line on the display shows the instantaneous position of the probe.
-
Page 18: Average Between 2 Last Measurements
User's Manual Average between 2 last measurements By pressing this key, the average between the 2 last height measurements, centerline, Min or Max is determined. These various measurements can be combined with each other. Averages : M1 = Between 2 centerlines M2 = Between 2 heights M3 = Between Min et Max M12 = Between centreline and height... -
Page 19: Difference Between 2 Last Measurements
V3 / V4 5.10 Difference between 2 last measurements By pressing the difference key, the distance between the 2 last height measurements, centerline, Min or Max is determined and mentioned on the 2 line of the display. These various measurements can be combined with each other. -
Page 20: Secondary Functions
User's Manual SECONDARY FUNCTIONS Inversion of the measuring direction It is possible to invert the measuring direction to obtain positive measuring values in both directions (upwards and downwards starting at zero). This function is mainly used when the part to be measured is higher than the measuring range of the instrument. -
Page 21: Probe Holder Change
V3 / V4 Probe Holder Change This function allows to pass from one probe holder to another while keeping the same origin. Press the key opposite during 2 seconds to activate the probe holder change function > 2 s Procedure to follow 1. -
Page 22: Display Modes
User's Manual Display modes In height measuring mode, 2 ways are possible to display the measured value : "Standard" display The upper line of the display permanently indicates the current position of the probe. It remains frozen at the measured value during probing. During probing the lower line indicates the distance from the former height (Dimension in chain). -
Page 23: Data Transfer And Print-Out
Cable Cable USB A-Mini B: TA-EL-014 (ref. 332 02 0002) Software The software TrimosDataTransfer is freely available on www.trimos.ch, in the corresponding product section. Data transfer procedure 1. Start TrimosDataTransfer 2. Connect the instrument to the PC with TA-EL-014 cable and wait for the connection to be established 3. -
Page 24: Rs232 Connection
User's Manual RS232 Connection Data transmission - Speed : 4800 baud - ASCII Code : 7 bits - Parity : even - Stop bits : - Handshake : without Connection to printer Thermal printer TA-EL-032 (Ref. 756 0018), includes RS232 cable, charging unit and support. -
Page 25: Configuration
V3 / V4 CONFIGURATION Various parameters of the instrument can be configured, Validation Press the key during 2 seconds to enter set-up menu Validation key A simple pressure on validates the choice and allows passing on to the next menu. - Page 26 User's Manual Number of references definition The number of references available for the user can be defined (1 ÷ 9). To do so, press keys opposite. Programmable button 1 (V4) Various functions can be attributed to programmable button - REF: change of reference - PRESET: Preset - ZERO: Zero setting (by default) - PRINT: Data transfer (PRINT)
- Page 27 V3 / V4 Size of reference gauge If the measuring insert calibration has to be made with another reference gauge than that delivered with the instrument, the height of the gauge can be entered with the help of the numeric keypad.
-
Page 28: Application And Adjustments
User's Manual APPLICATION AND ADJUSTMENTS Probing The measurement precision is directly linked to the quality of contact between the probe and the part to be measured (⇒ probing). The instrument offers all tools allowing an optimal probing: Probing indicator Situated on the left of the measured value, it views the probing zone (1). -
Page 29: Adjustment Of Floating Probe Suspension Balancing
A correct recycling of this product will help to preserve the environment and the natural resources. For more detailed information about the recycling of this product, please contact your local authorities or your TRIMOS supplier. 750 50 0045 03... -
Page 30: Resetting Of The Instrument
10.1 Complaints / repairs In case of problems, please contact your local TRIMOS agent. For any transport, use the original packing or an adequate one. 10.2 Agents You can find the official TRIMOS agents list on the website www.trimos.ch 750 50 0045 03... -
Page 31: Technical Specifications
V3 / V4 TECHNICAL SPECIFICATIONS Measuring range mm (in) 407 (16) 711 (28) Application range mm (in) 508 (20) 812 (32) Max. permissible errors, E µm Repeatability, R µm 2 (Ø: 4) 2 (Ø: 4) Overall squareness deviation (frontal), S µm... -
Page 32: Dimensions
User's Manual DIMENSIONS L: depends on the measuring insert used 750 50 0045 03...
Need help?
Do you have a question about the V3 and is the answer not in the manual?
Questions and answers