Table of Contents
Advertisement
Quick Links
Downloaded from
www.Manualslib.com
User Manual
Color video door phone CDV-70UX
• Thank you for purchasing COMMAX products.
• Thank you for purchasing COMMAX products.
• Please carefully read this User's Guide (in particular, precautions for safety) before using a product and follow
• Please carefully read this User's Guide (in particular, precautions for safety) before using a product and follow
instructions to use a product exactly.
instructions to use a product exactly.
• The company is not responsible for any safety accidents caused by abnormal operation of the product.
• The company is not responsible for any safety accidents caused by abnormal operation of the product.
manuals search engine
Advertisement
Table of Contents

Related Manuals for Commax CDV-70UX


Summary of Contents for Commax CDV-70UX
-
Page 1: User Manual
User Manual Color video door phone CDV-70UX • Thank you for purchasing COMMAX products. • Thank you for purchasing COMMAX products. • Please carefully read this User’s Guide (in particular, precautions for safety) before using a product and follow • Please carefully read this User’s Guide (in particular, precautions for safety) before using a product and follow instructions to use a product exactly. -
Page 2: Table Of Contents
1. Table of Contents Table of Contents 2. Safety Warning & Caution .......2 3. -
Page 3: Safety Warning & Caution
2. Safety Warning & Caution Please follow the things described below in order to prevent any danger or property damage. Warning Prohibition. It may cause a serious damage or No disassembly injury if violated. No touch Must follow strictly. Caution Shows plugging out the power cord It may cause a minor damage or without an exception... - Page 4 Warning Please don’ t disassemble, If an abnormal sound, burning Please don’t insert any Please use only the designated repair or rebuild this product smell or smoke is coming out metallic or burnable materials batteries for the products of of the product, please plug out arbitrarily (please contact the into the ventilation hole.
-
Page 5: Start
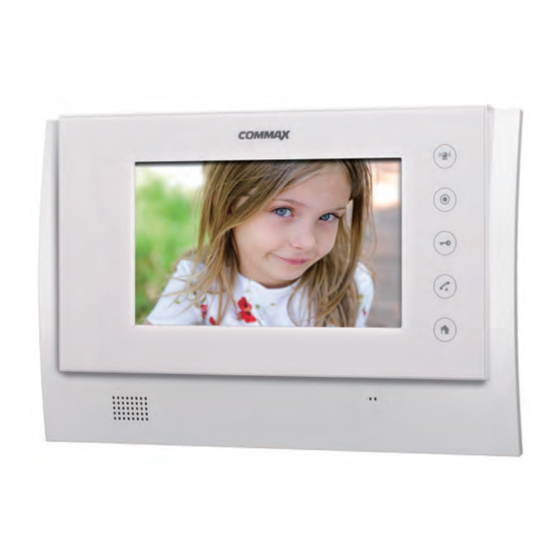
3. Start 3.1. Part name ① ⑤ ⑥ ⑦ ⑧ ⑨ ⑩ ② ⑭ ③ ④ ⑪ ⑫ ⑬ ⑭ Description Description Call button Touch screen Speaker Home button Power switch Power LED Camera 1 connector Microphone Panic button Camera 2 connector Page button Interphone connector Door release button... -
Page 6: Display Composition
3.2. Display composition Page scrolling enabled Buttons at the top Other options (background & Go to Home settings) Back Volume down Volume up Alert icons The corresponding icon will be indicated for each alert. Scroll down while touching the top line of alert indication to display the alert detail. -
Page 7: Home
4. Home 4.1. Display composition Door Monitoring individual entrance, talking with a visitor, etc. Call log Call log Visitor Photo Viewer Check recorded images of visitors Emergency Panic alert phone Call interphone Downloaded from www.Manualslib.com manuals search engine... -
Page 8: Door
4.2. Door Monitoring individual entrance 1) Individual entrance monitoring and talking with a visitor enabled by a touch of 'Individual entrance’ button. 2) Please refer to section ‘5.1.2 Individual entrance’ for detail. 4.3. Call log Call log, Call type, Make a call from Call log 1) Touch ‘Call log’... -
Page 9: Applications
5. Applications 5.1. Call 5.1.1. Display composition Door Monitoring individual entrance, Talking with a visitor, etc. phone Call interphone Call log Call log Downloaded from www.Manualslib.com manuals search engine... -
Page 10: Door
① Activated call indication ⑦ Capture a video ② Requesting a call ⑧ Display setting ③ Call ⑨ Call display ④ End call ⑩ Volume ⑤ Cancel ⑪ Recording in progress ⑥ Capture an image ⑫ Door Open ※ Different ‘Call display’ is displayed for each type of call. ※... -
Page 11: Call Log
Individual entrance image display setting Receiving a call from an individual entrance 1) When paged from an entrance, the touch panel rings and displays the visitor. 2) To receive a call, touch (Call) button. To reject a call, touch (Cancel) button. 3) To hang up a call, touch (End call) button. -
Page 12: Receiving A Call From Smartphone
5.1.4. Receiving a call from Smartphone The call is being forwarded to a registered wireless device. Display while a call is being forwarded to Smartphone 1) Smartphone rings and by a touch of ‘Confirm’ button visitor’s image is displayed. 2) To receive a call, touch ‘Call’ button and touch ‘Cancel’ button to reject a call. 3) To end a call, touch ‘End call’... -
Page 13: Security
5.2. Security 5.2.1. Display composition Security functions Panic alert Panic alert Check visitors Check recorded images of visitors Downloaded from www.Manualslib.com manuals search engine... -
Page 14: Panic Alert
5.2.2 Panic alert Panic alert By touch of ‘Panic alert’ button, the Panic alert is activated. The Panic alert notice is processed in three steps such as ‘On’, ‘Off’, and ‘Reset’. Panic alert on 1) Touch ‘Panic alert’ icon to activate the emergency alert. The touch panel displays the Panic alert icon and sounds a siren. -
Page 15: Check Visitors
5.2.3. Check visitors Viewing recorded images of visitors from an individual entrance ① Menu ④ Page information ② Visit location and unanswered call log ⑤ Previous page ③ Time of picture taken ⑥ Next page Touch ‘Menu’ button to view menu selection Select all Check all images viewed in current display Delete... - Page 16 Check recorded images In Check visitors mode, all recorded images from individual entrances can be viewed including time and date information. Deleting recorded images 1) Touch ‘Menu (①)’ button. 2) Touch ‘Menu (①)’ button or touch an image for 2 seconds or longer to activate ‘Select’ mode. 3) Select an image by a touch or touch (Select all) button to select images you wish to delete.
-
Page 17: Convenient Features
5.3. Convenient features 5.3.1. Display composition Convenient features Create account User registration at ‘Ruvie’ (http://www.ruvie.co.kr/) Wifi Analyzer Wifi Analyzer Alarm clock Alarm clock Calculator Calculator Sound recorder Sound recorder Downloaded from www.Manualslib.com manuals search engine... -
Page 18: Create Account
5.3.2. Create account User registration User registration 1) Touch ‘Applications’ icon. 3) Enter your ID and touch ‘ID check’ button to 2) Touch ‘User registration’ button. check for validity. 4) Enter your password and email address and touch ‘Confirm’ button. 5) User registration is completed. -
Page 19: Alarm Clock
5.3.3. Alarm clock Alarm clock setting / activation ① List of alarm ② Activation button Alarm clock Time setting 1) Touch a time you wish to set up (①). 2) Touch the time to adjust. 3) After setting up an alarm, check the box on the right to activate the alarm. Ringtone setting 1) Touch ‘Ringtone’. -
Page 20: Calculator
5.3.4. Calculator Only the four fundamental arithmetic operations are provided Calculator 5.3.5. Sound recorder Voice recorder Recording a voice message 1) Touch ‘Record (①)’ button. 2) Touch ‘Stop (②)’ button to stop recording and select ‘Finish recording’ to complete recording or ‘Delete’... -
Page 21: Settings
※ Default setting of password is 1234. 6.3. Advanced setting Alert for wireless device connection Settings → COMMAX User Options → Advanced setting → Alert for wireless device connection Enabling alert for wireless device connection. 1) Check the box by a touch to activate the alert. -
Page 22: Wireless Network Setting
2) Uncheck the box to cancel. Select the video streaming quality Settings → COMMAX User Options → Advanced setting → Streaming quality Setting the video streaming quality for Smartphone. 1) Check the box by a touch to set ‘High resolution’. -
Page 23: Display Setting
1) Touch ‘Mute mode’. 2) If ‘Mute mode’ checked, the ‘Sound setting’ mode at the bottom of the screen is deactivated is displayed at the top of the screen. 3) If ‘Mute mode’ unchecked, the ‘Sound setting’ mode at the bottom of the screen is activated disappears from the top of the screen. -
Page 24: Language And Keyboard Setting
Testing touch screen Settings → Display → Touch screen test 1) Touch the ‘Touch screen test’ button. 2) The ‘Touch screen test page’ is displayed. 3) Press ‘Home button (hardware button)’ to return to Home. 6.7. Language and keyboard setting Language setting Settings →... -
Page 25: System Information
24-Hour Time setting 1) Check ’24-Hour Time’ or uncheck. 2) If checked, the time will be displayed as in ’24-Hour Time’. Date type setting 1) Touch ‘Date type’. 2) Available date types are displayed. 3) Select the type. 6.9. System information System information including the components and firmware version information is displayed. -
Page 26: Supplement
7. Supplement 7.1. The package includes the followings. 7.2. Specification and Features Item CDV-70UX Wiring type Individual entrance: Common 4-wire, Interphone: 4-wire Power 100-240V~ , 50~60Hz Power consumption Standby: 6W, Maximum: 12W Communication HANDSFREE type VoIP mothod Individual entrance : Electronic chime with 3 tones... -
Page 27: Wiring
7.3. Wiring 7.4. Caution for cabling ※ When wiring, please use the core provided in the package to wrap around as shown in the above. Downloaded from www.Manualslib.com manuals search engine... -
Page 28: Caution For Recoding Video Of Visitors
7.5. Caution for recoding video of visitors Please do not replace or remove SD card while recording an image or video. It may cause a system error or losing recorded data. When the memory is full, automatic overwriting is activated and starts deleting the oldest image or video. -
Page 29: Connecting Via Smartphone
3) Read the user agreement and check the 2) Enter the same ID and Password box to agree on the terms. registered at CDV-70UX and touch 'Log 4) As connection is completed, function list in' button. is displayed. Touch ‘Next’. - Page 30 8) When connected, the corresponding 9) Touch ‘Door release’ button‘. Read the entrance is viewed. warning message and touch ‘Cancel’ to cancel the door release. 10) Touch ‘Confirm’ to release the door. Downloaded from www.Manualslib.com manuals search engine...
- Page 31 Memo Downloaded from www.Manualslib.com manuals search engine...
- Page 32 Memo Downloaded from www.Manualslib.com manuals search engine...
- Page 33 Memo Downloaded from www.Manualslib.com manuals search engine...
- Page 34 513-11, Sangdaewon-dong, Jungwon-gu, Seongnam-si, Gyeonggi-do, Korea Int’l Business Dept. Tel. : +82-31-7393-540~550 Fax. : +82-31-745-2133 Web site : www.commax.com PM0770UX0010 Printed In Korea / 2014.05.104 Downloaded from www.Manualslib.com manuals search engine...
Need help?
Do you have a question about the CDV-70UX and is the answer not in the manual?
Questions and answers
لا استطيع فتح الباب وسابقا كنت استطيع فتحة ولا ادري ماالسبب وشكرا لكم