Advertisement
OWNER'S
MANUAL
Model No.
16116901
Recumbent cycle
Assembly
Operation
Exercise
Parts
Warranty
CAUTION:
You must read and
understand this
owner's manual
before operating
unit.
RETAIN FOR FUTURE REFERENCE
MAURICE PINCOFFS CANADA INC. 6050 DON MURIE STREET, NIAGARA FALLS, ONTARIO
RECUMBENT CYCLE
L2G 0B3
Advertisement
Table of Contents

Subscribe to Our Youtube Channel
Related Manuals for Body Break 16116901


Summary of Contents for Body Break 16116901
-
Page 1: Recumbent Cycle
OWNER’S MANUAL Model No. 16116901 RECUMBENT CYCLE Recumbent cycle Assembly Operation Exercise Parts Warranty CAUTION: You must read and understand this owner’s manual before operating unit. RETAIN FOR FUTURE REFERENCE MAURICE PINCOFFS CANADA INC. 6050 DON MURIE STREET, NIAGARA FALLS, ONTARIO... - Page 2 Manufacture’s One-Year Limited Warranty Your Body Break Recumbent Cycle is warranted for one year from the date of purchase against defects in material when used for the purpose intended, under normal conditions and provided it receives proper care. Any part found defective or missing will be sent at no cost when returned in accordance with the terms of this warranty.
-
Page 3: Safety Precautions
SAFETY PRECAUTIONS Thank you for purchasing our product. Even though we go to great efforts to ensure the quality of each product we produce, occasional errors and /or omissions do occur. In any event should you find this product to have either a defective or a missing part please contact us for a replacement. This product has been designed for home use only. - Page 4 PRE-ASSEMBLY CHECK LIST Q’TY PART NO. Q’TY PART NO. DESCRIPTION DESCRIPTION Main Frame Assembly Monitor Console Tube w/ wires Right Rear Handlebar Front Foot Tube w/ wheels Left Rear Handlebar Rear Foot Tube w/ end caps Bottle Rack Seat Carriage w/ Seat Slider Pin 30/30A Left Pedal / Left Pedal Strap and Adjustment Knob Tension Knob Assembly...
-
Page 5: Hardware Packing List
HARDWARE PACKING LIST M6X15mm PHILLIPS SCREW (62) Ø6xø6x1.0t WASHER (63) QTY 8 QTY 8 Note: Above described parts is the hardware needed to assemble this machine. Before you start to assemble, please check to ensure all parts are included for assembly. All the pre-assembled hardware will need to be removed for each of the assembly steps. -
Page 6: Assembly Instruction
ASSEMBLY INSTRUCTION This manual is designed to help you easily assemble, adjust and use this machine. Please read this manual carefully. For the sake of familiarizing yourself with the parts identified in the instruction, first study the overview drawing. Set all parts in a clear area on the floor and remove the packing material. - Page 7 STEP 2 Unlock the Seat adjustment knob (59) from the seat carriage (5) and put the seat carriage (5) onto the rear supporting rectangular bracket of main Frame (1). Adjust to your desired seat position and lock the seat carriage (5) to the main Frame (1) with the seat adjustment knob (59) as shown in drawing.
- Page 8 STEP 3 Attach the seat (9) to the seat Carriage (5). Secure using four M6 X15mm Metal Screw (62) and four M6 X16mm Washer (63). Attach the back pad (60) to the seat carriage (5). Secure using four M6 X15mm Metal Screw (62) and four M6 X16mm Washer (63).
- Page 9 STEP 4: Attach the right pedal strap (31A) to the right pedal (31). Repeat for the left pedal (30). Attach the right pedal (31) to the right crank arm (6). Repeat for the left pedal (30). Note: The pedals are marked R&L. The right pedal should be threaded on clockwise and the left pedal should be threaded counter-clockwise.
- Page 10 STEP 5: Connect the Upper Extension Pulse Wire (66) to Rear Extension Pulse Wire (44). Connect the Extension Sensor Wire (58) to the Sensor Wire (38). Connect the tension knob assembly (8) to the Tension Cable Bracket (61) from the Main Frame (1).
- Page 11 STEP 6 Attach the Front Handlebar (10) to the Console Tube (2). Secure using three screws(55) and three washers(49) which are pre-assembled. Attach the Bottle Rack (27) to the side of Console Tube (2). Secure using two screws (70) which are pre-assembled.
- Page 12 STEP 7 Insert the batteries into the back of the Monitor (15). Plug one end of the audio cable (76) into the backside of computer (15) and the other end into the Music Player. Note: Place the switch (at the back cover of the computer) to the “on” position. Power on the computer and the music will play accordingly by operating the MP3 function.
-
Page 13: Computer Instructions
COMPUTER INSTRUCTIONS The things you should know before exercise SLEEP MODE: The monitor will entry SLEEP mode (LCD off) when there is no signal input and no key be pressed after 4 minutes. Press any key or speed in, can wake up system from sleep mode. - Page 14 There are 6 button keys and the function description as follows: UP key: During the STOP mode, press the key to increase the value of Time, Distance and Calories. RESET key: During the STOP mode, by holding this key for over two seconds then the computer will re-power-on.Or, press the key to clear the exercising value or setting value to zero.
- Page 15 To obtain the greatest cardiovascular benefits from your exercise workout, it is important to work within your target heart rate zone. The American Heart Association (AHA) defines this target as 60%-75% percent of your maximum heart rate. Your maximum heart rate may be roughly calculated by subtracting your age from 220. Your maximum heart rate and aerobic capacity naturally decreases as you age.
-
Page 16: Monitoring Your Heart Rate
Monitoring Your Heart Rate Customer Service 1-888-707-1880 Maurice Pincoffs Canada Inc. © 2012... - Page 17 User Direction BEFORE YOU BEGIN Thank you for selecting the revolutionary Body Break exercise bike. Cycling is an effective exercise for increasing cardiovascular fitness, building endurance, and toning the body. The exercise bike provides an impressive selection of features designed to make your workouts at home more effective and enjoyable.
-
Page 18: How To Use The Exercise Bike
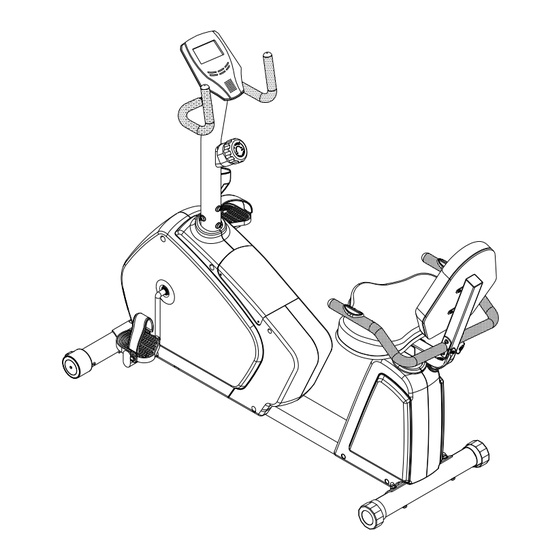
HOW TO USE THE EXERCISE BIKE HOW TO ADJUST THE SEAT The seat can be adjusted forward or backward to the position that is the most comfortable. To adjust the seat, unlock the seat adjustment knob , slide the seat to the desired position, and lock the seat carriage to main Frame with seat adjustment knob. - Page 19 DIAGRAM Customer Service 1-888-707-1880 Maurice Pincoffs Canada Inc. © 2012...
- Page 20 PARTS LIST KEY NO. PART NO. DESCRIPTION 1690101 Main Frame Assembly 1690102 Console Tube 1690103 Front stabilizer 1690104 Rear stabilizer 1690105 Seat Carriage 1690106 Crank with Pulley Assembly 1690107 Mag Brake 1690108 Tension Knob Assembly 1690109 Seat 1690110 Front Handlebar 1690111 Left Bottom Housing 1690112...
- Page 21 KEY NO. PART NO. DESCRIPTION 1690131 Right Pedal 1690131A Right Pedal Strap 1690132 Wire Plug 1690133 Front Handlebar Sleeve 1690134 Magnet 1690135 V-Belt 1690136 M4x16mm Flat Head Screw 1690137 Plastic Plug 1690138 Sensor Wire W/Sensor 1690139 M5x10mm Metal Screw 1690140 6x35mm Eyebolt 1690141 Adjustment Channel...
- Page 22 KEY NO. PART NO. DESCRIPTION 1690163 M6x16mm Washer 1690164 Hand Pulse Sensor w/Wire 1690165 M10x19mm Washer 1690166 Upper Extension Pulse Wire 1690167 TP4x12mm Screw 1690168 1”Ball Plug 1690169 Seat Slider Pin 1690170 TP4x16mm Screw 1690171 TP4x30mm Screw 1690172 8mm Nylon Nut (thin) 1690173 M8x50mm Hex Head Bolt 1690174...
-
Page 23: Trouble Shooting
TROUBLE SHOOTING Problem Cause Correction Monitor does not Batteries not installed Insert batteries display No speed or Securely plug sending unit into distance displays Sending unit not connected extension wire and the back of the on the monitor computer Sending unit not working properly Replace sending unit Computer not working properly Replace computer... -
Page 24: Training Guidelines
TRAINING GUIDELINES Exercise Exercise is one of the most important factors in the overall health of an individual. Listed among its benefits are: Increased capacity for physical work (strength endurance) Increased cardiovascular (heart and arteries/veins) and respiratory efficiency ... - Page 25 Specificity Different forms of exercise produce different results. The type of exercise that is carried out is specific both to the muscle groups being used and to the energy source involved. There is little transfer of the effects of exercise, i.e. from strength training to cardiovascular fitness. That is why it is important to have an exercise program tailored to your specific needs.
- Page 26 Don’t push yourself too hard to reach the figures on this table. It can be very uncomfortable if you overdo it. Let it happen naturally as you work through your program. Remember, the target is a guide, not a rule, a little above or below is just fine. Two final comments: (1) don’t be concerned with day to day variations in your pulse rate, being under pressure or not enough sleep can affect it;(2) your pulse rate is a guide, don’t become a slave to it.
- Page 27 STRETCHING Stretching should be included in both your warm up and cool down, and should be performed after 3-5 minutes of low intensity aerobic activity or callisthenic type exercise. Movements should be performed slowly and smoothly, with no bouncing or jerking. Move into the stretch until slight tension, not pain, is felt in the muscle and hold for 20-30 seconds.
- Page 28 Customer Service 1-888-707-1880 Maurice Pincoffs Canada Inc. © 2012...
Need help?
Do you have a question about the 16116901 and is the answer not in the manual?
Questions and answers