Tait TM8250 User Manual
Hide thumbs
Also See for TM8250:
- Operator's manual (142 pages) ,
- User manual (98 pages) ,
- Service manual (578 pages)
Table of Contents
Advertisement
Quick Links
Advertisement
Table of Contents

Related Manuals for Tait TM8250


Summary of Contents for Tait TM8250
- Page 3 övriga rele- Vea también: http://eudocs.taitworld.com/ vanta bestämmelser som framgår av direktiv Suomi 1999/5/EG. Tait Electronics Limited vakuuttaa täten että Se även: http://eudocs.taitworld.com/ TMAA4C, TMAB1C, TMAH5C & TMAC0C MMA-00003-05 Issue 5 © Tait Electronics Limited June 2006. All rights reserved.
-
Page 4: Safety And Compliance Warnings
Please be environmen- tally responsible and dispose through the original supplier, your local municipal waste “separate collec- tion” service, or contact Tait Electronics Limited. Radio frequency exposure information For your own safety and to ensure you comply with the Federal Communication Commission’s (FCC) radio... - Page 5 0.9m (35 inches) between people and the antenna. This is the minimum safe distance. Use the radio only with Tait-approved antennas and attachments, and make only authorized modifications to the antenna otherwise you could damage the radio and violate FCC regulations.
-
Page 6: Radio Frequency Emissions Limits In The Usa
Note: Changes or modifications to this device that are not expressly approved by Tait Electronics Limited may make its use illegal. Health, safety and electromagnetic compatibility... -
Page 7: Electromagnetic Compatibility In European Vehicles
Website: To download the formal declaration of conformity, go to http://eudocs.taitworld.com/. A signed and dated paper copy of the declaration of conformity can be obtained from Tait Europe Limited. Electromagnetic compatibility in European vehicles In the European Community, radio equipment fitted to auto- motive vehicles is regulated by Directive 72/245/EEC, as amended by 95/54/EC. -
Page 8: Safe Radio Operation
(e.g. when jump-starting the vehicle). GPS operation Tait Electronics Limited is not responsible for the operation or failure of operation of GPS satellites or the availability of GPS satellite signals. -
Page 9: Your Radio's Settings
Your radio’s settings Use the following table to list your radio’s programmed settings. Function key settings Conventional Trunked quick access menus: Frequently used channels and groups ID/Number Description ID/Number Description... -
Page 13: Table Of Contents
Contents Safety and compliance warnings ..........2 Radio frequency exposure information ............2 Radio frequency emissions limits in the USA ..........4 Health, safety and electromagnetic compatibility in Europe ......4 Electromagnetic compatibility in European vehicles ........5 EN 60950 requirements (25 watt radios) ............. 5 Safe radio operation ................... - Page 14 When your radio won’t turn on ..............65 Removing the microphone ................ 65 Reinstalling the microphone ..............66 Removing the radio from the vehicle ............66 Describing the radio’s audible tones ............67 Tait general software licence agreement ......... 69...
-
Page 15: About This Guide
About this guide This user’s guide provides information about the TM8250 and TM8255 mobile radios, version 3.0x and higher. If you need further assistance or your radio does not operate as you expect, contact your radio provider. Website: For information about how to install your TM8200 radio, go to http://support.taitworld.com/. -
Page 16: Copyright Information
Copyright information All information contained in this guide is the property of Tait Electronics Limited. All rights are reserved. This guide may not, in whole or in part, be copied, photocopied, reproduced, translated, stored, or reduced to any electronic medium or machine-readable form, without prior written permission from Tait Electronics Limited. -
Page 17: Getting Started
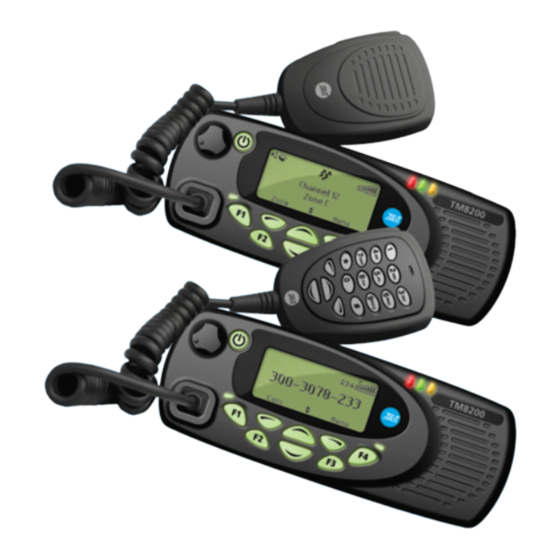
Getting started This section provides a brief description of your radio’s controls and indicators and explains how to use the radio’s menus. The following topics are covered in this section: about the radio controls about the keypad microphone understanding the radio display understanding the radio indicators navigating your radio’s menus viewing your radio’s function key... - Page 18 press-to-talk (PTT) key radio status LEDs green microphone amber speaker display on/off key volume control microphone socket function keys main menu scroll keys 1 to 4 left selection key right selection key Symbol Name Function PTT key Press and hold to transmit and release to listen Volume control Rotate to change the speaker volume...
-
Page 19: About The Keypad Microphone
About the keypad microphone Your radio may have a keypad microphone installed. The keypad microphone has a PTT key as well as twelve alphanu- meric keys, two scroll keys, and left and right selection keys. The PTT key and the scroll and selection keys work in the same way as those on the control head (see “About the radio controls”... -
Page 20: Understanding The Radio Display
Understanding the radio display The messages and symbols you see on your radio display depend on the mode in which your radio is operating and the way it is programmed. The following diagram shows a typical display and explains some of the information that may be available. symbols The symbols along the top of the... - Page 21 Radio display symbols These are some of the symbols you may see on you radio display: Symbol Meaning Received signal strength indicator (RSSI): the more bars, the stronger the signal being received by your radio Transmit: your radio is transmitting Low-power transmit: your radio is transmitting on low power Silent operation: your radio’s audible tones have been turned off External alert: external alert is active...
-
Page 22: Understanding The Radio Indicators
Understanding the radio indicators The status LED indicators and the radio’s audible tones— together with the radio display—all combine to give you information about the state of your radio. The most common way the indicators work is described in the following sections. Note: The way these indicators behave may be affected by the way your radio is programmed. -
Page 23: Navigating Your Radio's Menus
Audible tones Note: If quiet or silent mode has been turned on, you will not hear any audible tones. For a description of other tones you may hear, see “Describ- ing the radio’s audible tones” on page Tone type Meaning one short Valid key press: the action you have attempted is beep... - Page 24 Using the scroll key Quick Access menu Your radio may be programmed so that your scroll keys act as a shortcut to a frequently used menu. To go to this Quick Access menu, press a scroll key , and the Quick Access menu appears.
-
Page 25: Viewing Your Radio's Function Key Settings
Viewing your radio’s function key settings Your radio’s four function keys can have programmed func- tions assigned to each key. Some keys may have a function associated with both a short key press and a long key press. To check the functions assigned to your radio’s function keys, you can use the Main menu. -
Page 26: Basic Operation
Basic operation This section describes the basic operation of your radio. The following topics are covered in this section: turning the radio on and off entering your personal identification number adjusting the speaker volume turning on control-head backlighting changing the level of control-head backlighting changing the contrast of the radio display viewing GPS information. -
Page 27: Adjusting The Speaker Volume
Adjusting the speaker volume Rotate the volume control clockwise to increase the speaker volume and counterclockwise to decrease the volume. The volume control also changes the volume level of the radio’s audible indicators. Note: Your radio may be programmed with a minimum volume level. -
Page 28: Changing The Level Of Control-Head Backlighting
Turning backlighting on and off by using the Main menu When backlighting is turned on using the menu, it remains on until the setting is changed to off, regardless of radio activity. Select Menu>Radio settings> Display settings>Backlighting. In the Backlighting menu, choose either On or Off. -
Page 29: Changing The Contrast Of The Radio Display
Note: GPS information on the radio display is not a standard feature. Before being programmed, it must be purchased and enabled on the radio via the Software Feature Enabler. Contact Tait Electronics Limited for more information. While viewing GPS information, the status appears at the top right of the display. - Page 30 To view GPS information, you may be able to either: use a programmed function key, or use the Main menu. Viewing GPS information by using a programmed function key Press the function key programmed for GPS display. GPS information is now shown in the display.
-
Page 31: Operating In Conventional Mode
Operating in conventional mode The following topics are covered in this section: selecting a zone selecting a channel selecting a group checking that a channel is clear making a call making a local call making a call using your address book making an emergency call receiving a call. -
Page 32: Selecting A Channel
Press Select. The zone indication may be programmed to appear either below the channel information or beside the RSSI symbol. Selecting a zone by using your Quick Access menu Note: Your scroll keys may be programmed for zone scroll. If this is the case, press the scroll key to immediately begin scrolling through your list of zones. - Page 33 Selecting a channel by using a programmed function key Press the function key programmed for preset channel. The programmed channel is now shown in the display. Selecting a channel by using the Main menu Select Menu>Channels. In the Channels menu, scroll through the list of channels until the channel you want appears.
-
Page 34: Selecting A Group
Scroll through the list of chan- nels until the channel you want appears. Press Done. The programmed channel is now shown in the display. Selecting a group A group is a collection of channels that are grouped together for either scanning or voting. In the Channels menu, the group is shown as being a single channel item, e.g. - Page 35 In the Channels menu, scroll through the list of channels and groups until the group you want appears. Press Done. The amber LED glows and the scanning symbol appears in the display. Selecting a group by using your Quick Access menu Note: Your scroll keys may be programmed for channel scroll.
-
Page 36: Checking That A Channel Is Clear
Checking that a channel is clear You or your user group may be segregated from other user groups by special signalling. If an incoming call carries the special signalling tones specific to you or your user group, your radio’s signalling mute opens and you can hear the call. These tones may not be audible. -
Page 37: Communicating Directly With Other Radios
Activating monitor by using the Main menu Select Menu>Radio settings> Function settings>Monitor. In the Monitor menu, choose On. Press Select. While monitor is on, the green LED flashes slowly and the moni- tor symbol appears in the display. Note: Your radio may be programmed so that monitor turns off automatically after a short time. -
Page 38: Main Menu
Activating repeater talkaround by using a function key Change to the required channel. Press the programmed function key to turn repeater talk- around on. The message Talkaround acti- vated appears and the repeater talkaround symbol appears in the display. Proceed with your call. To turn repeater talkaround off, either: change the channel, or press the function key again. -
Page 39: Making A Call
Making a call Select the required channel or scan group. Check that the channel is clear. If the green LED is glowing, the channel is busy and you may not be able to transmit. Once the channel is clear (the green LED is off), lift the microphone off the microphone clip. - Page 40 Making a local call by using the Main menu Select the required channel. Select Menu>Local calls. In the Local Calls menu, scroll through the list of local calls until the call you want appears. Press Send. The call details appear in the display, the red LED glows and the transmit symbol appears...
-
Page 41: Making A Call Using Your Address Book
Making a call using your address book Your Address Book menu has a programmed list of calls, which can be made from any channel or zone. Address-book calls may also be used to send status information, such as “at lunch” or “on site”. To make a call using your address book, you may be able to either: use a programmed function key,... -
Page 42: Making An Emergency Call
Press Send. The call details appear in the display, the red LED glows and the transmit symbol appears in the display. Making an address-book call by using your Quick Access menu Press one of the scroll keys to open the Address Book menu. -
Page 43: Receiving A Call
While emergency mode is active, your radio may cycle between receive and transmit, so that your dispatcher can hear any activity near the radio. Alternatively, your radio may appear to turn off but will actually remain in emergency mode. Reset the radio to normal operation at any time by turning the radio off and then on. -
Page 44: Operating In Mpt Trunked Mode
Operating in MPT trunked mode Note: Your radio must have trunking functionality programmed before it can operate in MPT trunked mode. The following topics are covered in this section: changing your operating mode checking that your network is available changing your network making a preset call about emergency operation dialling a PABX number... -
Page 45: Checking That Your Network Is Available
In the Change Mode menu, select either Conventional or MPT. Press Select. Press Yes when you are prompted to confirm your selection. The message Changing Mode appears and your radio now shows the programmed default display for either conventional or MPT trunked mode. Checking that your network is available Check that the amber LED is glowing and the network symbol... - Page 46 Using the Main menu to change networks Select Menu>Change network. In the Change Network menu, scroll through the list of networks until the network you want appears. Press Select. The radio will restart, and display a power-up message followed by the name of the new network. Check that the amber LED is glowing and the network symbol appears in the display.
-
Page 47: Making A Preset Call
Making a preset call The preset calls programmed for your radio may be to other radios, to PABX extensions or to PSTN numbers. To make a preset call from your radio, you may be able to either: use a programmed function key, use the Main menu, use your Quick Access menu, or dial the preset call using a keypad microphone. - Page 48 Using your Quick Access menu to make a call preset Press the left selection key or one of the scroll keys to enter the Preset Calls menu. Scroll through the list of names until the you want appears. Press Send. The call details appear in the display.
-
Page 49: About Emergency Operation
Press Send or the or PTT key. The call details appear in the display. While the call is being setup, you can cancel the call by pressing Clear. About emergency operation In an emergency you may be able to summon help by send- ing an emergency call. - Page 50 Dialling an emergency call If your radio has a keypad microphone installed, you can dial an emergency call. For information about entering characters using the keypad microphone, see “About the keypad micro- phone” on page Dial *9. Press Send or the or PTT key.
-
Page 51: Dialling A Pabx Number
Cancelling emergency mode Reset the radio to normal operation at any time by turning the radio off and then on. Note: Emergency mode may be programmed to end after a fixed period of time. In this case, there is no need to turn the radio off and then on in order to return the radio to normal operation. -
Page 52: Dialling A Pstn Number
Dialling a PSTN number If your radio has a keypad microphone installed, you may be able to make calls to a PSTN number. For information about entering characters using the keypad microphone, see “About the keypad microphone” on page To dial a PSTN number: Dial 0n, where n is the PSTN number you wish to call. - Page 53 Once the symbol appears, you can proceed with the call, as follows: Hold the microphone about 5cm (2 inches) from your mouth. Press and hold the PTT key to transmit. Speak clearly into the microphone and release the PTT key when you have finished talking. While you are transmitting, the red LED glows and the transmit symbol...
-
Page 54: Re-Establishing A Call
Re-establishing a call The last number recall, unanswered call and callback func- tions allow you to re-establish calls using the PTT key. Last number recall When an outgoing call has ended, the message Last call to and the called unit’s identity may appear on the display. To make a call to that person again, briefly press the PTT key. - Page 55 Accessing the call queue Use the scroll keys to move through the calls in the call queue until the call you want appears. Press Options to open the Call Queue Options menu. The options available for the call depend on the type of call it is. If the call is a voice call, select Call to return the call or Delete to delete the call.
-
Page 56: About Status Messages
About status messages A status message is sent to another party to indicate your current activity or location, such as “en route” or “at lunch”. If the radio receiving your message has been programmed with the same status messages, it will decode and display your message. - Page 57 Press Send. The call details appear in the display. While the call is being setup, you can cancel the call by pressing Clear. Dialling a status message If your radio has a keypad microphone installed, the status messages programmed for your radio can be dialled. To dial the message, you need to know the number associated with the status message.
-
Page 58: About Text Messages
About text messages Your radio may be programmed so that you can send text messages. There are three options for creating text messages: selecting a preset text message, editing a preset text message, or creating a new text message. Note: To either edit or enter a text message, your radio must have a keypad microphone installed. - Page 59 Editing a preset text message Select Menu>Send> Text message>Preset message. In the Preset Message menu, a short label representing each message is displayed. Scroll through the list of preset message labels until the one you want appears. Press Edit, and the complete text message you have chosen is now displayed.
-
Page 60: Calls To Conventional Channels Or Groups
Sending a text message When you have chosen or entered a message, press Options and the Send To menu opens. In the Send To menu, scroll through the list of options until the choice you want appears. If your radio has a keypad microphone installed, you can choose the option Send to dialled, then dial... -
Page 61: Dialling Calls In Mpt Trunked Mode
Dialling calls in MPT trunked mode If your radio has a keypad microphone installed, you can make dialled calls from your radio. The numbers you dial and dialling features available depend on the way your radio is programmed and the way your network operates. Contact your radio provider for further assistance. - Page 62 Press the or PTT key. The name associated with your network and your radio’s full MPT number appears. The number is in the form: Prefix Fleet Radio unit number Radio unit number 3078 MPT 1343 dialled calls The following table summarizes the way you dial calls to other radios and groups of radios and gives an example of each type of call.
-
Page 63: Nokia Ann Fleet Calls
Nokia ANN fleet calls If your MPT trunked network uses Nokia ANN dialling, the numbers you dial depend on your fleet size. Fleets are defined as either large, small or mini. Your radio’s unique number on the network consists of: a lead number 7, 8 or 9, depending on the fleet size, a zero-, one-, two- or three-digit prefix, a one- or two-digit fleet number, and... - Page 64 Nokia ANN dialled calls The following table summarizes the way you dial calls to other radios and gives an example of each type of call. Note: In the following dialled numbers, the # terminator is not necessary if you press the PTT key instead. Call to Dialling code and example Radio 23 in the same...
-
Page 65: Accessing Common Mpt Trunking Functions
Accessing common MPT trunking functions The following tables explain how you can access special MPT trunking functions using the * and # keys. The availability of these functions is dependant on the way your radio is programmed and the way your network operates. Note: In the following examples, the final # may be replaced by a short press of the PTT key. - Page 66 *... # functions Dialling code Call to Example *48# Queue incoming calls #48# Cancel queue *49# Do not disturb #49# Cancel do not disturb *491# Do not disturb - voice calls only #491# Cancel do not disturb, voice calls only *492# Do not disturb - data calls only #492#...
-
Page 67: Troubleshooting
Troubleshooting The following topics are covered in this section: when your radio won’t turn on removing the microphone reinstalling the microphone removing the radio from the vehicle describing the radio’s audible tones. When your radio won’t turn on If the red, green and amber LEDs on the control head do not light up when the radio is turned on, it is likely that no power is reaching the radio. -
Page 68: Reinstalling The Microphone
Reinstalling the microphone Caution: The microphone grommet must be installed when- ever the microphone is plugged into the micro- phone socket. Plug the microphone into the microphone socket. Slide the microphone grommet along the microphone cord and push two adjacent corners of the grommet into the microphone socket cavity. -
Page 69: Describing The Radio's Audible Tones
Describing the radio’s audible tones The following table summarizes the radio’s audible tones. Action and tone Meaning two short Radio turned on: the radio is powered on and beeps ready to use one short beep after Radio locked: you need to enter your personal the power-up beeps identity number (PIN) before you can use the radio one long, low-... - Page 70 Action and tone Meaning two high-pitched beeps Radio's temperature is very high: the radio's temperature is in the very high temperature range and all transmissions will now be at low power; if the radio's temperature rises outside this range, transmissions will be inhibited continuous low- Radio system error: a system error has occurred pitched tone...
-
Page 71: Tait General Software Licence Agreement
THIS LICENCE WILL BE TERMINATED AUTOMATICALLY AND WITHOUT MERGE IT INTO ANOTHER PROGRAM FOR YOUR USE NOTICE FROM TAIT IN THE EVENT THAT THE LICENSEE ON THE SINGLE MACHINE ANY PORTION OF ANY FAILS TO COMPLY WITH ANY TERM OR CONDITION... - Page 72 LIMITED TO BREACH OF CONTRACT AND TAIT S SOLE AND TOTAL LIABILITY FOR ANY SUCH CLAIM SHALL BE LIMITED AT THE OPTION OF TAIT TO THE REPAIR OR REPLACEMENT OF THE SOFTWARE OR FIRMWARE OR THE REFUND OF THE PURCHASE PRICE OF THE SOFT...
- Page 74 www.taitworld.com 06/06 MMA-00003-05...
Need help?
Do you have a question about the TM8250 and is the answer not in the manual?
Questions and answers