Tait TM8260 User Manual
Mobile radios
Hide thumbs
Also See for TM8260:
- Installation and programming manual (52 pages) ,
- Getting started manual (4 pages) ,
- Operator's manual (142 pages)
Table of Contents
Advertisement
Quick Links
Advertisement
Table of Contents

Subscribe to Our Youtube Channel
Related Manuals for Tait TM8260


Summary of Contents for Tait TM8260
- Page 1 TM8260 Mobile Radios User’s Guide MMA-00040-05 · Issue 5 · February 2013...
- Page 2 See also: www.taitradio.com/eudoc TMAB1C, TMAH5C, TMAH6C & TMAC0C Español está conforme com os requisitos essenciais e Por medio de la presente Tait Limited declara outras provisões da Directiva 1999/5/CE. que el TMAA4C, TMAB1C, TMAH5C, Veja também: www.taitradio.com/eudoc TMAH6C & TMAC0C cumple con los...
-
Page 3: Table Of Contents
Contents For your safety ................9 Safety warnings used in this guide .............. 9 Radio frequency exposure information ............9 Radio frequency emissions limits in the USA ..........11 Frequency band reserved for distress beacons ........... 11 Australia and New Zealand citizens band (476.4 to 477.4MHz) ....11 Health, safety, and electromagnetic compatibility in Europe ....... - Page 4 Monitoring more than one radio (dual receive) .......... 62 Cross-band repeater mode ................ 63 Troubleshooting ................. 64 When your radio won’t turn on ..............64 Removing the microphone ................ 64 Reinstalling the microphone ..............64 Describing the radio’s audible tones ............66 Tait Software Licence Agreement ..........68...
- Page 5 Tait Limited. The word TAIT and the TAIT logo are trademarks of Tait Limited. All trade names referenced are the service mark, trademark or registered trademark of the respective manufacturers.
-
Page 6: Updates Of Manual And Equipment
Tait office. Updates of manual and equipment In the interests of improving the performance, reliability or servicing of the equipment, Tait Limited reserves the right to update the equipment or this document or both without prior notice. -
Page 7: About This Guide
Please be environmentally responsible and dispose through the original supplier, or contact Tait Limited. Tait Limited also complies with the Restriction of the Use of Certain Hazardous Substances in Electrical and Electronic Equipment (RoHS) Directive in the European Union. -
Page 8: For Your Safety
For your safety Before using your radio, please read the following important safety and compliance information. Safety warnings used in this guide Please follow exactly any instruction that appears in the text as an ‘alert’. An alert provides necessary safety information as well as instruction in the proper use of the product. -
Page 9: Controlling Your Exposure To Rf Energy
35 inches (0.9m) between people and the antenna. This is the minimum safe distance. Use the radio only with Tait-approved antennas and ■ attachments, and make only authorized modifications to the antenna otherwise you could damage the radio and violate FCC regulations. -
Page 10: Radio Frequency Emissions Limits In The Usa
United States Federal Communications Commission, ■ Code of Federal Regulations (CFR) Title 47 Parts 1.1307, 1.1310, and 2.1091. American National Standards Institute (ANSI) / Institute ■ of Electrical and Electronic Engineers (IEEE) C95.1-1992. Institute of Electrical and Electronic Engineers (IEEE) ■... -
Page 11: Health, Safety, And Electromagnetic Compatibility In Europe
will be in the range of 31 to 38, unless it is intended to use the repeater facility, and to avoid using local repeater output channels, which will be in the range 1 to 8, at any time. No voice transmissions are permitted on data channels 22 and 23. -
Page 12: Declaration Of Conformity
apply to transmitter power, operating frequency, channel spacing, and emission. Declaration of conformity Brief Declarations of Conformity appear on page To download the formal declaration of conformity, go to www.taitradio.com/eudoc. Interference with electronic devices Warning Some electronic devices may be prone to malfunc- tion due to a lack of protection from the RF energy that is present when your radio is transmitting. -
Page 13: Potentially Explosive Atmospheres And Blasting Areas
Potentially explosive atmospheres and blasting areas Warning Warning the radio is specifically certified for use in a potentially explosive atmosphere, turn off the radio before entering such an atmosphere. An explosion could cause seri- ous injury or death. Examples of potentially explosive atmo- spheres include filling stations, and any environment where there are flammable liquids, gases, or dusts. -
Page 14: Electromagnetic Compatibility In European Vehicles
The radio is designed to satisfy the applicable compliance regulations. Do not make modifications or changes to the radio that are not expressly approved by Tait Limited. Failure to do so could invalidate compliance requirements and void the user’s authority to operate the radio. -
Page 15: Gps Operation
GPS operation Tait Limited is not responsible for the operation or failure of operation of GPS satellites or the availability of GPS satellite signals. Acknowledgement: The radio uses an implementation of UTM conversion sourced (with permission) from Geoscience Australia (GA). -
Page 16: Your Radio's Settings
Your radio’s settings Use the following table to list your radio’s programmed settings. Radio identification Radio name Description Radio name Description Frequently used channels and groups ID/Number Description ID/Number Description... - Page 17 Function key settings Menu map Some of the menus shown below may not be available for your radio. quick access menus:...
-
Page 18: Getting Started
■ About the foreground and background radio The TM8260 can be installed and programmed as two radios, that can be accessed via the user-interface. In such a dual-radio system, one radio is always at the foreground, and one at the background. -
Page 19: About The Radio Controls
About the radio controls The radio controls are the PTT key, volume control, on/off key, scroll keys, selection keys and function keys. Some keys may have functions assigned to both short and long key presses: a short key press is less than one second, and ■... -
Page 20: About The Hand-Held Control Head
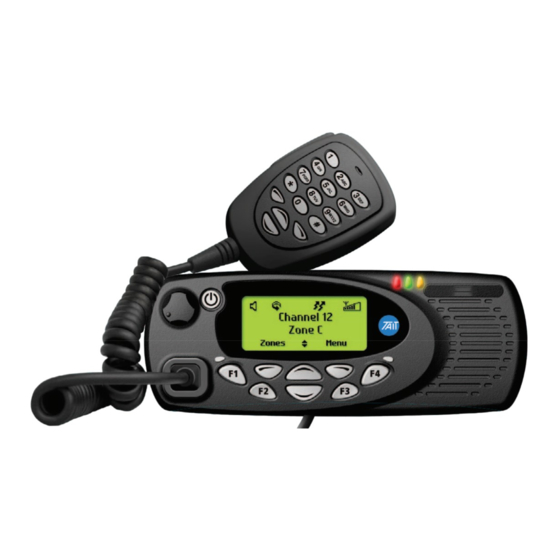
Symbol Name Function Left selection key Action determined by the text above the left selection key, or deletes a dialled character from the display Right selection key Action determined by the text above the right selection key Scroll keys Scroll up and down through a list of menu options or scroll left and right in messages Select your Quick Access menu Tip: If you press and hold the scroll keys, the scroll speed increases. - Page 21 on/off key function key 1 status LEDs microphone function key 2 function key 3 display PTT key right selection key (press-to-talk) left selection key scroll keys volume up function keys volume down 4 to 6 alphanumeric keys Symbol Name Function PTT key Press and hold to transmit and release to listen Volume up...
-
Page 22: Understanding The Radio Display
Understanding the radio display The messages and symbols you see on your radio display depend on the mode in which your radio is operating and the way it is programmed. The following diagram shows a typical display and explains some of the information that may be available. symbols The symbols along the top of the... - Page 23 Radio display symbols These are some of the symbols you may see on you radio display: Symbol Meaning Received signal strength indicator (RSSI): the more bars, the stronger the signal being received by your radio Transmit: your radio is transmitting Low-power transmit: your radio is transmitting on low power Silent operation: your radio’s audible tones have been turned off External alert: external alert is active...
-
Page 24: Understanding The Radio Indicators
Understanding the radio indicators The status LED indicators and the radio’s audible tones— together with the radio display—all combine to give you information about the state of your radio. The most common way the indicators work is described in the following sections. The way these indicators behave may be affected by the way your radio is programmed. - Page 25 Audible tones If quiet or silent mode has been turned on, you will not hear any audible tones. For a description of other tones you may hear, see “Describing the radio’s audible tones” on page Tone type Meaning one short Valid key press: the action you have attempted is beep permitted, or...
-
Page 26: Navigating Your Radio's Menus
Navigating your radio’s menus Your radio has a number of menus available, each containing lists or submenus. The menus available will depend on the way your radio is programmed. Using the Main menu Whenever Menu appears above the right selection key , you are Channel 1 able to open the Main menu... - Page 27 Your scroll keys may be programmed for channel scroll. If this is the case, press the scroll key to immediately begin scrolling through your list of channels. Using the left selection key Quick Access menu Your radio may be programmed so that your left selection key acts Channel 9 as a shortcut to another frequently...
-
Page 28: Viewing Your Radio's Function Key Settings
Viewing your radio’s function key settings Your radio’s four function keys can have programmed functions assigned to each key. Some keys may have a function associated with both a short key press and a long key press. To check the functions assigned to the foreground radio’s function keys, you can use the Main menu. -
Page 29: Sharing A Multi-Head Radio With Other Users
Sharing a multi-head radio with other users Your radio may be installed with multiple control heads, so you can share the radio with other users. Elements of the user interface (such as display content, internal speaker audio, and LEDs) are duplicated on all control heads. When sharing the radio with other users: wait until other users have finished before using the ■... -
Page 30: Basic Operation
Basic operation This section describes the basic operation of your radio. The following topics are covered in this section: turning the radio on and off ■ entering your personal identification number ■ adjusting the speaker volume ■ turning on control-head backlighting ■... -
Page 31: Adjusting The Speaker Volume
If you do not know your PIN or you receive a wrong PIN message, Wrong PIN, try again consult your radio provider or administrator. Adjusting the speaker volume The volume control also changes the volume level of the radio’s audible indicators. Your radio may be programmed with a minimum volume level. -
Page 32: Changing The Level Of Control-Head Backlighting
a short key press turns backlighting on momentarily, and ■ a long key press turns backlighting on, and it remains on ■ until there is a further long key press. Turning backlighting on and off by using a function key The function key programmed for Backlighting turns backlighting on and off. -
Page 33: Changing The Contrast Of The Radio Display
Select Menu>Radio settings> Display settings Display settings>Backlight level. Backlight level Backlighting Back Select In the Backlight Level menu, Backlight level Medium choose either High, Medium High or Low. Back Select Press Select. Changing the contrast of the radio display If the radio’s display is too dark or too light, you may be able to adjust the contrast by using the Contrast Adjust menu. -
Page 34: About Gps Information
GPS information on the radio display is not a standard feature. Before being programmed, it must be purchased and enabled on the radio via the Software Feature Enabler. Contact Tait for more information. About GPS status information While viewing GPS information, GPS status information appears at the top right of the display. -
Page 35: Viewing Gps Information
Viewing GPS information To view GPS information, you may be able to either: use a programmed function key, or ■ use the Main menu. ■ Viewing GPS information by using a programmed function key Press the function key programmed for GPS display. GPS information is now shown in tracking GPS info... -
Page 36: About The Lone Worker Feature
About the lone worker feature The ‘lone worker’ emergency feature is designed for people who work alone in potentially hazardous environments. Your radio may be programmed so that lone worker monitoring is active as soon as your radio is turned on, or you may be able to turn lone worker on and off. - Page 37 Lone worker operation Lone worker monitoring is made up of three stages. The way the radio behaves and the duration of each stage depends on how the radio is programmed. See “Lone worker messages and indicators” on page Stage 1: Lone worker is activated and the ■...
-
Page 38: Emergency Mode
Radio behaviour Explanation Lone worker is active and user activity timer Channel 1 counting down. Menu user activity timer symbol The radio sounds a There has been no user low-pitched beep. activity and the user activity time has expired. timer is user response Loneworker counting down. - Page 39 Activating lone worker To turn the lone worker feature on and off: Press the assigned function key. ■ The message Loneworker activated (or Loneworker deactivated) appears in the display. Your radio may be programmed so that lone worker is active as soon as your radio is turned on.
-
Page 40: Single Radio Operation
Single radio operation The following topics are covered in this section: selecting a zone ■ selecting a channel ■ selecting a group ■ checking that a channel is clear ■ communicating directly with other radios ■ making a call ■ making a local call ■... - Page 41 In the Zones menu, scroll Zones through the list of zones until the Zone 2 Zone 3 one you want appears. Back Select Press Select. The zone indication may be programmed to appear either Channel 9 Zone 3 below the channel information Menu or beside the RSSI symbol.
-
Page 42: Selecting A Channel
Selecting a channel To select a channel on the foreground radio you may be able to either: use a programmed function key, ■ use the Main menu, or ■ use your quick access menu. ■ Selecting a channel by using a programmed function key Press the function key programmed for preset channel. - Page 43 Selecting a channel by using your Quick Access menu Your scroll keys may be programmed for channel scroll. If this is the case, press the scroll key to immediately begin scrolling through your list of channels. Press one of the scroll keys to open the Channels menu.
-
Page 44: Selecting A Group
Selecting a group A group is a collection of channels that are grouped together for either scanning or voting. In the Channels menu, the group is shown as being a single channel item, e.g. “Scan1”. To select a group on the foreground radio you may be able to either: use a programmed function key, ■... - Page 45 Selecting a group by using your Quick Access menu Your scroll keys may be programmed for channel scroll. If this is the case, press the scroll key to immediately begin scrolling through your list of channels and groups. Press one of the scroll keys to open the Channels menu.
-
Page 46: Checking That A Channel Is Clear
Checking that a channel is clear You or your user group may be segregated from other user groups by special signalling. If an incoming call carries the special signalling tones specific to you or your user group, your radio’s signalling mute opens and you can hear the call. These tones may not be audible. - Page 47 Activating monitor by using the Main menu Select Menu>Radio settings> Functions Monitor Functions>Monitor. Public address Back Select In the Monitor menu, Monitor choose On. Press Select. Back Select While monitor is on, the green LED flashes slowly and the Channel 9 monitor symbol appears in Menu...
-
Page 48: Communicating Directly With Other Radios
Communicating directly with other radios You can bypass the radio repeater and communicate directly with another radio. This feature is known as repeater talkaround. You can do this, for example, when you are out of range of the repeater, or if the repeater is busy or stops working. While repeater talkaround is active, all transmissions are made on the receive frequency of the channel you are on. -
Page 49: Main Menu
Activating repeater talkaround by using the Main menu Change to the required channel. Select Menu>Radio settings> Functions>Talkaround. In the Talkaround menu, Talkaround choose On. Press Select. Back Select The message Talkaround Talkaround activated appears. The repeater activated talkaround symbol appears if you navigate to the default display. -
Page 50: Making A Call
Making a call The steps below explain how to make a call on the foreground radio. See page 61 for information on how to make a call on more than one radio. Select the required channel or scan group. Check that the channel is clear. If the green LED is glowing, the channel is busy and you may not be able to transmit. -
Page 51: Making A Local Call
Making a local call Each channel on your radio may have one or more local calls programmed. To make a local call on the foreground radio you may be able to either: use the Main menu, or ■ use your Quick Access menu. ■... - Page 52 Making a local call by using your Quick Access menu Select the required channel. Press one of the scroll keys to open the Channel 9 Local Calls menu. Menu Scroll through the list of local Local calls Car 2 calls until the call you Dispatcher want appears.
-
Page 53: Making A Call Using Your Address Book
Making a call using your address book Your Address Book menu has a programmed list of calls, which can be made from any channel or zone. Address-book calls may also be used to send status information, such as “at lunch” or “on site”. To make a call on the foreground radio using your address book, you may be able to either: use a programmed function key,... - Page 54 Press Send. The call details appear in the display, the red LED glows and Calling... Base the transmit symbol appears Clear in the display. Making an address-book call by using your Quick Access menu Press one of the scroll keys to open the Channel 9 Address Book menu.
-
Page 55: Making An Emergency Call
Making an emergency call You may be able to activate emergency mode by using a programmed function key. The emergency function key may be programmed for either a short key press or long key press. Press the function key programmed for Emergency Mode and an emergency call is sent to your dispatcher, or some other predetermined location. -
Page 56: Receiving A Call
Receiving a call When there is valid activity on the currently selected channel or group on the foreground radio, the radio then unmutes and you can hear the call. The radio may also unmute if there is activity on the background radio, depending on the current mode. -
Page 57: Dual Radio Operation
Dual radio operation The TM8260 can be installed and programmed as two radios, with one user-interface. This enables you to switch between the radios, and access different features and channels on those radios (for example, channels that operate on different frequency bands). You can also toggle modes that enable you to receive and transmit on both radios at the same time. -
Page 58: Dual Radio Display States And Descriptions
Dual radio display states and descriptions The following table lists various states of the radio display, and the implications for transmitting and receiving. Display Description The radio system will receive and transmit on the foreground radio R1:Channel 12 only. Menu The radio system will receive on R1:Channel 12 both radios, and transmit on the... -
Page 59: Radio Controls In A Dual Radio System
Radio controls in a dual radio system Certain radio controls and functions are global and apply to the radio system as a whole. The on-off key turns the entire radio system on or off. The volume control adjusts the volume of all received audio and indicators. -
Page 60: Switching Between Radios (Changing The Foreground Radio)
Switching between radios (changing the foreground radio) In a dual-radio system, one radio is always at the foreground and one at the background. For more information, see “About the foreground and background radio” on page To change the foreground radio, press the function key programmed R1:Channel 12 for switching the active radio. -
Page 61: Monitoring More Than One Radio (Dual Receive)
Select the required channel or scan group on the second radio. Press and hold the PTT key to transmit. Press the function key Dual tx programmed for dual body mode deactivated or the key programmed for single body mode to disable dual transmission. -
Page 62: Cross-Band Repeater Mode
Cross-band repeater mode Cross-band repeater mode allows the radio to be used as a temporary repeater. Any activity received on one radio will be automatically transmitted on the other radio, and vice versa. Activating cross-band repeater mode by using a function key Press the function key programmed for cross-band repeater. -
Page 63: Troubleshooting
Troubleshooting The following topics are covered in this section: when your radio won’t turn on ■ removing the microphone ■ reinstalling the microphone ■ describing the radio’s audible tones ■ When your radio won’t turn on If the red, green and amber LEDs on the control head do not light up when the radio is turned on, it is likely that no power is reaching the radio. - Page 64 Plug the microphone into the microphone socket. Slide the microphone grommet along the microphone cord and push two adjacent corners of the grommet into the microphone socket cavity. Squeeze the grommet and push the remaining corners into position. Check that the grommet is seated correctly in the cavity. microphone grommet control head...
-
Page 65: Describing The Radio's Audible Tones
Describing the radio’s audible tones The following table summarizes the radio’s audible tones. Action and tone Meaning two short Radio turned on: the radio is powered on and beeps ready to use one short beep after Radio locked: you need to enter your personal the power-up beeps identity number (PIN) before you can use the radio one long, low-... - Page 66 Action and tone Meaning two high-pitched beeps Radio's temperature is very high: the radio's temperature is in the very high temperature range and all transmissions will now be at low power; if the radio's temperature rises outside this range, transmissions will be inhibited continuous low- Radio system error: a system error has occurred pitched tone...
-
Page 67: Tait Software Licence Agreement
“Confidential Information” means all or works from, the Software or Documentation, any information supplied to or received by whether made by Tait or another party, or any Licensee from Tait, whether before or after improvements that result from Tait processes installation or use and whether directly or indi- or, provision of information services. - Page 68 Agreement enhancements, new versions and new and the terms and conditions of the any releases of the software provided by Tait; and applicable Open Source Software Licenses, (iii) may contain one or more items of the terms and conditions of the Open Source software owned by a third-party supplier.
- Page 69 Software in a manner that would result Section 5 OWNERSHIP AND TITLE in the production of a copy of the Software by Tait, its licensors, and its suppliers retain all of any means whatsoever other than what is their Intellectual Property Rights in and to the permitted in this Agreement.
- Page 70 Security Vulnerabili- radio products to a third party, Licensee may ties. If Tait cannot correct the defect within a assign its right to use the Software which is reasonable time, then at Tait option, Tait will embedded in or furnished for use with the...
- Page 71 Documentation may be terminated immedi- limited at the option of Tait to the repair or ately upon notice by Tait. replacement of the Software or the refund of the purchase price of the Software. 8.2. Within thirty (30) days after termination...
- Page 72 Agreement to the specific subject matter of this Agree- between it and Tait in relation to the Soft- ment, this Agreement prevails. ware. This Agreement supersedes any 11.8. SECURITY. Tait uses reasonable means...
- Page 73 74 Tait general software licence agreement...
Need help?
Do you have a question about the TM8260 and is the answer not in the manual?
Questions and answers