Sindoh D310 Series User Manual
Hide thumbs
Also See for D310 Series:
- User manual (8 pages) ,
- User manual (324 pages) ,
- Quick installation manual (17 pages)

Related Manuals for Sindoh D310 Series


Summary of Contents for Sindoh D310 Series
- Page 1 D310 Series USER MANUAL/About This Machine Before using this Product, please read the USER MANUAL carefully and keep it for your reference.
-
Page 2: Table Of Contents
Table of contents Checking the Name and Function of each Part in this Machine Front..............................1-2 Side/rear..............................1-3 Inside..............................1-4 Checking the Status of This Machine Using LED Indicators Warning Indicator..........................2-2 Data Indicator..........................2-3 Checking the Name and Function of Each Optional Component Checking the list of optional components.................. - Page 3 Installing BioDriver (USB-Driver) (Windows 7/8.1/10) .................6-9 Installing BioDriver (USB-Driver) (Windows Vista) ................6-11 Installing Data Administrator PlugIn for Biometric Authentication Unit AU-102 ..........6-12 6.5.3 Registering User Authentication Information ..................6-13 Using the Authentication Unit (IC Card Type) Authentication Unit (IC card type) ....................7-2 Status of authentication unit......................
-
Page 4: Checking The Name And Function Of Each Part In This Machine
Checking the Name and Function of each Part in this Machine... -
Page 5: Front
Checking the Name and Function of each Part in Checking the Name and Function of each Part in this Machine this Machine Front Front Name Name Description Description Control Panel Control Panel Used to configure various settings in this machine. Used to configure various settings in this machine. -
Page 6: Side/Rear
Name Description Power key Press this key to switch to the Power Save mode. During the normal operation, the key lights up blue. During the power save mode, the key flashes blue or lights up orange. Stylus Pen Used to select a menu on the Touch Panel, or enter characters. Warning Indicator Flashes or lights up to indicate that a problem has occurred in this ma- chine. -
Page 7: Inside
Inside Inside Name Name Description Description Original Glass Original Glass Used to load the original. Used to load the original. Fusing Adjustment Fusing Adjustment Used to clear paper jams in the fusing unit when printing envelopes. Used to clear paper jams in the fusing unit when printing envelopes. Lever Lever Fusing Unit... -
Page 8: Checking The Status Of This Machine Using Led Indicators
Checking the Status of This Machine Using LED Indicators... -
Page 9: Warning Indicator
Warning Indicator Checking the Status of This Machine Using LED In- dicators Warning Indicator Flashes or lights up to indicate that a problem has occurred in this machine. Status of LED Status of this machine Flash: Orange Indicates that a warning has occurred in this machine. Light up: Orange Indicates that this machine is stopped due to an error. -
Page 10: Data Indicator
Data Indicator Data Indicator Flashes or lights up to indicate the data receiving status on this machine. Status of LED Status of this machine Flash: Blue Indicates that print data is currently being received. Light up: Blue Indicates that data is currently being stored. [About This Machine]... - Page 11 Data Indicator [About This Machine]...
-
Page 12: Checking The Name And Function Of Each Optional Component
Checking the Name and Function of Each Optional Component... -
Page 13: Checking The List Of Optional Components
Checking the list of optional components Checking the list of optional components Checking the Name and Function of Each Optional Checking the Name and Function of Each Optional Component Component Checking the list of optional components Checking the list of optional components List of optional components List of optional components 18 19... - Page 14 Checking the list of optional components Name Description Main unit Scans the original in the scanner section, and prints a scanned image in the printer section. "D311/D310" in This unit is referred to as "machine", "main unit", or "C287/C227" in the manual.
-
Page 15: List Of Other Optional Components
Checking the list of optional components Name Description Finisher FS-533 Install this unit onto the output tray of this machine. The Mount Kit MK-602 and Mount Kit MK-603 are required to install Finisher FS-533. Sorts, groups and staples printed paper before outputting it. Mount Kit MK-602 This unit is required to install Finisher FS-533. - Page 16 Checking the list of optional components Name Description i-Option LK-111 Supports the ThinPrint function that is one of the advanced functions. i-Option LK-114 Supports the serverless pull printing function that is one of the ad- vanced functions. i-Option LK-115 v2 You can use TPM (Trusted Platform Module) that is one of the ad- vanced functions.
-
Page 17: Front
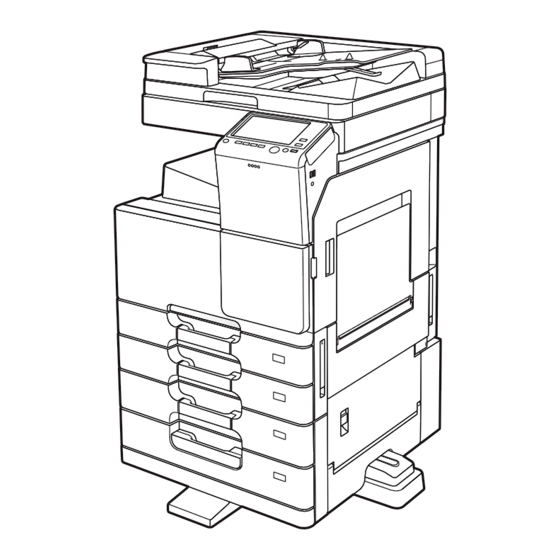
Checking the list of optional components Checking the list of optional components Front Front The illustration shows the main unit with Reverse Automatic Document Feeder DF-628, and Paper Feed The illustration shows the main unit with Reverse Automatic Document Feeder DF-628, and Paper Feed Cabinet PC-414. - Page 18 Checking the list of optional components Checking the list of optional components The illustration shows the main unit with Paper Feed Cabinet PC-214 or Paper Feed Cabinet PC-114, and The illustration shows the main unit with Paper Feed Cabinet PC-214 or Paper Feed Cabinet PC-114, and Reverse Automatic Document Feeder DF-628.
-
Page 19: Side/Rear
Checking the list of optional components Side/rear The illustration shows the main unit with Reverse Automatic Document Feeder DF-628, Paper Feed Cab- inet PC-214, Fax Kit FK-513, Power Supply BOX MK-734, Clean Unit CU-101, and Mount Kit MK-748. LINE Name Description Jack for connecting a Used to connect a telephone cord. -
Page 20: Finisher Fs-533, Punch Kit Pk-519
Finisher FS-533, Punch Kit PK-519 Finisher FS-533, Punch Kit PK-519 Finisher FS-533, Punch Kit PK-519 Finisher FS-533, Punch Kit PK-519 Name Name Description Description Jam Removal Dial Jam Removal Dial Turn this dial to remove paper that caused a paper jam in the finisher. Turn this dial to remove paper that caused a paper jam in the finisher. -
Page 21: Job Separator Js-506
Job Separator JS-506 Job Separator JS-506 Job Separator JS-506 Job Separator JS-506 Name Name Description Description Output Tray1 Output Tray1 Outputs printed pages. Outputs printed pages. Output Tray2 Output Tray2 Outputs printed pages. Outputs printed pages. [About This Machine] [About This Machine] 3-10 3-10... -
Page 22: Finisher Fs-534/Saddle Stitcher Sd-511/Punch Kit Pk-520
Finisher FS-534/Saddle Stitcher SD-511/Punch Kit PK-520 Finisher FS-534/Saddle Stitcher SD-511/Punch Kit PK-520 Finisher FS-534/Saddle Stitcher SD-511/Punch Kit PK-520 Finisher FS-534/Saddle Stitcher SD-511/Punch Kit PK-520 [About This Machine] [About This Machine] 3-11 3-11... - Page 23 Finisher FS-534/Saddle Stitcher SD-511/Punch Kit PK-520 Finisher FS-534/Saddle Stitcher SD-511/Punch Kit PK-520 Name Name Description Description Output Tray2 Output Tray2 Outputs printed pages. Outputs printed pages. Output Tray1 Output Tray1 Outputs printed pages. Outputs printed pages. Front Door Front Door Open this door when clearing a paper jam or staple jam or when re- Open this door when clearing a paper jam or staple jam or when re- placing a staple cartridge.
- Page 24 Finisher FS-534/Saddle Stitcher SD-511/Punch Kit PK-520 Name Description Punch Scrap Box Remove this box when disposing of punch scraps. Staple Cartridge Pull out this cartridge from the finisher when clearing a staple jam or replacing a staple cartridge. Guide Lever [FS4] Turn this lever to clear a paper jam.
- Page 25 Finisher FS-534/Saddle Stitcher SD-511/Punch Kit PK-520 [About This Machine] 3-14...
-
Page 26: Checking The Specifications Of This Machine
Checking the Specifications of This Machine... -
Page 27: Main Unit
Checking the Specifications of This Machine Main Unit Item Specifications D311 Name bizhub C287 D310 bizhub C227 Type Desktop/Console 600 dpi e 600 dpi Scanning resolution 1800 dpi (equivalent) e 600 dpi Writing resolution Gradation Memory size 2 GB (std.), 4 GB (max.) 250 GB Originals Sheets, books, objects (Max. -
Page 28: Scanning Function Specifications
Item Specifications Copy magnification < Fixed same magnification > Full size 1: 1 ^ 0.5% or less Enlarge Inch area 1: 1.214/1.294/1.545/2.000 Metric area 1: 1.154/1.224/1.414/2.000 Reduce Inch area 1: 0.785/0.733/0.647/0.500 Metric area 1: 0.866/0.816/0.707/0.500 < Preset > 3 types <... -
Page 29: Printer Specifications
Printer Specifications Item Specifications Type Embedded Paper size Conforms to the main unit specifications. Print speed Conforms to the main unit specifications. Resolution 1800 dpi (equivalent) e 600 dpi (at smoothing) Page description lan- PCL5e/c Emulation guage PCL6 (XL ver. 3.0) Emulation PostScript 3 Emulation (3016) XPS ver.1.0 Fonts... -
Page 30: Checking The Specifications Of Optional Components
Checking the Specifications of Optional Components... -
Page 31: Fax Kit Fk-513
Checking the Specifications of Optional Compo- nents Fax Kit FK-513 Item Specifications Model number FK-513 Communication Super G3 Applicable lines Subscribed telephone lines (including facsimile communication networks) PBX lines Line density Ultra Fine: 600 dpi e 600 dpi Super Fine: 16 dot/mm e 15.4 line/mm, 400 dpi e 400 dpi Fine: 8 dot/mm e 7.7 line/mm, 200 dpi e 200 dpi... -
Page 32: Paper Feed Cabinet Pc-114
Item Specifications Max. 11 e 17 (A3) (Fax mode: Max. 39-3/8 inches (1000 mm)) Original size Original loading capaci- 100 sheets (21-1/4 lb (80 g/m Supports same type original or different types mixed original. Feeding speed * When copying (Letter (8-1/2 e 11 v) or A4 v, resolution 600 dpi) 1-sided original: 36 sheets/min. -
Page 33: Paper Feed Cabinet Pc-414
Paper Feed Cabinet PC-414 Item Specifications Model number PC-414 Paper type Plain paper (15-15/16 lb to 23-15/16 lb (60 g/m to 90 g/m )), Thick (24-3/16 lb to 68-1/8 lb (91 g/m to 256 g/m 8-1/2 e 11 v, A4 v Paper size Number of sheets able Plain paper: 2500 sheets (21-1/4 lb (80 g/m... - Page 34 Item Specifications Stacking ca- Sort/Group Plain paper 8-1/2 e 11 (A4), 7-1/4 e 10-1/2 (B5): 3000 sheets pacity • (Output Tray2) • 8-1/2 e 14 (B4) or more: 1500 sheets 5-1/2 e 8-1/2 (A5) or less: 500 sheets • Thick, Transparency, Envelope, Label sheet, Letterhead: 20 sheets * Paper cannot be stacked higher than the following height regard- less of the number of sheets in the stack.
-
Page 35: Saddle Stitcher Sd-511
Saddle Stitcher SD-511 Item Specifications Model number SD-511 Applicable Finisher FS-534 Paper size • Center Staple, Half-Fold: 11 e 17, 8-1/2 e 14, 8-1/2 e 11 w, A3, B4, A4 w, 8K • Tri-Fold: 8-1/2 e 11 w, A4 w, 16K w Paper type Center Staple Plain paper (15-15/16 lb to 23-15/16 lb (60 g/m... -
Page 36: Punch Kit Pk-519
Item Specifications 11 e 17 to 5-1/2 e 8-1/2, A3 to A5, B6 w, A6 w, 16K, 8K, Postcard Paper size Group/Sort (4 e 6 (A6 Card)), Banner paper 11 e 17 to 7-1/4 e 10-1/2, A3 to B5, 16K, 8K Offset Group/Offset Sort... -
Page 37: Job Separator Js-506
Item Specifications Weight Approx. 7-1/16 lb (3.2 kg) Job Separator JS-506 Item Specifications Model number JS-506 Paper size Output Tray1 11 e 17 to 5-1/2 e 8-1/2, A3 to A5, B6 w, A6 w, 16K, 8K, Postcard (4 e 6 (A6 Card)) Group/Sort: 11 e 17 to 5-1/2 e 8-1/2, A3 to A5, B6 w, A6 w, 16K, Output Tray2 •... -
Page 38: Authentication Unit Au-201S
Item Specifications System condi- Ambient tem- 32 °F to 122 °F (0 °C to 50 °C) tions (non-op- perature erating state) Humidity 20% to 80% (No dew condensation) Compatible Computer PC-AT compatible machine computer Conforms to the recommended operating environment of your oper- ating system. -
Page 39: Upgrade Kit Uk-212
Item Specifications Compatible Computer PC-AT compatible machine computer Conforms to the recommended operating environment of your oper- ating system. Memory (RAM) Conforms to the recommended operating environment of your oper- ating system. Free space on 600 MB or more hard disk 800 e 600 pixels or more Monitor Network... -
Page 40: Using The Authentication Unit (Biometric Type)
Using the Authentication Unit (Biometric Type) -
Page 41: Authentication Unit (Biometric Type)
Authentication Unit (Biometric Type) Using the Authentication Unit (Biometric Type) Authentication Unit (Biometric Type) The Authentication Unit (Biometric Type) is a "biometrics (biometric authentication) system" that scans fin- ger vein patterns to perform personal authentication. It offers a system that makes it difficult for someone to masquerade as an authorized user, realizing enhanced security. -
Page 42: Status Of Authentication Unit
Status of Authentication Unit Status of Authentication Unit The status of the authentication unit is indicated by status indicator LEDs and beep sounds. Status indicator LEDs Status Lit up green Ready state, or scanning or authentication is completed Flash in green During authentication Lit up red Scanning or authentication failed... -
Page 43: Operations Required To Use This Function (For The Administrator)
Operations Required to Use This Function (for the Administrator) Operations Required to Use This Function (for the Administrator) 6.3.1 Configuring Authentication Settings of This Machine First, configure the authentication function of this machine (ON (MFP)). Tips This machine does not support external server authentication. You can use a combination of user authentication based on biometric information and account track to manage users for each account track. -
Page 44: Registering User Authentication Information
Operations Required to Use This Function (for the Administrator) Tap [Authentication Device Settings] - [General Settings] - [Bio Authentication], and configure the fol- lowing setting. Settings Description [Beep Sound] Select whether to give a "blip" sound when the finger vein pattern is scanned successfully. - Page 45 Operations Required to Use This Function (for the Administrator) Select a desired registration number, then tap [Edit]. Enter the user name and password, and tap [Register Auth. Info.]. % To restrict functions applicable to users, select Function Permission. Tap [Edit]. % Up to two authentication information items can be registered for each user.
- Page 46 Operations Required to Use This Function (for the Administrator) Place your finger on the authentication unit to scan the finger vein pattern. % Place your finger straight so that your finger cushion lightly touches the hollow and protuberance part of the scanning section. % Scan a finger vein pattern three times.
-
Page 47: Logging In To This Machine
Logging in to This Machine Logging in to This Machine The login methods vary depending on the authentication settings of this machine. [1-to-many authentication] allows the user to log in by simply placing his or her finger on the authenti- cation unit. -
Page 48: Using Data Administrator (For The Administrator)
Using Data Administrator (for the Administrator) Using Data Administrator (for the Administrator) 6.5.1 Data Administrator Data Administrator is a management tool to edit or register authentication information or address informa- tion of the target device through a computer on the network. Using this tool allows you to import authentication information or address information from a device and re- write it to the device after editing. - Page 49 Using Data Administrator (for the Administrator) In the [Hardware] tab, click [Properties]. In the [General] tab, click [Change settings]. Click [Update Driver...]. [About This Machine] 6-10...
-
Page 50: Installing Biodriver (Usb-Driver) (Windows Vista)
Using Data Administrator (for the Administrator) In the screen in which to select how to search the driver software, click [Browse my computer for driver software]. Click [Browse...]. Select the BioDriver (USB-Driver) file in the computer, then click [OK]. Click [Next], and perform the procedure by following the on-screen instructions. % If the [Windows Security] dialog box for verifying the publisher appears, click [Install this driver soft- ware anyway]. -
Page 51: Installing
Using Data Administrator (for the Administrator) Select [Locate and install driver software (recommended)]. Click [Browse my computer for driver software (advanced)]. Click [Browse...]. Select the BioDriver (USB-Driver) file in the computer, then click [OK]. Click [Next], and perform the procedure by following the on-screen instructions. When the installation is complete, click [Close]. -
Page 52: Registering User Authentication Information
Using Data Administrator (for the Administrator) 6.5.3 Registering User Authentication Information To register user authentication information with Data Administrator, connect the authentication unit to the USB port of the computer, and also connect the computer to this machine via network. To use Data Administrator, set up the operating environment in advance. - Page 53 Using Data Administrator (for the Administrator) Select a user template, and click [OK]. % For details about templates, refer to the relevant Data Administrator manual. The User Registration screen appears. Enter the user name and password, select the [AU-102] tab, then click [Register Auth. Info]. % Up to two authentication information items can be registered for each user.
- Page 54 Using Data Administrator (for the Administrator) Place your finger on the authentication unit to scan the finger vein pattern. % Place your finger straight so that your finger cushion lightly touches the hollow and protuberance part of the scanning section. % Scan a finger vein pattern three times.
- Page 55 Using Data Administrator (for the Administrator) Click [Write]. % Data Administrator supports the batch copy function. When necessary, you can collectively write the registered authentication information to multiple devices. When writing to this machine has finished, click [OK]. Disconnect the authentication unit from the USB port of the computer. NOTICE When connecting or disconnecting the USB cable, hold the plug.
-
Page 56: Using The Authentication Unit (Ic Card Type)
Using the Authentication Unit (IC Card Type) -
Page 57: Authentication Unit (Ic Card Type)
Authentication Unit (IC card type) Using the Authentication Unit (IC Card Type) Authentication Unit (IC card type) The Authentication Unit (IC card type) is an "IC card authentication" system that reads the IC card or NFC- compatible Android terminal to perform personal authentication. If you register a compatible noncontact IC card such as an employee ID card, you can use this machine synchronously with functions such as the user entering-leaving management to integrate the authentication system. -
Page 58: Status Of Authentication Unit
Status of authentication unit Status of authentication unit The status of the authentication unit is indicated by status indicator LEDs. Status indicator LEDs Status Light up (Yellow green) The unit is running normally. Flash (Orange) USB communications are not available. Light up (Red) Out of order [About This Machine]... -
Page 59: Operations Required To Use This Function (For The Administrator)
Operations Required to Use This Function (for the Administrator) Operations Required to Use This Function (for the Administrator) 7.3.1 Configuring Authentication Settings of This Machine This section explains an example of setting General Settings to [ON (MFP)]. Reference You can also configure settings so that authentication is performed in the LDAP server using the card ID reg- istered in the authentication card (LDAP-IC Card Authentication). - Page 60 Operations Required to Use This Function (for the Administrator) Tap [Authentication Device Settings] - [General Settings] - [Card Authentication], and configure the fol- lowing setting. Settings Description [IC Card type setting] Select the type of the required IC card. • To use the FeliCa card, select [FeliCa], [SSFC], [FCF], [FCF (Campus)], or [FeliCa (Proprietary Card)].
-
Page 61: Registering User Authentication Information
Operations Required to Use This Function (for the Administrator) 7.3.2 Registering User Authentication Information After the authentication function of this machine (ON (MFP)) has been configured, register user authentication information. The following two methods are available to register information. Connect the authentication unit to this machine, and use the Touch Panel to register information. Connect the authentication unit to a computer, and use Data Administrator through a computer to reg- ister information. -
Page 62: Logging In To This Machine
Logging in to This Machine Logging in to This Machine The login methods vary depending on the authentication settings of this machine. When using [Card Authentication], you can log in only by placing the IC card or NFC-compatible An- droid terminal on the authentication unit. When using [Card Authentication + Password], you can log in by placing the IC card or NFC-compatible Android terminal on the authentication unit and entering the password. -
Page 63: Using Data Administrator (For The Administrator)
Using Data Administrator (for the Administrator) Using Data Administrator (for the Administrator) 7.5.1 Data Administrator Data Administrator is a management tool to edit or register authentication information or address informa- tion of the target device through a computer on the network. Using this tool allows you to import authentication information or address information from a device and re- write it to the device after editing. - Page 64 Using Data Administrator (for the Administrator) In the [Hardware] tab, click [Properties]. In the [General] tab, click [Change settings]. Click [Update Driver...]. [About This Machine]...
-
Page 65: Installing Ic Carddriver (Usb-Driver) (Windows Vista)
Using Data Administrator (for the Administrator) In the screen in which to select how to search the driver software, click [Browse my computer for driver software]. Click [Browse...]. Select the IC CardDriver (USB-Driver) file in the computer, then click [OK]. Click [Next], and perform the procedure by following the on-screen instructions. -
Page 66: Installing Data Administrator Plugin For Ic Card Authentication Unit Au-201S
Using Data Administrator (for the Administrator) Select [Locate and install driver software (recommended)]. Click [Browse my computer for driver software (advanced)]. Click [Browse...]. Select the IC CardDriver (USB-Driver) file in the computer, then click [OK]. Click [Next], and perform the procedure by following the on-screen instructions. % If the [Windows Security] dialog box for verifying the publisher appears, click [Install this driver soft- ware anyway]. -
Page 67: Registering User Authentication Information
Using Data Administrator (for the Administrator) 7.5.3 Registering user Authentication Information To register user authentication information with Data Administrator, connect the authentication unit to the USB port of the computer, and also connect the computer to this machine via network. To use Data Administrator, set up the operating environment in advance. - Page 68 Using Data Administrator (for the Administrator) Select a user template, and click [OK]. % For details about templates, refer to the relevant Data Administrator manual. The User Registration screen appears. Enter the user name and password, and select the [IC card / NFC authentication] tab. Place the IC card or NFC-compatible Android terminal on the authentication unit, then click [Start read- ing].
- Page 69 Using Data Administrator (for the Administrator) Click [Write]. % Data Administrator supports the batch copy function. When necessary, you can collectively write the registered authentication information to multiple devices. When writing to this machine has finished, click [OK]. Disconnect the authentication unit from the USB port of the computer. NOTICE When connecting or disconnecting the USB cable, hold the plug.
Need help?
Do you have a question about the D310 Series and is the answer not in the manual?
Questions and answers