Sign In
Upload
Manuals
Brands
Sindoh Manuals
All in One Printer
D310 Series
Sindoh D310 Series Manuals
Manuals and User Guides for Sindoh D310 Series. We have
4
Sindoh D310 Series manuals available for free PDF download: User Manual, Quick Installation Manual
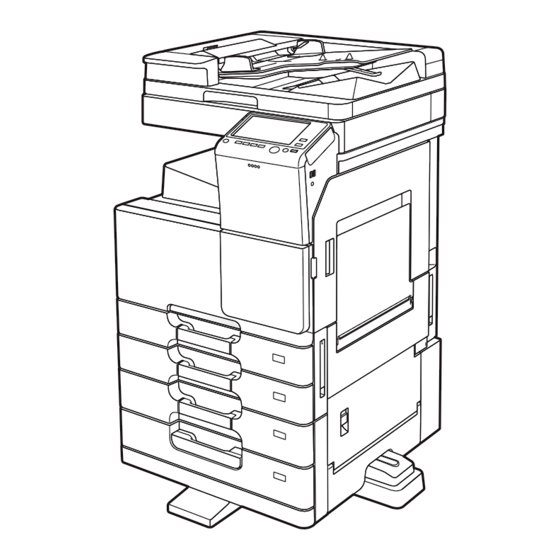
Sindoh D310 Series User Manual (324 pages)
Brand:
Sindoh
| Category:
All in One Printer
| Size: 4 MB
Table of Contents
Table of Contents
2
Web Connection
12
Operating Environment
13
2 Operations Required to Use Web Connection
14
Configuring Network Environment Settings
15
Overview
15
Assigning an IP Address
15
Confirming the IP Address
16
Web Management Tool]
16
Confirming Web Browser Settings
17
Web Management Tool]
17
3 Basic Usage
18
How to Access
19
Web Management Tool]
19
Layout of Web Connection Screen
20
Web Management Tool]
20
Login Methods
22
Login Screen
22
Login Mode
23
Switching Login Modes
24
Logging in to the Administrator Mode
24
Logging in to Administrator Mode (for a Registered User with Administrator Privileges)
26
Logging in to the User Mode
27
User Mode Overview
29
Main Menu
29
Each Mode in the User Mode
30
[Information]
30
[Job]
31
[Box]
31
[Direct Print]
32
[Store Address]
32
[Favorite Setting]
33
[Customize]
34
Using the Shortcut Function
35
Registering a Function in Bookmarks of the Web Browser
35
Creating a Shortcut for a Specific Page
35
Using the Help Function
36
Using the Online Help
36
Displaying the Meaning of the Setting in the Popup Window
36
Using the Wizard When Configuring Function Settings
37
Restricting Use of Web Connection
39
4 Configuring Basic Information Settings of this Machine
40
Registering Information of this Machine
41
Registering Support Information
42
Setting the Date and Time for the Machine
43
Manually Configuring Settings
43
Automatically Configuring Settings Using NTP
43
5 Configuring Network Settings of this Machine
44
Using in the Ipv4 Environment
45
Overview
45
Assigning an IP Address
45
Registering the DNS Server Used by this Machine
46
Registering the Host Name
46
Registering the Domain Name
46
Using in the Ipv6 Environment
47
Using this Machine in a Wireless Network Environment
48
Overview
48
Setting a Network Interface Configuration
48
Configuring the Basic Settings for TCP/IP
48
Configuring a Setting to Operate this Machine as a Wireless LAN Adapter
49
Configuring a Setting to Operate this Machine as a Wireless LAN Access Point
51
Configuring a Setting to Operate this Machine as a Wi-Fi Direct Group Owner
52
Checking the Communication Status of the Wireless Network Environment
53
Checking the MAC Address of the Wireless Network Adapter
53
Displaying this Machine on the Network Map
54
Displaying the Network Error Code
55
6 Setting up the Operating Environment of Web Connection
56
Encrypting Communication Using Web Connection
57
Changing the Administrator Password
58
Customizing the Initial Screen
59
Changing the Time Period until Automatic Log out
60
7 Configuring the Scan Environment
62
Configuring the Scan to E-Mail Environment
63
Overview
63
Configuring Basic Settings for Scan to E-Mail
63
Using an SSL/TLS Communication
64
Using SMTP Authentication
65
Using POP before SMTP Authentication
66
Using S/MIME
67
Configuring the SMB Transmission Environment
69
Overview
69
Configuring Basic Settings for the SMB Transmission
70
Using the WINS Server
70
Using the Direct Hosting SMB Service
71
Resolving the Name Using LLMNR
71
Using in the DFS Environment
71
Configuring the FTP Transmission Environment
72
Overview
72
Configuring Basic Settings for the FTP Transmission
72
Using the Proxy Server
72
Configuring the Webdav Transmission Environment
73
Overview
73
Configure Basic Settings for the Webdav Transmission
73
Using the Proxy Server
73
Using SSL Communication
74
Configuring the WS Scan Environment
75
Overview
75
Configure the Basic Settings for the WS Scan Transmission
75
Using the Proxy Server
76
Using SSL Communication
76
Configuring the TWAIN Scan Environment
78
Overview
78
Configuring the Basic Settings for the TWAIN Scan
78
Changing the Control Panel Lock Time
78
Searching for a Destination Using the LDAP Server
79
Overview
79
Configuring Basic Settings for the LDAP Search
79
Using SSL Communication
81
8 Configuring the Printing Environment
82
Configuring the LPR Printing Environment
83
Overview
83
Enabling LPD
83
Configuring the Port9100 Printing Environment
84
Overview
84
Changing the RAW Port Number
84
Configuring the SMB Printing Environment
85
Overview
85
Configure Basic Settings for the SMB Printing
85
Using the WINS Server
86
Using the Direct Hosting SMB Service
86
Resolving the Name Using LLMNR
87
Configuring the IPP Printing Environment
88
Overview
88
Configuring Basic Settings for the IPP Printing
88
Using the IPP Authentication
89
Communicating Using SSL (IPPS)
89
Configuring the WS Printing Environment
91
Overview
91
Configure Basic Settings for the WS Printing
91
Using the Proxy Server
92
Using SSL Communication
92
Configuring the Bonjour Printing Environment
94
Configuring a Setting to Make Prints from an Android Terminal Using Mopria
95
Configuring the E-Mail RX Print Environment
96
Overview
96
Configure Settings to Receive E-Mails on this Machine
96
Configure Settings to Print a Received E-Mail Attachment
97
Specifying the Default Print Settings for this Machine
98
Specifying the Default Print Settings
98
Specifying the Default PCL Print Settings
100
Specifying the Default PS Print Settings
101
Specifying the Default TIFF Print Settings
102
Configuring Security Settings for XPS or OOXML Printing
102
Configuring the Default OOXML Print Settings
102
Configuring the Default Combination Settings
103
Specifying the Time-Out Time by Interface
104
Restricting Users from Obtaining Device Information Using Password
105
9 Configuring the Fax Environment
106
Configuring Basic Fax Settings
107
Configuring the Line Usage Settings
107
Configuring Connection Settings for a PBX Environment
107
Registering the Sender Information
108
Specifying Operations When Sending and Receiving a Fax
109
Specifying How to Print the Sender Name/Reception Information
109
Changing Print Settings When Receiving a Fax
109
Canceling Stamp Setting When Sending a Fax
110
Adjusting the Image Quality Depending on the Resolution of a Received Fax
110
Specifying Useful Transmission and Reception Functions
111
Enabling/Disabling the Fax Functions
111
Using the Closed Network RX Function
112
Using the Fax Retransmit Function
112
Using the Memory RX Function
112
Using the Forward TX Function
113
Using the PC-Fax RX Function
114
Using the TSI Routing Function
114
Restricting PC-FAX Transmission
116
Specifying Fax Report Print Conditions
117
Restricting Deletions of Received Faxes
119
10 Configuring the Network Fax Environment
120
Configuring the Internet Fax Environment
121
Overview
121
Configure Basic Settings for Sending and Receiving an Internet Fax
121
Checking a Fax Reception
124
Specifying the Reception Ability of this Machine
124
Configuring Default Compression Type Setting for Transmission in Black and White
125
Configuring Default Compression Type Setting for Transmission in Color
125
Using an SSL/TLS Communication
125
Using SMTP Authentication
126
Using POP before SMTP Authentication
127
Configuring the IP Address Fax Environment
129
Overview
129
Configure Basic Settings for Sending and Receiving Faxes Using IP Address Fax
129
Configuring Default Compression Type Setting for Transmission in Black and White
130
Configuring Default Compression Type Setting for Transmission in Color
130
11 Configuring the User Box Environment
132
Creating and Editing a User Box
133
Creating a User Box
133
Changing User Box Settings
134
Creating and Editing a System User Box
135
Creating a Bulletin Board User Box
135
Creating a Relay User Box
135
Creating an Annotation User Box
136
Changing Bulletin Board User Box Settings
137
Changing Relay User Box Settings
137
Changing Annotation User Box Settings
138
Configuring User Box Environment
139
Specifying the Maximum Number of User Boxes
139
Deleting All Empty User Boxes
139
Automatically Deleting Files from a User Box
139
Automatically Deleting Files from the SMB Folder
140
Specifying How to Process a File after Printing or Transmission
140
Configuring System User Box Environment
141
Deleting All Secure Documents
141
Automatically Deleting Files from a System User Box
141
Specifying Operations of Printed ID & Print Documents
141
Configuring the Share SMB File Function
142
Overview
142
Configuring the SMB Server
142
Creating a Public User Box to Share Files
143
Configuring the USB Memory Device Settings
144
Disabling User's Operation of Registration/Change of a User Box
145
Managing Files Saved in a User Box Using the Scan to URL Function
146
Deleting All Files Saved in a User Box Using the Scan to URL Function
146
12 Restricting Users from Using this Device
148
Overview of User Authentication and Account Track
149
User Authentication
149
Account Track
150
Combining User Authentication and Account Track
150
Employing the MFP Authentication
152
Overview
152
Configuring Basic Settings for the User Authentication
152
Employing the Account Track Function
154
Overview
154
Configuring Basic Account Track Settings
154
Overview
156
Employing the Active Directory Authentication
156
Sending to Your Computer (Scan to Home)
158
Using the Single Sign-On
158
Reinforcing Authentication Processing When Using Active Directory
158
Employing the NTLM Authentication
160
Overview
160
Configuring Basic Settings for the NTLM Authentication
160
Using the WINS Server
162
Using the Direct Hosting SMB Service
162
Employing the LDAP Authentication
163
Overview
163
Configuring Basic Settings for the LDAP Authentication
163
Using SSL Communication
165
Sending to Your Address (Scan to Me)
166
Sending the Download URL to Your Address (Scan to URL)
167
Constructing a Single Sign-On Environment for the SMB Transmission
168
Configuring a Setting so that a User Can Log in to this Machine Using Administrator Privileges
169
Setting Privileges to Use the Functions of this Machine by User or Account
170
12.11.1 Restricting Available Functions by User or Account
170
Specifying the Default Function Permission Setting When the External Server Authentication Is Used
171
12.11.3 Restricting Functions Available to Public Users
172
Managing the Maximum Number of Copies by User or Account
173
Limiting the Access to Destinations for each User
174
12.13.1 Methods to Limit Access to Destinations
174
12.13.2 Managing Based on the Reference Allowed Level
174
Reference Allowed Level
174
Setting the Reference Allowed Level
174
12.13.3 Managing Based on the Reference Allowed Group
175
Reference Allowed Group
175
Assigning a Reference Allowed Group
175
Managing Based on a Combination of the Reference Allowed Level and the Reference Allowed Group
175
Combining the Reference Allowed Level with the Reference Allowed Group
175
Simultaneously Setting a Reference Allowed Level and Reference Allowed Group
176
Changing the Function Key Display Pattern by User or Account
177
Overview
177
Allowing Changing the Function Key Display Pattern by User or Account
177
Selecting a Function Key Display Pattern by User
177
Selecting a Function Key Display Pattern by Account
178
Specifying the Operations of the ID & Print Function
179
Configuring Common Settings When Using the Authentication Function
180
Restricting Print Jobs Without Authentication Information
181
Printing Without Password (Quick Authentication)
182
Overview
182
Permitting the Quick Authentication
182
Registering the Quick Authentication Server
182
Using SSL Communication
183
Setting a Secondary Authentication Server against Shutdown of the Quick Authentication Server
184
Using the Authentication Unit
187
12.19.1 Setting Operations of the Authentication Unit
187
Authentication Unit (IC Card Type)
187
Authentication Unit (Biometric Type)
187
Authenticating in the LDAP Server Using the Authentication Card (LDAP-IC Card Authentication)
187
Overview
187
Configuring Basic Settings for the LDAP-IC Card Authentication
188
Using SSL Communication
189
Setting a Secondary Authentication Server against Shutdown of the LDAP Server
189
Setting to Allow the User to Register the IC Card in the LDAP Server
192
12.19.3 Recording the Authentication Card ID in Counter Information of this Machine
192
Using the MFP Authentication Together against in the Case Where an Enhanced Server Has Shut down
193
Setting a Secondary Authentication Server against Shutdown of an Authentication Server
195
Using a Mobile Terminal for Authentication Purposes
196
12.22.1 Employing the NFC Authentication
196
Overview
196
Configuring Settings for NFC Authentication on an Android Terminal
196
Enabling the NFC Authentication Function on this Machine
196
Using NFC on an Android Terminal to Log in to this Machine
196
12.22.2 Employing Bluetooth LE Authentication
197
Overview
197
Configuring Settings for Bluetooth LE Authentication on an Ios Terminal
197
Enabling the Bluetooth LE Authentication Function on this Machine
197
Using Bluetooth LE on an Ios Terminal to Log in to this Machine
197
13 Reinforcing Security
200
Creating a Certificate for this Machine to Communicate Via SSL
201
Overview
201
Using the Certificate Registered Upon Shipment
201
Self-Creating a Certificate
201
Requesting the Certificate Authority for Issuing a Certificate
202
Managing the Certificates for this Machine
204
Using Different Certificates Depending on the Application
204
Exporting a Certificate
205
Exporting a Certificate to Your Computer
205
Exporting a Certificate to an SMB Sharing Folder
205
Importing a Certificate
206
Importing a Certificate from Your Computer
206
Importing a Certificate from an SMB Sharing Folder
206
Deleting a Certificate
206
Configuring Certificate Verification Settings
207
Verifying a Certificate for Peer
207
Importing External Certificates Used for Validating the Chain
207
Types of External Certificates that Can be Imported
207
How to Import
208
Registering User's Certificates Automatically on this Machine
209
Controlling the Access to this Machine by IP Address
210
Ipv4 Address Filtering
210
Ipv6 Address Filtering
210
Using Ipsec Communication
211
Using the IEEE802.1X Authentication
215
Sending Data to the Authenticated Share Folder (Scan to Authorized Folder)
217
Scan to Authorized Folder
217
Limiting the Direct Input of Addresses
217
Disabling User's Operation of Registration/Change
218
Restricting User's Web Browser Setting Operations
219
Saving the Operation Log of the Control Panel
220
Enhancing the Security of this Machine by Simple Operation
221
Restricting Functions Using the USB Port
223
Restricting the Firmware Update Using a USB Memory with a Password
224
14 Managing the Machine Status
226
Managing the Machine Power for Power Saving
227
Setting the Power Key/Power Save Function
227
Switching to Power Save Mode at Specified Time (Weekly Timer)
228
Returning the Machine from the Power Save Mode Via the Wireless Network
229
Configuring the Daylight Saving Time Settings
230
Customizing the Control Panel Environment
231
Changing a Function to be Assigned to a Register Key
231
Selecting Functions to be Arranged in the Main Menu
231
Changing the Theme of the Main Menu
232
Selecting Function Keys to be Displayed on the Main Screen (Using a Display Pattern)
233
Selecting Function Keys to be Displayed on the Main Screen (Individual Specification)
233
Overview
233
Allowing the Change of Functions Keys in each Mode
234
Changing Function Keys in Copy Mode
234
Changing Function Keys in Fax/Scan Mode
234
Changing Function Keys in Fax Mode
234
Allowing the Change of Display Language on the Touch Panel
234
Changing the Keypad Display When Entering Number of Sets
235
Registering Shortcut Keys for Setting Items of [Administrator Settings]
235
Configuring Settings to Display the Slide Menu
235
14.3.10 Placing Widgets on the Touch Panel
235
Notifying of the Machine Status Via E-Mail
236
Overview
236
Configuring the Machine Status Notification Settings
236
Notifying of the Machine Counter Via E-Mail
237
Overview
237
Configuring the Counter Notification Settings
237
Managing the Machine Via SNMP
238
Overview
238
Configuring the Settings for Using SNMP
238
Checking the Printer Information
241
Checking the Counter of this Machine
241
Checking the ROM Version
241
Managing the Setting Information
242
Writing the Setting Information to this Machine (Import)
242
Types of Information that Can be Imported
242
Importing Information from Your Computer
242
Importing Information from an SMB Sharing Folder
243
Saving the Setting Information of this Machine (Export)
244
Types of Information that Can be Exported
244
Exporting Information to Your Computer
244
Exporting Information to an SMB Sharing Folder
244
Resetting the Network Settings
245
Restarting the Network Interface
245
Deleting All Address Information
245
Outputting Job Logs
246
Operations Required to Use Closed Network RX
246
Downloading Job Logs
246
Backing up Setting Information of this Machine
247
Backing up Data to the Server
247
Backing up Data to the Hard Disk
247
Setting the Operating Environment for this Machine
249
Configuring Default Settings for Normal Display and Enlarge Display Collectively
249
14.11.2 Setting the Action for Switching the Display to Enlarge Display
249
14.11.3 Configuring the Default Method to Display Destinations
249
14.11.4 Changing the Default Scan Data File Name
250
14.11.5 Configuring Settings to Display the Preview Function
250
Printing a Stamp on Blank
250
Printing from the Bypass Tray Using the Paper Size and Type Specified in the Printer Driver
250
14.11.8 Setting the Skip Job Conditions
251
14.11.9 Specifying Operations When Converting to a Compact PDF File
251
14.11.10 Setting the Processing Accuracy of Outline PDF
251
Allowing Transmission of the Machine Usage Frequency or Function Settings Information
251
14.11.12 Allowing Acquisition of Machine Usage Information
252
Checking Whether There Are Sub Folders When Searching for an SMB Sharing Folder
252
Using an Advanced Function by Registering the License
253
14.12.1 Issuing the Request Code
253
14.12.2 Enabling the Advanced Function
253
Enabling the Function Using the Function and License Codes
253
Enabling the Function Using the Token Number
253
Updating the Firmware of this Machine
254
Overview
254
Preparing to Download Firmware Via FTP
254
Preparing to Download Firmware Via HTTP
254
Updating the Firmware Automatically at the Specified Time
255
Updating the Firmware Manually
255
Automatically Updating Firmware of this Machine or Other Devices
256
14.14.1 Configuring Settings to Update Firmware of this Machine
256
14.14.2 Configuring Settings to Update Firmware of Other Devices
258
Returning the Updated Firmware to the Previous Version
261
Checking Whether Settings Are Updated
262
Enabling Functions that Require the Authentication by an External Institution
263
15 Registering Various Types of Information
264
Registering Address Books
265
Registering E-Mail Address
265
Registering an FTP Destination
265
Registering an SMB Destination
266
Registering a Webdav Destination
267
Registering a User Box
268
Registering a Fax Address
268
Registering an Internet Fax Address
269
Registering an IP Address Fax Destination
270
Registering a Group
271
Registering a Program
272
Registering an E-Mail Address Program
272
Registering an FTP Program
272
Registering an SMB Program
273
Registering a Webdav Program
273
Registering a User Box Program
274
Registering a Fax Address Program
275
Registering an Internet Fax Address Program
275
Registering an IP Address Fax Program
276
Registering a Group Program
276
15.3.10 Registering a Program Without Destination
277
15.3.11 Configuring the Fax/Scan Transmission Option Settings
277
Registering a Temporary One-Touch Destination
281
Registering the Subject and Body of an E-Mail
282
Registering the Subject
282
Registering the Body
282
Registering a Prefix and Suffix of each Destination
283
Registering the Information to be Added to Header/Footer
284
Adding a Font/Macro
285
Registering a Paper Name and Paper Type
286
Using Data Management Utility
287
15.10.1 Data Management Utility
287
15.10.2 Managing the Copy Protect Data
287
15.10.3 Managing the Stamp Data
289
15.10.4 Managing the Font/Macro Data
290
16 Associating with External Application
292
Using the Web Browser Function
293
Configuring Basic Settings for Web Browser
293
Enabling the Web Browser Function
293
Restricting File Operations on a Web Browser
293
Setting up the Web Browser Operating Environment
294
Configuring Settings to Display Contents
294
Managing Bookmarks
294
Managing the History
294
Setting Web Browser Operations
295
Associating Via TCP Socket
296
Overview
296
Configuring the Basic TCP Socket Settings
296
Using SSL Communication
296
Associating Via Openapi
297
Overview
297
Configure the Basic Openapi Settings
297
Using the Proxy Server
298
Using SSL Communication
298
Using the Single Sign-On
299
Using the Machine FTP Server for Association
300
Overview
300
Configuring the FTP Server Settings
300
Using the Machine Webdav Server for Association
301
Overview
301
Configuring the Webdav Server Settings
301
Using SSL Communication
301
Releasing the Association with Application
302
Associating with the Distributed Scan Server
303
Overview
303
Configuring the Environment to Use Distributed Scan Management
303
Enable the Distributed Scan Management
303
Associating with the Thinprint System
304
Allowing for Upload of Contents to this Machine
306
Associating with the Remote Diagnosis System
307
16.10.1 Registering a Proxy Server Used for Remote Diagnosis
307
16.10.2 Allowing Acquisition of the Machine Counter
307
16.10.3 Sending the Machine Operating Status
307
16.10.4 Allowing Read and Write of the Machine Setting Information
308
Associating with the Fax Server
309
Overview
309
Registering Applications
309
Application Setting Templates
310
Associating with the Fax Server Communicating in E-Mail Format
312
Operating the Machine Control Panel Remotely
313
Overview
313
Using the Dedicated Software
313
Accessing the Machine Directly
314
Using an Android/Ios Terminal for Operations
315
Customizing the Openapi Application Key Arrangement on the Main Menu
317
Overview
317
Changing the Name and Icon of Registered Application List Key
317
Managing Application Shortcut Keys by Group
317
Associating this Machine with an Android/Ios Terminal Using the QR Code
319
Displaying Network Information of this Machine Using the QR Code
319
Reading the QR Code to Pair with an Android/Ios Terminal
319
Associating this Machine with an Android/Ios Terminal Using NFC
320
Setting Network Information of this Machine Via NFC
320
Connecting an Android Terminal to this Machine Via NFC Using Mobile for Android
320
Connecting an Android Terminal to this Machine Via NFC Using Remote Access
321
Configuring the Application to be Started on the Android Terminal
321
Associating this Machine with an Ios Terminal Using Bluetooth LE
322
Enabling the Bluetooth LE Function on this Machine
322
Connecting an Ios Terminal to this Machine Via Bluetooth LE Using Mobile for Iphone/Ipad
322
Connecting an Ios Terminal to this Machine Via Remote Access Using Bluetooth LE
323
Advertisement
Sindoh D310 Series User Manual (70 pages)
Brand:
Sindoh
| Category:
All in One Printer
| Size: 10 MB
Table of Contents
Table of Contents
2
1 Checking the Name and Function of each Part in this Machine
4
Front
5
Side/Rear
6
Inside
7
2 Checking the Status of this Machine Using LED Indicators
8
Warning Indicator
9
Data Indicator
10
3 Checking the Name and Function of each Optional Component
12
Checking the List of Optional Components
13
List of Optional Components
13
List of Other Optional Components
15
Front
17
Side/Rear
19
Finisher FS-533, Punch Kit PK-519
20
Job Separator JS-506
21
Finisher FS-534/Saddle Stitcher SD-511/Punch Kit PK-520
22
4 Checking the Specifications of this Machine
26
Main Unit
27
Scanning Function Specifications
28
Printer Specifications
29
5 Checking the Specifications of Optional Components
30
Fax Kit FK-513
31
Reverse Automatic Document Feeder DF-628
31
Paper Feed Cabinet PC-114
32
Paper Feed Cabinet PC-214
32
Paper Feed Cabinet PC-414
33
Finisher FS-534
33
Saddle Stitcher SD-511
35
Punch Kit PK-520
35
Finisher FS-533
35
Punch Kit PK-519
36
Job Separator JS-506
37
Authentication Unit AU-102
37
Authentication Unit AU-201S
38
Upgrade Kit UK-212
39
6 Using the Authentication Unit (Biometric Type)
40
Authentication Unit (Biometric Type)
41
Status of Authentication Unit
42
Operations Required to Use this Function (for the Administrator)
43
Configuring Authentication Settings of this Machine
43
Registering User Authentication Information
44
Logging in to this Machine
47
Using Data Administrator (for the Administrator)
48
Data Administrator
48
Setting up the Operating Environment
48
Installing Biodriver (USB-Driver) (Windows 7/8.1/10)
48
Installing Biodriver (USB-Driver) (Windows Vista)
50
Installing
51
Data Administrator Plugin for Biometric Authentication Unit AU-102
51
Installing Data Administrator Plugin for Biometric Authentication Unit AU-102
51
Registering User Authentication Information
52
7 Using the Authentication Unit (IC Card Type)
56
Authentication Unit (IC Card Type)
57
Status of Authentication Unit
58
Operations Required to Use this Function (for the Administrator)
59
Configuring Authentication Settings of this Machine
59
Registering User Authentication Information
61
Logging in to this Machine
62
Using Data Administrator (for the Administrator)
63
Data Administrator
63
Setting up the Operating Environment
63
Installing IC Carddriver (USB-Driver) (Windows 7/8.1/10)
63
Installing IC Carddriver (USB-Driver) (Windows Vista)
65
Installing Data Administrator Plugin for IC Card Authentication Unit AU-201S
66
Registering User Authentication Information
67
Sindoh D310 Series Quick Installation Manual (17 pages)
Brand:
Sindoh
| Category:
Printer
| Size: 2 MB
Table of Contents
Overview of Installation Procedure
2
Accessory Parts
3
Installing the Toner Cartridge
7
Installing Other Options
8
Connecting the Power Cord
8
Configuring Other Options
10
Connecting the Network Cable
10
Network Setting
11
Restarting the Machine
11
Affixing the Panel Sheet
12
Installation Procedures
13
Advertisement
Sindoh D310 Series User Manual (8 pages)
Brand:
Sindoh
| Category:
All in One Printer
| Size: 0 MB
Table of Contents
Determination of Peak Runoff Rate
1
Available Data
3
Table 11.2: Hydrologic Soil Group Conversion Factors
3
Determine Time of Concentration
3
Determine the Area Weighted Runoff Coefficient
4
Determine the 10-Year Return Period Peak Runoff Rate
4
Determine the Area-Weighed Curve Number
7
Determine the Lag Time
7
Determine the Unit Duration of Excess Rainfall
8
Determine the Peak Runoff Rate for 1 CM of Excess Rainfall
8
References
8
Advertisement
Related Products
Sindoh D330E Series
Sindoh D200 Series
Sindoh DP200 Series
Sindoh DP201 Series
Sindoh DP102
Sindoh DP202
Sindoh DP203
Sindoh D330A Series
Sindoh A410
Sindoh A411dn
Sindoh Categories
3D Printers
All in One Printer
Printer
Scanner
Copier
More Sindoh Manuals
Login
Sign In
OR
Sign in with Facebook
Sign in with Google
Upload manual
Upload from disk
Upload from URL