
Related Manuals for FitLogic YK-ET1402B


Summary of Contents for FitLogic YK-ET1402B
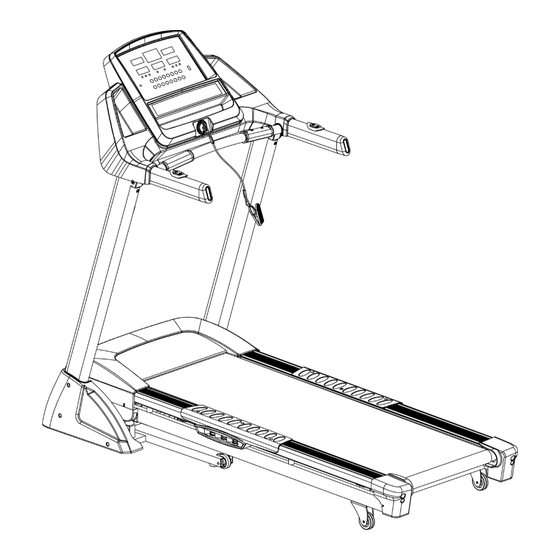
- Page 1 PM-ET1402B/YK—ET1402B INSTRUCTION MANUAL PLEASE READ THIS MANUAL CAREFULLY BEFORE USING AND SAVE IT FOR FUTURE REFERENCE.
-
Page 2: Table Of Contents
CONTENT Safety Precautions Assembly Steps Folding Steps Technical Data Operation Instruction Instructions for Use Maintenance Explosive Drawing... -
Page 3: Safety Precautions
Safety Precautions Thank you for purchasing this treadmill, it has been designed and manufactured to give you many years of trouble free service. You may already be familiar with using a similar product but please take the time to read these instructions which have been written to ensure that you get the very best from your purchase. - Page 4 treadmill with at least 2 meters * 1 meter of free space behind the treadmill. Keep the treadmill away from excessive moisture and dust. Before using the treadmill, check the nuts and bolts are securely tightened. The safety level of the treadmill can be maintained only if it is examined regularly for damage and wear. Replace defective components immediately.
-
Page 5: Assembly Steps
Assembly Steps The following are the part when you open the package. Package list: Description Specification QTY NO. Description Specification Mainframe 66 Solid wrench S=13,14,15 M8*15 23 Left bottom cover 70 Inner hex pan head bolt 24 Right bottom cover 86 Cross pan head screw M5×12 37 Safety key... - Page 6 Step 1: Open the package and put the mainframe on the floor. Step 2: Unfold the display (A). ATTENTION: Hold the column steadily while unfolding. Step 3: Fix the left and right column (B) to the mainframe (A) with inner hex pan head bolt (70), teeth washer (95) by 5# Allen wrench (65) .
- Page 7 Step 4: Fix the display to the mainframe with teeth washer (95) and inner hex pan head bolt (70) 5# Allen wrench (65) . Step 5: Fix the left and right bottom cover (23), (24) to the mainframe with cross pan head screw (86) by solid wrench (66).
-
Page 8: Folding Steps
Folding Steps When folding: Hold the running deck which showed in “A” position and then push it in the arrow direction until you hear a “bang” voice from the bumper B. Unfolding: Hold the A position and kick the bumper B and then pull it down automatically. -
Page 9: Technical Data
Technical Data 1690*760*1430 1837W Assembly size (mm) Power 1080*760*1470 2756 Folding size (mm) Max output As per country 1300×450 Running area (mm) Input currency 0.8-18KM/h 65 KG N.W. Speed range 120KG 15 sections Incline Max loading LED window Speed Time Distance Calorie Pulse Incline... -
Page 10: Operation Instruction
Operation Instruction 1. Window Display: “SPEED” window: display the exercising speed from 0.8 to 18 km/h. (Initial data is 0.0.) Under setting mode, display P1-P6; Under count down mode, display H1-H3. “TIME” window: display the exercising time from 0:00 to 99:59. (Initial data is 0.0.) “CAL”... - Page 11 change different mode the window data will flash continuously. Users can change the data by pressing “-SPEED+” or “-INCLINE+” key. After that you can press the “START” key to start the machine. You can choose each program by pressing the program key directly. There are 6 programs inside: WEIGHT LOSS, INTERVAL, HILL CLIMB, WALK and FUN RUN.
- Page 12 In time countdown mode press the “MODE” key to enter into distance countdown mode. “1.0” will be flashed displaying in the “DIST” window. Press the “-INCLINE+” or “-SPEED+” key to change the data from 0.5 to 99.9. In distance countdown mode, press the “MODE” key to enter into calorie countdown mode, “50” will be flashed displaying in the “CAL”...
- Page 13 6. Program introduction Each program is divided into 15 stages. And every stage has its own speed and incline. Formula table Preset time/15 = Each exercising time Stage formula SPEED MANUAL INCLINE SPEED WEIGHT LOSS INCLINE SPEED INTERVAL INCLINE SPEED HILL CLIMB INCLINE SPEED...
- Page 14 8. Display Range of Each Item: Item Initial Original data Range Display range Time (min: sec) 0:00 30:00 5:00-99:00 0:00-99:59 Incline (step) 0-15 0-15 Speed (km/h) 0.8-18 0.8-18 Distance (km) 0.50-99.9 0.00-99.9 Heart rate (time/min) 50-200 Calorie (K) 10-999 0-999 9.
- Page 15 driver is ok or not. B. There are something wrong with the display component part, please replace the display. C. Replace the transformer. 3) The display shows E02 after switch on. A. Check the motor cable is ok or not, if not please reconnect the motor cable. If it does not work, please replace the motor.
- Page 16 • Always warm up the body before stretching, as this increases blood flow around the body, which in turn makes the muscles more supple. • Start with your legs, and work up the body. • Each stretch should be held for at least 10 seconds (working up to 20 to 30 seconds) and usually repeated about 2 or 3 times.
-
Page 17: Maintenance
Maintenance Warning: Before cleaning the machine, please make sure the power has been switched off. Cleaning: Wipe away the dust on the belt, running board and side footboard as excess dust may increase the frictional on the belt and cause damage to the machine. It is recommended to clean the machine once a month. -
Page 18: Explosive Drawing
Explosive Drawing... -
Page 19: Part List
Part List Description QTY NO. Description Bottom frame Safety key Running frame DC motor Incline frame Incline motor Display frame PCB board Motor seat frame Black bumper cushion Left column Plug Right column Square shaped switch Filter Overload protector Inductor Running belt Front roller Multi-v belt... - Page 20 Inner hex pan head bolt Washer Inner hex pan head bolt Washer Inner hex pan head bolt Washer Inner hex pan head bolt Cross recessed pan head screw Inner hex pan head bolt Upper wire of the display Inner hex pan head bolt Lower wire of the display Inner hex pan head bolt Handle pulse...
Need help?
Do you have a question about the YK-ET1402B and is the answer not in the manual?
Questions and answers