Table of Contents
Advertisement
Advertisement
Table of Contents

Subscribe to Our Youtube Channel
Related Manuals for Jensen VX7021


Summary of Contents for Jensen VX7021
- Page 1 atts eak...
- Page 2 “Made for iPod” and “Made for iPhone” means that an electronic accessory has been designed to connect specifically to iPod or iPhone, respectively, and has been certified by the developers to meet Apple performance standards. Apple is not responsible for the operation of this device or its compliance with safety or regulatory standards.
- Page 3 ..................................................................................................................................................................................................................................................................................................................................................................................
- Page 4 1. This device complies with Part 15 of the FCC Rules. Operation is subject to the following two conditions: This device may not cause harmful interference This device must accept any interference received, including interference that may cause undesired operation. 2.
- Page 5 Thank you for choosing a product. We hope you will find the instructions in this owner’s manual clear and easy to follow. If you take a few minutes to look through it, you’ll learn how to use all the features of your new Multimedia Receiver for maximum enjoyment.
- Page 6 Satellite Channel Name, Artist, Song, and Categories Displayed on Monitor (Vehicle Tuner Subscription equired and old eparately) 2.0 DIN (Import / ISO-DIN Mountable) Fixed Front Panel 6.2” High Definition 800 x 480 Beep Tone Confirmation Built-In Bluetooth® providing Hands-Free operation for safety and convenience and A2DP for streaming music from your smartphone or other Bluetooth®...
- Page 8 EJECT MENU MUTE Accepts DVD/CD/MP3 discs. If the unit is turned on, playback begins when a disc is inserted. Touch icons on this screen to access menus or control functions. Used to receive command signals from the remote control. 3.5mm AV IN This connector accepts a 3.5 mm through which signals from various audio/video devices can be...
- Page 9 Covers the AV IN , microSD card and USB slot. Press this button to reset the system settings (except password and parental lock settings) and to correct a system halt or other illegal operation. Use the tip of a pen to press the eset button. Press to turn the unit ON.
- Page 12 External devices, can be connected to this unit using its front 3.5mm (AV In 1) rear (AV In 2). You cannot directly control external devices connected to the AV I using the front panel controls or this unit’s remote control. AV In1 is used for playback of audio/video from an external device connected to the unit through a 3.5mm .
- Page 13 2. Touch the desired source icon on one of the two main menu screens. Screen 1 of 2: Disc, Radio, USB, AV IN1, Settings, Bluetooth (BT) or Camera. Touch Next at the bottom of the screen to access Screen 2 of 2: AV IN2, Pandora or SiriusXM (SXM).
- Page 15 Reset...
- Page 18 To access System Settings, touch the icon on the Main Menu screen. There are seven System Settings Sub-menus (General, Audio, Time, Language, Bluetooth, DVD or Volume) that are used to adjust the performance of each option of the . The Version is for information only.
- Page 19 - Touch O O to turn the confirmation beep O or O . - Touch to select the wallpaper . Touch again to confirm and set the wallpaper. The ouch creen alibration adjustment is used to set the parameters of the touch screen to ensure that when the screen is touched, it corresponds to the feature desired.
- Page 20 - Touch to access the Illumination . Touch a color to set the front panel display to the selected color. - Touch to select the user interface color. Touch again to confirm and set the color. - Touch O O to turn the emonstration ode O or O . The factory default setting is O .
- Page 21 The Audio is used to turn the Subwoofer output ON or OFF and to select a Subwoofer crossover frequency. - Touch ON or OFF to turn the subwoofer output ON or OFF. - Touch a crossover frequency (80Hz, 120Hz or 160Hz) to set a cut-off frequency for the subwoofer’s low-pass filter (LPF).
- Page 22 - Touch the Time icon and use the icons to set the hour, minute, and either AM or PM. After setting the time, touch Save. The time will appear to the right of the Date option. If a DVD supports more than one Subtitle or Audio language, all the languages are available for selection during playback.
- Page 23 The Bluetooth audio capabilities can be used for wireless phones hands free applications. Before attempting to use the Bluetooth functions on this unit, please make sure the wireless phone to be connected supports Bluetooth functions. - Touch ON or OFF to turn the Bluetooth function ON or OFF. - Touch ON or OFF to turn the Bluetooth Auto-Connect function ON or OFF.
- Page 24 The DVD system has a built-in parental lock feature to prevent unauthorized persons from viewing restricted disc content. By default, the rating system is unlocked. Once set up, the parental lock is released only by entering the correct password. Once the password is entered, rating is available for setup. - This feature allows the user to create a unique 4-digit password to activate or deactivate the “Rating”...
- Page 25 - This feature allows the user to “Reset” to restore the factory default settings. To reset the password, access the “RATING” menu and enter the current password. Once the correct password is entered, you can access the “Password” field and enter a new one.
- Page 26 - Touch the AV IN1 icon to enter the setting of the connected device then use the icons to increase or decrease the relative volume level between -6 to +6. - Touch the AV IN2 icon to enter the setting of the connected device then use the icons to increase or decrease the relative volume level between -6 to +6.
- Page 27 This system will play the following types of discs: DVD - DVDs that contain audio and/or video. Audio discs - Audio CDs that contain audio, video and image files. MP3 discs - A disc that contains audio, video and image files (for example, a CD-R with downloaded MP3 files).
- Page 28 - The title/chapter information displayed is the current number of the track playing, the total number of tracks on the disc, the current chapter playing and the total number of chapters on the disc. - This indicator displays the time as entered by the user in the Settings Menu.
- Page 29 - Touch this icon during playback to repeat the current chapter. The icon on the screen will light and small letter C will appear below the icon and the chapter will repeat. Touch this icon a second time to repeat the current title. The icon on the TFT LCD screen will light and small letter T will appear below the icon and the title track will repeat.
- Page 30 When the Direct Entry icon is touched the Direct Entry Screen appears. The user can manually select a title or a chapter. By touching icon, the user can select a chapter or title. The title or chapter can be selected by touching the corresponding number for a title or chapter.
- Page 31 - If you are watching a disc recorded in multiple languages, touch the TFT LCD screen, then touch AUDIO to choose a language. Each time the icon is touched the language will change. - If you are watching a disc recorded in multiple languages with subtitles, touch the TFT LCD, then touch Language screen to choose the language that you would like the subtitles to appear.
- Page 32 Single side single layer (DVD-5) (MPEG 2 Method) Single side double layer (DVD-9) 133 minutes Double side single layer (DVD-10) 242 minutes Double side double layer (DVD-18) 266 minutes 484 minutes Single side single layer (VCD) (MPEG 1 Method) 74 minutes Single side single layer 74 minutes Number of voice languages recorded.
- Page 33 From the Main Menu Screen touch the DISC icon or insert a CD into the disc slot, label side up. Playback begins in CD mode when a disc is inserted correctly. The on-screen icons and touch key areas are outlined below. - Touch this icon to return to the Main Menu Screen.
- Page 34 - Touch this icon to access the list of tracks contained on the disc. Touch a desired track icon twice and the track will begin playing. - Touch this icon to play tracks in the directory in a random order. The icon will light on the main CD screen.
- Page 35 Touching the List icon will display the CD List Screen. The CD List Screen illustrates the contents of a CD disc. The contents are divided into folders and various file types. The file types are audio tracks, Audio Video Interleave (AVI) files, and image files such as JPEGS.
- Page 36 When the Direct Entry icon is touched the Direct Entry Screen appears. The user can manually select a track by touching the corresponding number. After entering the track numbers touch the OK icon. If a wrong digit is entered touching the arrow will remove the number.
- Page 37 MP3 is a format for storing digital audio. An audio CD-quality song can be compressed into the MP3 format with very little loss of quality, while taking up much less space. Insert a MP3 Disc into the disc slot, label side up. Playback begins in MP3 mode when a disc is inserted correctly.
- Page 38 - Upon inserting a MP3/WMA disc, disc play begins. You cannot insert a disc if there is already a disc in the unit or if the power is off. - Press the Eject ( ) button on the front of the unit to eject the disc. The unit automatically reverts to Tuner mode.
- Page 40 ) - Touch the icons to display the next or previous page of the Disc menu. - Touch this icon to momentarily seek the previous available radio station. Touch and hold this icon to manually tune the radio in 200KHz (for FM) or 10kHZ (for AM) increments. Default mode is resumed after 10 seconds of inactivity.
- Page 41 There are 27 categories in the PTY function. 1. None 8. Adult Hits 15. Jazz 22. Personality 2. News 9. Soft Rock 16. Classic 23. Public 3. Info 10. Top 40 17. RGB 24. College 4. Sports 11. Country 18. Soft RGB 25.
- Page 42 When the Direct Entry icon is touched the Direct Entry Screen appears. The user can enter the desired radio station frequency using the on-screen number pad. After entering the radio station frequency touch the OK icon. If a wrong digit is entered touching the green arrow will remove the number.
- Page 43 3. Touch the preset number in which you would like to store the current station. The station frequency is displayed at the top of the menu. The preset number will appear highlighted. The station frequency will be stored in the highlighted preset.
- Page 44 USB Cable (not included) Right Audio Left Audio Ground V ideo 3.5mm A/V Cable (not included)
- Page 45 From the main menu screen touch the USB icon. The on-screen icons and touch key areas are outlined below. - Touch this icon to return to the Main Menu Screen. - Displays current track information. - Lists the current audio track playing and the total number of audio tracks in audio mode.
- Page 46 - Touch this icon to access the list of audio and video files contained on the USB device. Touch a folder icon and the contents of the folder will be displayed. Touch a desired track icon twice and the track will begin playing. - Touch this icon to play audio or video tracks in a random order.
- Page 47 Touching the List icon will display the USB List Screen. The USB List Screen illustrates the audio and video files present in the USB device. The contents are divided into folders and various file types. The file types consist of audio and video files.
- Page 48 When the Direct Entry icon is touched the Direct Entry Screen appears. The user can manually select a track by touching the corresponding number. After entering the track numbers touch the OK icon. If a wrong digit is entered touching the arrow will remove the number.
- Page 52 AV In1 is used for playback of audio/video from an external device connected to the unit through a 3.5mm jack located on the font panel. The unit can increase or decrease the volume of the connected device. All other controls are done on the connected device.
- Page 53 Bluetooth® was launched by a special interest group (SIG) comprised of Ericsson Inc., Intel Corp., Nokia Corp., Toshiba and IBM in 1998, and it is currently developed by nearly 2,000 companies worldwide. The Bluetooth® word mark and logos are owned by the Bluetooth® SIG, Inc. and any use of such marks by the Electronics Corporation is under license.
- Page 54 The on-screen icons and information for Bluetooth® functions are outlined below. - Touch this icon to return to the Main Menu Screen. - Displays the current source. - Indicates the device that is paired with the unit. ) - Indicates whether the unit is connected with a Bluetooth®device. Touch to connect to a Bluetooth®...
- Page 55 Touch the “Pair” icon on the unit’ s Bluetooth® user interface screen. A prompt to pair or bond should appear on your mobile phone. Accept the request and initiate the process. A prompt to enter a PIN number or passkey for the unit should appear. The default passkey for the unit is “0000”.
- Page 56 Press the front panel MENU button and then touch the BLUETOOTH icon to access the Bluetooth® main menu. The following screen will appear: 2. Use the 0-9, */+, and # icons to input the phone number. If necessary touch the green arrow icon to clear the last digit or the entire number and start over.
- Page 57 To mute the phone call audio from the unit when a call is received, press the front panel rotary knob. Press the front panel rotary knob again and phone call audio will be restored. The call log consists of dialed numbers, received calls and missed calls. - The Missed Calls List retrieves the list of missed numbers from your wireless phone if your wireless phone allows the function.
- Page 58 While talking, to transfer audio from the unit back to the mobile phone, touch the icon. You can only transfer a call after it has been answered. Touching the icon will return the audio from the mobile phone to the unit. Touch the icon and the following screen will appear: Bluetooth®...
- Page 59 While listening to audio the following functions are available: Pause/Play ( ) icon: Touch to pause playback. Touch again to resume playback. 2. Previous ( ) icon: Touch to play the previous track. 3. Next ( ) icon: Touch to play the next track. Functionality varies depending on the profile used: A2DP: Stream audio from your Bluetooth®...
- Page 60 This unit is “ amera eady. ” Before accessing any camera features, you must install a rear video camera. When the camera is not installed and the function is accessed by the gear selector being placed in reverse or by the unit’s menu, the message “No Signal” will be displayed and the following screen will appear.
- Page 62 Pandora Radio is available via your iPhone® (data usage will occur) or Android™ device (via Bluetooth®). Note: The Pandora app must be installed on your iPhone®/iPod® touch or Android device. Note: To play Pandora Radio on this radio using an Android device, it is necessary to first establish a connection using Bluetooth®...
- Page 63 - Touch the icon to pause playback. Touch the icon to begin playback. - Press this icon skip a song, subject to the skip limit. - Press thumbs up to tell Pandora you like the track currently playing, and Pandora will play more tracks like it. Press thumbs down to tell Pandora not to play this track.
- Page 64 The Station List Screen allows you to search for music by stations you created. Touch a station on the list to choose that station. Touch the Scroll Down ( ) icon to view the next page in the list or the Scroll Up ( ) icon to view the previous page.
- Page 65 3. If both an Android device and iPhone®/ iPod® are connected to the radio, the Select Android or iOS Screen appears. 4. To stop Pandora, exit the Pandora app on the iPhone®, iPod® or Android device. BookMark Track Error Software Error The track could not be bookmarked, please try again in a moment.
- Page 66 Only SiriusXM® brings you more of what you love to listen to, all in one place. Get over 140 channels, including commercial-free music plus the best sports, news, talk, comedy and entertainment. Welcome to the world of satellite radio. A SiriusXM Vehicle Tuner and Subscription are required.
- Page 67 The on-screen indicators and touch key areas for SiriusXM® functions are outlined below. Menu Page 1 - Touch to return to the unit’s Main Menu Screen. - Displays SiriusXM® radio band currently selected. Three bands are available: SXM1, SXM2, and SXM3. - This indicator displays the time as entered by the user in the Settings Menu.
- Page 68 - Touch to tune to the previous channel. - Touch to toggle the icon displayed between Category and Channel. When Channel is displayed, touching tunes channels up or down. When Category is displayed, touching tunes channels within a category up or down. - Touch to tune to the next channel.
- Page 69 Touch the top left corner of the screen (the box) to view the Main Menu screen. From the Main menu screen, touch the icon. Press the button on the front panel to switch to the SXM source. Touch the icon on the SXM Menu screen to change between the following bands: SXM1, SXM2, and SXM3.
- Page 70 A preset is a channel name that is stored for instant access to that channel. Ten numbered preset buttons store and recall channels for each band. Select a band (if needed), then select a channel. 2. On the SiriusXM® menu page 2, touch the icon to access the Preset Channel Screen.
- Page 71 To search by channel: On the SirusXM® menu page 1, touch the icon (if needed) to select 2. Touch to display the Channel Search Screen: 3. Touch a channel to tune to that channel. Touch the or icon to scroll up or down the list.
- Page 72 SiriusXM® attaches a label to channels with mature content. The radio recognizes these channels as “Mature”. The Mature Channel Lock option allows you to lock out channels with “Mature” labels. These channels will still appear in the channel listing (with a lock icon), but will not be tunable unless the parental lockout password is correctly entered.
- Page 73 When the global “Mature Lock” is enabled, a mature channel can be temporarily unlocked. All mature channels are temporarily unlocked (but still hidden when channel browsing) until the SXM source is changed, Accy (Key) is cycled or the “Power Button” on front panel of radio turns the Radio off. This mode is useful for listening to mature/adult content on a temporary basis, allowing you to listen on a locked channel without having to disable the global “Mature Lock.
- Page 74 To unlock all mature channels: On the SirusXM® menu page 2, touch the icon. The following screen appears: 3. Enter your 4-digit password and then press the icon. The following screen appears: 4. Touch the icon. All channels are now unlocked.
- Page 75 An user can lock individual channels. When locked, a channel has the lock ( icon next to it on the channel list. To lock an individual channel: On the SirusXM® menu page 2, touch the Lock icon. The following screen appears: 2.
- Page 76 To unlock an individual channel: On the SirusXM® menu page 2, touch the Lock icon. The Enter Password Screen appears appears. 2. Enter your 4-digit password. The following screen appears: 3. Touch a lock ( ) icon to unlock a channel. The icon is replaced by an unlocked ( ) icon.
- Page 77 SiriusXM® user advisory messages are listed below: Check SXM Tuner Check the SiriusXM® tuner connection on the back of the unit to ensure that it’s correctly connected. Check SXM Antenna Ensure the SiriusXM® antenna cable is connected to the SiriusXM® tuner correctly. Check the SiriusXM®...
- Page 79 ine is off...
- Page 80 No image Incorrect connection to parking Check wiring and brake wire correct Parking brake is not engage Stop vehicle in safe place and apply parking brake Flashing image DVD is not compatible with Change setup to or interference current TV system settings accommodate disc appears on screen Improper video signal...
- Page 81 Disc does not play Disc is warped or scratched Use disc in good back condition Clean disc with soft Disc is dirty or wet cloth Laser pickup is dirty Clean laser pickup with cleaning disc Incompatible disc is used Use compatible disc Disc rating exceeds Parental Change Parental Lock Lock rating limit...
- Page 82 Loading Disc is being read No Disc Disc is dirty Clean disc with soft cloth Disc is upside down Insert disc with label side Disc not present in Insert disc loading compartment Bad Disc Disc is dirty Clean disc with soft cloth Disc is upside down Insert disc with label side Unknown disc...
- Page 83 Use only a clean silicone cloth and neutral detergent to clean the front panel or monitor. A rough cloth and non-neutral detergent (such as alcohol) may result in scratching or discoloration. 2. Do not get water or cleaning fluids on the unit. 3.
-
Page 87: Tools And Supplies
What’s in the Box Tools and Supplies The following items are supplied The following tools and supplies with the VX702 : are needed to install the • VX702 Head Unit • Torx type, fl at-head and Philips • Trim screwdrivers •... - Page 88 Disconnect the Battery • • When replacing the vehicles adio fuse always use the proper rated replacement fuse. Using a fuse with an improper rating could damage the unit and cause a fi re. ISO-DIN Installation is designed to fi t into a 2.0 DIN dashboard opening. The unit has threaded holes in the chassis side panels which may be used with the original factory mounting brackets of some Toyota, Nissan, Mitsubishi, Isuzu, Hyundai and Honda vehicles to mount the radio to the dashboard.
- Page 90 Dual Electronics Corporation Heathrow, FL 32746 Technical Assistance: 8 www.jensenmobile.com © 201...
- Page 91 iGo Primo Next Gen Navigation Manual...
-
Page 92: Table Of Contents
Table of contents 1 Warnings and safety information .................... 5 2 Getting started ........................... 6 2.1 Initial set-up............................6 2.2 Screen controls ........................... 7 2.2.1 Using the buttons and other controls ......................8 2.2.2 Using the cursor ............................8 2.2.3 Using the keyboard ............................. 9 2.2.4 Using touch gestures .......................... - Page 93 3.1.4 Selecting a Saved Location ........................43 3.1.5 Selecting a History item ..........................44 3.1.6 Selecting a saved route ..........................46 3.1.7 Entering coordinates ..........................47 3.1.8 Selecting a location on the map ........................ 48 3.1.9 Planning a Multipoint Route ........................49 3.2 Checking Route Information and Alternatives .................
- Page 94 4.2.1 Where Am I .............................. 71 4.2.2 Trip Monitor ............................. 72 4.3 Settings menu ............................ 73 4.3.1 Route preferences settings ........................74 4.3.1.1 Vehicle profile ..............................75 4.3.1.2 Route Planning Method types ..........................77 4.3.1.3 Navigation Mode ..............................77 4.3.1.4 Road types ................................77 4.3.2 Sound settings ............................
-
Page 95: Warnings And Safety Information
1 Warnings and safety information The navigation system helps you find your way to your destination with the built-in GPS receiver. The navigation system does not transmit your GPS position; others cannot track you. It is important to look at the display only when it is safe to do so. If you are the driver of the vehicle, we recommend that you plan and review your route before you start your journey. -
Page 96: Getting Started
2 Getting started iGo Primo Next Gen is optimized for in-car use. You can use it easily by tapping the screen buttons and the map with your fingertips. 2.1 Initial set-up When using the navigation software for the first time, an initial set-up process starts automatically. Select your preferred language, then tap to confirm your selection. -
Page 97: Screen Controls
If needed, modify the time format and unit settings. Later you can change them in Regional settings (page 84). Tap to continue. If needed, modify the default route planning options. Later you can change them in Route Preferences (page 74). Tap to continue. -
Page 98: Using The Buttons And Other Controls
2.2.1 Using the buttons and other controls To operate, tap the buttons on the touch screen. The Navigation menu may contain several menu items on one or more pages. To open the other pages, tap the arrows on the side of the screen. The Navigation menu may contain several menu items on one or more pages. -
Page 99: Using The Keyboard
2.2.3 Using the keyboard You can type with your fingertips on the screen keyboards and you can switch between various keyboard layouts, for example English, Greek or numerical. Only those keyboard buttons are active that can be used to type a name that is available on the map. The other keys are grayed out. Action Function Switching to another keyboard... -
Page 100: Using Touch Gestures
2.2.4 Using touch gestures You usually need to tap the screen only once. However, some useful features can be accessed with other gestures. See the table below. Action Function Tapping and Tap and keep pressing the following buttons to reach extra functions: holding the screen •... -
Page 101: Manipulating The Map
2.2.5 Manipulating the map If you tap the map anywhere during navigation, the map stops following the current position (the blue arrow is not locked in a fix position on the screen anymore) and control buttons appear to help you modify the map view. -
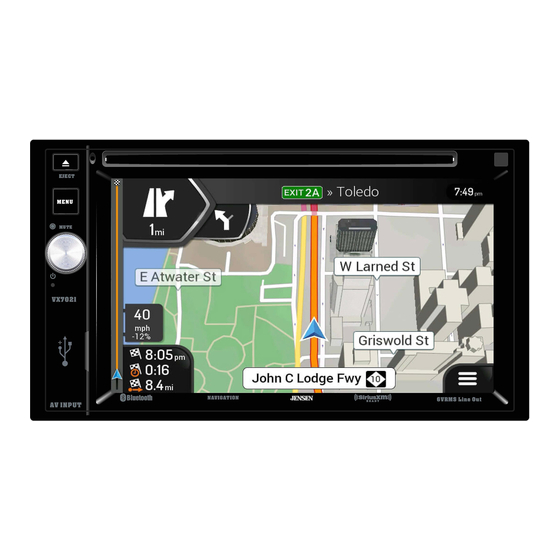
Page 102: Navigation View
Changing 2D, Switch between the 3D perspective, 2D Heading up, and 2D 3D, or 2D North North up map view modes. In Heading up mode the map is up views rotated so its top always points in the current driving direction. This is the default orientation in 3D map view mode. - Page 103 Number Name Description Current The current position is displayed as a blue arrow by default. When there is position no GPS position, the current position marker is transparent and it shows marker your last known position. See page 14. GPS position The dot near the arrow shows the GPS position as perceived by the GPS receiver.
-
Page 104: Streets And Roads
Signpost It show the available destinations and the road numbers. See page 17. Freeway By tapping it, you can check the details of the next few service stations (gas services stations, restaurants) when traveling on a freeway. See page 19. Navigation By tapping it, you can open the Navigation menu, where you can reach menu... -
Page 105: The Planned Route
• In all other cases, the position marker may not show your exact GPS position and heading. If roads are near, the GPS position is locked on the road and aligned to the nearest road to suppress GPS position errors, and the direction of the icon is aligned to the direction of the road. 2.3.3 The planned route The planned route is the currently navigated route. -
Page 106: Turn Preview And Next Street
2.3.4 Turn preview and next street When navigating a route, the top section of the Navigation view shows information about the next route event (maneuver) and the next street or the next town. There is a field in the top left corner displaying the next maneuver. Both the type of the maneuver (turn, traffic circle, exiting freeway, and so on) and its distance from the current position are displayed. -
Page 107: Lane Information And Signposts
Enter the traffic circle (second next maneuver). Enter the freeway. Exit the freeway. Board the ferry. Leave the ferry. Approaching a waypoint on the right. Approaching the destination. 2.3.6 Lane information and signposts When navigating on multi-lane roads, it is important to take the appropriate lane in order to follow the planned route. -
Page 108: Junction View
2.3.7 Junction view (Not supported on the VX7021) If you are approaching a freeway exit or a complex intersection and the needed information exists, the map is replaced with a 3D view of the junction. The lanes you need to take are displayed with arrows. At the top of the screen, road signs show you additional information. -
Page 109: Freeway Services
2.3.9 Freeway services When you are driving on a freeway, the button appears at the top right corner of the Navigation view. Tap it to open a panel with the details of the next few service stations (gas stations, restaurants). Tap any of them to display the exit area on the map. -
Page 110: Navigation Menu
2.4 Navigation menu On the Navigation view, tap to open the Navigation menu. You can see the following menu options when you are navigating without a planned route: Button Function Select your destination by entering an address or its coordinate, or by selecting a Place, a Saved Location, or a Saved Route. - Page 111 Button Function Add an intermediate destination to your route. See route alternatives to avoid parts of the route, or to avoid a specific road from your planned route. View the route in its full length on the map and check route parameters and route alternatives. to access additional options, like Simulation or Route Preferences.
- Page 112 Tap the Back button to return to the previous screen. You can also press and hold this button to quickly return to the Navigation view from any other screen.
-
Page 113: Using The Navigation
3 Using the navigation By default, the navigation system calculates routes using the road network of the maps provided with the product. You can select the destination and start navigating to it right away (normal navigation) if you need a route for immediate navigation. - Page 114 . You can see the input field at the top of the screen. Right next to it you can see the search area, the town around which the search is carried out. The default search area is the area where you are located. For a local search, skip the next step. (optional) To search in a different area, tap the input field with the search area, and start entering the name of the new search area on the keyboard.
- Page 115 to switch to the result screen. You can see all the results in the list, regardless of their type. Addresses, Places, Place categories, Saved locations, and recent destinations are mixed in one list. You can immediately select the result you want to use as your destination or narrow the list of results for only one type (for example, Places).
-
Page 116: Selecting An Address
Check the settings for road types and change them if necessary. to enable or avoid freeways, tap for roads with Period Charge or Per-use Toll, tap for ferries, or tap for carpool lanes. to confirm the destination, or tap to select a different destination. The route is calculated and the map appears showing the entire route, where you can check route information and route alternatives. -
Page 117: Entering An Address With States
3.1.2.1 Entering an address with states To enter an address as the destination, follow these steps: on the Navigation view to access the Navigation menu. By default, the navigation system proposes the country and state where you are or in case there is no valid GPS position, the country and state of the last known position. - Page 118 To open this list, tap and select the city. Enter the street name. Tap the Street field. (optional) On the Select Street screen, you can immediately select a street from the list of suggestions. c. Otherwise, start entering the street name on the keyboard, the names that match the string appear in a list.
- Page 119 c. Tap the selected address to finish the address search. A full screen map appears with the selected point in the middle. If necessary, tap the map somewhere else to modify the destination. The cursor ( ) appears at the new location. Check the settings for road types and change them if necessary.
-
Page 120: Entering An Address Starting With The Street Name
3.1.2.2 Entering an address starting with the street name After you have selected the country and state, you can leave the city or ZIP code field empty and start the search with the street name. This way you can search in all streets of a state. If you select the country without a state, this function cannot work. - Page 121 Enter the street name. Tap the Street field. (optional) On the Select Street screen, you can immediately select a street from the list of suggestions. c. Otherwise, start entering the street name on the keyboard, the names that match the string appear in a list.
-
Page 122: Selecting A Town Center
to enable or avoid freeways, tap for roads with Period Charge or Per-use Toll, tap for ferries, or tap for carpool lanes. to confirm the destination. You can also select a nearby point on the map or tap to select a different destination. The route is calculated and the map appears showing the entire route, where you can check route information and route alternatives. -
Page 123: Selecting The Midpoint Of A Street
(optional) On the Town of ZIP code screen, you can select a town from the list of suggestions. c. Otherwise, start entering the first few letters of the town. The names that match the string appear in a list. To open the list, tap and select the town. -
Page 124: Selecting An Intersection In A Town
c. Otherwise, start entering the street name on the keyboard. The names that match the string appear in a list. to open the list of results. Select the street from the list. Instead of entering the house number, tap . The midpoint of the street is selected as the destination. -
Page 125: Using The Zip Code To Select A Destination
Tap the House number or crossing street field and browse the list of crossing streets or start entering the street name in the field. Select one from the list. 3.1.2.6 Using the ZIP code to select a destination You can also select any kind of destination by entering the ZIP code instead of the city name. To select the ZIP code, perform the following steps: Go to , and modify the country and state as described earlier (page 27), if... -
Page 126: Selecting A Place Of Interest
3.1.3 Selecting a Place of Interest You can search for Places of Interest (Places) in the menu. Using the same screen, you can find a Place by selecting one of the following options: • Finding frequently searched types of Places with the Quick search categories, see page 36 •... - Page 127 If there is no planned route (destination is not selected), the search is carried out around the current position. If the current position is not available either (no GPS signal), places are searched around the last known position. Tap any of the quick search buttons to get an instant list of Places. The Places in the list can be ordered by their distance from the current or last known position, from the destination, or by the length of the necessary detour.
-
Page 128: Searching By Category
The route is calculated and the map appears showing the entire route, where you can check route information and route alternatives. Tap to modify the route parameters, or tap to start your journey. 3.1.3.2 Searching by category To search for Places by their categories and subcategories, perform the following steps: on the Navigation view to access the Navigation menu. - Page 129 • to search for a place within a selected town. (The result list is ordered by the distance from the center of the selected town.) (optional) If you have selected , select the town to search in. Select one of the main Place categories (for example, Accommodation), then browse the subcategories (for example, Hotel or Motel) to find your destination.
-
Page 130: Searching By Name
to reorder the list. To filter the list of results by providers, tap and then the provider logo on the right side of the screen. Browse the list and tap one of the list items. A full screen map appears with the selected point in the middle. - Page 131 (optional) If you have selected , select the town to search in. You can search for the name of a Place in all categories by performing the following steps: . Using the keyboard, start entering the name of the Place or browse in the categories.
-
Page 132: Finding Help Nearby
3.1.3.4 Finding help nearby To quickly search for nearby assistance, perform the following steps: on the Navigation view to access the Navigation menu. Places in the following pre-set search categories can be searched for around the current position (or around the last known position if the current position is not available): •... -
Page 133: Selecting A Saved Location
3.1.4 Selecting a Saved Location To select a location that you have already saved (page 59), perform the following steps: on the Navigation view to access the Navigation menu. The list of saved locations is displayed. It contains two pre-set categories: Home and Work. Tap the location that you want to set as your destination. -
Page 134: Selecting A History Item
The route is calculated and the map appears showing the entire route, where you can check route information and route alternatives. Tap to modify the route parameters, or tap to start your journey. 3.1.5 Selecting a History item The destinations that you have used earlier appear in the History list. Smart History offers these locations from your previous destinations, using parameters like the current time of day, the day of week, and the current location. - Page 135 to enable or avoid freeways, tap for roads with Period Charge or Per-use Toll, tap for ferries, or tap for carpool lanes. to confirm the destination. You can also select a nearby point on the map or tap to select a different destination. The route is calculated and the map appears showing the entire route, where you can check route information and route alternatives.
-
Page 136: Selecting A Saved Route
3.1.6 Selecting a saved route The routes that you have saved earlier appear in a list. To select a previous route, perform the following steps: on the Navigation view to access the Navigation menu. The list of saved routes appears. If necessary, scroll the list to see earlier routes. Select a route and the Multipoint Route screen appears. -
Page 137: Entering Coordinates
3.1.7 Entering coordinates To select a destination by entering its coordinates, perform the following steps: on the Navigation view to access the Navigation menu. You can enter the latitude and longitude values in any of the following formats: decimal degrees, degrees and decimal minutes, or degrees, minutes and decimal seconds. -
Page 138: Selecting A Location On The Map
Check the settings for road types and change them if necessary. to enable or avoid freeways, tap for roads with Period Charge or Per-use Toll, tap for ferries, or tap for carpool lanes. to confirm the destination. You can also select a nearby point on the map or tap to select a different destination. -
Page 139: Planning A Multipoint Route
Tap the location that you want to select as your destination. The cursor ( ) appears there. (optional) If needed, tap to list the Places near the selected point or to save this location. Tip! If you already have a planned route, tap to add the selected location to your route. - Page 140 to select the destination. The New Route to... screen appears, where you can select the destination of the route the same way as described in the previous sections. When the selected location appears on the map, tap and the list returns. If needed, you can add further intermediate destinations.
-
Page 141: Checking Route Information And Alternatives
3.2 Checking Route Information and Alternatives To get a map overview of the planned route and check different parameters of the planned route, perform the following steps: on the Navigation view to access the Navigation menu. In the Navigation menu, tap The planned route is displayed in its full length on the map with the following additional information: •... -
Page 142: Editing The Route
• to list route alternatives and select the most suitable route for you. on the Route Summary screen to carry out additional actions, for example edit your route preferences or display the itinerary. 3.3 Editing the route When navigation has already started, there are several ways to modify the planned route. You have the following options: •... - Page 143 In the Navigation menu, tap The first line from the bottom is the start of the route, normally the current GPS position. Tap , select , and confirm your action at the warning message. The Change Start to... screen appears. Select the starting point of the route the same way you select a destination.
-
Page 144: Adding An Additional Destination
To return to normal navigation, tap 3.3.2 Adding an additional destination If you already have a planned route and you select a new destination as described in the above sections, the route to the previous destination is deleted and a new route is calculated. To add a new intermediate destination to the planned route, perform one of the following actions: •... -
Page 145: Saving The Planned Route
• If you have a route with at least one intermediate destination, you can delete the waypoint from the list right from the Main menu. Tap , then confirm the deletion. 3.3.4 Saving the planned route To save the planned route, perform the following steps: Select a destination as described earlier and tap Type in a name and tap The route is saved and it is available in... -
Page 146: Deleting The Planned Route
3.3.5 Deleting the planned route You have the following two options to delete the navigated route: • If you already have a planned route and you select a new destination as described in the above sections, the route to the previous destination is automatically deleted and a new route is calculated. -
Page 147: Selecting A Route Alternative For An Existing Route
To view more suggestions, tap and scroll down for other alternative routes with different route planning methods. Select one of the route alternatives and tap to return to the previous screen. The navigation system recalculates the route. to start your journey. The Tap orange line now shows the new planned route. -
Page 148: Pausing Guidance
If there are more than a few suggestions, you can tap and scroll down for routes. Select one of the route alternatives and tap to return to the previous screen. The navigation system replaces the original route. to start your journey. Tap The orange line now shows the new planned route. -
Page 149: Saving A Location
3.4 Saving a location To add any location to the saved locations (the list of frequently used destinations), perform the following steps: Select a destination as described before. It can be an address, a Place, any location on the map, a previously used destination from History, and so on. -
Page 150: Editing A Saved Location
3.4.1 Editing a saved location To edit a location that you have already added as a Saved Location, perform the following steps: On the Navigation view, tap , and The list of Saved locations is displayed. Tap the location you want to edit, tap and enter the name of the location on the keyboard, then tap In Saved Locations, Home and Work cannot be renamed. - Page 151 The warning for road safety cameras is disabled when you are in a country where road safety camera warning is prohibited. However, you must make sure that using this feature is legal in Note! the country where you intend to use it. Return to the Navigation view, and select the Alert Point.
-
Page 152: Running A Simulation
3.6 Running a Simulation To run a simulated navigation that demonstrates the planned route, perform the following steps: on the Navigation view to access the Navigation menu. In the Navigation menu, tap . The simulation starts from the starting point of the route and leads you through the whole planned route using a realistic speed. -
Page 153: Off-Road Navigation
• : Jump to the previous route event (maneuver). • : Tap to increase the speed of the simulation to 4, 8 or 16 times faster. Tap again to return to normal speed. to stop the simulation. 3.7 Off-road navigation When first started, the navigation system calculates routes using the road network of the maps provided with the product. -
Page 154: Navigating In Off-Road Mode
3.7.3 Navigating in off-road mode The real difference between on-road and off-road modes is the navigation itself. When you are on the Navigation view with an off-road route: • Your position and heading is not aligned to the nearest road. •... -
Page 155: Reference Guide
4 Reference guide The following sections describe the different concepts and menu screens of the navigation system. 4.1 Concepts The following sections describe and explain navigation-related concepts. 4.1.1 2D/3D GPS reception The GPS receiver uses satellite signals to calculate its (your) position and needs at least four signals to give a three-dimensional position, including elevation. -
Page 156: Route Calculation And Recalculation
• Audio warning: beeps are played (if the voice guidance language that you selected is a natural voice) or the type of the alert can be announced (TTS voice) while you are approaching one of these points, and an extra alert warns you if you exceed the given speed limit while approaching. •... -
Page 157: Speed Limit Warning
4.1.6 Speed limit warning Maps may contain information about the speed limits of the road segments. The navigation system is able to warn you if you exceed the current limit. This information may not be available for your region, or may not be fully correct for all roads on the map. -
Page 158: Real-Time Alternative Routes
You can ignore this message and keep the original route by tapping or you can check the suggested route by tapping By tapping the plus/minus signs, you can increase or decrease the distance to avoid on the highway. You can accept the recommended detour by tapping 4.1.7.2 Real-time alternative routes (Not supported on all platforms) iGo Primo Next Gen may offer an alternative route on normal roads in case of a traffic jam. -
Page 159: Parking Around Destination
4.1.7.3 Parking around destination If you leave the planned route by exiting a freeway, the navigation system tries to guess the reason for making a detour. By tapping , you can open a top-down map with the recommended parking Places around the destination. -
Page 160: Useful Information Menu
4.2 Useful Information menu The Useful Information menu provides various additional functions. It can be found in the Navigation menu. You need an Internet connection via your cell phone to access online services, like parking and weather information. Button Description Shows information on the current position (latitude, longitude, nearest town, next crossing street, and so on) or the last known position if GPS reception is not available. -
Page 161: Where Am I
4.2.1 Where Am I This screen contains information about the current position (or about the last known position if GPS reception is not available). You can access it the following two ways: • By going to the Navigation menu and tapping •... -
Page 162: Trip Monitor
4.2.2 Trip Monitor Trip Monitor logs information about your route. You can record a new trip by tapping and stop it by tapping By tapping on the Trip Monitor screen, you can select the following options: Button Function By selecting a recorded trip, you can delete, rename, or change the color of the recorded route. -
Page 163: Settings Menu
4.3 Settings menu You can configure the navigation settings, and modify the behavior of the navigation system, by tapping Tap the arrows to view the content of other pages. The Settings menu provides the following options: Button Function Select the type of vehicle you are driving, the road types used in route planning, and the route planning method. -
Page 164: Route Preferences Settings
Turn the automatic trip log saving on or off and check the current size of the trip database. Enable or disable services that require Internet connection. Collects usage information and GPS logs that may be used for improving the application and the quality and coverage of maps. -
Page 165: Vehicle Profile
4.3.1.1 Vehicle profile You can select the following vehicle types: Button Description Maneuver restrictions and directional constraints are taken into account when planning a route. Roads are used only if access for cars is allowed. Private roads and resident-only roads are used only if they are inevitable to reach the destination. - Page 166 Maneuver restrictions and one-way streets are taken into account when planning a route. Roads are used only if access for taxis is allowed. Private roads, resident-only roads and walkways are excluded from routes. Maneuver restrictions and one-way streets are taken into account when planning a route.
-
Page 167: Route Planning Method Types
4.3.1.2 Route Planning Method types You can select from the following route planning method types: Button Description Gives a quick route if you can travel at or near the speed limit on all roads. Usually, the best selection for fast and normal cars. Results in a route with fewer turns and no difficult maneuvers. -
Page 168: Sound Settings
The following road types are available: Button Description You might need to avoid freeways when you are driving a slow car or you are towing another vehicle. Charge roads are pay roads where you can purchase a pass or vignette to use the road for a longer period of time. - Page 169 You have the following options for each sound type: Button Function Volume slider Adjust the volume of the related sound. Mute the related sound. The slider becomes inactive. Tap again to re-enable it. Button Function Disable verbal instructions. This function is enabled by default. Choose from the following options: •...
-
Page 170: Warnings Settings
Allow reading out real-time traffic messages. Allow announcing system messages. 4.3.3 Warnings settings You can enable and modify the following settings: Button Description The navigation system is able to warn you if you exceed the current speed limit. This information may not be available in your region, or may not be fully correct for all roads on the map. -
Page 171: Navigation View Settings
Tap it to receive a warning when approaching a road safety camera or other Alert Points like school zones or railroad crossings. You must make sure that using this feature is legal in the country where you intend to use it. You can set the warning type for the different Alert Point categories (alert types) individually. - Page 172 You can modify the following settings: Button Function Adjust the basic zoom and tilt levels to your needs. Three levels are available. Switch between daytime and night color modes or let the software switch between the two modes automatically a few minutes before sunrise and a few minutes after sunset.
- Page 173 Zoom out and show an overview of the surrounding area if the next maneuver is far and you are driving on a freeway. When you get close to the event, the normal map view returns. Whenever adequate information is available, lane information similar to the real ones on road signs above the road is displayed at the top of the map.
-
Page 174: Regional Settings
4.3.5 Regional settings You can modify the following settings: Button Description It displays the current written language of the user interface. Tap it to select a new language from the list of available languages. The application restarts after you change this setting and confirm it. It shows the current voice guidance profile. -
Page 175: Trip Monitor Settings
4.3.7 Trip Monitor settings Trip logs contain useful information about your recorded trips. You can enable and modify the following settings: Button Description Trip monitor can record statistical data of your trips. If you need these logs later, you can let the application save them automatically for you. Track logs, the sequence of the positions given by the GPS receiver, can be saved together with trip logs. -
Page 176: Troubleshooting
5 Troubleshooting This section offers possible solutions to issues that may occur during the operation of the navigation system. 5.1 GPS signal cannot be received Issue: The current location is not available, because GPS signal cannot be received. Cause 1: GPS signal is weak or may not be available if you are between tall buildings, in garages or tunnels as the signal weakens or distorts as it travels through solid material. -
Page 177: The Calculated Route Is Not Optimal
5.3 The calculated route is not optimal Issue: The planned route is too long or includes several minor roads. Cause: In the route planning method is not set to the optimal parameter. Solution: Select your preferred route planning method by performing the following steps: , and and select your preferred route, for example . -
Page 178: Keyboard Buttons Are Grayed Out
5.5 Keyboard buttons are grayed out Issue: Some keyboard buttons are grayed out and cannot be used. Cause: The navigation system has a smart keyboard for address search, which means that only those buttons are active that can be used to type a name that is available on the map. Solution: Check if you entered the name correctly. -
Page 179: End-User License Agreement
6 End-user license agreement 0. Definitions The following terms shall have the meaning defined hereunder in this agreement when used with capital letters. The text of this agreement may also contain further defined terms. “Agreement” means this End User License Agreement (EULA) containing the terms and conditions of use of the Software, Databases and Services by You as the end user. - Page 180 term is defined at 48 C.F.R (“FAR”) 2.101 and that all use of the Navigation Product is subject to this Agreement. 3 Applicable law and venue 3.1 This Agreement will be governed by the laws of the country where the Licensor has its statutory seat or in the absence of such incorporation where it has its central administration (“country of residence”) without regard to such country’s choice of law provisions.
- Page 181 5.2 Intellectual property rights of Licensor, the Software Owner or other rightholders extend to the whole Navigation Product and to its parts separately as well. 5.3 The owner(s) of the copyrights of the Database(s) is (are) the Licensor, or natural person(s) or corporate business entity(ies) (referred to as: “Database Owner”) who supply them.
- Page 182 store, to transfer or to distribute these data or contents or to disclose them in full or in part to the public in any format or to download them from the Navigation Product. 8. No warranty, limitation of liability 8.1 The Licensor hereby informs the User that although the greatest care was taken in producing the Navigation Product, given the nature of the Navigation Product and its technical limitations, the Licensor and its suppliers do not provide a warranty for the Navigation Product being completely error-free, and they are not bound by any obligation whereby the Navigation Product obtained by the User should be...
- Page 183 Safety (e.g. speed) cameras are provided for informational purposes only and may not be used to encourage, facilitate or support the violation of any laws. Furthermore some countries prohibit the display or use of such features. Compliance with country specific laws and any usage or reliance on the information by user shall be at the User's own risk and sole responsibility.
- Page 184 10.4 Licensor hereby informs the User, that if it accesses the Internet through mobile data service while abroad or otherwise roaming another mobile network the transmission of such data may result in special roaming charges. To avoid such charges it is the responsibility of the User to disable mobile data services while roaming or to turn off the data collection functions of the Navigation Product.
- Page 185 11.7. Community Services. Some Connected Services may be based on data and information uploaded by participating individuals (Users or other persons) or a Database created and maintained by a group of such individuals. Such data may not come from a trusted source and may also be intentionally false or misleading, as Licensor or Software Owner does not have any means to control or verify the credibility or accuracy of such data or the individuals providing the data.
-
Page 186: Copyright Note
7 Copyright note The product and the information contained herein are subject to change without prior notification. This manual may not, in whole or in part, be reproduced or transmitted in any form either electronically or mechanically, including photocopying and recording, without the express written consent of Dual Electronics Corporation.
Need help?
Do you have a question about the VX7021 and is the answer not in the manual?
Questions and answers