
Related Manuals for Jensen VM9026


Summary of Contents for Jensen VM9026
- Page 1 For Sales Information Please Contact RoadTrucker Inc (www.RoadTrucker.com) 8312 Sidbury Rd. Wilmington, NC 28411 (800) 507-0482 / (910) 686-4281...
-
Page 2: Table Of Contents
Thank you for choosing a Jensen product. We hope you will find the instructions in this owner’s manual clear and easy to follow. If you take a few minutes to look through it, you’ll learn how to use all the features of your new Jensen VM9026 Mobile Multimedia Receiver for maximum enjoyment. - Page 3 Congratulations on your purchase of the Jensen VM9026 Mobile Multimedia Receiver. It’s a good idea to read all of the instructions before beginning the installation. We recommend having your Jensen VM9026 installed by a reputable installation shop. • Fast Forward/Reverse - 2X, 4X, 8X and 16X • Play, Pause, Stop, Next Chapter and Previous Chapter...
-
Page 4: Parking Brake Inhibit
Screen will only display video when the Parking Brake is engaged. Optional Equipment Rear Camera The VM9026 is “camera ready. ” Before accessing any camera features, you must purchase and install a rear video camera. Once the camera is connected and operating properly, the CAMERA source mode will become active. -
Page 5: Controls And Indicators
VM9026 CONTROLS AND INDICATORS VM9026 1. MENU Press to access the MAIN Menu. 2. Disc Slot Insert CD or DVD for playback of music/video files. 3. EJECT Press to eject a disc. 4. TFT SCREEN 5. AV INPUT COVER Protect the USB Port and SD Interface Slot when not in use. -
Page 6: Operating Instructions
VM9026 OPERATING INSTRUCTIONS Power ON / OFF Press the rotary Power button to turn the unit ON. The buttons on the front of the unit light up and the current mode status appears on the Screen. Press and hold the Power button again to turn the unit OFF. -
Page 7: Volume Adjustment
VM9026 External Devices External devices, including a game console, camcorder, navigation unit, iPod®, iPhone etc. can be connected to this unit via RCA output using an A/V Media Adapter Cable (not included). Connect an external device to the A/V Media Adapter Cable and plug the cable into the A/V INPUT connector on the front of the radio. -
Page 8: Setup Menu
VM9026 SETUP MENU To access system settings, press the Menu button to display the MAIN Menu, then touch SETUP on the screen to enter the SETUP Menu. The SETUP Menu appears. Accessing Menu Items Touch one of the five Sub-Menus (Clock, General, Audio, Video, and Other) to make adjustments to a desired feature. - Page 9 VM9026 General Sub-Menu Features Table 3: General Sub-Menu Adjustments Setting Options Function Reverse OFF or Camera image is reversed as if look through a rearview Camera mirror. Mirror Image OFF or Image can be viewed as normal or mirror. Beep No beep sounds.
- Page 10 VM9026 Audio Sub-Menu Features Touch the EQ button on the right side of the screen to display the equalizer screen. Table 4: Audio Sub-Menu Adjustments Setting Adjustable Function Range Fader 00 to +7F Balances the audio output levels between the front and back side of the vehicle.
- Page 11 VM9026 Video Sub-Menu Features Table 5: Video Sub-Menu Features Setting Options Function Aspect Ratio 4:3 or 16:9 Adjust the screen aspect ratio for viewing video. TFT Backlight -5 to +5 Adjust the backlight brightness of the screen. Brightness -5 to +5 Adjust the brightness of the screen.
- Page 12 VM9026 Other Sub-Menu Features Table 6: Other Sub-Menu Features Setting Options Function TS Calibrate Use to set parameters of touch screen to ensure that when screen touched, it will correspond to the feature the user is selecting. Load Factory Restores the unit to factory settings.
- Page 13 VM9026 Touch Calibrate (Screen Calibration) To access the “Screen Calibration” function from the SETTINGS MENU, select the “Other” and then the “Touch Calibrate” option. After entering Touch Calibration mode, a crosshair + appears in a corner quadrant of the Screen. To begin calibration, touch and hold the crosshair for one second until it moves to the next quadrant.
-
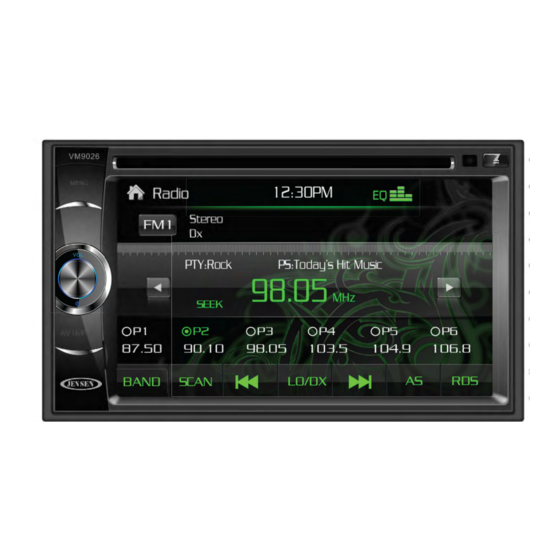
Page 14: Radio Tuner Operation
VM9026 RADIO TUNER OPERATION Radio Tuner Screen MAIN MENU ( ): Touch to view the MAIN MENU and select a new playback source CLOCK: Displays time in 12 hour AM/PM or 24 hour conventions as preset in Setup Menu. EQ (... -
Page 15: Using Preset Stations
VM9026 Seek Next Station Touch the icon on the screen to seek the next lower frequency station. Touch the icon on the screen to seek the next higher frequency station. Using Preset Stations Six numbered preset buttons store and recall stations for each band. All six stored stations ( ) for the current band appear on the screen. - Page 16 VM9026 stations and enter the new strong stations. This feature is most useful when travelling in an area where you are not familiar with the local stations. • Touch the AS icon to scan the six preset stations previously stored.
-
Page 17: Dvd/Vcd Video Operation
VM9026 DVD/VCD VIDEO OPERATION NOTE: When properly installed, DVD video cannot be displayed on the main screen unless the parking brake is applied. If you attempt to play a DVD while the vehicle is moving, the screen displays the above warning:... - Page 18 VM9026 1. MAIN MENU ( ) Touch to view the MAIN MENU and select a new playback source 2. MODE: Indicates that unit is in DVD-V viewing mode. 3. TRACK (T) and CHAPTER (C): Touch to select and manually set a Track or Chapter directly using the on-screen display.
-
Page 19: Resetting The Loading Mechanism
VM9026 Inserting a DVD/VCD Insert disc gently label side facing up (do not push disc, the unit will pull the disc in). The unit will detect the disc and will automatically begin playback. NOTE: You cannot insert a disc if there is already a disc in the unit or if the power is OFF. -
Page 20: Fast Reverse
VM9026 Fast Reverse Touch the FAST REVERSE ( ) icon on the first control menu page once to reverse playback of the disc two times faster (x2) than normal playback speed. Keep touching and releasing the icon to increase the rate from “x2” to “x4”, “x8”, and “x16”. - Page 21 VM9026 LANGUAGE Touch the LANGUAGE ( ) icon on the third control menu page during playback to select the audio language. Each time the icon is touched a different audio language is selected if you are watching a disc recorded in multiple languages.
-
Page 22: General Disc Information
VM9026 General Disc Information Table 7: Disc Properties Symbol 12cm Disc Properties Max Play Time Single side single layer (DVD-5) (MPEG 2 Method) Single side double layer (DVD-9) 133 minutes Double side single layer (DVD-10) 242 minutes Double side double layer (DVD-18) -
Page 23: Cd Audio Operation
To access the on-screen controls, touch the icons at the bottom of the screen while a CD is playing, select or set playback controls. Media Requirements The VM9026 will play music or other audio files from the following disc media: • CD-DA • CD-R/RW Upon inserting a CD the track number and playing time appear on the screen. - Page 24 VM9026 1. MAIN MENU ( ): Touch to view the MAIN MENU and select a new playback source. 2. MODE: Indicates that unit is in DISC playback mode. 3. TRACK INDICATOR: Displays the current track number playing and total number of tracks on the CD.
- Page 25 VM9026 Inserting a CD Insert disc gently label side facing up (do not push disc, the unit will pull the disc in). The unit will detect the disc and will automatically begin playback. NOTE: You cannot insert a disc if there is already a disc in the unit or if the power is OFF.
- Page 26 VM9026 Source Menu Touch the SOURCE MENU ( ) icon to access the CD track menu to view or change tracks manually. Touch the icon a again to return to the playback of the current track. Touch a track title (if available) or track number to begin playback of that track.
-
Page 27: Playing Mp3/Wma Operation
CD-R with their file names beginning with play sequence numbers such as “01” to “99”. NOTE: The VM9026 will recognize one folder level deep and 1000 songs / files in the ROOT directory of a disc / USB / SD card... - Page 28 VM9026 AUX-F PORT SD SLOT USB PORT For Sales Information Please Contact RoadTrucker Inc (www.RoadTrucker.com) 8312 Sidbury Rd. Wilmington, NC 28411 (800) 507-0482 / (910) 686-4281...
- Page 29 VM9026 MP3/WMA Display To access the on-screen controls, touch the icons at the bottom of the screen while playing tracks from a CD, USB Device of SD Card, select or set playback controls. (CD) MP3/WMA Display (USB) MP3/WMA Display (SD) MP3/WMA Display 1.
-
Page 30: Connecting A Usb Device
VM9026 Controlling Playback Inserting a CD-R/CD-RW/DVD+R/RW and DVD-R/RW Insert the disc gently label side facing up (do not push disc, the unit will pull the disc in). The unit will detect the disc and will automatically begin playback. NOTE: You cannot insert a disc if there is already a disc in the unit or if the power is OFF. - Page 31 VM9026 Shuffle Touch the SHUFFLE ( ) icon to play tracks in random order during playback. Touch the icon again exit Shuffle mode. Repeat Playback Touch the REPEAT ( ) icon once during playback to repeat the current track. Touch the icon a second time to repeat the current title. Touch the icon a third time to turn the repeat function OFF.
- Page 32 VM9026 Next Track Touch the NEXT TRACK ( ) icon to advance to the next track. Fast Reverse Touch the FAST REVERSE ( ) icon once to reverse playback of the disc two times faster (x2) than normal playback speed. Keep touching and releasing the icon to increase the rate from “x2”...
-
Page 33: Viewing Jpeg Files
VM9026 VIEWING JPEG FILES JPEG files can be viewed from a SD Card, Disc or a USB device. JPEG images can be stored as individual images or in folders. The unit will display the root menu. Menu Page 1 Menu Page 2 1. -
Page 34: Ipod® Operation
VM9026 iPod® OPERATION ® NOTE: Be sure your iPod has the latest Apple firmware installed to avoid connectivity issues. ® Accessing iPod Mode This unit is Made for iPod® and iPhone®. You can control your iPod® via touch screen to access Playlist, Artist, Albums, Songs, etc. Supported models include, but are not limited to the following: • iPhone®... - Page 35 VM9026 iPod®/iPhone® OPERATION To access the on-screen controls, touch the icons at the bottom of the screen while a iPhone®/iPod® is playing, select or set playback controls. 1. MAIN MENU ( ): Touch to view the MAIN MENU and select a new playback source 2.
- Page 36 VM9026 Shuffle Touch the SHUFFLE ( ) icon to play tracks in random order during iPhone®/iPod® playback. Touch the icon again exit Shuffle mode. Repeat Playback Touch the REPEAT ( ) icon once during playback to repeat the current track.
- Page 37 VM9026 Play/Pause Touch the PLAY/PAUSE ( ) icon when iPhone®/iPod® is loaded to begin playback. During playback of the iPhone®/iPod® touch the icon again to pause and once again to resume playback. Next Track Touch the NEXT TRACK ( ) icon to advance to the next track on the iPhone®/iPod®...
-
Page 38: Controlling Your Ipod
To return to the iPod® main screen touch the SOURCE Menu icon. NOTE: To transmit the video from your iPod® to the VM9026 screen, you must set the following options through the iPod® video settings menu: TV Out = ON, TV Signal = NTSC, and Widescreen = ON. -
Page 39: Rear Camera Operation
Menu within the General Sub-menu. STEERING WHEEL CONTROL (SWC) INTERFACE The VM9026 is compatible with various aftermarket SWC adapters from companies such as PAC / Metra / ADS. Information about SWC interfaces and other adapters is available on each companies web site. A 3.5mm female connector on the back of the VM9026 allows connectivity to various aftermarket SWC adapters. -
Page 40: Troubleshooting
VM9026 TROUBLESHOOTING Table 9: Troubleshooting (1 of 3) Problem Cause Corrective Action GENERAL Unit will not power Radio fuse blown Install new fuse with correct rating Car battery fuse blown Install new fuse with correct rating Illegal operation Press the RESET button... - Page 41 VM9026 Table 9: Troubleshooting (2 of 3) Problem Cause Corrective Action TFT Monitor No image Incorrect connection to parking Check wiring and brake wire correct Parking brake is not engaged Stop vehicle in safe place and apply parking brake Flashing image...
- Page 42 VM9026 Table 9: Troubleshooting (3 of 3) Image blurred, Disc is illegally copied Use original disc distorted or dark Problem Cause Corrective Action Disc does not play Disc is warped or scratched Use disc in good back condition Disc is dirty or wet...
-
Page 43: Error Messages
VM9026 Error Messages Table 10: Error Messages Message Displayed Cause Corrective Action Loading Disc is being read No Disc Disc is dirty Clean disc with soft cloth Disc is upside down Insert disc with label side Disc not present in... -
Page 44: Care And Maintenance
VM9026 Care and Maintenance Use only a clean silicone cloth and neutral detergent to clean the front panel or monitor. A rough cloth and non-neutral detergent (such as alcohol) may result in scratching or discoloration. 2. Do not get water or cleaning fluids on the unit. -
Page 45: Specifications
VM9026 SPECIFICATIONS DVD/CD Player Compatible Disc Media: DVD + R / RW (Single and Dual Layer) and CD-R / RW Compatible Media Formats: CD-DA, MP3, WMA, VCD, SVCD, Xvid, AVI, MPEG 1/2 Signal to Noise Ratio: >95dBA Dynamic Range: >95dB Frequency Response: 20Hz to 20 kHz, -3dB Channel Separation: >... -
Page 46: Cea Power Ratings
VM9026 General Auxiliary Input Impedance: 10k Power Supply: 11 to 16VDC, Negative Ground Power Antenna (Blue): 500mA Max Amplifier Remote (Blue/White): 500mA Max Operating Temperature: -20C ~ 65C Fuse: 15-amp ATO Type DIN Chassis Dimensions: 7” X 7” X 4” (178mm x 178mm x 100mm) CEA Power Ratings Power Output: 13 Watts RMS x 4 Channels into 4-Ohms @ <... -
Page 47: Wilmington, Nc 28411 (800) 507-0482 / (910) 686-4281
Audiovox Electronics Corporation Hauppauge, NY 11788 Technical Assistance: 1-800-323-4815 www.mobile.jensen.com © 2013 Audiovox Printed in China VM9026 Common Replacement Parts Owner’s Manual, Install Manual 30613820 Wire Harness (Speaker, Power, A/V) 30313820 Trim Ring 30413820 Hardware Bag - Miscellaneous Hardware 30513820...
Need help?
Do you have a question about the VM9026 and is the answer not in the manual?
Questions and answers