Medion F2 Revision 22 Operating Instructions Manual
All-in-one pc system;
high performance pc; multimedia pc; mini pc
Hide thumbs
Also See for F2 Revision 22:
- Operating instructions manual (80 pages) ,
- Operating instructions manual (68 pages)

Related Manuals for Medion F2 Revision 22


Summary of Contents for Medion F2 Revision 22
- Page 1 Operating instructions Multimedia PC High Performance PC All-in-One PC System Mini PC MEDION ®...
- Page 2 Important information about the illustrations PLEASE NOTE! The overview includes all connections; your device may differ from this depending on configuration. Some video connectors are fitted with a protective cov- er. These connections are not available in the respective configuration. ii of xxii...
- Page 3 Multimedia PC P3 Revision 22 MS/SD/MMS/xD iii of xxii...
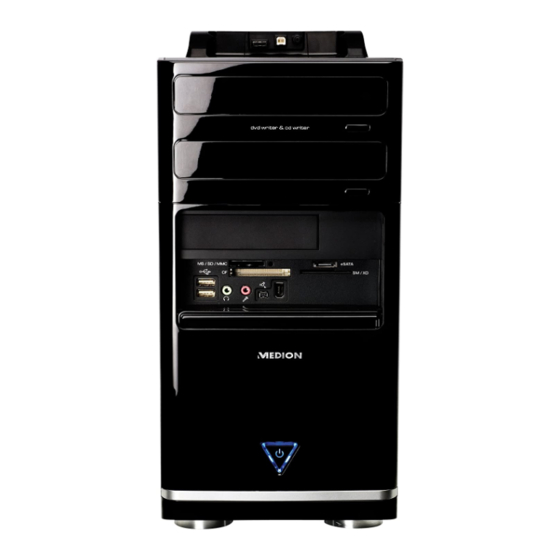
- Page 4 Multimedia PC F2 Revision 22 iv of xxii...
- Page 5 Multimedia PC R9 Revision 22 MS/SD/MMS/xD v of xxii...
- Page 6 Multimedia PC M50 Revision 34A vi of xxii...
- Page 7 Multimedia PC M55 Revision 34 vii of xxii...
- Page 8 Multimedia PC M65 Revision 34 viii of xxii...
- Page 9 High-Performance PC S91 Revision 22 ix of xxii...
- Page 10 High-Performance PC X50 Revision 29A x of xxii...
- Page 11 High-Performance PC X57 Revision 37 SD/MS/MMS xi of xxii...
- Page 12 High-Performance PC X71 Revision 30 xii of xxii...
- Page 13 High-Performance PC X75 Revision 32A xiii of xxii...
- Page 14 High-Performance PC X77 Revision 35 9 12 13 MS/SD/MMS/xD xiv of xxii...
- Page 15 All-in-One PC System G24/G24B xv of xxii...
- Page 16 All-in-One PC System G24/G24M xvi of xxii...
- Page 17 All-in-One PC System xvii of xxii...
- Page 18 Mini PC NUC S13 OPTICAL 19 V xviii of xxii...
- Page 19 Mini PC NUC S14 19 V xix of xxii...
- Page 20 Mini PC LivaX S15 xx of xxii...
- Page 21 Connections On/off switch/operating mode Slot for Medion HDDrive2Go super-speed external hard drive Optical drive Optical drive eject button Power supply (mains cable socket & mains switch) Front panel Hot-swap mobile rack Card reader USB 3.0 ports USB 3.1 ports USB 2.0 ports...
- Page 22 Source Select / Display off* eSATA connection Overclocking button Illumination control EJECT button xxii of xxii...
-
Page 23: Table Of Contents
Table of Content About these operating instructions ............3 1.1. Warning symbols and key words used in these operating instructions ......................3 1.2. Proper use ........................ 4 1.3. Declaration of conformity .................. 4 1.4. Information on trademarks ................5 Safety information ..................5 2.1. - Page 24 7.3. Scroll wheel ......................24 Keyboard ....................24 8.1. The Alt, Alt Gr and Ctrl keys ................24 Hard drive ....................25 9.1. Important directories ..................25 9.2. Hot-swap mobile rack (optional) ..............26 9.3. Connecting an external hard drive (optional) ..........29 Optical drive (optional) ................30 10.1.
-
Page 25: About These Operating Instructions
1. About these operating instructions Read the safety instructions carefully before using the device for the first time. Note the warnings on the device and in the operating instructions. Always keep the operating instructions close to hand. If you sell the device or give it away, please ensure that you also pass on these instructions. -
Page 26: Proper Use
LAN solution, the device may only be used inside buildings in the EU.* Full declarations of conformity are available at www.medion.com/conformity. In order to meet this requirement, you should not use channel range 34 - 64 on your wireless LAN access point. -
Page 27: Information On Trademarks
1.4. Information on trademarks Windows® is a registered trademark of Microsoft®. Intel®, the Intel® logo, Intel Inside®, Intel Core®, Ultrabook™ and Core Inside® are trademarks of the Intel® Corporation in the USA and other countries. ® , the HDMI logo and High-Definition Multimedia Interface are registered trademarks of HDMI Licensing LLC. -
Page 28: Operating Safety
2.2. Operating safety Read this section carefully and follow all instructions given. The instructions will help you to operate your PC reliably and help increase its service life. Liquids penetrating the device may impair the electrical safety of the product. ... -
Page 29: Never Carry Out Repairs Yourself
Switch the PC off immediately/do not switch the PC on and contact customer services if ... • the power cable or the attached plugs are burnt or damaged. Have faulty mains adapters/mains cables replaced only with original parts. These parts should not be repaired under any circumstances! •... -
Page 30: Package Contents
3. Package contents Please check your purchase to ensure that all items are included. If anything is missing, please contact us within 14 days of purchase. If you do contact us, please give your serial number. The following components are supplied with the PC you have purchased: •... -
Page 31: Setting Up The Pc
4. Setting up the PC Setting up your PC in the right way helps to ensure that your PC is comfortable to operate. 4.1. Installation location • Set up all components on a stable, level and vibration-free surface and only operate them on a surface of this kind to prevent the PC from malfunctioning. - Page 32 PLEASE NOTE! Take regular breaks when working at your monitor to prevent tenseness and fatigue. Sitting for a long time without changing position can be uncomfortable. Correct posture is very important for minimising the risks of physical problems or damage. 50 - 60 cm 40 - 45°...
-
Page 33: Connecting
5. Connecting PLEASE NOTE! The devices listed are not necessarily supplied. You only need to connect up those components that you want to operate on your PC. If you do not have the described device, you can simply skip the relevant point and carry out these steps at a later point in time if required. -
Page 34: Opening And Closing The Front Cover (Optional)
• Ensure that all connection cables are connected to their corresponding peripheral device to avoid any interference radiation. Disconnect any cables that are not required. 5.2. Opening and closing the front cover (optional) Some connections are behind the front cover. This is very useful because you can quickly and conveniently make frequently used connections without turning around the PC. - Page 35 5.5.2. Cleaning • Make sure that no water droplets remain on the display. • Water can cause permanent discolouration. • Clean the screen with a soft, lint-free cloth. • Do not place the screen in strong sunlight or near ultraviolet light.
-
Page 36: Brightness Control (Optional)
Image Command Swipe from the top edge of the Swipe from the top screen down when an application edge down is running to display the application menu. In tablet mode, you can move the screen up, down, to the left and to the right using one finger. -
Page 37: Connecting Ps/2 Devices (Optional)
Connecting USB devices (optional) PLEASE NOTE! Only connect your USB devices after initial set-up of your new PC. This will prevent unnecessary confusion during installation. These devices can normally be connected during operation. Please refer to the operating manual for your peripheral device. •... -
Page 38: Connecting The Audio Output / Headphones / Speaker Boxes
5.9. Connecting the audio output / headphones / speaker boxes Connect active speaker boxes for playback or an audio connection cable for recording. Read the operating instructions for your stereo to find out which input you need to use (usually Line In or Aux). ... -
Page 39: Connect Microphone (Optional)
5.10. Connect microphone (optional) Connect a microphone with a 3.5 mm mono jack plug to the pink socket on the front of your PC. Position the microphone so that it is not pointing directly at the speaker. This will prevent acoustic feedback that creates a loud whistling sound. -
Page 40: Eject Button
5.14.1. Select illumination style Press the illumination control once in order to switch on the lighting permanently. Press the control again to change the operating mode to pulsing light. Press the control again to switch off the lighting. 5.14.2. -
Page 41: Connecting Power Supply
5.16. Connecting power supply Finally, connect your PC and monitor to the power supply. Plug the mains cable into the socket and then connect it to the mains cable socket on your PC. Please observe the following safety information: DANGER! Risk of electric shock! Even when the mains switch is off, some components... -
Page 42: Starting Up For The First Time
6. Starting up for the fi rst time The operating system and all hardware drivers are pre-installed. For some programs (e.g. telephone CDs or encyclopaedias), it may be necessary to insert the relevant disc to call up the data stored on it. The software will prompt you to do this if necessary. - Page 43 Licence agreement Please read through the licence agreement carefully. It provides important legal information about the use of your software product. To view the text in full, you must move the scroll bar downwards using the mouse until you reach the end of the document.
-
Page 44: Overclocking Button (Optional)
6.2. Overclocking button (optional) Your computer is delivered with an application that enables you to overclock the processor. This is useful if you want higher performance for certain applications, such as video editing or games. Depending on computer model, you enable overclocking… •... - Page 45 6.2.2. Processor overclocking using the OC switch on the front cover If your computer has an OC switch on its front cover, you simply need to press the switch in order to overclock the processor (the switch should click into position).
-
Page 46: Mouse
7. Mouse In addition to the two standard buttons, the mouse also features a third button in the scroll wheel. 7.1. Left button The left mouse button is used to make a selection (click once) and to confirm this selection (double click). 7.2. -
Page 47: Hard Drive
9. Hard drive The hard drive is your main memory medium and combines high storage capacity with rapid data access. Your PC is supplied with an OEM version* of the Microsoft Windows® operating system which fully supports all of the PC’s performance features. We have configured your PC’s hard drive so that you will be able to work with it optimally without having to install any additional drivers yourself. -
Page 48: Hot-Swap Mobile Rack (Optional)
The second partition (D:\) is used for data backup and also contains drivers (D:\ Drivers) and utilities (D:\Tools) for your PC. PLEASE NOTE! Depending on the configuration of the computer, there may be other partitions with different drive designations. Therefore, it should be noted that the drive designation “D:\”... - Page 49 NOTICE! Only 3.5” hard drives can be installed in this mobile rack. It is not possible to install a 2.5” SSD drive. Proceed as follows: Pull the mobile rack out of the slot. Place the mobile rack onto a firm surface with the open side facing upwards. If necessary, use a soft surface to minimise any knocks or collisions.
- Page 50 Place the mobile rack onto a firm surface with the open side facing upwards. If necessary, use a soft surface to minimise any knocks or collisions. The handle must be facing in your direction. Pull the hard drive decoupler out of the mobile rack. ...
-
Page 51: Connecting An External Hard Drive (Optional)
These caps should be replaced if these connections are not being used. MEDION HDDrive 2Go super speed hard drives are available in the following sizes: • MEDION hard drive HDDrive 2Go super speed 6.35 cm/2.5" USB 3.0 and •... -
Page 52: Optical Drive (Optional)
10. Optical drive (optional) 10.1. Loading a disc PLEASE NOTE! Risk of damage! The high speeds in the drive can cause defective media to break and damage your device. Damage caused by faulty media is not covered under warranty and repairs will be chargeable. -
Page 53: Playing/Reading Discs
10.2. Playing/reading discs PLEASE NOTE! Some discs start automatically when they are inserted. This depends on the operating system and the corresponding settings. The optical drive on your PC is capable of playing audio CDs, DVD films or data discs. Once a disc has been loaded, a dialogue box opens containing various playback options. -
Page 54: Card Reader (Optional)
10.3.1. Important information on high-resolution video formats (optional) Depending on the model, your system is supplied with a Blu-ray drive. The technology used in the Blu-ray drive supports high-resolution video formats. You can use your drive to play the following media: •... -
Page 55: Inserting A Memory Card
11.1. Inserting a memory card PLEASE NOTE! Risk of damage! The memory cards can only be inserted in one direction. Please observe the instructions in the section above. Slide the card in as far as it will go. When a card is inserted into a slot, it is allocated a free drive letter on the workstation (but only if it is a removable data medium). -
Page 56: Sound System
13. Sound system The external audio connections can be configured so that you can connect a surround sound system. If you wish to change the default volume, click the loudspeaker icon in the taskbar. WARNING! Damage to hearing! Excessive volumes when using headphones or earphones, as well as changes to the default settings on the equaliser, driver, software or operating system, can generate excessive acoustic pressure that can cause... -
Page 57: Network Operation
15. Network operation 15.1. Wireless LAN (Wi-Fi) Your PC is equipped with WLAN. The components (module, antenna) have already been integrated into your PC and activated. You can disable this function using the Windows® device manager if required. Wireless LAN enables you to establish a network connection to a corresponding remote station. -
Page 58: Bluetooth
15.2. Bluetooth Bluetooth technology is used to wirelessly bridge short distances. Bluetooth devices transfer data via radio so that computers, mobile phones, printers, keyboards, mice and other devices can communicate with one another wirelessly. Bluetooth wireless technology has numerous possible applications. A few of them are listed below: •... -
Page 59: Settings
16. Settings 16.1. Reset PC to factory settings In the event of problems with installation or other software problems which make it necessary to reinstall the software, Windows® offers three options for reinstalling Windows® on your PC. First ensure that you have backed up all important data and programs. 16.1.1. -
Page 60: Uefi Setting
16.2. UEFI setting The UEFI setting (the basic hardware configuration of your system) offers you numerous configuration options for operating your PC. For example, you can modify the operating mode for interfaces, security features or power supply management. ATTENTION! Data loss! The PC has already been configured by the manufacturer to ensure optimum operation. -
Page 61: Faq - Frequently Asked Questions
17. FAQ - Frequently Asked Questions Where can I find the necessary drivers for my PC? • The drivers can be found in the second hard drive partition in the Drivers and Tools folders. What is Windows activation? • You will find a relevant section in these operating instructions containing de- tailed information on this topic. -
Page 62: Faults And Possible Causes
Turn off the PC and check all cable connections. Do not swap around the cables for the various devices, even if they look exactly the same. The polarity of the various cables may be different. Once you have ensured that the power supply to the device is working correctly and all connections are intact, then switch the PC back on. -
Page 63: Driver Support
18.5. Driver support The system has been thoroughly and successfully tested with the installed drivers in our test laboratory. It is normal in the computer sector, however, for the drivers to need updating from time to time. This is because there may be compatibility problems with other components (pro- grams, devices) which have not yet been tested. -
Page 64: Notes For Service Technicians
21.1. Notes for service technicians Before opening the housing, disconnect all power and connecting cables. If the PC is not disconnected from the power supply before being opened, there is a risk of fatal electric shock. There is also a risk that the components could be da- maged. -
Page 65: Recycling And Disposal
22. Recycling and disposal If you have any questions about disposal, please contact your sales agent or our ser- vice centre. PACKAGING Your device has been packaged to protect it against transportation da- mage. Packaging is raw material and can be re-used or added to the recycling system. -
Page 66: Information About The Scope Of Delivery
23. Information about the scope of delivery 23.1. Keyboard and mouse Model Manufacturer Sysgration Keyboard KB313U WELL PARK KB313W AGM-946 Sysgration Mouse MA105U MA105W WELL PARK MG100U Receiver RG10-P WELL PARK 23.2. WiFi USB Model Manufacturer EW-7811GLN EW-7811UTC WiFi USB Acelink/Edimax EW-7611ULB EW-7611UCB... -
Page 67: Legal Notice
Subject to technical and optical changes as well as printing errors. The operating manual can be reordered via the service hotline and is available for download via the service portal at www.medion.com/gb/service/start/. You can also scan the QR code above and download the operating manual onto your mobile device via the service portal. -
Page 68: Index
Environmental requirements ....9 25. Index Ergonomics ............9 Arms ............10 Bluetooth ............36 Back ............10 Brightness control ........14 General ............. 10 Head ............10 Cable connections ........11 Legs ............10 Card reader ........... 32 Wrists ............10 Memory Stick.......... - Page 69 Operation Keyboard ..........24 Wireless LAN ..........35 Mouse............24 Optical drive ..........30 CD-ROM ............ 30 DVD ............30 Overclocking ..........22 Power supply ..........19 Proper use ............4 PS/2 devices ..........15 Recycling ............43 Repairs ............41 Security Cable connections ........
- Page 70 letzte Seite 48 of 48...
Need help?
Do you have a question about the F2 Revision 22 and is the answer not in the manual?
Questions and answers