Table of Contents
Advertisement
Patents Pending, Registered Design
Electric Shower
Installation and Instruction Manual
Installer - please read all instructions carefully before installation
and leave this manual with the end user for future reference
Intertek BEAB Control
Intertek EMC Verified
(Europe)
Intertek ETL
(Europe)
Smart App
3yr
Warranty
3yr
Warranty
150kg
Rail Rating
150kg
Rail Rating
C0
Advertisement
Table of Contents
Troubleshooting

Subscribe to Our Youtube Channel
Related Manuals for Akw Itherm


Summary of Contents for Akw Itherm
- Page 1 Smart App Warranty Warranty Intertek BEAB Control 150kg Rail Rating Patents Pending, Registered Design Intertek EMC Verified (Europe) Electric Shower Installation and Instruction Manual 150kg Rail Rating Intertek ETL Installer - please read all instructions carefully before installation (Europe) and leave this manual with the end user for future reference...
-
Page 2: Product Features
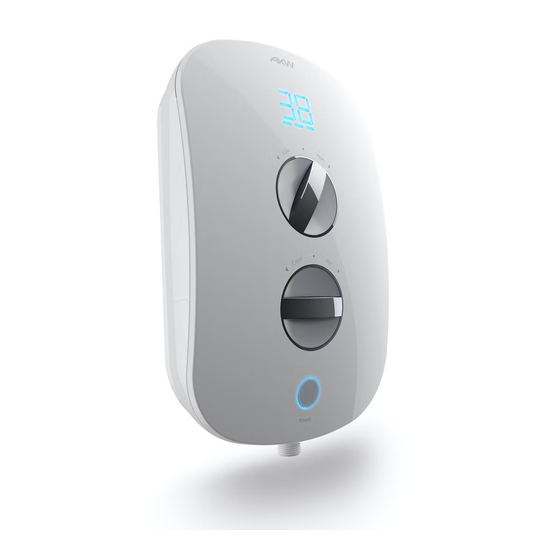
The iCare Shower h electrical cable inlet Right and left hand e The iTherm Electric Shower has been designed to allow for easy operation. The large The iCare Shower co ergonomic control knobs and LED interface clearly indicate the temperature and flow an Adjustable Riser rates. -
Page 3: Table Of Contents
These instructions are provided to advise the minimum standards of installation and recommends the best practice for the installation. Due to the very wide variability of possible installation conditions AKW cannot provide all circumstances for the installation. AKW cannot Due to the very wide variability of possible installation conditions AKW cannot provide all circumstances for the installation. AKW cannot accept any liability in connection with this information or its use. -
Page 4: User Safety Information
Do not operate the shower if the spray handset or hose is damaged or blocked. Do not restrict fl ow out of the shower by blocking or obstructing spray handset. © 2015 AKW 13-012-085-13 © 2015 AKW © 2015 AKW... -
Page 5: User Operating Instructions
To switch off, press and release the power button to stop water flowing. Your iTherm shower will enter into phased shut-down mode to allow for the hot water to flow for a short period of time while the heater cools down before automatically turning off. - Page 6 180° shower back to anti-clockwise and the 30°C, turn the shower will enter cold Temperature flow (no heating) Control knob by two clicks (NOT 180˚ 180°). *Inlet water temperature will vary dependent on season and location © 2015 AKW 14-019-002-08...
-
Page 7: User Volume Setting
User Volume Setting User Volume Setting Enter Volume Setting Step 1 The iTherm Electric Shower has audible tones enabled in its factory Press and hold settings. This can be enabled/disabled for your preference. Please Temp ‘+’ and Flow ‘+’ contact a qualified local installer and refer them to Page 29 to change simultaneously for it to your preference. -
Page 8: Cleaning Recommendations
Do not use abrasive pads or cloths. Do not use strong or concentrated acidic, alkaline or other cleaning materials as these may damage or discolour the product. © 2015 AKW © 2015 AKW 14-019-002-08 13-012-085-13... -
Page 9: User Troubleshooting
This may be caused (1bar Recommended) by other appliances on the same Wait until pressure increases pipework drawing water Obstruction in hose or handset Call AKW Technical Enquiries Water from pressure relief outlet-PRD activated Fault LED’s Display Low Flow/Low Pressure... -
Page 10: User Warranty
AKW guarantee your shower against any defects in manufacturing or materials for 3 years from the date of purchase. Within this period AKW will decide to repair or replace as we may choose. To be free of charge, proof of purchase is required. Work is to only be undertaken by AKW or our approved agents with prior agreement. -
Page 11: Main Components
Ribbon Cable Removable Bottom Case Side Pipe & Cable Side Pipe & Cable Cut-out Entry Cut-out Entry Fixing Hole Rear of Front Cover Shower Hose Outlet Bottom Pipe Inlet and Cable Entry Cover © 2015 AKW © 2015 AKW 14-019-002-08 13-012-085-13... -
Page 12: Specification S
Suitable for M Series (Flow Sensor) Shower Drain Pump Connections Suitable for M Series (Flow Sensor) or AKW A4 (Flow Switch) or AKW A4 (Flow Switch) or AKW A4 (Flow Switch) * For Optimal Product Performance the recommended minimum dynamic water pressure should be 100kPa (1 Bar) * For Optimal Product Performance the recommended minimum dynamic water pressure should be 100kPa (1 Bar) ©... -
Page 13: Important Safety Information
Building Regulations and following these instructions. Any actions to remove, modify or fi x this shower by non AKW appointed engineers or service staff will invalidate this warranty. All products manufactured and supplied by AKW are safe provided they are installed, used correctly and maintained in accordance with these instructions. -
Page 14: Installation Requirements
The outlet pipe acts as a vent and must never be blocked, restricted or connected to any other parts or fittings other than the AKW shower handset and hose supplied with this appliance. Before you start work: Take care when you unpack the product and make sure that you do not inadvertently discard any small parts. -
Page 15: Positioning Of The Shower
Ensure the shower unit is positioned over a bath, shower tray or wet floor. The showerhead must be directed away from the shower unit, during normal use the showerhead must not spray directly on to the shower unit. © 2015 AKW © 2015 AKW 14-019-002-08... -
Page 16: Disassembly
Note the unit can be temporarily hung using the top screws fixings whilst the cable and pipe work entries Note the unit can be temporarily hung using the top screws fixings whilst the cable and pipe work entries can be connected. can be connected. © 2015 AKW © 2015 AKW 14-019-002-08 13-012-085-13... -
Page 17: Fitting To The Wall
Before screws to the wall. Note: the bottom screw drilling, ensure there are no cables or water should only be fitted during final installation supplies running within the wall © 2015 AKW © 2015 AKW 14-019-002-08 13-012-085-13... -
Page 18: Reassembly- Bottom Cover
Pull the outlet connector up Slide back in the bottom cover plate Carefully push the outlet connector down to its Fasten the screws holding the outlet connector and home position bottom cover © 2015 AKW © 2015 AKW 14-019-002-08 13-012-085-13... -
Page 19: Reassembly - Front Cover
Do not seal the shower to the wall with silicone sealant. Carefully connect the ribbon cable Carefully connect the ribbon cable Attach the front cover to the shower Attach the front cover to the shower © 2015 AKW © 2015 AKW 14-019-002-08 13-012-085-13... -
Page 20: Water Requirements
Note: If the stated flow rates are not available, it may not be possible to achieve optimum performance from the unit throughout the year. Note: If the Pressure Relief Device fails, then call the installer in first instance as there may be a dynamic pressure problem. © 2015 AKW © 2015 AKW 14-019-002-08 13-012-085-13... -
Page 21: Plumbing Connections
DO NOT fit any form of outlet flow control to the water heater. DO NOT use excessive force when making connections to the water supply inlet, the flexible hose or the spray head. © 2015 AKW © 2015 AKW 14-019-002-08... -
Page 22: Plumbing Entry Points
Left or right side top inlet entry. Use blanking plug plug for the side which is not used. for the side which is not used. Note - Some water from the factory testing may escape when the blanking plugs are removed. © 2015 AKW © 2015 AKW 14-019-002-08 13-012-085-13... -
Page 23: Check List
Place absorbent material around the inlet areas in case of leaks. Checked that there are no leaks Turn off the supply, dry off any water in and around the appliance before connecting or reinstating the electricity. © 2015 AKW © 2015 AKW 14-019-002-08 13-012-085-13... -
Page 24: Electrical Requirements
A 30mA residual current device (RCD) MUST be installed in all UK electric and pumped shower circuits. This may be part of the consumer unit or a separate RCD unit. This appliance must be earthed. © 2015 AKW © 2015 AKW 14-019-002-08... - Page 25 Where shower cubicles are located outside of a bathroom, all socket outlets in the room must be protected by a 30mA RCD. Consult the wiring regulations. It is recommended to use the shortest cable route possible from the consumer unit to the shower. © 2015 AKW © 2015 AKW 14-019-002-08...
-
Page 26: Electrical Entry Points
Note: Depending on cable size and entry point used, it may be necessary to strip back the outer cable sheath sufficiently to allow cables to be directed to the terminal connection block within the unit. © 2015 AKW © 2015 AKW... -
Page 27: Connecting Waste Pump
The current carrying capacity of the cable must be at least that of the shower circuit protection. Trim and replace the pipe and cable entry covers. DO NOT connect any other fittings to this shower. DO NOT use silicone sealant to seal the shower appliance to the wall. © 2015 AKW © 2015 AKW 14-019-002-08 13-012-085-13... - Page 28 Put into cold water flush mode. To do this, refer to the dip switch mode settings on page 29. Once the shower is flushed and primed, reset the dip switch back to STD position. The Dipswitch is located on the inside of the cover © 2015 AKW 14-019-002-08...
- Page 29 This will prime the heater it off. tank. © 2015 AKW © 2015 AKW 14-019-002-08 13-012-085-13...
-
Page 30: Commissioning
Press the Power button to revert to standby mode It is important to complete the installation and record the commissioning tests to provide a performance reference point for future tests. © 2015 AKW 14-019-002-08... -
Page 31: Commissioning Tests
© 2015 AKW 13-012-085-13 © 2015 AKW © 2015 AKW... -
Page 32: Troubleshooting For Engineers
Check the hose and shower handset. If the filter is suspected to be blocked, clean it. If which could cause unsafe temperatures within the unit, the device will disconnect the heating elements and switch off the the problem still persists, contact AKW Technical Enquiries. shower. The flow and the over temp LED will then flash. - Page 33 -Blank Page- © 2015 AKW © 2015 AKW 14-019-002-08 13-012-085-13...
- Page 34 -Blank Page- © 2015 AKW © 2015 AKW 14-019-002-08 13-012-085-13...
- Page 35 -Blank Page- © 2015 AKW © 2015 AKW 14-019-002-08 13-012-085-13...
-
Page 36: Contact Us
01905 560219 technicalenquiries@akw-ltd.co.uk 01905 823297 Website www.akw-ltd.co.uk Quotes & Orders Email orders@akw-ltd.co.uk Sales & Enquiries Email sales@akw-ltd.co.uk AKW, Pointon Way, Hampton Lovett, Droitwich Spa, WR9 0LR Social facebook.com/akwstyleability twitter.com/akwinstallers youtube.com/akwstyleability linkedin.com/company/akw As part of our continuous improvement programme we appreciate any feedback on our products and instructions.
Need help?
Do you have a question about the Itherm and is the answer not in the manual?
Questions and answers