Table of Contents
Advertisement
Quick Links
World HQ
US Office
Neocom Software
Neocom Software
8th Line 29, Vasilyevsky Ostrov
15200 Jog Road, Suite 202
St. Petersburg, 199004, Russia
Delray Beach, FL 33446, USA
Radio-over-IP Gateway
TRBOnet Swift A200
Internet
Telephone
EMEA: +44 203 608 0598
Email: info@trbonet.com
Americas: +1 872 222 8726
WWW.TRBONET.COM
APAC: +61 28 6078325
User Manual
Advertisement
Table of Contents

Related Manuals for TRBOnet Swift A200


Summary of Contents for TRBOnet Swift A200
-
Page 1: User Manual
Radio-over-IP Gateway TRBOnet Swift A200 User Manual World HQ US Office Internet Telephone Neocom Software Neocom Software EMEA: +44 203 608 0598 8th Line 29, Vasilyevsky Ostrov 15200 Jog Road, Suite 202 Email: info@trbonet.com Americas: +1 872 222 8726 St. Petersburg, 199004, Russia Delray Beach, FL 33446, USA WWW.TRBONET.COM... -
Page 2: Legal Notices
Neocom Software, Ltd offers no warranties, express or implied, in this document. Neocom and the Neocom logo, TRBOnet and the TRBOnet logo are either registered trademarks or trademarks of Neocom Software, Ltd. MOTOROLA, MOTO, MOTOROLA SOLUTIONS and the Stylized M logo are trademarks or registered trademarks of Motorola Trademark Holdings, LLC. -
Page 3: Table Of Contents
Configuring the Radio ........................12 3.4. Configuring the Option Board ...................... 13 3.5. Connecting the Radio and the LAN..................... 14 3.6. Connecting Swift A200 to Power Supply .................. 14 3.6.1. DC Power Supply ......................... 14 3.6.2. AC Power Supply ......................... 15 3.6.3. -
Page 4: Introduction
The information in this document is intended for engineers responsible for building MOTOTRBO radio networks and programming two-way radios for end users. The document describes in detail how to connect, set up, and maintain the TRBOnet Swift A200 hardware radio-over-IP gateway. -
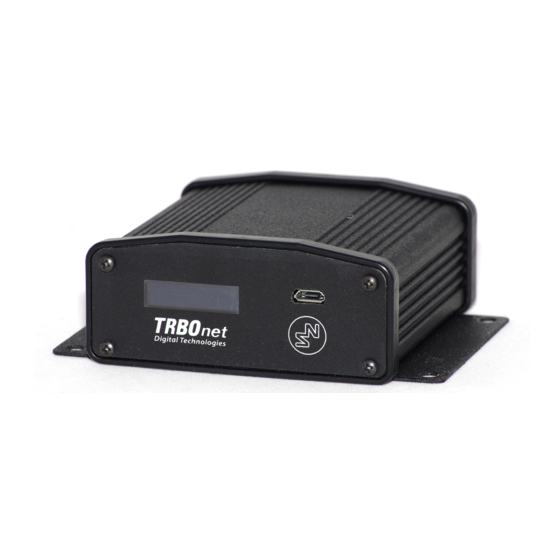
Page 5: About Swift A200
A gateway from a radio channel to an IP network A MOTOTRBO radio connected to Swift A200 can transfer voice and data to all connected TRBOnet Servers over IP. Swift A200 performs no encryption of the transferred voice and data traffic. -
Page 6: Delivery Kit
About Swift A200 2.3. Delivery Kit TRBOnet Swift A200 delivery kit includes accessories listed in Table 1. Table 1: TRBOnet Swift A200 delivery kit Item Description Quantity TRBOnet Swift A200 The radio-over-IP gateway unit with a factory-installed MicroSD card (4 Gb or more) and a CR1220 battery. -
Page 7: Panels
2. Audio In and Audio Out for an analog two-way radio (not supported). 3. Micro-Fit 3mm pitch connector for 12VDC supply and/or external hardware. 4. LAN port. 5. USB port for a MOTOTRBO radio. TRBOnet Swift A200 — User Manual... -
Page 8: Connectors
2. Input (IN7) 8. Output (OUT7) 3. Input/output (IO6) 9. Input/output (IO5) 4. Input/output (IO4) 10. Input/output (IO3) 5. Input/output (IO2) 11. Input/output (IO1) 6. UART input, 5V (RX) 12. UART output, 5V (TX) TRBOnet Swift A200 — User Manual... -
Page 9: Led Indication
Flashing icon: The radio is not connected or powered off. Radio TX Radio RX IP connection Digit (next to the icon): The number of connected TRBOnet servers. Flashing icon: The IP network is not connected. Activity on the IP connection... -
Page 10: Acronyms
Global System for Mobile Communications Input/output Internet Protocol Local Area Network Light-emitting diode Media Access Control Mbit/s Megabit per second Millimeter Nordic RF OLED Organic LED Reception Transmit UART Universal Asynchronous Receiver/Transmitter Universal Serial Bus Volt TRBOnet Swift A200 — User Manual... -
Page 11: Setup And Connection
Setup and Connection 3. Setup and Connection To prepare your Swift A200 for operation, follow the steps in Table 5. Table 5: High-level steps to prepare Swift A200 for operation Step Refer to: Update the firmware and configure your 3.1. Configuring Swift A200 Swift A200. - Page 12 Device menu. In the Firmware update window, select your device and point the latest firmware version. Click Update. 5. To open the configuration of your Swift A200, click Read on the Device menu. In the Select device window, point your device. The configuration settings appear in a separate tab.
-
Page 13: Installing The Option Board
Note: It is important to specify the same NRF connection settings in the configuration of the option board installed in the radio (page 13). 8. To save the updated settings on your Swift A200, select Write on the Device menu. - Page 14 7. Assemble the control head seal on the radio. Assemble the control head to the radio chassis by aligning one side of the control head assembly tabs to one side of the radio chassis tabs and then rotate the control head assembly until the other side engages. TRBOnet Swift A200 — User Manual...
-
Page 15: Configuring The Radio
Figure 6: Enabling the use of the option board on the radio channels 6. Save the updated settings to the radio by clicking Write on the Device menu. 7. Close the application and disconnect the radio from the computer. TRBOnet Swift A200 — User Manual... -
Page 16: Configuring The Option Board
After you have installed the option board into a MOTOTRBO radio, update the firmware of the option board to the latest version. If the wireless connection between Swift A200 and the radio is required, configure the NRF settings of the option board. -
Page 17: Connecting The Radio And The Lan
When all configuration settings have been updated, connect your Swift A200 to the local IP network. The LAN port is located on the rear panel of Swift A200. If the radio and Swift A200 have identical NRF settings (data transfer rate and channel), the wireless connection is established automatically as soon as both devices are powered up. -
Page 18: Ac Power Supply
To connect your Swift A200 to a DC power source: 1. Insert the Micro-Fit plug into the I/O jack on the rear panel of Swift A200. 2. Connect the other end of the red wire to terminal (+) and the black wire to terminal (-) of a DC power unit. -
Page 19: Maintenance
Maintenance Icons IP connection and USB connection to the radio (or Wireless connection to the radio) are steady, indicating the respective connection detected by Swift A200. Power up the connected radio. The Radio connection icon stops flashing, which means Swift A200 has detected the connected radio. -
Page 20: Memory Card Replacement
4.2. Memory Card Replacement Swift A200 is equipped with a 4 Gb microSD memory card. If necessary, you can replace the memory card as described below. To replace the memory card: 1. Disconnect the unit from the power supply.
Need help?
Do you have a question about the Swift A200 and is the answer not in the manual?
Questions and answers