Advertisement
Quick Links
Advertisement

Related Manuals for Xtracycle LEAP


Summary of Contents for Xtracycle LEAP
- Page 1 L E A P A S S E M B L Y M A N U A L Rev 1A...
- Page 2 Congratulations on purchasing an Xtracycle Leap DIY Cargo Bike Kit, and being one of the visionaries using the Leap to create your dream cargo- or passenger hauling bicycle. This guide well help you set up the Leap on your bicycle safely and easily.
- Page 3 For Attaching the LEAP: Bicycle Inspection • Metric open-end or Before undertaking the LEAP box wrenches: 10, 17mm conversion, check to make sure that • Metric allen wrenches: 3, 4, 5, 6mm your bicycle is in good working order. • Cable + housing cutters Make sure that the frame is sound and •...
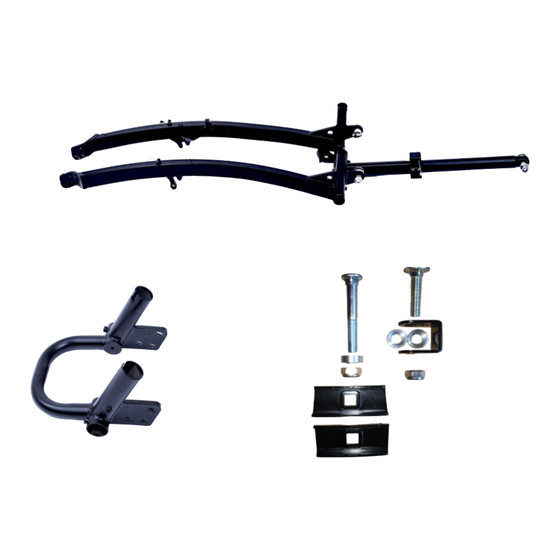
- Page 4 Install chainstay clamping plates 1B: Once you have decided on proper placement, assemble the clamping hardware on the longer 1A: Decide where you are going to place the extension tube clamping M10 carriage bolt as shown. plates on the chainstays. 1C: Install the chainstay clamping plates with the wider side facing the rear dropouts.
- Page 5 Assemble Leap Frame 2C: Insert the dropout fixing bolts into the holes on the Leap frame, with the dome nuts and lock washers facing outwards, and the dropout spacer on the inside of the frame. Note: There are two mounting positions for the dropout fixing bolts on the Leap frame.
- Page 6 Install dropout fixing bolts 3A: Attach the Leap frame to the bike frame, by inserting the dropout fixing bolts into the rear Dropout dropouts of the bicycle as shown. Carriage Bolt The curved side of the dropout insertion tab needs to be placed into the dropout.
- Page 7 Cont’d: Install dropout fixing bolts 3D: Remove and re-assemble the shorter M10 carriage bolt on the extension tube bracket. • Insert the cupped spacers between the extension tube and the inside of the extension tube bracket. The cups should face outwards. •...
- Page 8 • Pull tight and clamp with the M5 bolt. • Cut off excess cable and crimp on a cable end cap. Assemble Rest of LEAP Frame 5A 5B 5A: Install the rear wheel in the Leap Frame. 5B: Attach the...
- Page 9 5D: Install V-Racks 5C: Prep the V-Racks and RackLocks now. See the U-Tube LT2 Assembly Guide for • Insert the V-Racks into the Leap Frame • Grease the M4 bolts on the RackLocks, more information. and check that they are fully seated.
- Page 10 • The derailleur housing should be run under the forward bar of the Leap 160mm rotor work. Also, with cargo bikes, your braking frame to avoid interference with the chain. There is a welded-on cable guide needs increase significantly and thus it is highly for the derailleur cable ahead of the dropout.
- Page 11 Cont’d: Re-Assemble Drivetrain and Rear Brake 6D: If you are using the Chain Roller (recommend for protecting your LEAP frame and riding off-road), now is a good time to install it. 6E: Then, install the chain, using the chain extension and included master links to extend it, if present.
- Page 12 Cont’d: Install remaining accessories 7E: Once all bolts are installed, tighten the 7C: The holes at either end of the deck use 7D: Thread the shorter 15mm bolts into bolts to 3-4Nm. the longer M5x35mm bolts. the V-Rack bosses under the middle mounting holes.
- Page 13 Xtracycle. • Before hauling your first big load, test ride your bike in a safe, car-free area to check brakes, shifting, and the Leap attachment points. • Use caution on your first few rides with a load--it’ll take some time to get used to how the new bike handles, but you’ll soon get the...
Need help?
Do you have a question about the LEAP and is the answer not in the manual?
Questions and answers