Table of Contents
Advertisement
Quick Links
INSTRUCTIONS FOR
1600W 115V
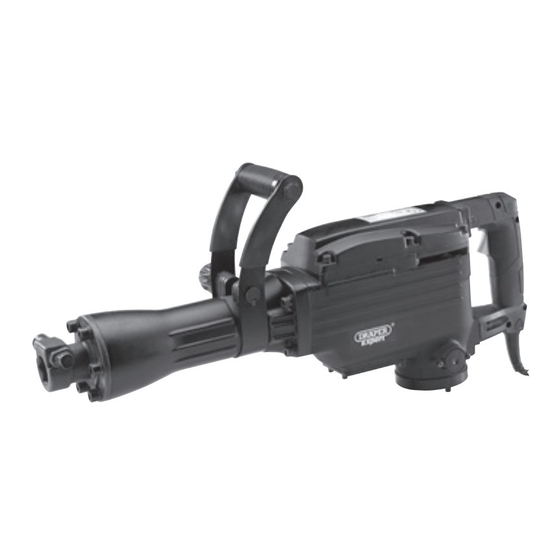
15kg Breaker
Stock No.17768
Part No.BR15A
IMPORTANT: PLEASE READ THESE INSTRUCTIONS CAREFULLY TO ENSURE THE SAFE AND
EFFECTIVE USE OF THIS PRODUCT.
GENERAL INFORMATION
These instructions accompanying the product are the original instructions. This document is part of the product, keep it
for the life of the product passing it on to any subsequent holder of the product. Read all these instructions before
assembling, operating or maintaining this product.
This manual has been compiled by Draper Tools describing the purpose for which the product has been designed, and
contains all the necessary information to ensure its correct and safe use. By following all the general safety instructions
contained in this manual, it will ensure both product and operator safety, together with longer life of the product itself.
AlI photographs and drawings in this manual are supplied by Draper Tools to help illustrate the operation of the product.
Whilst every effort has been made to ensure the accuracy of information contained in this manual, the Draper Tools
policy of continuous improvement determines the right to make modifications without prior warning.
Advertisement
Table of Contents

Subscribe to Our Youtube Channel
Related Manuals for Draper BR15A


Summary of Contents for Draper BR15A
-
Page 1: General Information
AlI photographs and drawings in this manual are supplied by Draper Tools to help illustrate the operation of the product. -
Page 2: Title Page
Commercial copying, redistribution, hiring or lending is prohibited. No part of this publication may be stored in a retrieval system or transmitted in any other form or means without written permission from Draper Tools Limited. In all cases this copyright notice must remain intact. -
Page 3: Table Of Contents
CONTENTS 2.1 CONTENTS Page content Page TITLE PAGE INTRODUCTION ....................2 REVISION HISTORY................... 2 UNDERSTANDING THIS MANUAL ..............2 COPYRIGHT NOTICE ..................2 CONTENTS CONTENTS ......................3 GUARANTEE GUARANTEE ..................... 4 INTRODUCTION SCOPE........................ 5 SPECIFICATION ....................5 HANDLING & STORAGE ................... 5 HEALTH &... -
Page 4: Guarantee
This guarantee applies in lieu of any other guarantee expressed or implied and variations of its terms are not authorised. Your Draper guarantee is not effective unless you can produce upon request a dated receipt or invoice to verify your proof of purchase within the 24 month period. -
Page 5: Introduction
4.1 SCOPE This machine is designed for heavy duty demolition and chiselling work using the appropriate chisel. 4.2 SPECIFICATION Stock no..........................17768 Part no..........................BR15A Voltage ..........................115V Impact energy......................45 Joules Impact rate .........................2000r/min Chisel size.......................... 29mm Sound pressure level ....................98.6dB(A) Sound power level ...................... -
Page 6: Health & Safety Information
IMPORTANT: Draper Tools Limited recommends that this machine should not be modified or used for any application other than that for which it was designed. If you are unsure of its relative applications do not hesitate to contact us in writing and we will advise you. -
Page 7: Connection To The Power Supply
HEALTH & SAFETY INFORMATION 20. CHECK DAMAGED PARTS: Before further use of the tool, a guard or other part that is damaged should be carefully checked to determine that it will operate properly and perform its intended function. Check for alignment of moving parts, free running of moving parts, breakage of parts, mounting and any other conditions that may affect its operation. -
Page 8: Technical Description
TECHNICAL DESCRIPTION 6.1 IDENTIFICATION Tool chuck Trigger switch Locking bolt 110V 3-pin plug Lock for auxiliary handle Insulated auxiliary handle Handle Inspection window / Oil filler opening... -
Page 9: Unpacking & Checking
Lay the contents out and check them against the parts shown below. If any part is damaged or missing; please contact the Draper Helpline (the telephone number appears on the Title page) and do not attempt to use the tool. -
Page 10: Preparing The Breaker
PREPARING THE BREAKER NOTE: Before you connect the equipment to the mains supply make sure that the data on the rating plate are identical to the mains data. Remove the plug from the socket before carrying out adjustment, servicing or maintenance. 8.1 AUXILIARY HANDLE - FIGS. -
Page 11: Check The Oil Level
PREPARING THE BREAKER 8.3 CHECK THE OIL LEVEL - FIG. 4 Check the oil level before using the machine. Place the machine on the floor with the tool mounting pointing downwards. The oil must be at least 3 mm above the bottom edge of the inspection window FIG.4... -
Page 12: Operating Instructions
OPERATING INSTRUCTIONS IMPORTANT: Make sure that the mains voltage matches the voltage stated on the machines rating plate. 9.1 SWITCH OPERATION - FIG. 5 The trigger switch on this tool is fitted with a locking device, , allowing the tool to be operated for longer periods of time without interruptions. -
Page 13: Maintenance
10. MAINTENANCE Always pull out the mains power plug before starting any cleaning work. 10.1 CLEANING • Keep all safety devices, air vents and the motor housing free of dirt and dust as far as possible. Wipe the equipment with a clean cloth or blow it with compressed air at low pressure. -
Page 14: Oil Change
10. MAINTENANCE 10.4 OIL CHANGE - FIG. 7 Switch off the machine and pull the mains plug out of the socket. Undo the hexagonal head screw with the inspection window using the wrench and drain the oil. To prevent the oil from running out in an uncontrolled manner, hold a small metal chute under the opening and collect the oil in a vessel until it has fully drained out of the machine. -
Page 15: Explanation Of Symbols
11. EXPLANATION OF SYMBOLS 11.1 EXPLANATION OF SYMBOLS WEEE Do not dispose of Waste Class II construction Electrical & Electronic Equipment (Double insulated). in with domestic rubbish Warning! Single value noise marking. Read the instruction manual (maximum declared A-Weighted sound power level in decibels). -
Page 16: Disposal
12. DISPOSAL 12.1 DISPOSAL - At the end of the machine’s working life, or when it can no longer be repaired, ensure that it is disposed of according to national regulations. - Contact your local authority for details of collection schemes in your area. In all circumstances: •... - Page 17 NOTES...
- Page 18 NOTES...
- Page 19 NOTES...
- Page 20 - Sales Desk: (023) 8049 4333 - General Enquiries: (023) 8026 6355 - Service/Warranty Repair Agent For aftersales servicing or warranty repairs, please contact the Draper Tools Helpline for details of an agent in your local area. YOUR DRAPER STOCKIST RDDH0516...
Need help?
Do you have a question about the BR15A and is the answer not in the manual?
Questions and answers