Table of Contents
Advertisement
EasiLED 4 DMX Controller
100
80
60
40
20
0
SPOT 1
DMX OUTPUT
1 = Ground
2 = Data -
3 = Data +
1
2
3
User Manual
100
100
80
80
60
60
40
40
20
20
0
0
SPOT 2
SPOT 3
1
1
SPOT 1
CHANNEL MODE:
17
4
SPOT 2
1: RGB
2: RGBD
3: RGBW 4: RGBWD
33
7
SPOT 3
5: DRGB 6: DRGBW
49
10
SPOT 4
1 2 3 4 5 6
Order code: LEDJ323
CHASES
4
3
5
2
6
1
7
12
8
11
10 9
FADER/
PRESET
USER/
BANK
4
3
5
2
6
1
7
12
8
11
10 9
FADE/SOUND SENS
SCENES
SAVE/DELETE
SPOT 4
EasiLED 4
www.prolight.co.uk
AUDIO INPUT
LINE/MIC
EasiLED 4
0%
100%
BLACKOUT
MASTER
TAP/TEMPO
0%
100%
SPEED
AUTO
0%
100%
SOUND
STROBE
0%
100%
STROBE
SPEED
DC INPUT
POWER
DC 9V-12V
300mA min
I
O
Advertisement
Table of Contents

Subscribe to Our Youtube Channel
Related Manuals for Ledj EasiLED 4


Summary of Contents for Ledj EasiLED 4
- Page 1 EasiLED 4 DMX Controller User Manual EasiLED 4 CHASES 10 9 100% BLACKOUT MASTER FADER/ PRESET TAP/TEMPO USER/ 100% BANK SPEED AUTO 10 9 100% FADE/SOUND SENS SOUND SCENES STROBE SAVE/DELETE 100% STROBE SPEED SPOT 1 SPOT 2 SPOT 3...
-
Page 2: Safety Advice
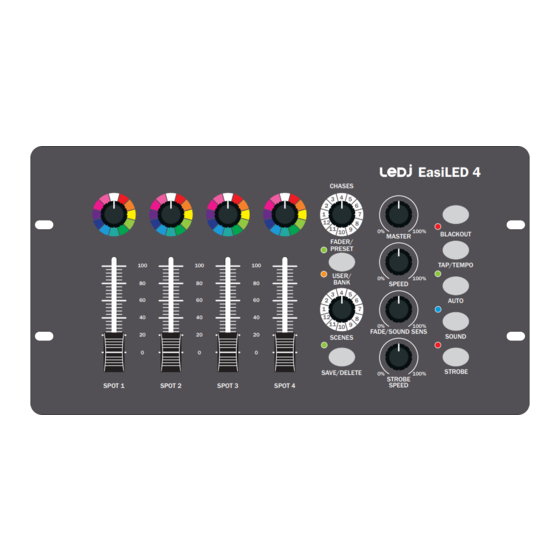
• Repairs, servicing and power connection must only be equipment is not in use or before cleaning! Only handle carried out by a qualified technician. THIS UNIT CONTAINS the power-cable by the plug. Never pull out the plug by NO USER SERVICEABLE PARTS. pulling the power-cable. • This fixture is for professional use only - it is not designed • Make sure that the available mains supply voltage is for or suitable for household use. The product must be between 100~240V AC, 50/60Hz. installed by a qualified technician in accordance with local territory regulations. The safety of the installation is the • Make sure that the power cable is never crimped or responsibility of the installer. The fixture presents risks of damaged. Check the equipment and the power cable severe injury or death due to fire hazards, electric shock periodically. and falls. • If the equipment is dropped or damaged, disconnect the • WARRANTY: One year from date of purchase. mains power supply immediately and have a qualified engineer inspect the equipment before operating again. OPERATING DETERMINATIONS If this equipment is operated in any other way, than those described in this manual, the product may suffer damage and the warranty becomes void. Incorrect operation may lead to danger e.g: short-circuit, burns and electric shocks etc. Do not endanger your own safety and the safety of others! Incorrect installation or use can cause serious damage to people and/or property. www.prolight.co.uk EasiLED 4 DMX Controller User Manual... - Page 3 02 - Fixture dimmer controls 11 - Blackout button 20 - Audio Input 03 - Chase selector (12 settings) 12 - TAP/Tempo button 21 - DC power input (centre +ve) 04 - Preset/User bank selector 13 - Auto mode button 22 - Power on/off switch 05 - Scene selector (12 settings) 14 - S ound mode button 06 - Save/Delete button 15 - Strobe button In the box: 1 x controller, 07 - Master dimmer 16 - 3-Pin DMX output 1 x power adaptor 08 - Speed control 17 - DMX start address & 1 x user manual 09 - Fade time control 18 - DMX channel selection www.prolight.co.uk EasiLED 4 DMX Controller User Manual...
-
Page 4: Initial Setup
3 = Data + SPOT 3 www.prolight.co.uk DC INPUT 5: DRGB 6: DRGBW POWER SPOT 4 AUDIO INPUT DC 9V-12V 1 2 3 4 5 6 300mA min LINE/MIC DMX address: 001 DMX address: 004 DMX address: 007 DMX address: 010 www.prolight.co.uk EasiLED 4 DMX Controller User Manual... - Page 5 Music or Fader/Preset & User/Bank buttons to switch between each user mode. The LED indicators will illuminate next to each of the buttons to confirm the user mode selected. The Manual mode is indicated by the fader/preset green LED. After power on, the controller will restart in the last used mode assuming the last used mode was active for 10 seconds or more. Please note: In all modes, the blackout button may be pressed to turn off the light output. The red LED next to blackout button will flash to indicate blackout is active. Blackout will operate regardless of the fixture/group selection. Manual mode: Manual Mode can be used for selection of colours either for ad hoc scenes or for creating scenes before recording into saved scenes or chases. Switch the controller to Manual Mode (indicated by Green LED by the Fader/Preset button) and follow the steps listed below: - Set the colours of the fixtures/groups using the rotary selectors - Adjust the intensity (brightness) of the fixtures/groups using Faders 1-4 ensuring the master dimmer is also active. - Turn the fade time control anti-clockwise to “0” for instant colour changes or rotate clockwise to in crease the fade time between colours. Saving scenes: After setting the scene as per the Manual Mode instructions you can save the scene and at the same time save the scene as a single step in the selected chase (1 to 12). Select the Chase and Scene then press the “Save/Delete” button, the green LED will flash quickly three times to confirm. Deleting scenes: After setting the scene as per the Manual Mode. Select the Chase and Scene then press and hold the “Save/Delete” button, all of the LEDs on the controller will flash to confirm. Scene playback: Press the Fader/Preset button to illuminate the orange LED confirming the controller is now in User/ Bank mode. Select the chase and then scene required. Scene playback may be manually advanced by selecting scenes individually using the rotary Scene selector, or they may be advanced by either Sound or Auto modes. www.prolight.co.uk EasiLED 4 DMX Controller User Manual...
- Page 6 07) Master dimmer: Active in all modes, the master dimmer control can be used to adjust the intensity of all fixtures connected to the controller. 08) Speed control: The speed control can be used to adjust the chase speed when the controller is in Auto mode. Turn clockwise to increase the chase speed. 09) Fade time control: Active in all modes, the Fade Time control can be used to adjust fade time between all functions on the controller including manual colour selections. For instant changes the fade time must be turned fully to the left (anti-clockwise). 10) Strobe speed control: The Strobe Speed Control can be preselected ahead of Strobe Mode activation. Turn clockwise to increase the strobe frequency. 11) Blackout button: Press the Blackout button to activate blackout for all fixtures controlled by the EasiLED 4 controller. While activated, Blackout mode will be confirmed by a red LED flashing next to the button. 12) TAP/Tempo button: The TAP/Tempo control allows the user to select the playback speed for chases in time. While in Auto mode, press the TAP/Tempo button a minimum of three times to set the desired playback speed. www.prolight.co.uk EasiLED 4 DMX Controller User Manual...
- Page 7 Dimmer channel they can be addressed with sufficient spacing between the fixtures to account for the extra channels (001, 017, 033 and 049). 18) DMX channel selection: The controller can be used to control up to four fixtures from RGB through to RGBW+Dimmer. Slide the switch to the position suit the fixtures being used. Please note: To operate correctly, all fixtures should share the same DMX channel allocation. 19) Internal microphone/external audio select: The controller can be triggered either via the internal microphone or from an external line level audio source. 20) Audio input: Unbalanced 6.35mm (1/4”) jack socket for line level audio input. 21) DC power input (centre +ve): Centre positive type connection. 9-12VDC, 300mA minimum regulated type. 22) Power on/off switch: Use this switch to power the controller on/off. www.prolight.co.uk EasiLED 4 DMX Controller User Manual...
-
Page 8: Dmx Setup
DATA cable (DMX cable) requirements (for DMX operation): This fixture can be controlled via DMX-512 protocol. The DMX address is set on the back of the unit. Your unit and your DMX controller require a standard 3-pin XLR connector for data input/output, see image below. Further DMX cables can be purchased from all good sound and lighting suppliers or Pro Light Concepts dealers. Please quote: CABL10 – 2m CABL11 – 5m CABL12 – 10m Note: DMX cable must be daisy chained and cannot be split. www.prolight.co.uk EasiLED 4 DMX Controller User Manual... -
Page 9: Line Termination
3-pin XLR (socket) Pin 1: GND (screen) Pin 1: GND (screen) Pin 2: Signal (-) Pin 2: Signal (-) Pin 3: Signal (+) Pin 3: Signal (+) Pin 4: N/C Pin 5: N/C www.prolight.co.uk EasiLED 4 DMX Controller User Manual... -
Page 10: Weee Notice
WEEE notice Correct Disposal of this Product (Waste Electrical & Electronic Equipment) (Applicable in the European Union and other European countries with separate collection systems) This marking shown on the product or its literature, indicates that it should not be disposed with other household wastes at the end of its working life. To prevent possible harm to the environment or human health from uncontrolled waste disposal, please separate this from other types of wastes and recycle it responsibly to promote the sustainable reuse of material resources. Household users should contact either the retailer where they purchased this product, or their local government office, for details of where and how they can take this item for environmentally safe recycling. Business users should contact their supplier and check the terms and conditions of the purchase contract. This product should not be mixed with other commercial wastes for disposal. www.prolight.co.uk EasiLED 4 DMX Controller User Manual... - Page 11 EasiLED 4 DMX Controller User Manual...
- Page 12 EasiLED 4 DMX Controller User Manual...
Need help?
Do you have a question about the EasiLED 4 and is the answer not in the manual?
Questions and answers