Bowflex TREADCLIMBER TC200 Assembly & Owners Manual
Hide thumbs
Also See for TREADCLIMBER TC200:
- User manual ,
- Troubleshooting manual (8 pages) ,
- Quick start manual (2 pages)

Related Manuals for Bowflex TREADCLIMBER TC200


Summary of Contents for Bowflex TREADCLIMBER TC200
- Page 1 TC200 TC200 A SSE MB LY / O W NE R’ S M AN UAL A SSE MB LY / O W NE R’ S M AN UAL Manual en Español Latino Americano: www.support.nautilus.com...
-
Page 2: Table Of Contents
You’re about to experience an incredible workout that can help you lose weight and reshape your entire body so you’ll look and feel better than ever before. We thank you for trusting in the Bowflex brand. We’re so confident in your purchase that we guarantee results. If you don’t see results in the first six weeks, you can get your money back (less shipping and handling) –... -
Page 3: Important Safety Instructions
Important Safety Instructions When using an electrical appliance, basic precautions should always be followed, including the following: This icon means a potentially hazardous situation which, if not avoided, could result in death or serious injury. Obey the following warnings: Read and understand all Warnings on this machine. Carefully read and understand the Assembly/Owner’s Manual. - Page 4 Before using this equipment, obey the following warnings: Read and understand the complete Owner's Manual. Keep the Owner’s Manual for future reference. Important Safety Instructions Read and understand all Warnings on this machine. If at any time the Warning stickers become loose, unreadable or dislodged, contact Nautilus Customer Service for replacement stickers.
- Page 5 • The electrical wiring for the residence in which the machine will be used must obey the applicable local and provincial requirements. • Exercise on this machine requires coordination and balance. Be sure to anticipate that changes in speed, the angle of Walking Decks, and resistance level can occur during workouts, and be attentive in order to avoid loss of balance and possible injury.
-
Page 6: Safety Warning Labels And Serial Number
Safety Warning Labels and Serial Number CAUTION Risk of Injury to Persons - To Avoid injury, use extreme caution when stepping onto or off of a moving belt. Read instruction manual before using. WARNING! • Prior to use, read and understand the Owner’s Manual, including all Warnings. -
Page 7: Grounding Instructions
Grounding Instructions This product must be electrically grounded. If a malfunction occurs, correct grounding decreases the risk of electric shock. The power cord is equipped with an equipment-grounding conductor, and must be connected to an outlet that is properly installed and grounded. Safety Warning Labels and Serial Number The electrical wiring must comply with all applicable local and provincial standards and requirements. -
Page 8: Specifications / Before Assembly
Machine Mat The Bowflex™ TreadClimber™ Machine Mat is an optional accessory that helps keep your workout area clear and adds a layer of protection to your floor. The rubber machine mat provides a non-slip, rubber surface which limits static discharge and reduces the possibility of display errors. If possible, put your Bowflex™... -
Page 9: Parts
Parts ( 2 BOXES ) Box 1 Item Description Item Description Handlebar Assembly Upright, Left Console Assembly Upright, Right Rear Cover Base Assembly Pivot Cover Heart Rate Strap Side Cover, Right Safety Key Side Cover, Left Transport Handle Hardware Card Shock Document Kit Motor Cover... -
Page 10: Hardware / Tools
Hardware / Tools Hardware Item Description Item Description Hex Head Screw, M8x20 Black Button Head Hex Screw, M8x20 Black Lock Washer, M8x14 Black Flat Washer, M8x18 Black Flat Washer, M8x24 Black Phillips Head Screw, Self Tapping M4x16 Black Button Head Hex Screw, M8x20 Phillips Head Screw, M4x10 Black Lock Washer, M8x14 Flat Washer, M4x10 Black... -
Page 11: Assembly
Assembly Some components of the machine can be heavy or awkward. Use a second person when doing the assembly steps involving these parts. Do not do steps that involve heavy lifting or awkward movements on your own. 1. Cut open the end of Box 2 and move the Treadle Assembly into your fitness area DO NOT CUT the Shipping Strap or Shipping Zip-Tie on the Treadle Assembly until instructed. - Page 12 2. Attach the Transport Handle and Release the Pull Cable from the Back of the Base Assembly Note: Hardware is pre-installed and not on Hardware Card (*). Do not fully tighten until all hardware has been installed. Place the Pull Cable forward along the inside of the Base Assembly.
- Page 13 3. Place the Treadle Assembly on the Base Assembly, Cut and Remove the Shipping Strap (*), and then Secure to the Base Assembly Note: Be sure not to pinch the Pull Cable when placing the Treadle Assembly. 13 mm Assembly / Owner’s Manual...
-
Page 14: Base Assembly
4. Attach the Pull Cable to the Lower Input/Output Cable and Route It through the Right Side of the Base Assembly Note: Be sure to route the cable through the side opening of the Base Assembly. Do not crimp the Lower I/O Cable. * Treadles removed for clarity. - Page 15 5. Route the Lower I/O Cable through the Right Upright Note: Do not crimp the I/O Cable. Assembly / Owner’s Manual...
- Page 16 6. Attach the Uprights to the Base Assembly Note: Do not crimp the I/O Cables. This step may require two people. Do not fully tighten until all hardware has been installed. In order to avoid possible serious injury, when inserting the tube ends onto the Base Assembly be careful to avoid fingers or hands being caught or pinched.
- Page 17 7. Connect the Cables and Attach the Console Assembly to the Handlebar Assembly Note: Do not crimp the Cables. Place a clean towel or blanket under the Console Assembly to protect it. In order to avoid possible serious injury, when inserting the tube ends into the Console Assembly be careful to avoid fingers or hands being caught or pinched.
- Page 18 8. Attach the Console / Handlebar Assembly to the Uprights In order to avoid possible serious injury, when inserting the tube ends onto the Uprights be careful to avoid fingers or hands being caught or pinched. Be sure the excess length of the I/O Cable goes into the Upright and does not get crimped. Note: Do not crimp the Cables.
- Page 19 9. Attach the Shocks to Uprights and then Treadles Note: The settings decal on the Shocks must be up, with the arrows facing to the rear of the machine. Attach to Uprights before the Treadles. The Treadles do not have a locking mechanism and can move freely. Take care not to allow harm or injury to occur when lifting the Treadles.
- Page 20 10. Attach the Motor Cover to the Base Assembly Note: Be sure the safety tabs on the Motor Cover snap onto the Base Assembly. Assembly / Owner’s Manual...
- Page 21 11. Attach the Side Covers to the Treadle Assembly Note: Do not fully tighten until all hardware has been installed. Assembly / Owner’s Manual...
- Page 22 12. Attach the Pivot Covers to the Treadle Assembly Note: Do not fully tighten until all hardware has been installed. Assembly / Owner’s Manual...
- Page 23 13. Pivot the Rear Cover onto the Treadle Assembly and Install the Hardware Note: Be sure the safety tabs on the upper-inside of the Rear Cover snap onto the Base Assembly. Assembly / Owner’s Manual...
- Page 24 14. Cut the Shipping Zip-Tie from between the Treadles Assembly / Owner’s Manual...
- Page 25 15. Connect Power Cord to Treadle Assembly Note: The TC200 TreadClimber fitness machine is designed to plug directly into a properly wired and grounded three prong 120V outlet. ® If you connect the machine to an outlet with GFI (ground fault interrupt) or AFCI (arc fault circuit interrupt), machine operation can cause the circuit to trip.
-
Page 26: Moving Your Machine
Adjustments Moving Your Machine The TreadClimber fitness machine weighs approximately 202 lbs (91.6 kg) when fully assembled and requires caution when being moved. Use the ® Transport Handle found under the front of the machine to move it. To get access to the Transport Handle, turn the Levelers until you have sufficient clearance between the machine and floor. -
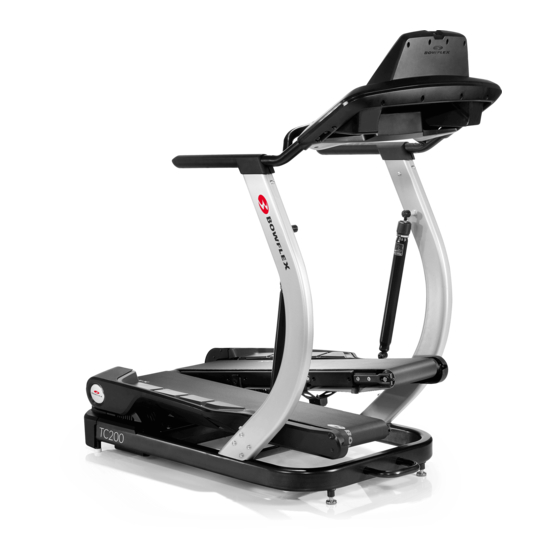
Page 27: Features
Features USB Port Media Tray Safety Key Port Console Contact heart Rate Sensors Bottle Holder Handlebars Walking Belt Adjustment Bolt Easy Step Shock ™ Treadle Transport Handle Walking Belt Guide Leveler Walking Belt Side Foot Support Platform Transport Wheel Power Switch Assembly / Owner’s Manual... - Page 28 Console Active User display ENTER USER Program buttons Just Walk Calorie Goal Time Goal Distance Goal Interval PROGRAMS Zone Indicator Light STOP Quick Speed buttons START Speed buttons PAUSE User button Push to change the selected Active User. Active User display The Active User display shows the currently selected User Profi le.
-
Page 29: Console Display
STOP/PAUSE button Push to pause a workout, exit the User Profile or Machine Settings mode, or end a paused workout. Speed buttons (Increase and Decrease) Push to change the speed of the belts by 0.1 mph/kph increments, push and hold to quickly change the belt speed. Quick Speed buttons (Increase and Decrease) Push to change the speed of the belts by 0.5 mph/kph increments, push and hold to quickly change the belt speed. - Page 30 Heart Rate display The Heart Rate display shows your heart beats per minute. The heart icon will flash when acquiring the rate. With a stable reading, the icon will be shown as solid. The heart rate displayed is an approximation and should be used for reference only. Heart Rate Zone During a workout, the Heart Rate Zone displays the current Heart Rate Zone for the User.
- Page 31 Software Fitness App “Bowflex TreadClimber™” The “Bowflex TreadClimber™” Software App syncs with your fitness machine to track total time, calories burned, and distance, while saving every workout for quick reference. Plus, it automatically syncs your workout data to Bowflex Connect™ and MyFitnessPal to make hitting your daily calo- ®...
- Page 32 Smart device to import workout results to Bowflex Connect™: ® 1. Sign in to Bowflex Connect™ to instantly sync your workout data with it. Once you have an account, your Workouts will be uploaded to Bowflex Connect™ immediately after a workout through your Bluetooth Smart device.
- Page 33 Easy Step™ Shocks Your TreadClimber machine uses Easy Step Shocks to absorb your steps and cushion your joints, decreasing your ™ ® overall fatigue and reducing muscle strain. The displacement of the Treadles is adjusted by the dials on the Easy Step ™...
-
Page 34: Chest Strap
Remote Heart Rate Monitor Monitoring your Heart Rate is one of the best procedures to control the intensity of your exercise. The Console reads the telemetry HR signals from the Heart Rate Chest Strap Transmitter that operates in the 4.5kHz - 5.5kHz range. - Page 35 • Movement of the upper body muscles (including arms) produces an electrical signal (muscle artifact) that can interfere with pulse detection. Slight hand movement while in contact with the sensors can also produce interference. • Calluses and hand lotion may act as an insulating layer to reduce the signal strength. •...
-
Page 36: Fitness Basics
® ® SelectTech dumbbells, and follow the Bowflex™ Body Weight Loss Guide that is included in this manual. ® Consistency Busy work schedules, family obligations and daily chores can make it difficult to fit regular exercise into your life. Try these tips to increase your chances of success: Schedule your workouts the same way you schedule meetings or appointments. - Page 37 Dynamic Knee Hug Stand with the feet together. Bring one knee forward and up toward the chest. Place the hands around the shin and pull the knee into the chest. Release the stretch by putting the foot on the floor. Each repetition of the sequence should take 1 to 3 seconds.
- Page 38 Dynamic Side Reach Stand with the feet apart, the knees slightly bent and the arms at the sides of the body. Reach with one hand above the head and lean over to the opposite side. Release the stretch by returning to the start position. Then reach with the other hand to the opposite side.
- Page 39 Afterburn Rate At the end of an intense Interval Training workout, your body will actually need to expend additional energy to replenish your body’s reserves. This additional amount of energy that your body will be using is the Afterburn Rate, or EPOC (Excess Post-exercise Oxygen Consumption). The level of this additional energy requirement for your body is directly related to many factors.
- Page 40 Workout Log Use this log to track your workouts and progress. Tracking your workouts helps you stay motivated and achieve your goals. Date Shock Distance Time Calories Average Setting Speed Easy Step Shock label ™ Shock Setting: (for reference only) Assembly / Owner’s Manual...
- Page 41 Cool-Down * When you are done using your TreadClimber fitness machine, consider doing these relaxing stretches, which will help your body recover from the ® workout and make you more flexible: Lying Leg Raise Lie on the floor face up with the legs slightly bent. Lift one leg up toward the ceiling, keeping the knee straight.
- Page 42 Dynamic Heel Drop Place the ball of one foot on the edge of a step or staircase. Place the other foot slightly in front. Lower the heel of the back foot as far as comfortably possible, keeping the knee straight. Release the stretch by lifting the heel as high as comfortably possible.
-
Page 43: Operations
Operations Before You Start 1. Place the TreadClimber fitness machine in your workout area. ® Place the machine on a clean, hard, level surface, free from unwanted material or other objects that may hamper your ability to move freely. A rubber mat can be used below the machine to prevent the release of static electricity and protect your flooring. The machine can be moved by one or more persons. -
Page 44: Power Up / Idle Mode
Power Up / Idle Mode The Console will enter Power Up mode when initially plugged into a power source and the On/Off button is switched to On. The belts will only move after a 3 second, audible beep countdown. Shut Off (Sleep Mode) If the Console does not receive any input for five minutes, it will automatically shut off. -
Page 45: Workout Programs
Edit User Profile 1. From the Power-Up Mode screen, push the User button to select one of the User Profiles. 2. Push and hold down the User button to edit the User Profile. 3. The Console display shows the Gender prompt and the current value. Push the Increase or Decrease buttons to change the displayed Gender value, and push the ENTER button to accept the displayed value. - Page 46 Time Goal (Default Goal : 30 minutes) At the start of a Time Goal workout, each segment of the Workout Segment Display represents 8 seconds. A segment is deactivated every 8 seconds during a workout. Note: The first segment deactivated during a workout may not represent 8 seconds because of the Goal value. Push the Increase () or Decrease () buttons to adjust the Goal by 5 minute increments.
-
Page 47: Pausing Or Stopping
During a workout, the Zone Indicator Light conveys the active heart rate zone of the User through light colors. The further the color of the Indicator Purple, light Light shifts toward red, the higher the heart rate zone. Purple, light Green, light Yellow Orange... - Page 48 For every workout completed that is longer than 10 minutes or a mile (1.6 km) in distance, the Console will apply those workout values toward your Fitness Score. This value is displayed on the Fitness Score Display area of the Console. Note: Using a Heart Rate Chest Strap provides the most accurate information to calculate the Fitness Score.
-
Page 49: Awards
Awards Awards are given to the User during a workout. When each Award is earned the Console will make an audible sound, display the name of the achievement, and activate an Award icon. The range of Awards varies and can span multiple workouts. -
Page 50: Machine Settings Mode
Machine Settings Mode The Machine Settings Mode lets you adjust the date and time, review error messages, update key systems, and view the total run hours for the machine. 1. Hold down the STOP/PAUSE button and Right button together for 3 seconds while in the Power-Up Mode to access the Machine Settings Mode. Note: Push STOP/PAUSE to exit the Machine Settings Mode and return to the Power-Up Mode screen. - Page 51 18. The Console displays the BLE DISCONNECT prompt. Note: If you want to disconnect the Bluetooth transmitter, push the ENTER button. Then push the Increase/Decrease buttons to select the ® “BLE DISCONNECT YES” option, and push ENTER. The Console will exit the Machine Settings Mode and return to the Power-Up Mode screen.
-
Page 52: Maintenance
We recommend that you use one of the following: • Lube-N-Walk Treadmill Lubrication Kit (available from www.bowflex.com or your local specialty fitness dealer) ® • 100% pure silicone, available at most hardware and auto parts stores. Silicone lubricant is not intended for human consumption. Keep out of reach of children. Store in a safe place. - Page 53 1. Unplug the machine fully from the wall outlet, and remove the power cord from the machine. Place the power cord in a secure location. 2. Carefully lift each belt and apply silicone lubricant in the center of the Treadle deck along the entire reachable length of the deck. Apply 0.5 to 1.5 oz.
-
Page 54: Walking Belt Alignment
Walking Belt Alignment The walking belts need to be adjusted if they are out of center enough to cause a rubbing or scraping sound. Adjustments can be made at the Front Roller of each Treadle. Adjusting the Walking Belts – While operating the machine, notice where the belts run on each Treadle. The Walking Belt Adjustment Bolts are on the front end of each Roller. - Page 55 Heart Rate Chest Strap Battery Replacement The heart rate (HR) chest strap uses a CR2032 battery. Do not perform this procedure outdoors or in moist or wet locations. 1. Using a coin, loosen the slotted cover on the battery bay. Remove the cover and battery.
-
Page 56: Maintenance Parts
Maintenance Parts Console / Handlebar Assembly Shock Power Cord Safety Key Heart Rate Strap Rear Cover Right Side Cover Right Upright Left Upright Treadle Assembly Shock Pivot Cover Base Motor Cover Left Side Cover Handle Assembly / Owner’s Manual... - Page 57 Maintenance Parts (Treadle Assembly) Drive Belt Drive Motor Front Roller Treadle Stop Lower Walking Belt Guide Walking Belt Adjustment Screw Walking Belt Adjustment Bracket Walking Belt Guide IGUS Bushing Right Side Foot Platform A/C Inlet Motor Control Board Rear Roller Assembly / Owner’s Manual...
-
Page 58: Troubleshooting
Troubleshooting Condition/Problem Things to Check Solution Unit will not power up/turn on/start Outlet Make sure outlet is functioning correctly. Verify this by plugging another device (ex: lamp) into the outlet. If outlet is connected to a light switch, check to make sure it is on. If outlet is not functioning find a working outlet. Power cord not plugged in Make sure the power cord is firmly secured to A/C inlet on the unit and firmly inserted into a non-GFI/AFCI wall socket. - Page 59 Condition/Problem Things to Check Solution Belts stop turning while in use Safety key Plug Safety Key into Console (See Emergency Stop Procedure in Safety Warn- ing Labels section). Motor overload Unit may be overloaded and drawing too much current, causing unit to shut power down to protect motor.
-
Page 60: Body Weight Loss Guide
By focusing on the main three elements of the Bowflex™ Body Weight Loss Guide- quality, balance, and consistency- you’ll be able to reach and maintain your weight loss and fitness goals for the next six weeks and beyond. - Page 61 – You can swap out any type of protein, vegetables or smart carbs for the suggested meal options. For example: • Turkey for tuna • Any fish or seafood for chicken • Cooked vegetables instead of salad • Eat your calories –...
- Page 62 Here’s an overview of what an ideal day looks like: (See Portion Size Guide for proper serving sizes) Breakfast Snack #1 smart rich fruit protein carb carbs smart protein carb veggies protein/fat Lunch Snack #2 healthy smart protein carb smart protein carb veggies...
- Page 63 Breakfast Options Fruit Smart Carb Protein/Fat Fruit and Nut Oatmeal Cook Berries or banana Plain oats Nuts and milk plain oats in water. Top with fruit, (Regular or quick-cook) nuts, milk, cinnamon, and honey. Egg Muffin Cook egg/s. Toast Tomato English muffin or sandwich thin Egg, ham, and cheese bread and top with 1 slice of...
- Page 64 1 string cheese Energy or protein bar with <200 calories* *See www.Bowflex.com/Resources for brand recommendations Optional Treats You have the choice of replacing Snack #2 with a 100-150 calorie treat. You can have an optional treat every day but for optimal health it is recom- mended to limit small splurges to 3-4 times per week.
- Page 65 Portion Size Guide Each of the items listed are for one serving MALE FEMALE PROTEIN 1 cup = baseball 2 eggs 1 egg 5oz chicken, fish, lean meat, or tofu 3oz chicken, fish, or lean meat 2/3 cup beans or lentils* 1/2 cup beans or lentils* 1 cup greek yogurt* 1/2 cup greek yogurt*...
- Page 66 Grocery List BREAD & GRAINS 100% whole wheat bread Tips: Look for 100% whole wheat as the first ingredient. Look for 4g of Sprouted grain breads fiber per slice or 5g per 2 slices of light or diet bread. Aim for bread with Light or whole wheat english muffins less than 100 calories per slice.
- Page 67 • 7 Day Meal Planning Form • Additional Dinner Options • Pre and Post Workout Fueling Guide Questions & Support • Ask questions, post suggestions, and connect with our online Bowflex™ Dietitian on the Bowflex Facebook page Recipes • www.wholeliving.com • www.eatingwell.com •...
- Page 68 Assembly / Owner’s Manual...
- Page 69 Assembly / Owner’s Manual...
-
Page 70: Buy Back Guarantee
Buy Back Guarantee We want you to know that your TreadClimber machine is a superior product. Your satisfaction is guaranteed. If, for any reason, you are not 100% ® satisfied with your TreadClimber machine, please follow the instructions below to return your merchandise and receive a refund of the purchase ®... -
Page 71: Warranty
Warranty Who Is Covered This warranty is valid only to the original purchaser and is not transferable or applicable to any other person(s). What Is Covered Nautilus, Inc. warrants that this product is free from defects in materials and workmanship, when used for the purpose intended, under normal conditions, and provided it receives proper care and maintenance as described in the Product’s Assembly and Owner’s manual. - Page 72 8007952.050116.D...
Need help?
Do you have a question about the TREADCLIMBER TC200 and is the answer not in the manual?
Questions and answers
both treads have moved to the outside rail at the bottom. How do I adjust that?
To adjust the walking belts on a Bowflex TreadClimber TC200 that have moved to the outside rail at the bottom, follow these steps:
1. Observe Belt Alignment – While the machine is operating, check where the belts are positioned on each Treadle.
2. Locate Adjustment Bolts – The Walking Belt Adjustment Bolts are at the front end of each Roller.
3. Make Adjustments –
- If the belt is tracking too far to the right, use a properly sized Hex Key to turn the right adjustment bolt clockwise in full turn increments.
- If the belt is tracking too far to the left, turn the left adjustment bolt clockwise in full turn increments.
Continue adjusting in small increments until the belts are centered properly.
This answer is automatically generated