Advertisement
Quick Links
Advertisement

Related Manuals for Euroscreen Sesame 2.1


Summary of Contents for Euroscreen Sesame 2.1
- Page 1 2 februari 2015, 4:32 PM Sesame 2.1 Made in Sweden...
- Page 2 Please read through the manual completely before installation and usage. Tack för att ni valt en Euroscreen som en del i er AV-installation. Vi ® hoppas den kan ge er många timmar av underhållning och/eller utbildning, beroende på...
- Page 3 SE För att garantin skall gälla för motoriserade dukar från Draper Europe AB måste de vara inkopplade på ett korrekt sätt. Detta uppnås förslagsvis genom att använda Draper Europe’s ”Euroscreen Control Box” (Art. 210730). Används reläboxar/reläer av andra fabrikat är det upp till kunden att funktionskraven nedan uppnås, samt att kunna bevisa korrekt funktion och inkoppling vid en eventuell tvist i ett eventuellt reklamationsärende.
-
Page 4: Installation
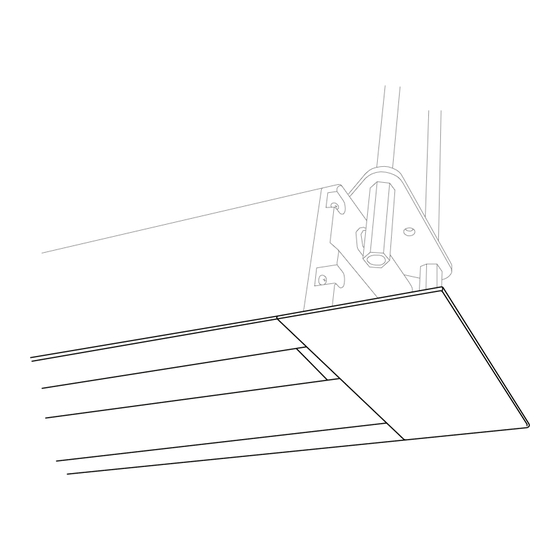
Installation / Installation Fig 1: Ø 6,5 Ø 6,5 - Intended for M6 screws. Ø 10,5 Ø 10,5 - Intended for M10 threaded rods. Ø 6,5 Ø 10,5 Mount the brackets by inserting the nuts into the top track of the case and fitting the Ø... - Page 5 Two screws / Två skruvar fig 4 Two threaded rods / Två gängstänger fig 5 STOP / STOPP Install the case in the ceiling (fig 3 to 5). Finish off by attaching the end cover plates. Please locate the ”stop” (see fig 6) on the plates.
- Page 6 Features / Funktioner Opening the lid / Öppna locket This has to be carried out by two people! a. Remove the end cover plates. b. Put your hand under the lid, see fig 8. The lid is hinged and will not fall to the ground but should not be released uncontrolled! c.
- Page 7 Set the motor limits / Justera motorns gränslägen Upper limit Övre gränsläge Lower limit Nedre gränsläge fig 12 The screen limits are set when delivered. Modifications to the upper factory settings will void the warranty! These settings are maximum outer limits, ie the upper may only be set lower and the lower may only be set higher! See fig 12 for guidance on which screw that sets each limit.
- Page 8 Set height of inner bracket / Justera höjden med innergaveln fig 13 For fine adjustment of screen level and case closing, the Sesame is equipped with adjustable inner brackets on both sides. There is a total travel distance of 8mm. These are set from factory with roughly 4mm in each direction, but may vary slightly.
- Page 9 Adjusting thread tension / Justera trådspänningen (TabTension only/endast) fig 14 fig 15 a. Unscrew endcap, see fig 14 b. Take out centering distance (small, black plastic tube) c. Adjust thread with tensioning screw (marked in red in fig 15). Anti-clockwise increases tension and vice versa.
- Page 10 European Parliament and of the European Council concerning the Registration, Evaluation, Authorisation and Restriction of Chemicals (REACH). All screen surfaces of Euroscreen ® projection screens are approved by the REACH regulation. ECHA European Chemicals Agency (ECHA) gathers information on the properties of manufacturers and importers chemical substances, which will allow their safe handling, and to register the information in a central database.
- Page 11 “Registration, Evaluation, Authorisation and limitation of CHemicals”. Regelverk (EC) No 1907/2006 från Europaparlamentet och Europarådet. The new EU chemicals legislation Alla dukmaterial som används i Euroscreen ® projektionsdukar är godkända enligt REACH. ECHA European CHemicals Agency (ECHA) samlar information om tillverkade och importerade kemikalier. Detta för att de skall kunna handhas på...
- Page 12 Draper Europe AB • Västervallvägen 6 SE-302 50 Halmstad Sweden www.euroscreens.se...
Need help?
Do you have a question about the Sesame 2.1 and is the answer not in the manual?
Questions and answers