dji INSPIRE 2 User Manual
Hide thumbs
Also See for INSPIRE 2:
- User manual ,
- Quick start manual (99 pages) ,
- Operating procedures manual (22 pages)
Table of Contents
Advertisement
Quick Links
Advertisement
Table of Contents

Subscribe to Our Youtube Channel
Related Manuals for dji INSPIRE 2


Summary of Contents for dji INSPIRE 2
- Page 1 INSPIRE 2 User Manual V1.0 2017.01...
-
Page 2: Using This Manual
Afterwards, prepare for your first flight by using the Quick Start Guide. Refer to this manual for more comprehensive information. Watch the video tutorials Please watch the tutorial video below to learn how to use Inspire 2 correctly and safely: http://www.dji.com/inspire-2/info#video Download the DJI GO 4 app Download and install the DJI GO 4 app before use. -
Page 3: Table Of Contents
Contents Using this manual Legends Before Flight Watch the video tutorials Download the DJI GOTM 4 app Download the DJI ASSISTANTTM 2 Product Profile Introduction Feature Highlights Assemble the Aircraft Preparing Remote Controller Aircraft Diagram Remote Controller Diagram Aircraft Flight Controller... - Page 4 INSPIRE 2 User Manual Gimbal and Camera Camera Gimbal Using CINESSD DJI GO 4 App Camera Editor SkyPixel Flight Flight Environment Requirements Flight Limits and No-Fly Zones Preflight Checklist Calibrating the Compass Auto Take-off and Auto Landing Starting/Stopping the Motors Stop the Motor Mid-flight...
-
Page 5: Product Profile
Product Profile This chapter describes the features of Inspire 2, instructs you to assemble the aircraft and explains the components on the aircraft and remote controllers. © 2016 DJI. All Rights Reserved. -
Page 6: Introduction
Product Profile Introduction The Inspire 2 is a powerful aerial film making system with class leading agility and speed, redundancy features for maximum reliability, and new, smart features that make capturing complex shots easy. The camera unit is now independent from image processor so that you have the flexibility to choose the perfect gimbal and camera system for each of your scenes. - Page 7 2. Press the gimbal and camera release button on the Inspire 2. Rotate to remove the Gimbal Cap from the Inspire 2. 3. Align the white dot on the gimbal to the red dot on Inspire 2 and insert the gimbal. 4. Rotate the Gimbal Lock to the locked position by aligning the red dots.
-
Page 8: Preparing Remote Controller
INSPIRE 2 User Manual Attaching 1550T Quick Release Propellers Following the steps below to attach the 1550T quick release propellers. 1. Pair the propellers and motors with arrows of the same color (red or white). Press down the spring pad and rotate... -
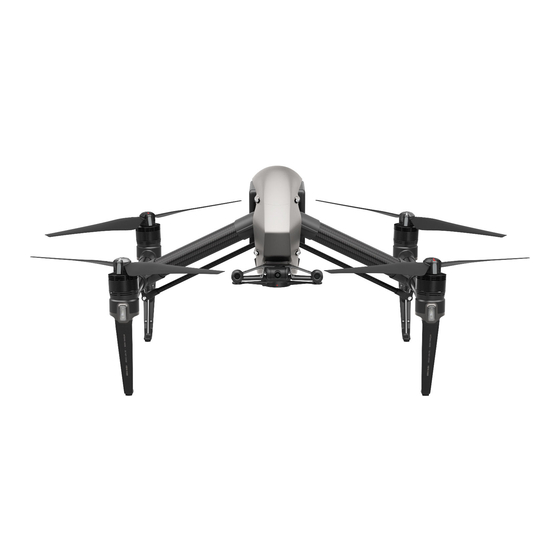
Page 9: Aircraft Diagram
Aircraft Diagram [11] Rear LEDs [1] FPV Camera [2] Forward Vision System [12] Intelligent Flight Batteries [3] DJI Gimbal Connector V2.0 (DGC2.0) [13] Power Button [4] Gimbal and Camera Detach Button [14] Battery Level Indicators [5] Downward Vision System [15] Battery Remove Button... -
Page 10: Remote Controller Diagram
[12] Camera Settings Dial Turn the dial to adjust camera settings. (Only functions when the remote controller is connected to a mobile device running the DJI GO 4 app.) [13] Record Button Press to start recording video. Press again to stop recording. - Page 11 Reserved extended port. [19] HDMI A Port HDMI A Port is for video output. [20] USB Port Connection to mobile device for DJI GO 4 app. [21] C1 Button Customizable through the DJI GO 4 app. [22] C2 Button Customizable through the DJI GO 4 app.
-
Page 12: Aircraft
Aircraft This chapter describes the features of the Flight Controller, Vision System and the Intelligent Flight Battery. -
Page 13: Flight Controller
Aircraft Flight Controller The Inspire 2 flight controller features several important upgrades. Safety modes include Failsafe and Return-to-Home. These features ensure the safe return of your aircraft if the control signal is lost. The flight controller can also save critical flight data from each flight to the on-board storage device. -
Page 14: Flight Status Indicator
INSPIRE 2 User Manual Flight Status Indicator The Inspire 2 comes with the Front LED, Rear LED and Aircraft Status Indicator. The positions of these LEDs are shown in the figure below: Aircraft Status Indicator Front LED Rear LED The Front LEDs show the orientation of the aircraft. The Front LEDs glow solid red when the aircraft is turned on to indicate the front (or nose) of the aircraft (the Front and rear LEDs can be turned off in the DJI GO 4 app). -
Page 15: Return-To-Home (Rth)
Failsafe. The aircraft cannot avoid obstruction during Failsafe RTH if Forward Vision System is disabled. It is important to set a suitable Failsafe altitude before each flight. Launch the DJI GO 4 app, enter “Camera” and tap to set the Failsafe Altitude. - Page 16 INSPIRE 2 User Manual Smart RTH Use the RTH button on the remote controller or tap the RTH button in the DJI GO 4 app and follow the on-screen instructions when GPS is available to initiate Smart RTH. The aircraft will then automatically return to the last recorded Home Point.
- Page 17 The aircraft cannot avoid obstruction during the Failsafe RTH when 20米 the Forward Vision System is disabled. Therefore, it is important to set a suitable Failsafe altitude before each flight. Launch the DJI GO 4 app, enter Camera and tap to set the Failsafe Altitude.
- Page 18 3. If Landing Protection is not operational, the DJI GO 4 app will display a landing prompt when the Inspire 2 descends below 0.7 meters. Tap to confirm or pull down the stick for 2s to activate landing once ensure the environment is appropriate for landing.
-
Page 19: Tapfly
1. Take off and ensure the aircraft is flying at least 6 feet (2 meters) above the ground. 2 meters Auto Hold 2. Launch the DJI GO 4 app and tap , then tap , read and understand the prompts. - Page 20 The aircraft will automatically adjust its speed when it senses an obstacle in front or if it is flying too close to the ground. DJI GO 4 app will prompt you if the aircraft is flying over the obstacle or from the left or right side of the obstacle.
-
Page 21: Activetrack
ActiveTrack allows you to mark and track a moving object on your mobile device screen. The aircraft will automatically avoid obstacles in its flight path. No external tracking device is required. The Inspire 2 can automatically identify and trace bikes and other vehicles, people and animals, and use different tracking strategies for each. - Page 22 The aircraft tracks the subject at constant angle distance. Use the roll stick on the remote and distance from the side. Use the roll stick on controller or the slider in DJI GO 4 app to circle the remote control to circle the subject. the subject.
-
Page 23: Tripod Mode
Tripod Mode Tap the icon in the DJI GO 4 app to enable Tripod Mode. The Tripod Mode is a speed-controlling mode that using the sticks to control the flight speed instead of the attitude, which can help the aircraft to obtain a stable speed, thus reducing the joystick jitter. -
Page 24: Vision System And Infrared Sensing System
INSPIRE 2 User Manual You can drag the subject in the DJI GO 4 app or control the gimbal via sticks to change the subject position in app. Aircraft spin is enabled by default in free mode, which makes the gimbal rotate back quickly when it reaches the limited angle during shooting. - Page 25 1. Make sure that the aircraft is in landing mode. Power on the aircraft and toggle the USB Mode Switch down. 2. Connect the Inspire 2 and the PC via the USB cable (with Double A ports) 3. Launch DJI Assistant 2 and login with a DJI account.
- Page 26 Vision System is activated automatically when the Inspire 2 is powered on. No manual action is required. Vision System is typically used in the indoor environment where no GPS is available. By using the sensors on the Vision system, Inspire 2 can perform precision hovering even when no GPS is available.
- Page 27 INSPIRE 2 User Manual Assisted Braking from Obstacle Sensing Powered by the Obstacle Sensing, the aircraft will now be able to actively brake when obstacles are detected around the aircraft. Note that Obstacle Sensing function works best when lighting is adequate and the obstacle is clearly marked or textured. The aircraft must fly at no more than 31mph (50kph) to allow sufficient braking distance.
-
Page 28: Flight Recorder
ONLY use original DJI propellers for a better and safer flight experience. DJI Intelligent Flight Battery The DJI Intelligent Flight Battery has a capacity of 4280mAh, voltage of 22.8V, and smart charge- discharge functionality. It can only be charged with an appropriate DJI approved charger. - Page 29 Connecting to a Power Source Connect the standard Inspire 2 Battery Charger to a power outlet (100-240V, 50/60Hz), then uncover the rubber cover on the power port to connect the Charging Hub to the Inspire 2 Battery Charger*. Charging Hub...
- Page 30 INSPIRE 2 User Manual * It will take approximately 1.5 hours to fully charge the Inspire 2 Intelligent Flight Battery, and 3 hours for the remote controller. It will take a longer time to charge the Intelligent Flight Battery and remote controller together.
- Page 31 1 hour Updating the Firmware DJI will release firmware updates when available. Refer to the official DJI website and follow the instructions below to update the firmware. 1. Download the latest firmware update program from the official DJI website.
- Page 32 INSPIRE 2 User Manual 2. Turn on the Charging Hub, then connect it to a computer using a Micro USB cable. 3. Run the firmware update program. Press the update button and wait for the process to finish. 4. The Charging Hub will automatically restart when the update has been successfully completed.
- Page 33 4.35 V before each flight. 2. If the DJI GO 4 app displays the “Critical Low Battery Level Warning” when flying in low temperature environments, stop flying and land the aircraft immediately. You will still be able to control the aircraft’s movement when this warning is triggered.
-
Page 34: Remote Controllers
Remote Controllers This chapter describes the features of the remote controller that includes aircraft and remote controller operations and dual remote controller mode. -
Page 35: Remote Controller Profile
Powering On And Off The Remote Controller The Inspire 2 remote controller is powered by a 2S rechargeable battery with a capacity of 6000mAh. The battery level is indicated by the Battery Level LEDs on the front panel. Follow the steps below to power on your remote controller: 1. - Page 36 INSPIRE 2 User Manual Charging Remote Controller Charge the remote controller via supplied charger. Power Outlet Controlling Camera Shoot videos or images and adjust camera settings via the Shutter Button, Camera Settings Dial Video Recording Button and Gimbal Dial on the remote control.
- Page 37 Moving the right stick control left and right changes the aircraft’s left and right pitch. Push left to fly left and right to fly right. The Inspire 2 will hover in place if the stick is centered. Push the stick further away from the center position for a larger pitch angle and faster flight.
- Page 38 The Flight Mode is locked in P-mode by default, regardless of switch position. To switch flight modes, go to Camera view in the DJI GO 4 app, tap and enable “Multiple Flight Modes”. After enabling multiple flight modes, toggle the switch to P and then to S to fly in Sport Mode.
- Page 39 INSPIRE 2 User Manual 1. Raise: Raise the landing gear to its upper most position. 2. Lower: The landing gear will lower to its lowest position for landing. Do not raise the landing gear when the aircraft is on the ground. Ensure the landing gear is lowered before landing.
-
Page 40: Dual Remote Controllers Mode
INSPIRE 2 User Manual Connecting Mobile Device Tilt the Mobile Device Holder to the desired position. Press the button on the side of the Mobile Device Holder to release the clamp, and then place your mobile device into the clamp. Adjust the clamp to secure your mobile device. - Page 41 Remote controller cannot link to the aircraft if the remote controller is set as “Slave”. Meanwhile, the “Slave” remote controller cannot control the orientation of the aircraft. Reset the remote controller to “Master” in DJI GO 4 app if you wish to link the remote controller to the aircraft.
-
Page 42: Remote Controller Status Led
INSPIRE 2 User Manual 2. Search the “Master” remote controller in the surrounding area. Remote Controller Settings Master and Slave Set Remote Controller Status Master Slave Master ID: 28172d Slave ID: 14f93f Connection Status:OFF Search Master 3. Select the “Master” remote controller from the "Master" list and input the connection password to connect to the desired “Master”... -
Page 43: Linking The Remote Controller
Follow these steps to link a new remote controller: 1. Power on the remote controller and connect to the mobile device. Launch DJI GO 4 app. 2. Power on the Intelligent Flight Battery. -
Page 44: Used With The Dji Focus
Remote controller cannot link to the aircraft if the remote controller is set as “Slave”. Meanwhile, the “Slave” remote controller cannot control the orientation of the aircraft. Reset the remote controller to “Master” in DJI GO 4 app if you wish to link the remote controller to the aircraft. -
Page 45: Gimbal And Camera
Gimbal and Camera This chapter provides the technical specifications of the camera and explains the working mode of the gimbal. -
Page 46: Camera
The gimbal tilts the camera across a -130° to +40° pitch angle and pans ± 320° in both directions. Live HD video from the camera is streamed to the DJI GO 4 app. Camera Micro SD Card Slot To store your photos and videos, plug in the Micro SD card into the slot shown below before powering on the Inspire 2. -
Page 47: Gimbal
Use the Shutter and Record button on the remote controller to shoot the images or the videos. For more information about how to use these buttons, refer to “Controlling Camera”. DJI GO 4 app Use the DJI GO 4 app to shoot the images or the videos. For more information, refer to “Zenmuse X5S User Manual”. Gimbal... - Page 48 Three Gimbal operation modes are available. Switch between the different operation modes on the Camera page of the DJI GO 4 App. Note that your mobile device must be connected to the remote controller for changes to take effect. Refer to the table below for details:...
-
Page 49: Using Cinessd
4. Information about the CINESSD will be available in the DJI GO™ 4 app. Exporting Files 1. Power off the aircraft. Remove the batteries and then the CINESSD. 2. Insert the CINESSD into the DJI CINESSD Station, then connect the station to a computer via a USB cable. USB Port ©... - Page 50 To guarantee the high performance of the DJI CINESSD, the station only supports file exporting. To delete files, please insert the CINESSD into the aircraft and launch the DJI GO 4 app to format the CINESSD to free up storage space.
-
Page 51: Dji Go 4 App
DJI GO 4 App This chapter describes the four main GUI of the DJI GO 4 app. -
Page 52: Camera
DJI GO 4 App The DJI GO 4 app is a new mobile app designed specifically for the Inspire 2. Use this app to control the gimbal, camera and other features of your flight system. The app also comes with Map, Store a User Center, for configuring your aircraft and sharing your content with friends. - Page 53 INSPIRE 2 User Manual 1. System Status : This icon indicates aircraft flight status and various warning messages. READY TO GO (GPS) 2. Battery Level Indicator : The battery level indicator provides a dynamic display of the battery level. The colored zones on the battery level indicator represent the power levels needed to carry out different functions.
- Page 54 INSPIRE 2 User Manual 14. Photo/Video Button : Tap to switch between photo and video recording modes. 15. Gimbal Slider : Displays the pitch of the gimbal. 16. Shoot / Record Button : Tap to start shooting photos or recording video.
-
Page 55: Editor
: Tap this icon to return to the main menu. Editor An intelligent video editor is built into the DJI GO 4 app. After recording several video clips and downloading them to your mobile device, go to Editor on the home screen. You can then select a template and a specified number of clips which are automatically combined to create a short film that can be shared immediately. -
Page 56: Flight
Flight This chapter describes the flight safety and flight restrictions. -
Page 57: Flight Environment Requirements
Once pre-flight preparation is complete, it is recommended that you use the flight simulator in the DJI GO 4 app to hone your flight skills and practice flying safely. Ensure that all flights are carried out in an open area. - Page 58 No-Fly Zones All No-Fly Zones are listed on the DJI official website at http://www.dji.com/flysafe/no-fly. No-Fly Zones are divided into Airports and Restricted Areas. Airports include major airports and flying fields where manned aircraft operate at low altitudes. Restricted Areas include borders between countries or sensitive sites.
- Page 59 The value of R varies based on the definition of the restricted areas. (3) A “warning zone” has been set around the Restricted Area. When the aircraft approaches within 0.062 miles (100 m) of this zone, a warning message will appear on the DJI GO 4 app. Restricted Areas...
-
Page 60: Preflight Checklist
3. Micro SD card has been inserted, if necessary. 4. Gimbal is functioning normally. 5. Motors can start and are functioning normally. 6. The DJI GO 4 app is successfully connected to the aircraft. 7. Ensure that the sensors for the Obstacle Sensing System are clean. ©... -
Page 61: Calibrating The Compass
INSPIRE 2 User Manual Calibrating the Compass Only calibrate the compass when the DJI GO 4 app or the status indicator prompt you to do so. Observe the following rules when calibrating your compass: DO NOT calibrate your compass where there is a chance of strong magnetic interference, such as magnetite, parking structures, and steel reinforcements underground. -
Page 62: Auto Take-Off And Auto Landing
2. Abort landing process immediately by using the button on the screen. 3. a. When Landing Protection determines that the ground is suitable for landing, the Inspire 2 will land gently. b. If Landing Protection determines that the ground is not suitable for landing, the Inspire 2 will hover and wait for pilot confirmation. -
Page 63: Stop The Motor Mid-Flight
Pull the left stick to the bottom inside corners and press the RTH button at the same time. Only stop the motors mid-flight in emergency situations when doing so can reduce the risk of damage or injury. Please check that CSC is activated inside DJI GO 4 app, then the user can stop the aircraft mid-air. Flight Test Takeoff/Landing Procedures 1. - Page 64 Video Suggestions and Tips 1. Go through the full pre-flight checklist before each flight. 2. Select the desired gimbal operation mode in the DJI GO 4 app. 3. Only shoot video when flying in P-mode. 4. Always fly in good weather and avoid flying in rain or heavy wind.
-
Page 65: Appendix
Appendix... -
Page 66: Specifications
Approx. 461 g( Including original lens, balancing ring, lens hood) Weight Camera DJI MFT 15mm/1.7 ASPH (With Balancing Ring and Lens Hood) Panasonic Lumix 15mm/1.7 (With Balancing Ring and Lens Hood) Panasonic Lumix 14-42mm/3.5-5.6 HD (With Balancing Ring)Olympus M.Zuiko 12mm/2.0 (With Balancing Ring) Supported Lens Olympus M.Zuiko 17mm/1.8 (With Balancing Ring) - Page 67 INSPIRE 2 User Manual 72° (with DJI MFT 15mm/1.7 ASPH ) 4:3, 5280×3956 Photo Resolutions 16:9, 5280×2970 H.264 C4K: 4096×2160 23.976/24/25/29.97/47.95/50/59.94p @100Mbps 3840×2160 23.976/24/25/29.97/47.95/50/59.94p @100Mbps 3840×1572 23.976/24/25/29.97p @100Mbps 2.7K: 2720×1530 23.976/24/25/29.97p @80Mbps 47.95/50/59.94p @100Mbps FHD: 1920×1080 23.976/24/25/29.97p @60Mbps 47.95/50/59.94p @80Mbps 119.88p @100Mbps H.265...
- Page 68 INSPIRE 2 User Manual Anti-Flicker Auto, 50Hz, 60Hz PAL/NTSC Supported Environmental Operating Temperature 14° to 104°F (-10 to 40℃) Storage Temperature -4° to 140° F (-20 to 60 ℃) Gimbal Angular Vibration Range ±0.01° Controllable Range Pitch: -130° to +40°; Roll: ±20°; Pan: ±320°...
- Page 69 INSPIRE 2 User Manual Voltage 22.8 V Battery Type 6S LiPo Energy 97.58 Wh Net Weight 515 g Operating Temperature -4° to 104° F (-20° to 40° C) Less than 3 months: -4° to 113° F (-20° to 45° C) Storage Temperature More than 3 months: 72°...
-
Page 70: Upgrading The Firmware
1. Power on the Intelligent Flight Battery, and toggle the USB Mode Switch up. 2. Connect the aircraft and your mobile device via an appropriate USB cable. 3. Follow the on-screen instructions in the DJI GO 4 app to upgrade. Ensure to connect to the Inter- net when downloading the firmware. - Page 71 Method 1: Using the DJI GO 4 App Power on the remote controller and connect it with the DJI GO 4 app. A prompt will appear if a new firmware upgrade is available. To start upgrading, connect a mobile device to the Internet and follow the on-screen instructions.
-
Page 72: Compliance Information
INSPIRE 2 User Manual Compliance Information FCC Compliance Notice This device complies with Part 15 of the FCC Rules. Operation is subject to the following two conditions: (1) This device may not cause harmful interference, and (2) This device must accept any interference received, including interference that may cause undesired operation. - Page 73 Una copia della dichiarazione di conformità UE è disponibile online all'indirizzo Web www.dji.com/ euro-compliance Déclaration de conformité UE : Par la présente, SZ DJI TECHNOLOGY CO., LTD déclare que cet appareil est conforme aux principales exigences et autres clauses pertinentes de la directive européenne 1999/5/EC.
-
Page 74: After-Sales Information
INSPIRE 2 User Manual Environmentally friendly disposal Old electrical appliances must not be disposed of together with the residual waste, but have to be disposed of separately. The disposal at the communal collecting point via private persons is for free. The owner of old appliances is responsible to bring the appliances to these collecting points or to similar collection points. - Page 75 This content is subject to change. Download the latest version from www.dji.com/inspire-2 If you have any questions about this document, please contact DJI by sending a message to DocSupport@dji.com. © 2016 DJI All Rights Reserved.
Need help?
Do you have a question about the INSPIRE 2 and is the answer not in the manual?
Questions and answers