Fujitsu WPYA100LA Service Manual

Fujitsu WPYA100LA Service Manual

Air to water heat pump, monobloc type

Advertisement

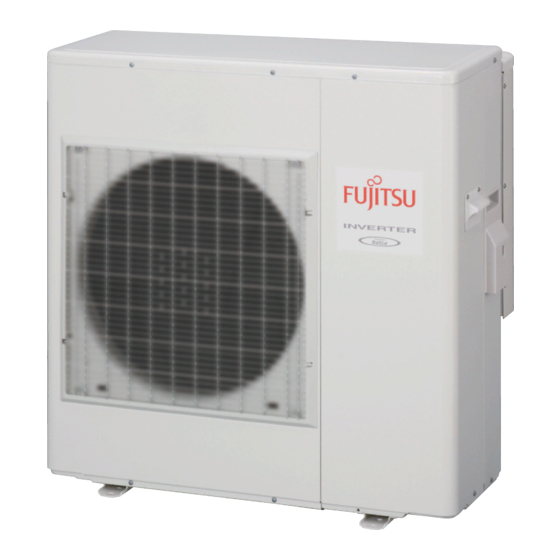
AIR TO WATER HEAT PUMP
MONOBLOC
Models
Outdoor unit
WPYA100LA
WPYA080LA
CONTENTS
SPECIFICATION. . . . . . . . . .. . . . . . . . . . . . . . 2
FUNCTION . . . . . . . . . . . . . . . . . . . . . . . . . . . . 4
OPERATION DETAILS . . . . . . . . . . . . . . . . . . 5
TROBLESHOOTING GUIDE . . . . . . . . . . . . . 6
ELECTRIC CIRCUIT DIAGRAM . . . . . . . . .
EXPLODED VIEW . . . . . . . . . . . . . . . . . . . . .
PARTS LIST . . . . . . . . . . . . . . . . . . . . . . . . . .
DISASSEMBLY PROCESS . . . . . . . . . . .. . . 18
type
14
15
16

Advertisement

Table of Contents
loading

Summary of Contents for Fujitsu WPYA100LA

  • Page 1: Table Of Contents

    MONOBLOC type Models Outdoor unit WPYA100LA WPYA080LA CONTENTS SPECIFICATION......2 FUNCTION ......4 OPERATION DETAILS .
  • Page 2: Specification

    SPECIFICATION Unit WPYA100LA Cooling Capacity Heating Capacity 10.0 phase Single Power source TOP VIEW OUTLET Airflow Method INTAKE Cooling 2060 Input Heating 2300 Electrical Data Cooling 9.2(14.5) Running Current (MAX.) Heating 10.2(18.3) R1(25A) Water Pipe Size R1(25A) Return Power Cord Number of core-wire core-wire / 3.5~4.0mm...
  • Page 3 SPECIFICATION Unit WPYA080LA Cooling Capacity Heating Capacity phase Single Power source TOP VIEW OUTLET Airflow Method INTAKE Cooling 1780 Input Heating 1780 Electrical Data Cooling 8.0(13.1) Running Current (MAX.) Heating 8.0(16.1) R1(25A) Water Pipe Size R1(25A) Return Power Cord Number of core-wire core-wire / 3.5~4.0mm Height 881.5...
  • Page 4: Function

    FUNCTIONS UNIT Operation mode Cold water mode. Hot water mode. Inverter control Inverter control reduce the ON/OFF times of compressor, so can keep the water temperature changeless during opera- tion. Electricity consumption Inverter control can operate with less electricity consumption than normal air to water heat pump.
  • Page 5: Operation Details

    OPERATION DETAILS DEFROSTING OPERATION(FOR A UNIT HEAT EXCHANGER) • Defrosting operation is controlled by the temperature of outdoor heat exchanger sensed by the thermistor and the timer switch. • Defrosting operation starts when the both of the following conditions are met at the same time. a)35 minutes’...
  • Page 6: Trobleshooting Guide

    TROUBLESHOOTING GUIDE FOR YOUR SAFETY USE • For the safety and proper use and handling of the product, please read and follow the instructions carefully. • The meaning of the marks below are as follows. Danger Improper use will cause the significant risk of death or serious injury of the user. Warning Improper use may cause the risk of death or serious injury of the user.
  • Page 7 TROUBLESHOOTING GUIDE ERROR CODES – 7 –...
  • Page 8 TROUBLESHOOTING GUIDE ERROR CODES – 8 –...
  • Page 9 TROUBLESHOOTING GUIDE ELECTRIC CHARACTER [table 1] Sensor, temp. defrost [table 2] Sensor, temp. discharge Sensor, temp. outdoor Temp.(°C) Resistance(kΩ) Sensor, temp. suction Sensor, temp. outgoing 1,000 and return circulating water Temp.(°C) Resistance(kΩ) DISPLAY OF ERRORS IN THE PAST 1. Display method For a unit display board •...
  • Page 10 TROUBLESHOOTING GUIDE CHECK FOLLOWING STEPS [fig. 1] Continuity of current fuse on the PCB (CONTROL- [fig. 2] Voltage of fan motor on the PCB(CONTROLLER) LER) FUSE CF3 (CONTROLLER) (250V T5A) FUSE CF4 (250V T3.15A) + + + 0Ω FAN MOTOR BL Y W B R (CONTROLLER) FUSE CF1...
  • Page 11 TROUBLESHOOTING GUIDE CHECK FOLLOWING STEPS [fig. 5] Resistance of the heater for tank [fig. 6] Resistance of the circulation pump (CONTROLLER) (CONTROLLER) 2.6k [fig. 7] Resistance of POWER MODULE below 100k : BLUE : GRAY : ORANGE : PINK – 11 –...
  • Page 12 TROUBLESHOOTING GUIDE WIRING DIAGRAM WPYA100LA WPYA080LA – 12 –...
  • Page 13 TROUBLESHOOTING GUIDE MONITOR DISPLAY METHOD Switch “ ON ” the MODE SW. 4 on the unit PCB (DISPLAY). The monitor number and monitor data are alternately displayed. Push the PUMP SW. of the unit PCB (DISPLAY). Every time the PUMP SW. is pressed the display changes in the sequence below. Switch “...
  • Page 14: Electric Circuit Diagram

    ELECTRIC CIRCUIT DIAGRAM WPYA100LA WPYA080LA – 14 –...
  • Page 15: Exploded View

    EXPLODED VIEW WPYA100LA WPYA080LA – 15 –...
  • Page 16: Parts List

    SENSOR (TEMP.CIRCULATING WATER) 30112980 REACTOR 30112530 TERMINAL BLOCK 30112970 PCB (DISPLAY) 30051560 PCB (CONTROLLER) with CASE (WPYA100LA) 30112540+20605320 PCB (CONTROLLER) with CASE (WPYA080LA) 30116780+20605320 PCB (POWER MODULE) ASSY. WITH HEAT SINK 20605341 RUBBER HOSE (FOR RELEIF VALVE) 30114420 RUBBER HOSE (FOR AIR PURGE VALVE)
  • Page 17 PARTS LIST PARTS NAME PARTS No. O RING (P4) 01107120 O RING (P6) 01107600 O RING (P14) 01107150 QUICK FASTENER 52775700 QUICK FASTENER 00633600 QUICK FASTENER 00601690 DRAIN PLUG 30078010 – 17 –...
  • Page 18: Disassembly Process

    DISASSEMBLY PROCESS WARNING Before servicing the unit, the power supply switch OFF, Then, do not touch electric parts for 10 minutes due to the risk of electric shock 1.Appearance 2.SERVICE PANEL removal Screw Remove the screws. Remove the SERVICE PANEL. (3 places) by sliding downward.
  • Page 19 3.MAIN PCB removal Fire prevention cover Open Panel for hanging PCB Screw Screw Remove the screw for fixing Remove the screw for fixing the cover. Hook (2 places) the panel. (1 place) (1 place) Open the panel for hanging PCB. Remove the fire prevention cover.
  • Page 20 5.TOP PANEL removal Screw Remove the screws. (4 places) Remove the TOP PANEL. 6.REACTOR removal Connector Screw Remove the connectors. Remove the screws. (4 places) Remove the REACTOR. 7.MODULE PCB removal Screw Fire protection cover Screw Remove the screws. (2 places) Remove the screws.
  • Page 21 8.SOLENOID COIL (4way valve) removal Screw Remove the screw. (1 place) Remove the SOLENOID COIL (4way valve). 9.EEV COIL removal Remove the EEV COIL by hand. 1 0.FRONT PANEL(LEFT) removal Screw Remove the screws. (8 places) Remove the FRONT PANEL(LEFT). -21-...
  • Page 22 1 1.FAN MOTOR removal Cable for the SENSOR (TEMP.OUTDOOR) Cable for the FAN MOTOR Hook Remove the fixing nut. Remove the cable for the FAN MOTOR. Remove the PRPELLER FAN. from the hooks in the fan bracket. (3 places) Note at the installation. Tightening torque is from 4.0 to 6.0 N・m.
  • Page 23 1 2 .FAN BRACKET and SEPARATE WALL removal Screw Remove the screws. (2 places) Remove the FAN BRACKET. Screw Earth screw Remove the screws. (3 places) Remov e the screws. (3 places) Remove the SEPARATE WALL. -23-...
  • Page 24: Compressor Removal

    1 3.COMPRESSOR removal Precautions for exchange of Compressor. Do not allow moisture or debris to get inside refrigerant pipes during work. Procedure for Compressor removal. Check Collect the refrigerant from the CHECK JOINT. joint Start the following work after completely collecting the refrigerant. Do not reuse the refrigerant that has been collected.
  • Page 25 Range Range Cut the Discharge pipe Cut the Suction pipe Removethe COMP NUTS. (3 places) in this range. in this range. Remove the COMPLESSOR by lifting. Caution ・Keep the shape better. ・There is a possibility of catching fire to oil when removing by the welding without cutting. Procedure for compressor installation.
  • Page 26 1 4.CIRCULATION PUMP removal Precautions for exc hange of Pump. Drain in the water - cycle before work. Procedure for drain in the water - cycle. Install a drain pan or drain hose to the DRAIN PLUG. Open the DRAIN PLUG and drain. Drain plug Loose for open...
  • Page 27 1 5.TANK COVER removal Screw Screw Screw Remove the screw. (1 place) Remove the screws. (6 places) Remove the TANK COVER (TOP). Remove the TANK COVER (SIDE). 1 6.TANK HEATER removal Tank heater Remove the TANK HEATER by hand and exchange. -27-...
  • Page 28 1 7.TANK removal Screw Remove the nut for the tank. Remove the screw. (2 places) Remove the panel for fixing the tank. Note at the installation Remove the TANK. When take off Nut, remove a packing together. Tightening torque is from 15.0 to 30.0 N・m. 1...
  • Page 29 1 9 .HEAT EXCHANGER removal Panel for fixing the terminal block Screw Remove the screws. (2 places) Remove the panel for fixing the terminal block with the terminal block. Brazing point Remove the EEV COIL. (see chapter 9) Remove the pipes in the refrigerant - cycle by brazing. (2 places, see chapter 30) Remove the nuts.
  • Page 30 2 0 .MANOMETER removal Quick fastener Remove the quick fastener by pulling. Remove the MANOMETER. 2 1.PRESSURE RELIEF VALVE removal Hose band Hose Quick fastener Remove the clip for the hose. Remove the quick fastener by pulling. Remove the hose. Remove the PRESSURE RELIEF VALVE.
  • Page 31 2 2.AIR PURGE VALVE removal Hose band Hose 2 spanners Remove the clip for the hose Remove the AIR PURGE VALVE Remove the hose. by using 2 spanners. 2 3.SENSOR (TEMP.OUTDOOR) removal Sensor Remove the SENSOR (TEMP.OUTDOOR) by hand. 2 4.SENSOR (TEMP.DISCHARGE) removal Sensor Sensor and Holder Holder...
  • Page 32 2 5.SENSOR (TEMP.SUCTION) removal Sensor Remove the THERMISTOR SPRING. Remove the SENSOR (TEMP.SUCTION). 2 6.SENSOR (TEMP.DEFROST) removal Sensor Sensor and Holder Holder Remove the COMPRESSOR COVER ① , COVER②, COVER③, and COVER ④. (See chapter 14) Remove the SENSOR (TEMP.DEFROST) with the holder. 2...
  • Page 33 2 8.SENSOR (TEMP.CIRCULAITING WATER RETURN) removal Sensor Remove the THERMISTOR SPRING. Remove the SENSOR (TEMP. CIRCULAITING WATER RETURN). 2 9.Precautions for exchange of refrigerant - cycle parts and pipes. (1) During exchange the following parts shall be protected by wet rag and not makes the allowable temperature or more. (2) Remove the heat insulation when there is the heat insulation near the welding place.
  • Page 34 RA-70-[3] ISSUED DEC.2009 REVISED MAR.2010 REVISED APR.2010 Printed in Japan...

This manual is also suitable for:

Wpya080la

Table of Contents