Table of Contents
Advertisement
Quick Links
Advertisement
Table of Contents
Troubleshooting

Related Manuals for YOKOGAWA MW100


Summary of Contents for YOKOGAWA MW100
- Page 1 User’s Manual MW100 Data Acquisition Unit IM MW100-01E 2nd Edition...
-
Page 2: Foreword
Foreword Thank you for purchasing the MW100 Data Acquisition Unit. This user’s manual contains useful information about the instrument’s functions, installation and wiring procedures, operating procedures, and handling precautions. To ensure correct use, please read this manual thoroughly before beginning operation. The five manuals below are also provided in addition to this manual. -
Page 3: Safety Precautions
Take special note that if you handle the product in a manner that violates these instructions, the protection functionality of the product may be damaged or impaired. In such cases, YOKOGAWA does not guarantee the quality, performance, function, and safety of product. - Page 4 • YOKOGAWA makes no warranties regarding the product except those stated in the WARRANTY that is provided separately. • YOKOGAWA assumes no liability to any party for any loss or damage, direct or indirect, caused by the user or any unpredictable defect of the product.
-
Page 5: Conventions Used In This Manual
Indicates items that require you to switch the mode to Measurement in the procedural explanation of chapter 3. Setting Mode Indicates items that require you to switch the mode to Setting in the procedural explanation of chapter 3. IM MW100-01E... -
Page 6: Table Of Contents
Safety Precautions ........................ii Conventions Used in This Manual ....................iv Chapter 1 Explanation of Functions System Overview ......................1-1 MW100 Data Acquisition Unit ..................1-1 System Confi guration ..................... 1-1 Main Module ........................1-4 Input/Output Modules ..................... 1-4 Base Plate ........................1-6 PC Software ........................ - Page 7 Computation Operation ....................1-54 Math Interval ........................ 1-54 Rolling Average ......................1-55 Math Span ........................1-55 Handling Units in Computations ................... 1-55 Pulse Integration (TLOG.PSUM) Settings ..............1-55 Alarm Level ........................1-56 Math Error Data Processing ..................1-56 IM MW100-01E IM MW100-01E...
- Page 8 Connecting the RS-232 Interface (/C2 Option) ............2-28 Connector Pin Assignments and Signal Names ............2-28 Handshaking ........................ 2-28 Measures Against Noise on the MW100 Data Acquisition Unit ........2-30 Integrating A/D Converter ..................... 2-30 First-Order Lag Filter ....................2-32 2.10...
- Page 9 Installing Java ........................ 3-1 MW100 Operation Screens .................... 3-2 Host Name Display ......................3-3 Switching Modes ......................3-4 Connection to the MW100 ....................3-5 Ethernet Connection ...................... 3-5 Connecting with Serial Communication (Optional) ............3-7 Modbus/RTU Settings ....................3-8 Modbus/TCP Settings ....................3-10 Login Function and User Settings ................
- Page 10 Starting and Stopping Measurement ................3-43 Starting and Stopping Computation ................3-44 Starting and Stopping Recording ................. 3-44 Checking the Operating Status of the MW100 Using the Status Indicators ....3-45 3.13 Network Utility Settings ....................3-46 DNS Client Settings ..................... 3-46 FTP Client Settings ......................
- Page 11 External Dimensions ....................5-25 Base Plate Specifi cations ..................... 5-26 External Dimensions ....................5-26 Attaching the MW100 Main Module ................5-26 4-CH, High-Speed Universal Input Module Specifi cations ........... 5-27 Effects of Operating Conditions ................... 5-30 General Specifi cations ....................5-30 External Dimensions ....................
- Page 12 Using the Broken Line Data of Decimal Values ..........App-19 Appendix 8 Saving Data to the CF Card ................App-20 Write Timing ....................App-20 Replacing the CF Card While Recording ............App-21 Write Count ....................App-22 Index IM MW100-01E IM MW100-01E...
-
Page 13: Chapter 1 Explanation Of Functions
System Overview MW100 Data Acquisition Unit The MW100 Data Acquisition Unit consists of a main module equipped with an Ethernet port, I/O modules for input and output of signals (these are the same as those for the MX100 Data Acquisition Unit), and a base plate on which the first two items are mounted. - Page 14 One-to-N Connection with a PC This is an example of a configuration suitable for relatively large scale data acquisition tasks. Connections can be made via Ethernet or RS-422A/485. MW100 MW100 MW100 MW100 Data Acauisition Unit RS-422A/485 MW100 MW100 MW100 MW100 Data Acauisition Unit...
- Page 15 1.1 System Overview One-to-N Connection with the PC This is an example in which multiple PCs are connected to the MW100 for performing data monitoring. MW100 MW100 Data Acquisition Unit Connecting to Modbus Devices This is an example of configuration of a system with connections to Modbus devices.
-
Page 16: Main Module
• Input types: DC voltage, TC, 3-wire RTD, and DI (LEVEL, non-voltage contact) 6-CH, Medium-Speed, Four-Wire RTD Resistance Input Module (MX110-V4R-M06) • Minimum measurement interval: 100 ms • Maximum number of inputs: 6 inputs • Input types: DC voltage, 4-wire RTD, 4-wire resistance, and DI (LEVEL, non-voltage contact) IM MW100-01E... - Page 17 • Maximum number of inputs: 10 inputs • Input types: DI (non-voltage contact, open collector, 5-V logic) 10-CH, High-Speed Digital Input Module (MX115-D24-H10) • Minimum measurement interval: 10 ms • Maximum number of inputs: 10 inputs • Input types: DI (24-V logic) IM MW100-01E...
-
Page 18: Base Plate
There are six types of base plates available (connecting from one to six input/output modules ). By attaching DIN rail mounting brackets to the base plate, you can rack-mount or panel-mount the MW100 main unit. Base plate DIN rail mount bracket... -
Page 19: Pc Software
MW100 Viewer software user’s manual (IM MW180-01E). Address Setting Software Sets the IP address on the MW100. This software is used when setting an IP address for the first time, or if the current IP address needs to be changed. Viewer Software... -
Page 20: Mw100 Operation Guide
MW100 Operation Guide The figure below shows the general flow of operation when the MW100 is installed initially. Operations on the MW100 Operations on the PC Section 2.2 and 2.3 Section X.X indicates the referred Instal the MW100 sections in this manual. -
Page 21: Functions Of The Main Module
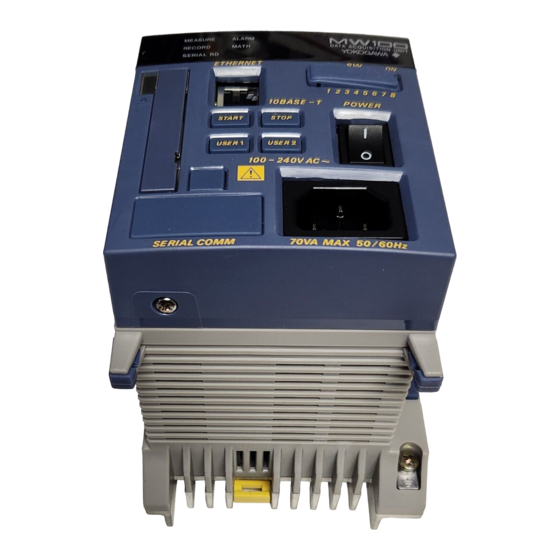
Functions of the Main Module The main module is the central component of the MW100 Data Acquisition Unit. Names and Functions of Parts Communication status LED Ethernet port Check the communication status Used for main unit settings Top: LINK LED... -
Page 22: Switches And Keys
1.3 Functions of the Main Module Switches and Keys The MW100 has the following switches and keys. Some are included with options. • Start and Stop keys • User function key 1 • User function key 2 • Dip switch 1 •... -
Page 23: Connectors
• Key Lock Status A key lock function is included for preventing accidental manipulation of the MW100 front panel keys. The key lock status is indicated by a dot at the bottom of the unit number. - Page 24 For CF card replacement, see “Saving Data to the CF Card” in this section. • Non-execution Display If the file division action is not executed, “--nuLL--” is displayed with the characters flowing from right to left as shown below. Check the execution condition of the file division. 1-12 IM MW100-01E...
-
Page 25: Measurement
Time constant = measurement interval × N (where N = 5, 10, 20, 25, 40, 50, or 100) For details, see section 2.10, “Measures against Noise on the MW100 Data Acquisition Unit.” For details on filters, see section 2.9, “Measures Against Noise on the MW100 Data Acquisition Unit.” 1-13... -
Page 26: Math
When the input mode is set to thermocouple (TC), you can set the burnout detection behavior. Measured values become “range over” during detection. Detection Behavior Notation No detection Measured values fixed at +range over Measured values fixed at –range over Down 1-14 IM MW100-01E... -
Page 27: Alarms
Set the delay to an integer multiple of the measurement or MATH interval. Delay high limit alarm Delay low limit alarm Alarm Delay time Alarm cleared Alarm activated setting Measured value Delay time Alarm release Alarm release Measured value Alarm activated 1-15 IM MW100-01E... -
Page 28: Operation Modes And Statuses
Operation Modes and Statuses The MW100 has a Setting mode in which input ranges and other settings can be entered, and a Measurement mode in which data acquisition is performed. The mode switches depending on the measurement item of the status information. -
Page 29: Event Action Function
Trigger occurrence on Trigger1 specified number Trigger2 Trigger3 Alarm ACK Alarm ACK Flag Flag Reset timer of specified Timer 1 Reset number (1-6) Timer 2 Reset Timer 3 Reset Timer 4 Reset Timer 5 Reset Timer 6 Reset 1-17 IM MW100-01E... -
Page 30: Daylight Saving Time
Time up occurs every day at the specified time (hr and min) * Conditions can be set for no operation. For details, see “Match Time” in section 5.2. ** For information about operation during power failures and time changes, see “Match Time” in section 5.2. 1-18 IM MW100-01E... -
Page 31: Recording Operation
Stop recording when there is no more free space on the CF card Start Rotate Time (s) Delete File File Continue recording by deleting the oldest file when there is no free space on the CF card 1-19 IM MW100-01E... - Page 32 * When the pretrigger is set to 30% and the recording Start Trigger condition met Stop stop action is Single Time (s) File 30% before the trigger 70% after the trigger Trigger point 1-20 IM MW100-01E...
-
Page 33: Saving Data To The Cf Card
Data is saved at a specified thinning interval. Thinning time: 4, 5, 10, 20, or 30 seconds, or 1, 2, 3, 4, 5, 10, 20, or 30 minutes, or 1 hour. Select a thinning time from the above choices. 1-21 IM MW100-01E... - Page 34 For a description of the time when data is written to the CF card, see appendix 8, “Saving Data to the CF Card.” Saving Settings MW100 setting values can be saved. The contents that are saved are as follows: • Range, alarm, and MATH related settings • Media related settings •...
-
Page 35: Communication Specifi Cations
MW100 settings and data can be monitored from a PC using a browser. WebDAV function A list of files and folders on the HTTP server (MW100) can be retrieved, and files and folders can be copied, moved, or deleted from a PC using a browser. -
Page 36: E-Mail Function
1.3 Functions of the Main Module • Modbus Server Function Modbus clients connect to an MW100 acting as the Modbus Server, and read from or write to its internal registers. Measured data and alarm statuses from measurement channels, measured data and alarm statuses from MATH channels, data from communication input channels, and time information are stored in the MW100’s registers. - Page 37 • Power supply ON notification e-mail From: mw100user@daqmaster.com Date: Fri,25 Mar 2005 19:57:00 +0900 Mail header Subject: [Power Faliure] To: mw100user2@daqmaster.com, mw100user3@daqmaster.com Power Faliure <Power Off> DATE 05/03/24 Date/time TIME 19:58:28 power failed <Power On> DATE 05/03/25 Date/time TIME 19:56:40 power restored 1-25 IM MW100-01E...
- Page 38 • Modbus Slave Function Modbus master devices can connect to other MW100s acting as Modbus slaves and read from or write to their internal registers. The MW100 registers are the same as those for the Modbus server function. Modbus master device...
-
Page 39: Log Information
1.3 Functions of the Main Module Log Information The MW100 operations are recorded in the log. You can view the log using a log file or communication output. Saving the Recording Log File While recording is stopped, information related to operation of the CF card and power ON/OFF status is saved in text format to a log file with the name RECORDLG.TXT. - Page 40 Log Output The following logs can be output using communication commands. You can also view the log information using a browser. For information about log statuses and messages, see the MW100 Communication Command manual (IM MW100-17E). Item Notation Request Type...
-
Page 41: Functions Of The 4-Ch, High-Speed Universal Input Module
0.0 to 1760.0°C Type-S 0.0 to 1760.0°C Type-B 0.0 to 1820.0°C Type-K –200.0 to 1370.0°C Type-E –200.0 to 800.0°C Type-J –200.0 to 1100.0°C Type-T –200.0 to 400.0°C Type-N 0.0 to 1300.0°C Type-W 0.0 to 2315.0°C Type-L –200.0 to 900.0°C 1-29 IM MW100-01E... - Page 42 Pt25 (JPt100 × 1/4) Pt25 –200.0 to 550.0°C Cu10 GE (high resolution) Cu10GEH –200.0 to 300.0°C Cu10 L&N (high resolution) Cu10LNH –200.0 to 300.0°C Cu10 WEED (high resolution) Cu10WEEDH –200.0 to 300.0°C Cu10 BAILEY (high resolution) Cu10BAILEYH –200.0 to 300.0°C 1-30 IM MW100-01E...
-
Page 43: Measurement Interval, Integration Time, And Filter
10 ms, 50 ms, 100 ms, 200 ms, 500 ms, 1 s, 2 s, 5 s, 10 s, 20 s, 30 s, 60 s The integral time and types of filters applied vary depending on the measurement interval. For details, see section 2.9, “Measures against Noise on the MW100 Data Acquisition Unit.”... -
Page 44: Functions Of The 10-Ch, Medium-Speed Universal Input Module
Rated Measurement Range Type-R 0.0 to 1760.0°C Type-S 0.0 to 1760.0°C Type-B 0.0 to 1820.0°C Type-K –200.0 to 1370.0°C Type-E –200.0 to 800.0°C Type-J –200.0 to 1100.0°C Type-T –200.0 to 400.0°C Type-N 0.0 to 1300.0°C Type-W 0.0 to 2315.0°C 1-32 IM MW100-01E... - Page 45 Cu10 WEED (high resolution) Cu10WEEDH –200.0 to 300.0°C Cu10 BAILEY (high resolution) Cu10BAILEYH –200.0 to 300.0°C Pt100 GOST Pt100G –200.0 to 600.0°C Cu100 GOST Cu100G –200.0 to 200.0°C Cu50 GOST Cu50G –200.0 to 200.0°C Cu10 GOST Cu10G –200.0 to 200.0°C 1-33 IM MW100-01E...
-
Page 46: Measurement Interval, Integration Time, And Filter
100 ms, 200 ms, 500 ms, 1 s, 2 s, 5 s, 10 s, 20 s, 30 s, 60 s The integral time and types of filters applied vary depending on the measurement interval. For details, see section 2.9, “Measures against Noise on the MW100 Data Acquisition Unit.”... -
Page 47: Functions Of The 6-Ch, Medium-Speed Four-Wire Rtd Resistance Input Module
–60.0 to 180.0°C Ni120 Ni120 –70.0 to 200.0°C Pt50 Pt50 –200.0 to 550.0°C Cu10 GE Cu10GE –200.0 to 300.0°C Cu10 L&N Cu10LN –200.0 to 300.0°C Cu10 WEED Cu10WEED –200.0 to 300.0°C Cu10 BAILEY Cu10BAILEY –200.0 to 300.0°C 1-35 IM MW100-01E... -
Page 48: Measurement Interval, Integration Time, And Filter
100 ms, 200 ms, 500 ms, 1 s, 2 s, 5 s, 10 s, 20 s, 30 s, 60 s The integral time and types of filters applied vary depending on the measurement interval. For details, see section 2.9, “Measures against Noise on the MW100 Data Acquisition Unit.”... -
Page 49: Functions Of The 4-Ch, Medium-Speed Strain Input Module
100 ms, 200 ms, 500 ms, 1 s, 2 s, 5 s, 10 s, 20 s, 30 s, 60 s The integral time and types of filters applied vary depending on the measurement interval. For details, see section 2.9, “Measures against Noise on the MW100 Data Acquisition Unit.”... -
Page 50: Initial Balancing (Unbalance Adjustment)
Initial unbalanced value Strain Reset With the MW100, initial balancing is performed in the ±10000 µstrain range. Initial balance: The value when the command is executed is taken as the initial unbalanced value, and the measured value is set to zero. -
Page 51: Scaling Settings Of The Strain Gauge Type Sensor
Min. value of span = [(K(mV/V) × 2000) / Y(unit)] × Smin (µSTR) Max. value of span = [(K(mV/V) × 2000) / Y(unit)] × Smax (µSTR) 1-39 IM MW100-01E... - Page 52 Span maximum: 15 × 500.25 µSTR = 7503.75 µSTR would be appropriate settings. Since the measurement range is the 20000 µSTR range, the resolution on the MW100 comes to 1 µSTR, so we round to the following: Span minimum: 1001 µSTR Span maximum: 7504 µSTR...
-
Page 53: Functions Of The 10-Ch, High-Speed Digital Input Module
Detection Detection Detection interval interval interval Detection interval = Measurement interval × 75% to 90% Chattering • Measurement interval of 5 s or more: Use the wider of the ON/OFF width of approximately 4.5 s 1-41 IM MW100-01E... -
Page 54: Functions Of The 8-Ch, Medium-Speed Analog Output Module
Eight-Channel Medium Speed PWM Output Module.” Output Operation during Calibration Calibration Condition Output Operation Channels being calibrated Arbitrary output (output of calibration value) Non-calibrated channels Holds the output value (holds the value last output during steady operation (see section 1.11)) 1-42 IM MW100-01E... -
Page 55: Functions Of The 8-Ch, Medium-Speed Pwm Output Module
The output is updated at 100-ms (minimum) intervals. It is not synchronized to the measurement interval. Operation upon Startup and Error Occurrence See section 1.11, “Operation of the 8-CH Medium-Speed Analog Output Module and the 8-CH Medium Speed PWM Output Module.” 1-43 IM MW100-01E... -
Page 56: Operation Of The 8-Ch Medium-Speed Analog Output Module And The 8-Ch Medium Speed Pwm Output Module
Start measurement Output upon error occurrences Transmission output within a unit Before meas start Operation when power is turned ON Start measurement Transmission output Arbitrary output No output request Operation when power is turned ON Output requested Arbitrary output 1-44 IM MW100-01E... - Page 57 (until the next output event) PWM: 1 ms ↔10 ms or interval Operation Arbitrary output → setting changes transmission within a unit When the range settings of a PWM output module are changed, the output value is not held. 1-45 IM MW100-01E...
-
Page 58: Steady Output Operation
Unusable modules illegal**) * The number corresponding to the error is shown in the ** Illegal occurs when a module is removed, when a module recognition fails, or when a module malfunctions. 1-46 IM MW100-01E... - Page 59 If the error recovery time is within 10 s; operation upon startup → arbitrary output CPU abnormality (does not recover) Operation upon errors * Executed by arbitrary output from the PC after recovering from the error. 1-47 IM MW100-01E...
-
Page 60: Functions Of The 10-Ch, Medium-Speed Digital Output Module
Media When the remaining space on the CF card reaches the specified time Fail Fail When an abnormality occurs on the CPU of the MW100 main module Error Error When an error is detected on the MW100 Output Update Interval The output is updated at 100-ms intervals. -
Page 61: Relay Operation
• You can specify the reflash function when OR is selected for the AND/OR function and Non-Hold is selected for the Hold/Non-Hold function. Alarm1 status Alarm2 status Alarm3 status Reflash function relay status 200ms 200ms 1-49 IM MW100-01E... -
Page 62: Math Function (/M1 Option)
When channel 001 ≠ 0 and channel 002 = 0, 1 When channel 001 = 0 and channel 002 ≠ 0, 1 When channels 001 and 002 ≠ 0, 0 Logical negation NOT001 When channel 001 = 0, 1 When channel 001 ≠ 0, 0 1-50 IM MW100-01E... - Page 63 CLOG.AVE() CLOG.AVE(011-020) Finds avg of measured data on ch 011 to 020. * The channels that can be specified in CLOG functions are the measurement and MATH channels. (The number of channels which can be specified is to ten channels.) 1-51 IM MW100-01E...
-
Page 64: Math Reference Channels
For example, given the expression: NOTF01 * TLOG.SUM(001) if the Event action’s Edge action is set to FLAG:F01, when the event occurs, F01 becomes 1 and NOTF01 becomes 0, therefore the total of channel 001 is 0. 1-52 IM MW100-01E... - Page 65 During self-computation, 0-clear the elapsed time and start the broken line computation • Operation after Elapsed Time Mode Notation Program channel operation Single Single Holds the broken line computed value of the last point Repeat Repeat Returns to the start point then repeats broken line 1-53 IM MW100-01E...
-
Page 66: Computation Operation
MATH reference channel at the measurement interval. However, for TLOG.PSUM, pulse integration can be performed at the interval of the measurement channel. For a description of the pulse integration, see “Pulse Integration (TLOG.PSUM) Settings” in this manual. 1-54 IM MW100-01E... -
Page 67: Rolling Average
Pulse Integration (TLOG.PSUM) Settings Computation is performed at 100-ms intervals or longer, but pulse integration can be performed at the measurement interval of the module that can receive DI input. The fastest measurement interval is 10 ms. 1-55 IM MW100-01E... -
Page 68: Alarm Level
*1 The upper or lower limit value that is replaced for the input channel varies depending on the MATH type. Input channel: Upper/lower limit of the measurement range Scaled input channel: Upper/lower limit of scaling 1-56 IM MW100-01E... - Page 69 Σ (data)/(Number of times of computing per second.) Every minute Σ (data)/(Number of times of computing per minute.) Every hour Hour Σ (data)/(Number of times of computing per hour.) * Integration of data every MATH integral number of times 1-57 IM MW100-01E...
-
Page 70: Chapter 2 Installation And Wiring
• Do not bring charged objects near the signal terminals. Doing so can lead to malfunction. • Do not pour volatile agents on the MW100 or leave it in contact with rubber or PVC products for an extended time. Doing so can lead to malfunction. -
Page 71: Installation
The MW100 Data Acquisition Unit can be used on the desktop, placed on a floor, rack mounted, or panel mounted. In all cases, be sure to install the instrument in a vertical position. - Page 72 Attaching to DIN Rails By attaching DIN rail mounting brackets to the base plate as in the figure below, you can rack-mount or panel-mount the MW100 Data Acquisition Unit. • Attachment of the DIN rail mount bracket to • Attachment of the base plate to the DIN rail...
-
Page 73: Attaching The Modules
To prevent electric shock and instrument breakdown, do not connect the power supply to the main module when attaching modules. Preparing the Base Plate The accessory brackets are attached in order to attach the MW100 main module to the base plate. Remove the base block blacket... -
Page 74: Attachment Positions And Channel Numbers
1 to 4. The last one digit on a 6-channel module is 1 to 6. The last one digit on a 8-channel module is 1 to 8. For setting the unit number, see “Other Settings” in section 3.3. IM MW100-01E... -
Page 75: Connecting Signal Wires
MAX TO 250V MAX TO 250V MAX CH TO CH 250V MAX TO Vext Vext Vext Vext Connect external power supply Connect external power supply to only one set of Vext terminals. to only one set of Vext terminals. IM MW100-01E... -
Page 76: Attaching And Removing The Terminal Block
10-CH, High-Speed Digital Input Module 10-CH, Medium-Speed Digital (-D05, -D24) Output Module Pull-out handle The terminal plate can be The terminal block can be attached and detached. attached and detached Attachment screw (fixed with screws). (Loosen before removing the terminal plate.) IM MW100-01E... -
Page 77: Attaching The Plate With Screw Terminal And Plate With Clamp Terminals For Current
The proper arrangement is shown on the back of the terminal covers, so be sure to replace the cover along with the terminal plate. For the handling of the plate with screw terminal, see “Handling the MX100/MW100 10-CH Plate with Screw Terminal” in IM MX100-77E. -
Page 78: General Precautions When Wiring The Input/Output Signal Wires
• To prevent fire, use signal wires of the following temperature ratings. Module Type Temp. Rating Screw terminal 75°C Analog output module, PWM output module signal wires 85°C Universal input module, digital input module, digital output module, 80°C 4-wire RTD resistance input/output module, strain input module IM MW100-01E... - Page 79 CAUTION • If a large pulling force is applied to the input/output signal wires connected to the MW100, the terminal or signal wire may break. To prevent this from happening, secure all the wiring cables to the installation panel. • Wiring of the Strain Input Module (-NDI) When connecting a bridge head, in order that the empty weight of the cable does not exceed 5 kg, ensure that the cable does not hang down more than 1.5...
- Page 80 In addition, ground the object under measurement. • Shielded wires are effective against noise caused by electrostatic induction. As necessary, connect the shield to the ground terminal of the MW100 (make sure this does not lead to grounding at two points).
-
Page 81: Wiring Procedures
When the plate with screw terminal (model 772080) is connected to the 10-CH Medium- Speed Universal Input Module, the terminal arrangement differs from that of clamp terminals, so wire according to the markings on the terminal cover. 2-12 IM MW100-01E... -
Page 82: Wiring The 4-Wire Rtd Resistance Input Module
E: voltage applied to bridge Bridge head -NDI -B12, -B35 (701955 or 701956) Jumper setting switch A(+V) No.1 No.2 B( L) No.3 C(-V) No.4 No.5 D( H) Bridge head No.1 No.2 No.3 No.4 No.5 switch 1 2 3 4 5 2-13 IM MW100-01E... - Page 83 E: voltage applied to bridge -NDI Bridge head -B12, -B35 (701955 or 701956) Jumper setting switch A(+V) No.1 B(L) No.2 No.3 C(-V) No.4 No.5 D( H) Bridge head switch No.1 No.2 No.3 No.4 No.5 1 2 3 4 5 2-14 IM MW100-01E...
- Page 84 -B12, -B35 Rg: resistance value of strain gauge e: output voltage from bridge Cannot be connected. Use -NDI. E: voltage applied to bridge -NDI Bridge head (701955 or 701956) Bridge head switch 1 2 3 4 5 2-15 IM MW100-01E...
- Page 85 -NDI Jumper setting switch A(+V) No.1 No.2 B( L) No.3 C(-V) No.4 No.5 D( H) Bridge head (319300) No.1 No.2 No.3 No.4 No.5 -NDI Bridge head (701955 or 701956) Bridge head switch 1 2 3 4 5 2-16 IM MW100-01E...
-
Page 86: Wiring Digital Input Modules
Min. detection pulse width: Twice the sampling interval or more Input threshold level: 24-V logic: OFF at 6 V or less and ON at 16 V or greater Terminal type: Clamp Applicable wire size: 0.14 to 1.5 mm (AWG26 to 16) 2-17 IM MW100-01E... -
Page 87: Wiring With The Analog Output Module
OFF. This module has a built-in fuse. The built-in fuse protects against fires or abnormal emissions of heat due to load shortages or other abnormalities. It does not protect against damage to internal circuits. 2-18 IM MW100-01E... -
Page 88: Wiring With The Digital Output Module
250 VDC/0.1 A, 250 VAC/2 A, or 30 VDC/2 A (resistance load) Terminal type: Clamp, attached and removed in units of 5 channels Applicable wire size: 0.08 to 2.5 mm (AWG28 to 12) Note Do not connect anything to the empty terminals of the digital output module. 2-19 IM MW100-01E... -
Page 89: Connecting The Power Supply And Turning The Power Switch On And Off
• To prevent the possibility of electric shock when wiring, confirm that the power supply source is turned OFF. • To prevent shock or fires, only use the power cord supplied by Yokogawa together with the MW100 Data Acquisition Unit. -
Page 90: Wiring The Power Supply Terminal (Power Supply/Cord Basic Specifi Cation Code -1W)
Close the power supply terminal cover and secure it with the screw. DATA ACQUISITION UNIT 100 - 240V AC Power supply terminal cover Power cord Protective Power cord grounding cord Protective grounding cord 2-21 IM MW100-01E... -
Page 91: Wiring The Power Supply Terminal (When The Suffi X Code Of The Power Supply/Cord Is -2 * Or -3W)
• To prevent the possibility of electric shock when wiring, confirm that the power supply source is turned OFF. • Use the power cord supplied by Yokogawa with the instrument. • Check that the supply voltage matches the rated voltage of the AC adapter before connecting the power cord. -
Page 92: Turning The Power Switch On And Off
If the condition does not change when turning ON the power even after checking those items, it is probably a malfunction. Contact your nearest YOKOGAWA dealer for repairs. • That the power cord is plugged in properly. -
Page 93: Connecting The Ethernet Cable
For the LED indications, see section 1.3, “Functions of the Main Module.” Changing the Data Rate The MW100 can be connected to a 10BASE-T/100BASE-TX hub. The data rate can be fixed to 10 Mbps half duplex by setting the dip switch. -
Page 94: Connecting The Rs-422A/485 Interface (/C3 Option)
RS-232 port, connect through a converter. Host computer or connected upstream instrument Main unit Connected RS-422A/485 upstream terminals instrument MW100 RS-422A/485 Host computer Main unit Connected upstream instrument RS-422A/485 terminals MW100 Converter RS-232 RS-422A/485 2-25 IM MW100-01E... - Page 95 2.7 Connecting the RS-422A/485 Interface (/C3 Option) Example of a Connection with an Upstream Device You can connect the MW100 to an upstream device with an RS-232, RS-422A, or RS485 connection port. For RS-232, use a converter. Refer to the following table for connections to most converter terminals.
- Page 96 The maximum number of units that can be connected in this case is sixteen. Drivers for some conventional Yokogawa recorders (the HR2400, µR series, and other recorders) only support RS-422A. When such recorders are used, only a maximum of sixteen units can be connected.
-
Page 97: Connecting The Rs-232 Interface (/C2 Option)
“X-ON” from the computer are treated as data, and CS is ignored. • Receive Data Control Handshaking is not performed between the instrument and the computer. When the receive buffer of the instrument becomes full, data thereafter is discarded. RS = True (fixed) 2-28 IM MW100-01E... - Page 98 Note • A computer program must be created such that the receive buffers of the instrument and computer do not become FULL. • When selecting XON-XON, output data in ASCII format. 2-29 IM MW100-01E...
-
Page 99: Measures Against Noise On The Mw100 Data Acquisition Unit
MW100 Data Acquisition Unit. This section briefly describes the integrating A/D converter and the first-order lag filter that the MW100 Data Acquisition Unit employs as measures against noise. Integrating A/D Converter MW100 input modules employ integrating A/D converters for converting the measured analog signals into digital signals. - Page 100 2.9 Measures Against Noise on the MW100 Data Acquisition Unit 6-CH, Medium-Speed 4-wire RTD Resistance Input Module/10-CH, Middle-Speed Universal Input Module Measurement Integration Rejected Frequencies and Notes Interval Time 100 ms 1.67 ms 600 Hz and its integer multiples* 200 ms 16.67 ms...
-
Page 101: First-Order Lag Filter
2.9 Measures Against Noise on the MW100 Data Acquisition Unit First-Order Lag Filter For noise sources other than power supply noise, the MW100 Data Acquisition Unit is equipped with a first-order lag filter having output characteristics indicated in the figure below against step input. -
Page 102: 2.10 Handling Of The Cf Card
CF card slot. When not using the eject lever, push the lever in so that the slot cover can be closed. For CF card replacement while recording is in progress, see “Saving Data to the CF Card” in section 1.3. 2-33 IM MW100-01E... -
Page 103: Chapter 3 Setting And Data Acquisition
• JRE (Java runtime environment) version 1.4 or later. (Version 1.4 recommended) Java might not be installed on the following operating systems. • Windows 2000 SP4 or later • Windows XP SP2 or later If it is not installed, you can install it from the MW100 User’s Manual CD. IM MW100-01E... -
Page 104: Mw100 Operation Screens
3.1 Connection Environment MW100 Operation Screens The operation screens of the MW100 main module consist of Monitor screens enabling operations in Measurement mode, Setting screens that are mainly used in Setting mode, and Status screens for mode changes. Top Screen •... -
Page 105: Host Name Display
Host Name Display The host name or IP address is shown in brackets on the title bar of the window. Host name, or IP address The IP address is displayed if a host name has not been specified. IM MW100-01E... -
Page 106: Switching Modes
3.1 Connection Environment Switching Modes The MW100 has a Measurement mode and a Setting mode, and the mode must be changed depending on the operation to be performed. Switch between Measurement and Setting modes. For the operating procedure, see section 3.3, “System Settings.”... -
Page 107: Connection To The Mw100
Open an Ethernet connection between the MW100 and PC, then start the browser. Enter the host name or IP address of the MW100 in the browser’s URL/Address box. The MW100 top page appears. If the login function is set, step 3 is required. Ex. 1) IP address is 192.168.1.100 http://192.168.1.100/ Ex. - Page 108 To obtain DNS information from the server, select the DNS Information check box. To register a host name on the server, select the Host Name check box. Click the Apply button. Power cycle the MW100. The setting changes are applied. IM MW100-01E...
-
Page 109: Connecting With Serial Communication (Optional)
Enter an address number in the Address box. Select the address in the range of 1 to 32 for the MW100-specific protocol and 1 to 247 for the Modbus slave. Data Transfer Settings Select a baud rate in the Baud Rate list. -
Page 110: Modbus/Rtu Settings
3.2 Connection to the MW100 Modbus/RTU Settings Set the items below to use the Modbus/RTU function. • For Modbus master, set “Modbus Master Setting 1 and 2.” • For Modbus slave, set “Modbus master settings 1 and 2,” and “Receiver settings.”... - Page 111 3.2 Connection to the MW100 Modbus Master Setting 2 From the Top screen, click Communication Setting > Modbus Master Setting 2. Select the command number group to be set from the Command List list. Select READ/WRITE in the Function box.
-
Page 112: Modbus/Tcp Settings
3.2 Connection to the MW100 Modbus/TCP Settings Set the items below to use the Modbus/TCP function. An explanation on the settings is given in the appendix. • For Modbus client, set Modbus Client Setting 1 to 3. • For Modbus server, set the Modbus server to On in the Server Setting. - Page 113 3.2 Connection to the MW100 Modbus Client Setting 2 From the Top screen, click Communication Setting > Modbus Client Setting 2. The server list is displayed. Enter the server name in the Server box. Enter the server port number in the Port box.
-
Page 114: Login Function And User Settings
If you forget the password for the user set to the Admin level, there is no way to recover except initializing the MW100 using dip switch 1. Be sure not to forget the password. For the initialization procedure using the dip switch, see section 4.6, “System Initialization.”... -
Page 115: System Settings
Setting Mode System Reconstruction When connecting the MW100 for the first time, or when changing the position of an installed input/output module on the connected MW100, system reconfiguration is performed (to match up with the actual modules). Before reconfiguration, connect to the MW100 to be reconfigured. -
Page 116: Viewing And Initializing The System Information
Checking the Free Disk Space The amount of used and total space is displayed in the Capacity box under Media Information. Formatting Select the Format check box under Media Information. Click the Initialize button to initialize the CF card. 3-14 IM MW100-01E... -
Page 117: Daylight Saving Time Setting
Click the Apply button. The Summer time and Winter time start times are enabled. Other Settings You can set the MW100 unit number, units of temperature, key lock for preventing inadvertent operations, alarm hold, and rate of change interval. From the top screen, click System Setting > Other Settings. -
Page 118: Status Information And Processing
Click the Apply button. The settings for each item are applied. For a description of the rate of change interval, see “Alarms” in section 1.3. Status Information and Processing You can change the MW100 operation mode, operate the main unit keys, and check alarm statuses. Changing Status Information (Mode) From the top screen, click System Setting >... - Page 119 • Execute Communication Test Select the item you wish to test from the Communication Test list. Click the Apply button. The test is executed. For a description of the execution of the communication test, see “Communication Test” in section 5.2. 3-17 IM MW100-01E...
-
Page 120: Setting Acquisition Conditions For Measured/Computed Data
Click the Apply button. The setting changes take effect. For a description of the measurement interval and integration time that can be specified, see section 2.9, “Measures Against Noise on the MW100 Data Acquisition Unit.” Note The measurement interval that is assigned to the measurement group number is, (interval is short) meas. -
Page 121: Computation Operation Settings
Select Over (computation stop) or Rotate in the PSUM Overflowed Data list. Click the Apply button. The setting changes take effect. For a description of the data processing for computation errors, see “MATH Error Data Processing” in section 1.13. 3-19 IM MW100-01E... -
Page 122: Recording Operation Settings
For a description of the recording start action, see “Saving Data to the CF Card” in section 1.3. File Message Settings Enter the message to be saved to the measured/computed data file in the File Message box. Click the Apply button. The setting changes take effect. 3-20 IM MW100-01E... -
Page 123: Thinning Operation Settings
Select a recording data length from the Data Length list. Thinning File Message Settings Enter the message to be saved to the thinning data file in the Thinning File Message box. Click the Apply button. The setting changes take effect. 3-21 IM MW100-01E... -
Page 124: Recording Channel Settings
Click the Apply button. The setting changes take effect. For a description of folder mode, see “Saving Data to the CF Card” in section 1.3. 3-22 IM MW100-01E... -
Page 125: Setting Measurement Conditions (Measurement Channel Settings)
Remote RJC (RRJC) Reference Channel Setting This is required when RRJC is selected for the input type. Enter the remote RJC reference channel number in the Ref. Ch. box. Click the Apply button. The setting changes take effect. 3-23 IM MW100-01E... - Page 126 Select the decimal place from the D.P. list under Scale. Enter the scale conversion value in the Unit box. • Settings of Differential Computation between Channels Enter the reference channel number in the Reference box. Click the Apply button. The setting changes take effect. 3-24 IM MW100-01E...
-
Page 127: Global Channel Settings
(The figure below is an example in which channels 001 to 004 are set collectively.) The first number is set to the default value. Change the setting. Click the Apply button. The settings are applied to the specified range of channels. 3-25 IM MW100-01E... -
Page 128: Scale Input Methods
Setting the Filter Coefficient Select a coefficient in the Filter list. Click the Apply button. The setting changes take effect. For information about filter coefficients, see section 2.9, “Measures against Noise on the MW100 Data Acquisition Unit.” 3-26 IM MW100-01E... -
Page 129: Setting Up And Executing Strain Input Initial Balancing
Execute the Initial balance items in the Status information of the system settings. For executing the initial balancing, see “Processing and Operation” in “Status Information and Processing” in section 3.3. For a description of initial balancing, see “Initial Balancing (Unbalance Adjustment)” in section 1.7. 3-27 IM MW100-01E... -
Page 130: Math Settings (Math Channel Settingsand The /M1 Option)
Select the decimal place from the D.P. list under Span. Enter the scale conversion value in the Unit box. For the procedure to enter the scale, see “Setting the Scale” in section 3.5. Click the Apply button. The setting changes take effect. 3-28 IM MW100-01E... -
Page 131: Global Expression Setting
Enter the channel numbers to be grouped in the Channel Set box. Specify channel numbers by delimiting them with dots as in A001.A003.A006, or specify a range as in A004-A008. Click the Apply button. The setting changes take effect. 3-29 IM MW100-01E... -
Page 132: Program Channel Settings
Enter the communication input data value in the Input Value box. For the range of available communication input values, see chapter 5, “Specifications.” Click the Apply button. The setting changes take effect. For the range of communication input data values, see “MATH Function Specifications (/M1 Option)” in section 5.2. 3-30 IM MW100-01E... -
Page 133: Setting Alarms
Enter a hysteresis value in the Hysteresis box. For the procedure to set the rate-of-change interval, see “Other Settings” in section 3.3. For the procedure to set the delay alarm, see “Delay Alarm Setting” in this section. 3-31 IM MW100-01E... -
Page 134: Alarm Setting (Math)
Alarm Setting (MATH) You can set MATH channel alarms. From the top screen, click Channel Setting > Alarm Setting (MATH). Below, enter settings in the same manner as with measurement alarms. With MATH alarms, there is no hysteresis setting. 3-32 IM MW100-01E... -
Page 135: Delay Alarm Setting
Enter the delay time in the range of 1 to 3600 (s) in the Time box of the channel number you want to set. Set the time so that it is an integer multiple of the measurement or MATH interval. Click the Apply button. The setting changes take effect. 3-33 IM MW100-01E... -
Page 136: Digital Output Settings
Select a relay operation condition in the Action list. Select Off in the Reflash list to perform the reflash function. For a description of the reflash alarm, see “Reflash Function” in section 1.12. Click the Apply button. The setting changes take effect. 3-34 IM MW100-01E... -
Page 137: Analog/Pwm Output Settings
Select 10 V (voltage output) or 20 mA (current output) in the Range box. Span Setting Select the actual output range from the allowed output range. Enter the lower limit of span in the Lower box under Span. Also, enter the upper limit value in the Upper box. 3-35 IM MW100-01E... -
Page 138: Output Range Settings (Pwm Output)
In the Channel List list, select the channels you want to set. Output Type In the Mode box, select PWM to output or SKIP to not output. Output Action Settings Select Trans (transmission output) or Comm.Input (arbitrary output) in the Action box. 3-36 IM MW100-01E... -
Page 139: Global Channel Settings
The setting range of channels is 001 to 060. The specified range of channels must be analog output modules only or PWM output modules only. For a description of the global setting of channels, see “Global Channel Settings” in section 3.5. 3-37 IM MW100-01E... -
Page 140: Output Operation Settings
Setting the Operation upon Error Occurrence Select Last or Preset in the Error list under Preset Value. When Preset is selected, the specified value is output in the output range setting screen. Click the Apply button. The setting changes take effect. 3-38 IM MW100-01E... -
Page 141: Transmission Output Control
Select the channel group you wish to set from the Channel List list. Select On or Off in the Output list of the channel number you wish to set. Click the Apply button. Starts transmission output on channels set to On. 3-39 IM MW100-01E... -
Page 142: 3.10 Event/Action Settings
Flag box is enabled, meaning that the setting in step 8 is required. Enter a flag number in the Flag box. For the action types, see “Event Action Function” in section 1.3. Click the Apply button. The setting changes take effect. 3-40 IM MW100-01E... -
Page 143: 3.11 Timer And Match Time Settings
The hour and minute are in order from the left in the box. Select the time interval you wish to set in the Interval list under Absolute Time. M and H indicate the minute and hour respectively. Click the Apply button. The setting changes take effect. 3-41 IM MW100-01E... -
Page 144: Setting The Match Time
Select Day in the Mode list. Enter the desired time in the Time box. Enter the hour and minute in the second and third box from the left, respectively. Click the Apply button. The setting changes take effect. 3-42 IM MW100-01E... -
Page 145: Starting And Stopping Measurement, Computation, And Recording
This is an explanation of the procedure for starting and stopping measurement, computation, and recording. These operations can be performed by pressing keys on the MW100 main module, or from a browser. The state transition diagram of the MW100 is given below. Setting Setting Mode... -
Page 146: Starting And Stopping Computation
In the Status table in the top screen, select Stop from the Operation list of the Recording item. Recording stops. You can also start or stop the recording from the Monitor screen. For the procedure to start or stop the recording in the Monitor screen, see section 3.15, “Measured Data Monitor Display/Settings.” 3-44 IM MW100-01E... -
Page 147: Checking The Operating Status Of The Mw100 Using The Status Indicators
3.12 Starting and Stopping Measurement, Computation, and Recording Checking the Operating Status of the MW100 Using the Status Indicators You can confirm the operational status of the MW100 by viewing the status indicators on the front panel. MEASURE Behavior Color... -
Page 148: 3.13 Network Utility Settings
Enter the folder to be accessed when opening a connection in the Directory box. You can select the PASV Mode check box to use FTP passive (PASV) mode. Click the Apply button. The setting changes take effect. 3-46 IM MW100-01E... -
Page 149: Mail Client Settings
Select the Password check box under Authentication, and then enter the password for accessing the POP3 server in the Password box. If you do not select the check box, you cannot enter the password. Click the Apply button. The setting changes take effect. 3-47 IM MW100-01E... - Page 150 Enter a reference time for the send interval in the Time box under Periodic Report. To attach instantaneous values to Periodic Report, select the Instantaneous Data check box. Click the Apply button. The setting changes take effect. 3-48 IM MW100-01E...
-
Page 151: Time Synchronization Client Settings
Enter the SNTP server port number in the Port box. Enter a reference time to be queried Ref.Time box under Query Action. Next, select a query time interval in the Interval list. Click the Apply button. The setting changes take effect. 3-49 IM MW100-01E... -
Page 152: Server Settings
For a description of the keepalive function, see “Communication” in section 5.2. Communication Timeout Function Select the Application Timeout check box to enable the application timeout function when connecting to the MW100-specific communication (GENE) server. Enter the timeout value for the connection to the GENE server in the Timeout box. -
Page 153: 3.14 Saving And Loading Setup Data
3.14 Saving and Loading Setup Data You can save and load MW100 main unit settings. The setup file is stored in the CONFIG folder of the CF card. For the settings that are saved and loaded, see “Saving Data to the CF Card” in section 1.3. -
Page 154: 3.15 Measured Data Monitor Display/Settings
3.15 Measured Data Monitor Display/Settings You can monitor-display data measured on the MW100. The screen consists of Screen display 1 and Screen display 2, and for each you can select trend display, digital display, meter display, bar graph display, or overview display. -
Page 155: Explanation Of Display Items
Click to turn relays ON Displays output values in a Output value display and OFF bar graph. Also, you can Analog output: V or mA click to change the output display values. PWM Output: % display 3-53 IM MW100-01E... - Page 156 Displayed in another window. Select a Background Color Switch background color between white and gray. Contents of the Status Bar MW100 serial number MW100 firmware version Measurement group recording operation (1 to 3)/ thinning recording operation status (T) Recording: Yellow...
- Page 157 • Slide zone • Auto zone Trip line You can display a trip line in the Trend display. For the procedure to set the trip line, see “Trip Line Setting” in “Display Settings” in this section. Trip line 3-55 IM MW100-01E...
- Page 158 Center for the bar graph section. For a description of the alarm status, see “Digital Display” in “Monitor Display Screen” in this section. Channel number display/ tag name display Graph display reference position • Normal • Center 3-56 IM MW100-01E...
- Page 159 Alarm Type Displays the alarm type (H/L/rH/rL/dH/dL/tH/tL). If two or more alarms occur at once, the alarm level numbers are displayed in order starting from the smallest number. 3-57 IM MW100-01E...
- Page 160 Sets the number of alarms to display. Type Shows the alarm level and type. Alarm type(H/L/rH/rL/dH/dL/tH/tL) Alarm level(1 to 4) Channel Shows the channel on which the alarm occurred. Click to sort in ascending or descending order. 3-58 IM MW100-01E...
-
Page 161: Display Settings
Enter a tag name in the Tag box of each tag number. You can use 15 alphanumeric characters. If you do not enter the tag names, the channel numbers are displayed even if the tag name display is enabled. Click the Apply button. The setting changes take effect. 3-59 IM MW100-01E... - Page 162 Select the channel group you wish to set from the Channel List list. Select the color you wish to assign in the Color list of each channel. Color samples are shown towards the bottom of the screen Click the Apply button. The setting changes take effect. 3-60 IM MW100-01E...
- Page 163 Specify a percentage from the top or bottom in the Zone boxes. Enter a Lower value of 0 to 95 (%), and an upper value from 5 to 100 (%). Click the Apply button. The setting changes take effect. 3-61 IM MW100-01E...
- Page 164 Specify a percentage for the position of the trip line in the Trip Point box. 100% is the scale maximum in the trend display, and 0% is the minimum. Click the Apply button. The setting changes take effect. 3-62 IM MW100-01E...
-
Page 165: Log Information
Meas. Mode Log Information You can display information from the recording log, alarm summaries, and other sources. For information about display contents, see the MW100 Communication Command manual (IM MW100-17E). Log Information From the top screen, click System Setting > Log Information. -
Page 166: Chapter 4 Troubleshooting And Maintenance
Error in the internal battery Servicing required. of the main module. However, this error is also displayed immediately after the battery is replaced. If this happens, power-cycle the MW100. Ethernet controller error Servicing required. Web fi le load error Servicing required. -
Page 167: Communication Errors
2.6 * to determine whether your environment supports host name registration. * See the MW100 Viewer Software User’s Manual (IM MW180-01E). Settings Errors The code is divided into two parts which are displayed alternately on the 7-segment LED; in the first part, the letter E appears in the left digit with the hundreds digit of the error code to the right, and the second part consists of the last two digits of the error code. - Page 168 Set a different value for the upper and lower limits of output be equal. span. E105 Invalid transmission reference channel. Set the input module or MATH channel number. E110 Invalid channel number for contact input event. Set the channel number for the universal input module or DI module. IM MW100-01E...
- Page 169 Specify a channel using the correct format. E165 Invalid channel number for Modbus command. Enter a correct channel. E166 Invalid combination of start and end channel for Set the fi rst and last channel to the same type. Modbus command. IM MW100-01E...
-
Page 170: Execution Error
Reinsert the CF card or format it. E314 File is write-protected. Check write permissions. E315 No such fi le or directory. Check the fi les and folders. * * May occur in the MW100 internal processing (during an abnormality) IM MW100-01E... -
Page 171: Communication Command Error
Perform the re-recording start operation. outage. Take appropriate action for power failure. * May occur in the MW100 internal processing (during an abnormality) Communication Command Error The code is divided into two parts which are displayed alternately on the 7-segment LED;... -
Page 172: Communication Error
E appears in the left digit with the hundreds digit of the error code to the right, and the second part consists of the last two digits of the error code. Display Possible Problem Corrective Action E999 System error. Servicing required. IM MW100-01E... -
Page 173: Error Display In The Monitor Screen And Corrective Actions
No data found in fi le. Check the recording settings. Remove MATH start/stop action from the Event/Action Remove MATH start/stop action from the Event/Action settings. settings. Remove recording start/stop action from the Event/Action Remove recording start/stop action from the Event/Action settings. settings. IM MW100-01E... -
Page 174: Troubleshooting
(servicing required). The power supply is shorted inside the main Replace the main module. (Servicing required.) module. The MW100 cannot be detected from the PC or cannot be detected with the Search button. Possible Problem Corrective Action Ref. section The LINK LED does not turn ON. - Page 175 4.3 Troubleshooting The MW100 can be detected using the Search button, but browser connection fails. Possible Problem Corrective Action Ref. section The IP address is set to the default value. Enter the correct IP address. The default value cannot be used to make the connection.
- Page 176 Make the alarm and output relay settings appropriate. The CF card is not detected. Possible Problem Corrective Action Ref. section There is a problem with the CF card. Replace the CF card. 2.11 Eject and format the CF card, then insert it again. 4-11 IM MW100-01E...
-
Page 177: Calibration
Calibration Procedure Wire the standard and instrument to be calibrated as shown in the figure below. Turn ON the power while holding down user function key 1 on the MW100. The unit enters Calibration mode. Allow a sufficient warm-up time for the MW100 Data Acquisition Unit (thirty minutes or more). - Page 178 * When calibrating the RTD (1 mA) 60 mV range, connect 60 the input terminal of CH6. Ω When calibrating the RTD (1 mA) 200 mV range, connect 200 to the input terminal of CH4. Resistance standard 4-13 IM MW100-01E...
- Page 179 * The Full calibration value of the 2000 µStrain range is equivalent to 12000 µStrain The Full calibration value of the 20000 µStrain range is equivalent to 30000 µStrain The Full calibration value of the 200000 µStrain range is equivalent to 200000 µStrain 4-14 IM MW100-01E...
- Page 180 Switch the bridge head 1 2 3 4 5 • When calibrating the output range of the 8-CH, Medium-Speed Analog Output module All eight channels are calibrated at Zero (0 V) and Full (10 V). Digital multimeter 4-15 IM MW100-01E...
-
Page 181: Calibration Of Temperature Measurements Using Thermocouples
0°C standard temperature device Note • Calibration of temperature measurements of the MW100 Data Acquisition Unit using thermocouples differs from calibration of DC voltage and RTD ranges in that the input cannot be adjusted. If the temperature measurement calibration using thermocouples does not meet the accuracy specifications, check thoroughly for input error and other problems, then contact your Yokogawa dealer or representative. -
Page 182: Parts And Maintenance
There is no replacement service for the parts listed. If you are to use the MW100 for an extended time, repair or replace the main module according to the service life of the parts and taking into consideration the actual usage conditions. -
Page 183: System Initialization
System Initialization Perform this procedure to initialize the settings on the MW100. The following types of initialization are available. Initialization Type Type Level Items Initialized Initialization using dip switches ---- All settings Initialization using Setting other than configurated module communication commands information All except Comm. -
Page 184: Updating The System
Checking the Current Version Check the current version of the MW100. Check that the firmware and Web software that you are going to use to update the MW100 are of the latest versions, and start the update operation. For the procedure to check the version, see “Viewing and Initializing the System Information”... -
Page 185: Update Confi Rmation
(cache) of the browser. If Java Runtime by Sun Microsystems Is Used When you update the MW100, the Setting or Monitor display of the browser will not display correctly. If you are using Java Runtime, clear the cache. -
Page 186: Chapter 5 Specifi Cation
(applies only to normal indoor atmospheres (with non- conductive pollution). Measurement category II: For measurements performed on circuits directly connected to the electrical distribution system such as provided by a wall outlet. IM MW100-01E... -
Page 187: Main Module Specifi Cations
1000 1000 2000 1200 1500 3000 1200 1500 2400 3000 6000 Measurement groups: Measurement channels can be divided into up to 3 groups by module. The measurement interval must be the same for all channels in the group. IM MW100-01E... -
Page 188: Math
+, – Relational computation .GT., .LT., .GE., .LE. Equal and not equal .EQ., .NE. Logical product Logical sum and exclusive logical sum OR, XOR (Low order of precedence) Calculation order: Performs calculation in ascending order by channel number. IM MW100-01E... - Page 189 Precision: Mantissa, 5 digits; exponent, 2 digits Range: –9.9999E+29 to –1.0000E-30,0,1.0000E-30 to 9.9999E+29 Flag input channels: Flag value can be substituted in computational expressions. Range: 0, 1 Varies according to the operation of the Event/Action function. IM MW100-01E...
- Page 190 When the volume of computations is high: Display updating on the monitor screen, response to computation stop operations, and other behavior may be slow. To stop computation promptly, press the Stop key on the main module. IM MW100-01E...
-
Page 191: Rjc
0°C. The MW100 performs compensation by measuring the temperature at the terminal of the universal input module and adding the corresponding thermoelectromotive force to the actual output of the thermocouple. -
Page 192: Alarms
The alarm detection behavior on the MATH channel is reset, and new alarm detection is started. Reflash alarm: If multiple alarms are assigned to an output relay and the second alarm occurs while the first relay is activated, the relay is deactivated once and activated again. IM MW100-01E... -
Page 193: Recorder Structure
• Space for storing the measured, computed, and thinned data. One fi le size for Single and FullStop Twice the one fi le size for Rotate • Space for storing long information fi les and alarm summary fi les Approx. 1 Mbyte IM MW100-01E... - Page 194 1500 ch/sec. or less Ex.) Measurement group 1 Recording interval 10 ms, 10 ch Measurement group 2 Recording interval 100 ms, 50 ch (1s / 0.01s) × 10ch + (1s / 0.1s) × 50ch = 1500 ch/sec. IM MW100-01E...
- Page 195 Files in measurement groups 1 to 3 are 1 to 3 Computed data fi le is M Thinned values, T XXXX: Sequence number 0000-9999 MXD: MW100 fi le extension (uppercase) Data length: Measurement groups for which TRIGGER was selected can be set individually.
- Page 196 The maximum number of characters that can be specifi ed is 120. The fi le message can be viewed when the fi le information is displayed on the MW100 Viewer Software. Write message: During execution of the recording action, a message that corresponds to the recorded data can be included in the fi...
- Page 197 Using the main unit’s internal backup memory (SRAM) even upon a power failure, data before the failure is saved to CF card without loss. Backup memory capacity: For measured and computed values 1.25 Mbyte For thinned values 256 Kbyte 5-12 IM MW100-01E...
-
Page 198: Display
The data rate can be fi xed to 10 Mbps half duplex by turning switch 6 of dip switch 1 OFF. Connector type: RJ-45 Main protocols: FTP, SMTP, SNTP, DHCP, DNS, HTTP, Modbus/TCP, and MW100 dedicated protocol. Communication services: Send/receive measured and computed values, send/receive setting values, maintenance/diagnostic services, and others. - Page 199 When time information is acquired upon startup, measurement start, and when the SNTP client is turned ON, the time is not applied if the difference between the time of the MW100 and the server is 1 hour or more. When the time is acquired at specifi...
- Page 200 Select either 7 or 8 bits Parity: Select even, odd, or none. Stop bit: Select either 1 or 2 bits Receive buffer length: 2047Byte Protocol: Dedicated protocol and Modbus/RTU Communication services: Send/receive setting values, send/receive measured and computed values. 5-15 IM MW100-01E...
- Page 201 For information about communication commands, see the MW100 Communication Command manual (IM MW100-17E). Communication Output Function The following information about the main unit can be output using communication commands. For information about communication commands, see the MW100 Communication Command manual (IM MW100-17E). Item Description...
-
Page 202: Modbus Protocol Specifi Cations
Select a time to wait between receiving of the response to a command until the next command is sent. Off, 0, 10, 20, 50, 100 ms Supported functions: The functions that the MW100 supports are as follows. Function Code Function Operation... - Page 203 MW100 performs the loop back test on the main instrument. Main instrument only support message return (diagnostic code (0x00). Write to hold registers MW100 writes to the main instrument’s (4XXXX) communication input data. Register Assign (Modbus Server Functions and Sharing)
- Page 204 The specified number of registers was zero. Could not be executed Attempted to read MATH registers from an instrument without the MATH function option. However, there is no response in the following cases. • CRC Error • Errors other than in above table. 5-19 IM MW100-01E...
- Page 205 30 s (fi xed) or more Supported function: Same as Modbus slave function. However, there is no function code 8 (loopback test). Register assignments: Same as Modbus slave function Modbus error response: Same as Modbus slave function 5-20 IM MW100-01E...
-
Page 206: Event Action
The setting is set in 1-minute intervals. When the power fails or the clock is changed and the timeup time is exceeded, the time up is not acknowledged. 5-21 IM MW100-01E... -
Page 207: User Interface
Tags can be added to measured values that are recorded and saved. During displaying: You can select whether to display tags or channel numbers on all channels. Tag string settings: Can be set channel by channel. No. of characters: Up to 15 5-22 IM MW100-01E... - Page 208 Modbus client log Modbus slave log Modbus server log Computation status Recording status Maximum no. displayed Item Maximum no. displayed Modbus client connection command Modbus client connection status Modbus master command Modbus master connection status Strain initial balance result 5-23 IM MW100-01E...
-
Page 209: General Specifi Cations
1500 VAC (50/60 Hz) for one minute DC power Between DC power supply terminal and earth terminal: 1000 VAC (50/60 Hz) for one minute External dimensions: Approx. 105 (W) × 131 (H) × 137 (D) mm Weight: Approx. 1kg. 5-24 IM MW100-01E... -
Page 210: External Dimensions
POWER START STOP USER 1 USER 2 12-28V DC - - - SERIAL COMM 35VA MAX 144.4 If not specified, the tolerance is ±3%. However, in cases of less than 10 mm, the tolerance is ±0.3 mm. 5-25 IM MW100-01E... -
Page 211: Base Plate Specifi Cations
±0.3 mm. Attaching the MW100 Main Module The accessory bracket must be attached in order to attach the MW100 main module to the base plate. For information about attaching the bracket, see the Installation and Connection Guide (IM MW100-72E). -
Page 212: 4-Ch, High-Speed Universal Input Module Specifi Cations
(1% of rdg + 2.5°C) R, S, B, K, E, J, T: ANSI, IEC 584, DIN IEC 584, JIS C 1602-1981 L: Fe-CuNi, DIN43710/U: Cu-CuNi, DIN 43710 N: Nicrosil-Nisil, IEC 584, DIN IEC 584 4 W: W•5%RE-W•26%Re (Hoskins Mfg Co) 5-27 IM MW100-01E... - Page 213 * When the measurement interval is 10 ms, measured values may fluctuate since power supply frequency noise is not rejected. In such cases, set the measurement interval to 50 ms or more. ** For DC power, set to 20 ms. Reference junction compensation: Switch external/internal by channel, includes remote RJC function 5-28 IM MW100-01E...
- Page 214 Approx. 3 W External dimensions: Approx. 57 (W) × 131 (H) × 151 (D) mm (including the terminal cover) Weight: Approx. 0.5 kg. Terminal type: Clamp, detachable per channel Applicable wire size: 0.2 to 2.5 mm (AWG24 to 12) 5-29 IM MW100-01E...
-
Page 215: Effects Of Operating Conditions
10 to 50% RH for 40 to 50°C 5 to 30% RH for 50 to 60 °C External Dimensions Units: mm 150.8 If not specified, the tolerance is ±3%. However, in cases of less than 10 mm, the tolerance is ±0.3 mm. 5-30 IM MW100-01E... -
Page 216: 10-Ch, Medium-Speed Universal Input Module Specifi Cations
(1% of rdg + 2.5°C) R, S, B, K, E, J, T: ANSI, IEC 584, DIN IEC 584, JIS C 1602-1995 L: Fe-CuNi, DIN43710/U: Cu-CuNi, DIN 43710 N: Nicrosil-Nisil, IEC 584, DIN IEC 584 4 W: W•5%RE-W•26%Re (Hoskins Mfg Co) 5-31 IM MW100-01E... - Page 217 When synchronizing time by SNTP, the integral time is set to 100 ms. Also in this case, noise of 10 Hz and its integer multiples is rejected. Reference junction compensation: Switch external/internal by channel, includes remote RJC function 5-32 IM MW100-01E...
- Page 218 External dimensions: Approx. 57 (W) × 131 (H) × 151 (D) mm (including the terminal cover) Weight: Approx. 0.5 kg. Terminal type: Clamp, terminal board is detachable Applicable wire size: 0.14 to 1.5 mm (AWG26 to 16) 5-33 IM MW100-01E...
-
Page 219: Effects Of Operating Conditions
10 to 50% RH for 40 to 50°C 5 to 30% RH for 50 to 60 °C External Dimensions Units: mm 150.8 If not specified, the tolerance is ±3%. However, in cases of less than 10 mm, the tolerance is ±0.3 mm. 5-34 IM MW100-01E... -
Page 220: 6-Ch, Medium-Speed Four-Wire Rtd Resistance Input Module Specifi Cations
JPt100: JIS C 1604-1989, JIS C 1606-1989 SAMA/DIN 3 McGRAW EDISON COMPANY 4 Guaranteed accuracy range Cu10 GE: –84.4 to 170.0°C/Cu10 L&N: –75.0 to 150.0°C/Cu10 WEED: –20.0 to 250.0°C/ Cu10 BAILEY: –20.0 to 250.0°C 5. 4-wire RTD, 4-wire resistance 5-35 IM MW100-01E... - Page 221 When the integration time is 16.67 ms or more: 120 dB or more When the integration time is 1.67 ms: 80 dB or more Common-mode voltage between channels: DC voltage, DI: 120 VACrms (50/60 Hz) RTD, resistance: 50 VACrms (50/60 Hz) 5-36 IM MW100-01E...
-
Page 222: Effects Of Operating Conditions
The fl uctuation that results by applying a sinusoidal vibration along all three axes at a frequency between 10 to 60 Hz and an acceleration of 0.2 m/s is ±(0.1% of rdg. + 1 digit) or less 5-37 IM MW100-01E... -
Page 223: General Specifi Cations
10 to 50% RH for 40 to 50°C 5 to 30% RH for 50 to 60 °C External Dimensions Units: mm 150.8 If not specified, the tolerance is ±3%. However, in cases of less than 10 mm, the tolerance is ±0.3 mm. 5-38 IM MW100-01E... -
Page 224: 4-Ch, Medium-Speed Strain Input Module Specifi Cations
Fixed at 2.0. Gauge factor can be compensated with the scaling function Balance adjustment: Automatic, digital calculation methods Balance adjustment range: ±10000 µstrain (1 gauge method conversion) Balance adjustment accuracy: The measurement accuracy or less Resistance accuracy for bridge: ±0.01% ±5ppm/°C Input resistance: 1 MΩ or more. 5-39 IM MW100-01E... -
Page 225: Effects Of Operating Conditions
Effects of magnetic fi eld: The fl uctuation in external magnetic fi elds for AC (50/60 Hz) 400 A/m is ±2% of range or less Effect of position: Horizontal with the feet at the bottom is the rule. 5-40 IM MW100-01E... - Page 226 5 to 30% RH for 50 to 60 °C External Dimensions Units: mm -B12, -B35 -NDI 133.8 150.8 If not specified, the tolerance is ±3%. However, in cases of less than 10 mm, the tolerance is ±0.3 mm. 5-41 IM MW100-01E...
-
Page 227: General Specifi Cations
10 to 50% RH for 40 to 50 °C 5 to 30% RH for 50 to 60 °C External Dimensions Units: mm 150.8 If not specified, the tolerance is ±3%. However, in cases of less than 10 mm, the tolerance is ±0.3 mm. 5-42 IM MW100-01E... -
Page 228: General Specifi Cations
External dimensions: Approx. 57 (W) × 131 (H) × 151 (D) mm (including the terminal cover) Weight: Approx. 0.5 kg. General Specifications Operating temperature range: –20 to 50°C Operating humidity range: 20 to 80% RH for –20 to 40 °C 10 to 50% RH for 40 to 50°C 5-43 IM MW100-01E... -
Page 229: External Dimensions
• When the input channel is ±OVER in the case of transmission output • When outside the range of voltage –11 V to +11 V, or current 0 mA to 22 mA (accuracy assured at 1 mA or more) 5-44 IM MW100-01E... -
Page 230: 8-Ch, Medium-Speed Pwm Output Module Specifi Cations
Clamp, attached and removed in units of 4 channels Applicable wire size: 0.08 to 2.5 mm (AWG28 to 12) External dimensions: Approx. 57 (W) × 131 (H) × 151 (D) mm (including the terminal cover) Weight: Approx. 0.5kg. 5-45 IM MW100-01E... -
Page 231: General Specifi Cations
Duty: +5% of the output Full Span –OVER Duty: –5% of the output Full Span ±OVER conditions • When duty exceeds 0.000 to 100.000% • When the input channel is ±OVER in the case of transmission output 5-46 IM MW100-01E... -
Page 232: Operations Common To The 8-Ch Medium-Speed Analog Output Module And The 8-Ch Medium Speed Pwm Output Module
Overview of Output Operation When Setting Holding of Previous Value of Transmission Output Previous value Previous value (held) Value held Output value Power ON Measurement Measurement Measurement stop restarts start (or Transmission output (or Transmission output execute disabled) execute enabled) 5-47 IM MW100-01E... -
Page 233: 10-Ch, Medium-Speed Digital Output Module Specifi Cations
20 to 80% RH for –20 to 40 °C 10 to 50% RH for 40 to 50 °C External Dimensions Units: mm 150.8 If not specified, the tolerance is ±3%. However, in cases of less than 10 mm, the tolerance is ±0.3 mm. 5-48 IM MW100-01E... -
Page 234: Appendix
Appendix Appendix 1 Supported Characters When entering characters on the MW100 from a browser, the following characters can be used. There are limits to which characters can be used depending on the type of entry item. For information on the characters can that can be used in communication commands, see the MW100 Communication Command manual (IM MW100-17E). -
Page 235: Appendix 2 Setting Data Communication That Uses Modbus Protocol
READ Direction of data WRITE The MW100 set up as the client in the above system diagram is referred to as the MW100 client. Likewise, the MW100 set up as the server is referred to as the MW100 server. App-2... -
Page 236: Setup Example
001 to 004 of the MW100 server, and also writes that data to the MW100 server. The following is an example in which the data written to the MW100 server is displayed. -
Page 237: Client/Server Settings For Read
Appendix 2 Setting Data Communication That Uses Modbus Protocol 2. Computed data from MATH channels A001 to A004 of the MW100 client are written to communication input channels C001 to C004 of the MW100 server. For WRITE (client writes data to the server) - Page 238 001 to 004 is of the 32-bit floating point type. MATH Channel Settings In order to display data loaded to the communication input channels from the MW100 server, enter the communication input channel numbers in the MATH channel expression entry area.
-
Page 239: Client/Server Settings For Write
READ. MATH Channel Settings In order to display data written to the hold registers from the MW100 client, enter the communication input channel numbers in the MATH channel expression entry area. These are the same as the MATH channel settings for READ. -
Page 240: Starting Communication
Displaying Data When data is sent/received via Modbus communication, the following waveform is displayed on the monitor screen of a Web browser. • Displaying MW100 Client Data (Trend) Computed data (data received via Modbus communications) • Displaying MW100 Server Data (Trend) -
Page 241: Checking The Communication Status
31002 (Lower 16bit) * MW100 data are all Little Endian, and assigned to Modbus registers. When loading MW100 data, specify “Little.” For the available MW100 register numbers, Modbus protocol specifications, and other information, see "Modbus Protocol Specifications" in section 5.2 of the MW100 User’s Manual (IM MW100-01E). -
Page 242: Appendix 3 Using The Event Action
0:00, 0:10, 0:20 and so on (at any of the 10 minute intervals). If you start the recording at 0:03, the data is recorded at 0:53, 1:53, 2:53, and so on. App-9 IM MW100-01E... -
Page 243: Diving The Data On Each Event
Event: DI, Alarm, Relay, UserKey, etc. Action: Memory Save Event detection: Edge • Setting the Recording Recording start action: Direct, recording stop action: Fullstop or Rotate, data length: arbitrary (long time) Start Relay User Key Time (s) Divide App-10 IM MW100-01E... -
Page 244: Appendix 4 E-Mail Format
Data status ( N , D , O , E ) N (normal), D (differential input), O (over), E (error) uuuuuu Unit information (output using 6 chars., left justified) mV____ : mV V_____ : V ^C____ : °C XXXXXX : (user specified char. string) App-11 IM MW100-01E... -
Page 245: File Creation Notifi Cation E-Mail Format
CRLF Year ( 00 99 ) Month ( 01 12 ) Day ( 01 31 ) Hour ( 00 23 ) Minute ( 00 59 ) Seconds ( 00 59 ) Folder name File name Blank App-12 IM MW100-01E... -
Page 246: Media Remaining Space Notifi Cation E-Mail Format
TIME_hh:mi:ssCRLF CRLF <Power_On>CRLF DATE_yy/mo/ddCRLF TIME_hh:mi:ssCRLF CRLF Year ( 00 99 ) Month ( 01 12 ) Day ( 01 31 ) Hour ( 00 23 ) Minute ( 00 59 ) Seconds ( 00 59 ) Blank App-13 IM MW100-01E... -
Page 247: Error Notifi Cation E-Mail Format
CRLF Year ( 00 99 ) Month ( 01 12 ) Day ( 01 31 ) Hour ( 00 23 ) Minute ( 00 59 ) Seconds ( 00 59 ) Error number mm··mm Error message Blank App-14 IM MW100-01E... -
Page 248: Periodic Report Notifi Cation E-Mail Format
: mV V_____ : V ^C____ : °C xxxxxx : (user specified char. string) Symbols (+, –) ddddd Data mantissa (measurement channel, 00000 99999 ) eeeeeeee Data mantissa (measurement channel, 00000000 99999999 ) Data exponent ( 0 Blank App-15 IM MW100-01E... -
Page 249: Test E-Mail Format
CRLF TestCRLF <Time>CRLF DATE_yy/mo/ddCRLF TIME_hh:mi:ssCRLF CRLF Year ( 00 99 ) Month ( 01 12 ) Day ( 01 31 ) Hour ( 00 23 ) Minute ( 00 59 ) Seconds ( 00 59 ) Blank App-16 IM MW100-01E... -
Page 250: Appendix 5 Retrieving Files Using Webdav
The MW100 communication service contains the WebDAV function. This function is used to operate the files on the CF card that is attached to the MW100 or retrieve the files. This section explains the method using a browser. Internet Explorer is used for the browser. -
Page 251: Appendix 6 Network Terminology
Web server can be managed from the client (Web browser). It allows (1) the document created on the client to be transmitted to the server for disclosure, (2) the list of folders and files on the server to be retrieved, and (3) the files and folders to be copied, moved, and deleted. App-18 IM MW100-01E... -
Page 252: Appendix 7 Using The Broken Line Data Of Decimal Values
(40, 2.2) (10, 1.5) (20, 1.5) (50, 0.0) (0, 0.0) X: Time (s) • Entry Example Set the calcuation constant as K01=10. The broken line data P01 is as follows: (0.0), (10.15), (20.15), (30.22), (40.22), (50.0), (-1.0) App-19 IM MW100-01E... -
Page 253: Appendix 8 Saving Data To The Cf Card
10:00. The data save operations is as follows: Length of one data writing Start Data length Data writing time Time (s) Next file 1st data writing 8th data writing File complete File generation start App-20 IM MW100-01E... -
Page 254: Replacing The Cf Card While Recording
The files that are divided due to the replacement of the CF card can be joined using the MW100 Viewer Software. The files that can be joined are limited those in which the recording start action is Direct. It is possible to join files even if there are dropouts. For details, see the MW100 Viewer Software User’s Manual (MW180-01E). -
Page 255: Write Count
Mbyte (when not using multi interval), the write count N is given by 30 min × 60 Write Count N > = 7.03 1.25 Mbyte / 2 × 100 ms 256 bytes In this example, data is written 8 times (30 minutes/8 = 3 minutes 45 seconds). App-22 IM MW100-01E... - Page 256 ............1-15 basic math ................1-50 delay time ................5-7 baud rate ................5-15 desktop ................. 2-3 browser ................. 3-1 DHCP ..............5-13, App-18 burnout ..............1-14, 3-27 DHCP client function ............1-23 DI ................1-36, 1-41 Index-1 IM MW100-01E...
- Page 257 3-15 floor..................2-3 key lock function ............1-10, 5-22 floor, placement ..............2-2 key lock status ..............1-11 flow of operation ..............1-8 key operation ..............3-17 folders, setting of ..............1-21 folder structure..............1-21 Index-2 IM MW100-01E...
- Page 258 MW-specific ................ 1-23 lower limit alarm ..............1-15 MW100-specific communication ......... 5-13 low limit on rate-of-change alarm ........1-15 MW100-specific protocol ..........1-23, 3-7 mail client settings .............. 3-47 non-hold................1-48 mail header ................. 3-48 normal mode rejection ratio ..... 5-29, 5-33, 5-36, 5-40 Main Module ..............
- Page 259 ..i, 5-2, 5-27, 5-31, 5-35, 5-39, 5-42, 5-43, 5-45, RS-232 communication ............1-26 5-48 RS-232 interface............2-28, 5-15 subnet mask ..............App-18 RS-422A/485 communication ..........1-26 supply voltage range used............ 5-1 RS-422A/485 interface ............2-25 supported external media ............. 5-9 Index-4 IM MW100-01E...
- Page 260 ..........5-43, 5-45, 5-48 updating ................4-19 upper limit alarm ..............1-15 user authentication ............. 3-47 user function keys............1-10, 5-22 user interface ..............5-22 user privileges ..............1-23 user settings ............... 3-12 user zone ................3-55 Index-5 IM MW100-01E...
Need help?
Do you have a question about the MW100 and is the answer not in the manual?
Questions and answers