Advertisement
Quick Links
1. Assemble the boat stand from parts
1-2-3 as shown on the small plan.
2. Prepare the hull by trimming as shown
on the small plan Drawing 1. Carefully
remove
the
excess
carefully down to the final height of 5mm
and shape the bow as
shown.
3. Lightly sand the inside
of the hull to provide a key
for the deck 5. Fit the deck
and sand if required to
ensure a snug fit. When
this is achieved Epoxy glue
Felix Building Instructions
Art. No. 20300
material
sand
the deck in position. (See hull sections
BB & CC for position.)
For the following sequence refer to the
main drawing
4. Parts 6-7. Fit the engine cover,
coamings
coamings under the lower deck.
5. Part 9. Fit the rear upper deck support
and glue.
6.
Part 10. Fit the seat supports and
glue.
7. Part 11. Check and fit the rear deck
hatch.
Seite 1
and
rear
access
© Krick Modelltechnik, Germany, June 2015
hatch
Advertisement

Subscribe to Our Youtube Channel
Related Manuals for Krick 20300


Summary of Contents for Krick 20300
- Page 1 3. Lightly sand the inside of the hull to provide a key for the deck 5. Fit the deck and sand if required to ensure a snug fit. When this is achieved Epoxy glue Seite 1 © Krick Modelltechnik, Germany, June 2015...
-
Page 2: Motor
Insert the shaft and tube and with the motor in position coupling 26 as an aligning jig to ensure complete accuracy. Seite 2 © Krick Modelltechnik, Germany, June 2015... -
Page 3: Main Deck
42 to the deck. Fit and glue in place the deck bulkhead 43. When the glue has dried, fit and glue in position the cabin sides 52. Carefully mark out the roof panel as dimensioned in drawing 8. Seite 3 © Krick Modelltechnik, Germany, June 2015... -
Page 4: Cabin Roof
Fit and glue the hand rail wood finish. Paint the roof to match the Cabin roof. 17. Part 66. Glaze the main cabin and the bridge using the supplied template. (Glue with PVA wood glue). Seite 4 © Krick Modelltechnik, Germany, June 2015... -
Page 5: Seite
Klaus Krick Modelltechnik 25. Parts 104 to 106. These components Industriestrasse 1 should be fitted as shown D-75438 Knittlingen drawing to your radio control servo. E-Mail: Service@Krick-Modell.de Seite 5 © Krick Modelltechnik, Germany, June 2015... - Page 6 Ships Wheel Support Wood Sheet 4 Ships Wheel Plastic Fixing Screw 2,2 x 9,5mm Pridge -,Sides Wood Sheet 4 Window Edging Strip wood 2 x 2 x 270 mm Bridge Front Wood Sheet 4 Seite 6 © Krick Modelltechnik, Germany, June 2015...
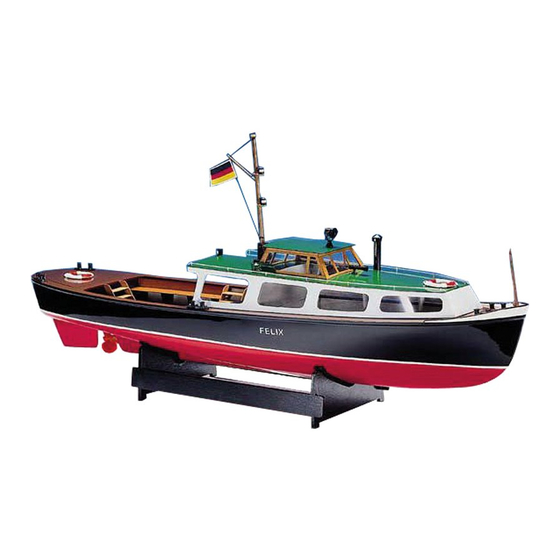
- Page 7 Search Lamp & Base Plastic Claxon Plastic Navigation Light Boxes 1 pair Plastic Life Belts Plastic Bollards Plastic Flag Pole Plastic Name Plates (FELIX) Transfer Loose Tiller Arm Plastic Control Rod Metal Collar Metal Seite 7 © Krick Modelltechnik, Germany, June 2015...
-
Page 8: Krick Modelltechnik, Germany, June
Pattern for cutting the windows from clear material Seite 8 © Krick Modelltechnik, Germany, June 2015... -
Page 9: Krick Modelltechnik, Germany, June
Seite 9 © Krick Modelltechnik, Germany, June 2015... - Page 10 Seite 10 © Krick Modelltechnik, Germany, June 2015...
Need help?
Do you have a question about the 20300 and is the answer not in the manual?
Questions and answers