Table of Contents
Advertisement
Advertisement
Table of Contents

Related Manuals for Hytera PD375


Summary of Contents for Hytera PD375
- Page 1 DIGITAL PORTABLE RADIO OWNER’S MANUAL...
- Page 3 Preface Thanks for your favor in our product. This manual is helpful for you to quickly know how to use the product. To avoid body injury or property loss caused by misoperation, please read the Safety Information Booklet carefully before use. This manual is applicable to the following product: PD37X Digital Portable Radio (X may represent 2, 5, 6 or 8)
-
Page 4: Icon Conventions
RF radiation. Hytera Communications Corporation Limited (the Company) endeavors to These standards consist of: achieve the accuracy and completeness of this manual, but no warranty ●... - Page 5 Operational Instructions and Training Guidelines To ensure optimal performance and compliance with the occupational/ controlled environment RF energy exposure limits in the above standards and guidelines, users should transmit not more than 50% of the time and always adhere to the following procedures: ●...
-
Page 6: Table Of Contents
Contents Items in the Package -----------------------------------------1 Features and Operations ------------------------------------10 Product Overview ----------------------------------------------2 Home Screen -------------------------------------------------------10 Product Controls ---------------------------------------------------2 Contact ----------------------------------------------------------10 Programmable Keys ----------------------------------------------3 Message --------------------------------------------------------11 LCD Icon -------------------------------------------------------------3 Call Log ---------------------------------------------------------11 LED Indicator -------------------------------------------------------4 Before Use-------------------------------------------------------5 Scan -------------------------------------------------------------------11 Setting the Radio --------------------------------------------------12 Attaching the Battery ----------------------------------------------5 Device Information ------------------------------------------------13 Attaching the Earpiece -------------------------------------------5... -
Page 7: Items In The Package
Items in the Package Please unpack carefully and check if all items listed below are received. If any item is missing or damaged, please contact your dealer. All pictures in this manual are for reference only. Note... -
Page 8: Product Overview
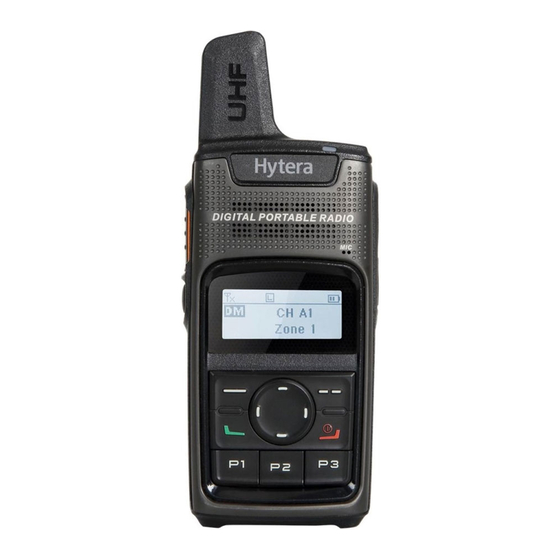
Product Overview Product Controls... -
Page 9: Programmable Keys
Product Overview Programmable Keys LCD Icon For enhanced convenience, you may request your dealer to program the Icon Name Radio Status SK1, P1, P2 and P3 as shortcuts to certain functions. Battery Power More bars indicate more battery power. Icon Low TX power for the current channel. -
Page 10: Led Indicator
Product Overview LED Indicator Icon Name Radio Status No signal. RSSI Icon More bars indicate stronger signal strength. Speaker Icon The speaker is unmuted. ● Indicates a private call in progress. ● Indicates a private contact in the contact LED Indicator Radio Status list. -
Page 11: Before Use
Before Use Attaching the Battery Attaching the Earpiece 1. Open the connector cover as ① shown. 2. Align the index of the earpiece with that of the radio and connect the To remove the battery, turn off the radio first. earpiece to the radio as ②... -
Page 12: Charging The Battery
Before Use Using the Power Adapter (Standard) To take out the belt clip, press and hold the buckle in the direction as arrow ① shows and lift up the belt clip in the direction as arrow ② shows. Please use the power adapter specified by the Company to charge the See the figure below. -
Page 13: Basic Operation
Before Use Basic Operation Using the Rapid-rate Charger (Optional) Turning the Radio On/Off Adjusting the Volume Please use the charger specified by the Company to charge the battery. Long press the Power On/Off/ESC key Charging Diagram is as follows. Selecting a Zone Charging Status Indication (on charger): A zone is a group of channels with the same property, which can facilitate LED Indicator... -
Page 14: Selecting A Channel
Basic Operation ● Shortcut key: Press the programmed Keypad Lock key to lock or ● Shortcut key: You can toggle to the appropriate zone by pressing the unlock the keypad. programmed Zone Up or Zone Down key preset by your dealer. ●... -
Page 15: Call On Digital Channel
Call Services Step Radio A Radio B Radio A and Radio B select the same digital channel. Radio A and Radio B select the same digital channel. Make a private call through any of the following ways: ● Preset Contact Radio A holds down the PTT key to initiate a call. -
Page 16: Call On Analog Channel (Without Signaling)
Call Services Step Radio A Radio B Call on Ana el (Without Signaling) log Chann Radio B can receive On the analog channel without signaling, hold down the PTT key and talk the call without any operation. When to make a call to all the users on the channel. Then release the PTT key receiving, the LED to receive. -
Page 17: Message
Features and Operations You can add or delete a contact in the “Favorite Contact” menu. Call Log Message The radio keeps track of all recent outgoing, incoming and missed private calls only. It can store up to 10 call logs. When the Call Log is full, the Press the OK/Menu key and go to the “Message”... -
Page 18: Setting The Radio
Features and Operations ● When activities are detected on a channel, the radio will stay on the You can enable and disable this feature via the “Settings” menu or by channel to receive current activities, and the LED indicator will glow pressing the programmed Talk Around key. -
Page 19: Device Information
Features and Operations Device Information LCD and the keypad, so as to facilitate your operation under dim light conditions. The menu has the following options: You can go to “Settings -> Device Info” and view basic information of ● Off: The backlight will remain off. the radio, including Radio ID, Radio Alias, Serial Number, Model Name, ●... -
Page 20: Transmission Management
Features and Operations Transmission Management ● Hold down the programmed Monitor Momentary key to enable the feature, then the radio displays the icon ; release this key to If you hold down the PTT key while the channel is in use, your radio disable the feature. -
Page 21: Troubleshooting
Troubleshooting Phenomena Analysis Solution The battery may be improperly installed. Remove the battery and then reattach it. The battery power may run out. Recharge or replace the battery. The radio cannot be powered on. The battery may suffer from poor contact caused by Clean the battery contacts. -
Page 22: Care And Cleaning
Care and Cleaning Product Cleaning To guarantee optimal performance as well as a long service life of the product, please follow the tips below. Turn off the product and remove the battery before Product Care cleaning. Caution ● Clean up the dust and fine particles on the product surface and Do not pierce or scrape the product. -
Page 23: Optional Accessories
Optional Accessories The following items are the main optional accessories for the product, and please consult your local dealer for more other accessories. Use the accessories specified by the Company only. If not, the Company shall not be liable for any losses or damages Caution arising out of use of unauthorized accessories. - Page 24 Hytera Communications Corporation Limited. 2015 Hytera Communications Corporation Limited. C10524 Z07639 L07157 8 1 1 PD3 7 0 0 0 0 0 0...
Need help?
Do you have a question about the PD375 and is the answer not in the manual?
Questions and answers