
Related Manuals for Hytera PD982


Summary of Contents for Hytera PD982
- Page 1 Preface Thanks for your favor in our product. This manual provides guidance for you to quickly know how to use the product. This manual is applicable to the following product: PD982 U(5) Digital Portable Radio...
- Page 2 Copyright Information Hytera is the trademark or registered trademark of Hytera Communications Corporation Limited (the Company) in the People's Republic of China (PRC) and/or other countries or areas. The Company retains the ownership of its trademarks and product names. All other trademarks and/or product names that may be used in this manual are properties of their respective owners.
- Page 3 Note: Changes or modifications to this unit not expressly approved by the party responsible for compliance could void the user's authority to operate the equipment. Compliance with RF Exposure Standards Hytera's radio complies with the following RF energy exposure standards and guidelines: United States Federal Communications Commission, Code of Federal Regulations; 47 CFR §...
- Page 4 When worn on the body, always place the radio in a Hytera-approved holder, holster, case, or body harness or by use of the correct clip for this product. Use of non-approved accessories may result in exposure levels which exceed the FCC's occupational/controlled environmental RF exposure limits.
-
Page 5: Table Of Contents
Contents Documentation Information ........................1 1. Packing List ............................2 2. Product Overview ..........................3 2.1 Product Layout ..........................3 3. Before Use ............................5 3.1 Attaching the Antenna ........................5 3.2 Installing the Micro-SD Card ......................5 3.3 Attaching the Battery ........................5 3.4 Attaching the Belt Clip ........................ - Page 6 8.3 Audio Optimization ........................30 8.4 MIC & SPK ............................ 31 8.5 One Touch Call/Menu ........................32 8.6 Scan .............................. 33 8.7 Hunt .............................. 34 8.8 Roam ............................35 8.9 Talk Around ..........................35 8.10 Time-out Timer ........................... 35 8.11 VOX ............................35 8.12 Call Divert ...........................
-
Page 7: Documentation Information
Documentation Information Icon Conventions Icon Description Indicates references that can further describe the related topics. Note Indicates situations that could cause data loss or equipment damage. Caution Notational Conventions Item Description Example To save the configuration, click Apply. Denotes menus, tabs, parameter names,... -
Page 8: Packing List
1. Packing List Please unpack carefully and check that you have received the following items. If any item is missing or damaged, please contact your dealer. Item Quantity Item Quantity (PCS) (PCS) Radio Antenna Battery Belt Clip Charger Strap Power Adapter User Manual Note Check whether the frequency band marked on the antenna label matches that on the radio label. -
Page 9: Product Overview
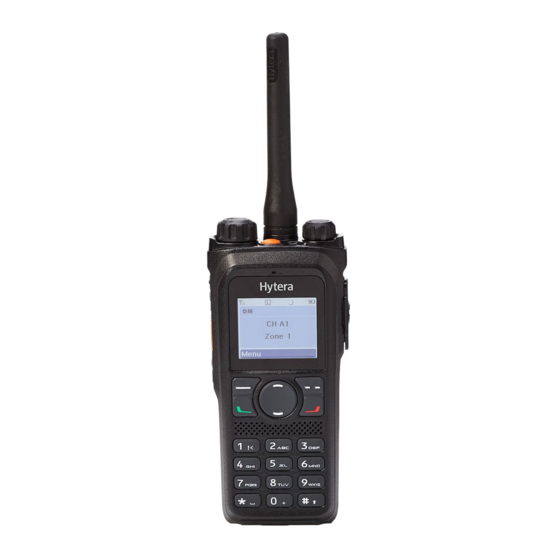
2. Product Overview Product Layout Part Name Part Name Side Key 1 (SK1) LED Indicator Push-to-Talk (PTT) Key Antenna Side Key 2 (SK2) On-Off/Volume Control Knob Top Key (TK) Accessory Connector Channel/Group Selector Knob Back/Subgroup Key Microphone P2/BackDial/End/Home Screen Key LCD Display Up Key OK/Menu Key... - Page 10 Note For enhanced convenience, you may request your dealer to program the TK, P1, P2, SK1, and SK2 as shortcuts to radio features.
-
Page 11: Before Use
3. Before Use Attaching the Antenna Caution Rotate the antenna clockwise until hand tight; if over tightened, the antenna or its connector may be damaged. Do not hold the radio by its antenna as it may reduce the radio performance and life span of the antenna. -
Page 12: Attaching The Belt Clip
Using an unapproved battery makes the battery power indication inaccurate and reduces the radio performance. Attaching the Belt Clip Step 1 Unfasten the two screws on the back of the radio. Step 2 Align the screw holes on the belt clip with those on the back of the radio. Step 3 Tighten the screws. -
Page 13: Charging The Battery
Step 3 Tighten the screw on the accessory plug. Charging the Battery Caution: Use the charger specified by the Company to charge the battery. Charge the battery fully before initial use because reduction of state of charge may lead to low battery alarm. - Page 14 LED Indication Charging Status Flashes red rapidly The battery fails to be charged.
-
Page 15: Basic Operations
4. Basic Operations Turning the Radio On/Off Adjusting the Volume Checking the Battery Power You can check the current battery power by holding down the preprogrammed Battery Power Indicator key, and release the key to exit. Battery power indications and alert tone are listed below: Icon LED Indication/Tone The LED Indicator glows green. -
Page 16: Using The Keypad
lock or unlock the keypad, do one of the following: Automatically lock or unlock the keypad The Keypad Lock feature allows the keypad to be locked automatically if no operation is performed within the preset time period. To enable this feature, go to Menu > Settings > Radio Set > Keypad Lock, select Enable, and set Delay Time(s) by pressing the Up or Down key. -
Page 17: Selecting A Zone And Channel (Conventioal)
Selecting a Zone and Channel (Conventioal) In conventional mode, the radio receives and transmits data and voice on the selected channel. A zone is a group of channels within the same operational area. To select a zone and then a channel contained in it, do as follows: Step 1 Select a zone in one of the following ways: ... -
Page 18: Status Indication
5. Status Indication LCD Icon The following tables list icons that may appear on the radio's liquid-crystal display (LCD). Operation Mode Icons Icon Radio Status Direct Mode: The radio transmits and receives directly. Repeater Mode: The radio transmits and receives through a repeater. TDMA Direct Mode: If one time slot is occupied, the radio can transmit and receive TDMA through the other time slot. - Page 19 The radio is in emergency mode. The radio is roaming. The Scrambler or Encrypt feature is enabled. The radio is scanning or hunting. The radio stays on a non-priority channel. The radio stays on priority channel 1. The radio stays on priority channel 2. The Voice Operated Transmit (VOX) feature is enabled.
-
Page 20: Led Indicator
An include call is in progress. LED Indicator To determine the radio status, check the LED indicator on the radio according to the following table: LED Indicator Radio Status Flashes green Being turned on. Flashes green slowly Standby in trunking mode. Glows green Receiving. -
Page 21: Call Services
6. Call Services You can initiate various types of calls in different manners. When initiating a call in Manual Dial manner in trunking mode, you need to enter a number complying with the dial rule. For the detailed dial rule, please consult your dealer. When you are speaking during a call, keep the microphone about 2.5 to 5 cm away from your mouth. - Page 22 Mode Manner Operation Press and hold the PTT key. Go to Menu > Contact > Favorites. Favorites Select the required group contact. Press or press and hold the PTT key. Press the preprogrammed Subgroup key or go to Menu > Subgroup.
-
Page 23: Private Call
A preemptive or emergency call interrupts the call. The base station signal is lost. Private Call A private call is a call from an individual user to another individual user. 6.2.1 Initiating Private Calls The following table describes how to initiate a private call in conventional mode and trunking mode. Mode Manner Operation... -
Page 24: Phone Call
Mode Manner Operation Go to Menu > Call Logs > Outgoing/Incoming/Missed > Outgoing Conventio List/Incoming List/Missed List. nal/ Call Log Select the required private contact. Trunking Press or press and hold the PTT key. 6.2.2 Receiving Private Calls Conventional Mode When you receive a private call, the radio displays . - Page 25 6.3.1 Initiating Phone Calls The following table describes how to initiate a phone call in conventional mode and trunking mode. Mode Manner Operation Go to Menu > Phone > DTMF Keypad, and then select Enable. Access the phone system in one of the following manner: If the One-Key Connect feature is enabled, press to transmit the ...
-
Page 26: All Call
Mode Manner Operation From the home screen, press (if preprogrammed as the ReDial/Back ReDial or BackDial key). Dial Call Log Select the required phone contact from the list. Press or press and hold the PTT key. 6.3.2 Receiving Phone Calls Conventional Mode When receiving a phone call, you need to transmit the preprogrammed connect code to access the telephone system as described in... - Page 27 General All Call: The called party can respond to the call. To set the type, go to Menu > Settings > Radio Set > All Call, and then select Broadcast Call or General Call. 6.4.1 Initiating All Calls Your radio can initiate an all call only after being authorized by your dealer. The following table describes how to initiate an all call in conventional mode and trunking mode.
-
Page 28: Broadcast Call (Trunking Only)
Broadcast Call (Trunking Only) A broadcast call is a special group call to which the called party cannot respond. Your radio can initiate a broadcast call only after being authorized by your dealer. 6.5.1 Initiating Broadcast Calls The following table describes how to initiate a broadcast call. Manner Operation Go to Menu >... -
Page 29: Include Call (Trunking Only)
automatically. In trunking mode, the radio displays after the call is established successfully. 6.5.3 Ending Broadcast Calls A broadcast call ends in any of the following cases: The calling party ends the call. The call duration exceeds the period preset by your dealer. ... -
Page 30: Message Services
7. Message Services The Message feature allows you to send and receive the following types of messages in trunking mode or on a digital channel in conventional mode: New messages: messages created using the keypad. Quick text messages: frequently used messages predefined by your dealer but editable. ... -
Page 31: Deleting Messages
Step 2 Press the OK/Menu key, and then select the required contact. Step 3 Press the OK/Menu key. Deleting Messages To delete a message from the InBox, OutBox, or Drafts, do as follows: Step 1 Go to Menu > Message > InBox/OutBox/Drafts > Inbox List/Outbox List/Drafts List. Step 2 Select the required message, and then press the OK/Menu key. -
Page 32: Supplementary Features
8. Supplementary Features The supplementary features of the radio vary with the operation mode. For details, see the following table. Conventional Feature Trunking Digital Analog Basic Settings √ √ √ Contact Management √ √ √ Mic Automatic Gain Control (AGC) √... -
Page 33: Basic Settings
Conventional Feature Trunking Digital Analog Data Query × × √ Control Services √ × × Analog Services × √ × Personal Security Services √ √ √ Encrypt √ × √ Scrambler × √ × Erasing Data in Emergency √ √ √... - Page 34 If you want to... Then... On: The backlight remains on. Timed: The backlight will automatically be off if no operation or activity is performed within the preset period. Adjust the brightness of the backlight Select Brightness, and then press the Up or Down key. Set the LCD mode Select Day/Night, and then select Day Mode or Night Mode.
-
Page 35: Contact Management
If you want to... Then... Turn all visible and audible indications Select Covert Mode, and then select On. Allow or disallow the radio to send its Select Send Alias, and then select On or Off. alias during voice transmission Contact Management 8.2.1 Adding Contacts You can add a contact to the following lists:... -
Page 36: Audio Optimization
(trunking only), do as follows: Step 1 Select the required contact from the corresponding list. Step 2 Select Delete or Del Contact, and then press the OK/Menu key. 8.2.3 Creating Folders Under Favorites (Trunking Only) Step 1 Go to Menu > Contact > Favorites > Folder Management > Add Folder. Step 2 Use the keypad to enter the folder name, and then press the OK/Menu key. -
Page 37: Mic & Spk
Step 2 Press the Up or Down key to change the value, and then press the OK/Menu key. It is recommended that you set the frequency gains according to the following table: Scenario Low Frequency Gain (dB) Mid Frequency Gain (dB) High Frequency Gain (dB) Square Indoor... -
Page 38: One Touch Call/Menu
8.4.2 Selecting the Speaker To set the way in which the radio uses the external or internal speaker, go to Menu > Settings > Radio Set > MIC & SPK > SPK Selection, and then select one of the following as required: ... -
Page 39: Scan
Note If the preprogrammed One Touch Call/Menu key is a numeric key, you need to go to Menu > Settings > Radio Set > Keypad Mode, and then select One Touch Call/Menu. Scan In conventional mode, the Scan feature allows you to listen to activities on other channels, keeping track of your team members. -
Page 40: Hunt
Step 2 Select Edit/View, and then select the required channel. Step 3 Select Delete CH. Hunt In trunking mode, the radio must register with a BS for normal operation. The Hunt feature allows the radio to: Hunt through the Trunked Station Control Channels (TSCCs) for an available BS for registration. ... -
Page 41: Roam
drops or discontinuous voice caused by low signal strength. To turn this feature on or off, go to Menu > Hunt > Handover > Handover On/Off, and then select Enable or Disable. Roam The Roam feature allows you to enjoy seamless communication across sites or networks. In conventional mode, you can turn this feature on or off as follows: Step 1 Go to Menu >... -
Page 42: Call Divert
Step 2 Select the appropriate level. A higher gain level indicates lower sensitivity, which requires higher volume for triggering transmission. 8.12 Call Divert The Call Divert feature allows you to divert an incoming half-duplex private call to a designated radio. To turn this feature on, do as follows: Step 1 Go to Menu >... -
Page 43: Work Order
To view location information of the nearest radio in a designated group, go to Menu > Accessories > GPS > Query Neighbors > Group Contact, and then select the required group contact. Digital Channel in Conventional Mode To view the location information of another radio, go to Menu > Accessories > GPS > Query Location >... -
Page 44: Data Query
8.15.2 Reporting the Task State To report the latest state of a task, do as follows: Step 1 Select the required task as described above. Step 2 Select the state to be reported, and then press the OK/Menu key. If the corresponding task state is associated with a numeric key by your dealer, you can also press the numeric key to report the state after selecting the required task. -
Page 45: Analog Services
Feature Description Operation Go to Ctrl Services > Alert Call/Radio Check/Remote Allows you to remotely Radio Monitor/Radio Enable/Radio Disable. enable a disabled radio Enable for normal operation. Radio Allows you to remotely Disable disable another radio. 8.18 Analog Services The following features are available only on an analog channel in conventional mode. 8.18.1 Turning the Compandor Feature On or Off The Compandor feature allows the radio to compress transmitted voice signals, which suppresses... -
Page 46: Personal Safety Services
or Tight (from low to high) as required. Generally, a higher squelch level requires higher signal strength. If the squelch level is set to Open, the speaker will always keep turned on. 8.18.5 Setting the CTCSS/CDCSS Feature The Continuous Tone-Coded Squelch System (CTCSS)/Continuous Digital-Coded Squelch System (CDCSS) feature allows the radio to filter out unwanted voice on the current channel. -
Page 47: Communication Security Services
The three emergency modes can be combined with any of the following emergency types: Regular, Silent, and Siren w/ Voice. 8.19.2 Triggering the Emergency Mode To trigger the emergency mode, press the preprogrammed Emergency On key. The radio then enters the preset emergency mode with or without indications depending on the preset emergency type. - Page 48 8.20.2 Turning the Encrypt Feature On or Off Go to Menu > Settings > Radio Set > Encrypt > On/Off, and then select On or Off. Setting the Encrypt Key (Conventional Only) You can add, edit, or select an encrypt key. Adding an Encrypt Key Go to Menu >...
- Page 49 8.20.4 Erasing Data in Emergency In case of emergency, you can erase encryption data from the radio to prevent the data from unauthorized access. To erase the data, press the SK1 and PTT key by turns twice, and make sure the press interval is less than 1.5 seconds.
-
Page 50: Troubleshooting
9. Troubleshooting Phenomena Analysis Solution The battery may be installed improperly.Remove and reattach the battery. The battery power may run out. Recharge or replace the battery. cannot turn The battery may suffer from poor the radio on. Clean the battery contacts or replace the contact caused by dirty or damaged battery. - Page 51 Phenomena Analysis Solution hear anyone members. because You may be in an unfavourable position. much noise For example, your communication may Move to an open and flat area, restart the hiss. be blocked by high buildings or blocked radio, and try again. in an underground area.
-
Page 52: Care And Cleaning
10. Care and Cleaning To guarantee optimal performance as well as a long service life of the product, please follow these tips. 10.1 Product Care Do not pierce or scrape the product. Keep the product far away from substances that can corrode the circuitry. ... -
Page 53: Optional Accessories
11. Optional Accessories Contact your local dealer for the optional accessories used with the product. Caution Use the accessories specified by the Company only; otherwise, the Company will not be liable for any loss or damage arising out of the use of any unauthorized accessories. -
Page 54: Abbreviations
Abbreviations Abbreviation Full Name Automatic Gain Control Base Station CDCSS Continuous Digital-coded Squelch System CTCSS Continuous Tone-coded Squelch System DGNA Dynamic Group Number Assignment DTMF Dual-tone Multi-frequency FOACSU Full Off Air Call Set-up Global Positioning System Liquid-crystal Display Light-emitting Diode Loudness and Quality Optimizer OACSU Off Air Call Set-up...
Need help?
Do you have a question about the PD982 and is the answer not in the manual?
Questions and answers