Table of Contents
Advertisement
OPERATION AND SERVICE MANUAL
®
Hypot
III
MODEL 3705 (AC ONLY HIPOT WITH GROUND CONTINUITY CHECK)
MODEL 3765 (AC/DC HIPOT WITH GROUND CONTINUITY CHECK)
MODEL 3770 (AC/DC HIPOT WITH IR AND GROUND CONTINUITY)
MODEL 3780 (500VA AC ONLY HIPOT WITH GROUND CONTINUITY CHECK)
SERIAL NUMBER
Models
© Associated Research, Inc., 2012
13860 West Laurel Drive
3705/3765/3770/3780
Lake Forest, Illinois, 60045-4546
U.S.A.
Item 39011
Ver 1.23
Printed October 9th, 2012
Advertisement
Table of Contents

Related Manuals for Associated Research hypot III 3705


Summary of Contents for Associated Research hypot III 3705
- Page 1 MODEL 3765 (AC/DC HIPOT WITH GROUND CONTINUITY CHECK) MODEL 3770 (AC/DC HIPOT WITH IR AND GROUND CONTINUITY) MODEL 3780 (500VA AC ONLY HIPOT WITH GROUND CONTINUITY CHECK) SERIAL NUMBER Models © Associated Research, Inc., 2012 13860 West Laurel Drive 3705/3765/3770/3780 Lake Forest, Illinois, 60045-4546 U.S.A.
- Page 2 92/31/EEC. The CE marking has been affixed on the device according to article 10 of the EMC Directive 8/336/EEC. The technical file and other documentation are on file with Associated Research, Inc. ______________________________ Joseph Guerriero Vice President / General Manager Associated Research, Inc.
- Page 4 2006/95/EC and the EMC Directive 2004/108/EC. The CE marking has been affixed on the device according to article 10 of the EMC Directive 2004/108/EC. The technical file and other documentation are on file with Associated Research, Inc. ______________________________ Joseph Guerriero Vice President / General Manager Associated Research, Inc.
-
Page 5: Table Of Contents
TABLE OF CONTENTS 1. INTRODUCTION ....................1 1.1. Warranty Policies ..................1 1.2. Safety Symbols ..................3 1.2.1. Product Marking Symbols ............... 3 1.2.2. Caution and Warning Symbols ............3 1.3. Glossary of Terms ..................3 1.4. Safety ......................5 1.4.1. - Page 6 4.3.1. Test Setup Soft Keys ..............34 4.3.2. Test Parameters ................34 4.3.3. Default Test Parameters ............... 36 4.3.4. Setting Up a Test ................36 5. OPERATING INSTRUCTIONS ............... 39 5.1. Instrument Connections ................39 5.1.1. Connecting the Test Leads ............39 5.1.2.
- Page 7 Index is located at the back of the manual...
-
Page 9: Introduction
1. INTRODUCTION 1.1. Warranty Policies Associated Research, Inc., certifies that the instrument listed in this manual meets or exceeds published manufacturing specifications. This instrument was calibrated using standards that are traceable to the National Institute of Standards and Technology (NIST). - Page 10 Elimination of any connections in the earth grounding system or bypassing any safety systems will void this warranty. This warranty does not cover accessories not of Associated Research, Inc. manufacture. Parts used must be parts that are recommended by Associated Research, Inc. as an acceptable specified part. Use of non-authorized parts in the repair of this instrument will void the warranty.
-
Page 11: Safety Symbols
1.2. Safety Symbols 1.2.1. Product Marking Symbols Product will be marked with this symbol when it is necessary to refer to the operation and service manual in order to prevent injury or equipment damage. Product will be marked with this symbol when hazardous voltages may be present. -
Page 12: Power
Direct Current, DC: Current that flows in one direction only. The source of direct current is said to be polarized and has one terminal that is always at a higher potential than the other. Frequency: The number of cycles an AC waveform repeats over time. Usually given in Hertz (Hz). Ground: Refers to the point of low potential in a circuit to which all other voltages are referenced. -
Page 13: Safety
FAX: 1 (847) 367-4080 LAKE FOREST, IL 60045-4546 U.S.A. info@asresearch.com E-MAIL: Service Interval Associated Research, Inc. will not be held liable for injuries suffered if the instrument is not properly maintained and safety checked annually. See section 1.1. Warranty Policies for more information. -
Page 14: Test Station
1.4.2. Test Station Location Select an area away from the mainstream of activity where employees do not walk while performing their normal duties. If this is not practical because of production line flow, then the area should be roped off and marked for HIGH VOLTAGE TESTING. No employees other than test operators should be allowed inside. -
Page 15: Test Operator
Test operators should be familiar with methods to properly discharge a device under test in case test leads become disconnected during testing. If the instrument is used in a manner not specified by Associated Research, Inc. the protection provided by the instrument may be impaired. -
Page 16: Key Features Of The Hypot Iii
1.5. Key Features of the HYPOT III SmartGFI™ disables the instrument’ s output voltage in less than 1 millisecond if excessive leakage to ground is detected. If enabled, PATENTED SMARTGFI™ SmartGFI™ automatically detects if the DUT is floating or grounding and turns ON or OFF accordingly. -
Page 17: Getting Started
2. GETTING STARTED Introduction This section contains information for the unpacking, inspection, preparation and storage of your Associated Research, Inc., product. 2.1. Unpacking and Inspection 2.1.1. Packaging Your instrument was shipped in a custom foam insulated container. If the shipping carton is damaged, inspect the contents for visible damage such as dents, scratches or a broken display. -
Page 18: Returning The Instrument For Service Or Calibration
Please include all accessories and test leads. Mark the container “ FRAGILE” to ensure proper handling. Before shipping, contact an Associated Research, Inc. customer support representative at 1-800-858-TEST (8378) to indicate and explain the reason for service. -
Page 19: Power Requirements
suggestions on the test area setup in section 1.4. Safety. Make sure the work area you choose has a three-prong grounded outlet capable of supplying the necessary input current to the power source. Be sure the outlet has been tested for proper wiring before connecting the instrument to it. - Page 20 This instrument may be operated in environments with the following limits: Temperature… ....32° - 104° F (0° - 40°C) Relative humidity… ... 0 – 80% Altitude… ......6560 feet (2,000 meters) NOTE: Keep the ventilation slits uncovered during operation. Failure to do so could cause the instrument to overheat and may damage internal components.
-
Page 21: Specifications
3. SPECIFICATIONS AND CONTROLS 3.1. 3705, 3765, 3770 Functional Specifications INPUT 115/230 VAC ± 10%, user selectable Voltage 50/60 Hz ± 5% Frequency Fuse 3.15 Amp, fast acting 250VAC DIELECTRIC WITHSTAND TEST MODE Output Rating 5000V @ 20 mA AC 6000V @ 7.5 mA DC Voltage Setting Range:... -
Page 22: Regulation
DIELECTRIC WITHSTAND TEST MODE Current Display Auto Range AC Range 1: 0.000mA – 3.500mA Resolution: 0.001mA Range 2: 3.00 – 20.00 mA Resolution: 0.01 mA 0.0 µA – 350.0 µA DC Range 1: 0.1 µA Resolution: Range 2: 0.300 mA – 3.500 mA Resolution: 0.001 mA Range 3:... -
Page 23: Short
INSULATION RESISTANCE TEST MODE Voltage Setting Range: 30 – 1000V DC Resolution: ± (2% of setting + 5 volts) Accuracy: Voltage Display Range: 0 – 1000 V Resolution: ± (2% of reading + 2 counts) Accuracy: Resistance Display Range: 1 – 9999 MΩ (4 Digit, Auto Ranging) Resolution: 500VDC 1000VDC... -
Page 24: Hypot Iii Functional Specifications
3.2. 3780 Functional Specifications INPUT 115/230 VAC ± 15%, automatically selected Voltage 50/60 Hz ± 5% Frequency Fuse 15 Amp, slow-blow 250VAC DIELECTRIC WITHSTAND TEST MODE Output Rating 5000V @ 100 mA AC Voltage Setting Range: 0 – 5.00KV AC Resolution: 0.01KV ±... - Page 25 DIELECTRIC WITHSTAND TEST MODE Current Display Auto Range AC Range 1: 0.000mA – 3.500mA Resolution: 0.001mA ± (2% of setting + 2 counts) Accuracy: Range 2: 3.00 – 99.99 mA Resolution: 0.01 mA ± (2% of setting + 6 counts) Accuracy: AC Voltage Wave Form Sine Wave, Crest Factor = 1.3 –...
- Page 26 GENERAL Remote Input-Output The following input and output signals are provided Control through two 9 pin D-type connectors: 1. Remote control: Test, Reset, and Remote Interlock. 2. Remote recall of memory program 1, 2 and 3 3. Outputs: Pass, Fail, Test-in-Process, and Reset Program Memory 10 memories, 3 steps per memory, all steps within a memory are linkable.
-
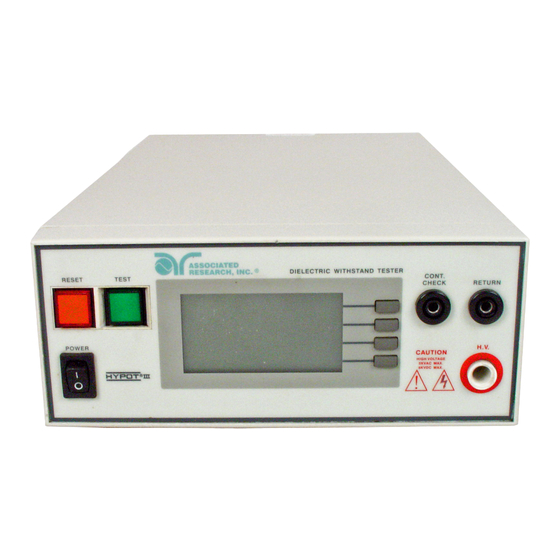
Page 27: Instrument Controls
3.3. Instrument Controls 3.3.1. Front Panel Controls 1. RESET BUTTON: Resets the instrument. If a failure condition occurs during a test, pressing this button will reset the system and shut off the alarm. Pressing the button a second time will clear the failure condition. The RESET button must be pressed before performing another test or changing any of the setup parameters. - Page 28 9. HIGH VOLTAGE OUTPUT TERMINAL: Connector used to attach the high voltage test lead, adapter box high voltage lead or test fixture high voltage lead to the instrument. This connection provides the high voltage used during a Hipot test.
-
Page 29: Rear Panel Controls
3.3.2. Rear Panel Controls 1. REAR PANEL OUTPUT TERMINALS: Second set of output connectors in parallel with the front panel connectors. 2. FUSE RECEPTACLE: To change the fuse, unplug the power (mains) cord and turn the fuse receptacle counter-clockwise. The fuse compartment will be exposed. - Page 30 9. CALIBRATION BUTTON: To put the instrument into the calibration mode push this button and turn on the power switch simultaneously.
-
Page 31: Front Panel Controls
3.3.3. Front Panel Controls (3780) 1. RESET BUTTON: Resets the instrument. If a failure condition occurs during a test, pressing this button will reset the system and shut off the alarm. Pressing the button a second time will clear the failure condition. The RESET button must be pressed before performing another test or changing any of the setup parameters. -
Page 32: Front Panel Controls
3.3.4. Rear Panel Controls (3780) 1. REAR PANEL OUTPUT TERMINALS: Second set of output connectors in parallel with the front panel connectors. 2. CALIBRATION BUTTON: To put the instrument into the calibration mode push this button and turn on the power switch simultaneously. 3. - Page 33 9. THERMAL COOLING FAN: Full time cooling fan.
-
Page 34: Programming Instructions
4. PROGRAMMING INSTRUCTIONS 4.1. Power Up The Hypot III automatically defaults to the Perform Tests screen upon power up. The Perform Tests screen will appear as follows: The Perform Tests screen is the main operational screen of instrument. From this screen, all test parameters are monitored while the test is being performed. -
Page 35: Results, Tests And System Selections
Menu Pressing the “ Menu” soft key from the Main Menu will display the Results, Test and System selections. Please refer to section 5.2.3. Results, Test, and System Selections. Memory The Hypot III has 10, 3-step programmable memory locations (M0-M9). Press the “... -
Page 36: System Setup
Test Pressing the “ Test” soft key from this menu will allow you to access the Parameter Review screen. For specific instructions for reviewing and editing test parameters, refer to section 4.3. Test Parameters. System Pressing the “ System” soft key from this menu will allow you to access the Setup System screen. -
Page 37: System Parameters
DID YOU KNOW? keys will change depending on which parameter the cursor is pointing to. You can control your Associated Research, Inc. PLC Remote instrument using basic PLC When the PLC remote is turned ON the front inputs and outputs. Execute... - Page 38 Results DID YOU KNOW? Selects the type of results you would prefer to have displayed at the end of a test or sequence of connected test steps. The You can learn to use your available selections are: All, P/F and Last. Hypot III online with our H3 Virtual Tour.
-
Page 39: Smart Gfi
When P/F is selected, it is not possible to see the test results directly at the end of the test. In order to review the test results refer to section 4.2.3. Reviewing Test Results. When Last is selected, the results of the last test step performed will be displayed on the Perform Tests screen. - Page 40 Alert Date, the instrument will display the Cal-Alert warning screen upon power up. If the “ Show this screen again?” function has been turned OFF at the Cal-Alert Warning screen, this parameter will automatically be set to OFF. Cal Date(Calibration Date) Cal Date is a non-editable parameter that indicates the last date that calibration was performed on the instrument.
-
Page 41: Default System Parameters
At the Cal-Alert Warning screen “ Show screen again?” will be displayed along with the options “ Yes” or “ No.” The question must be answered by toggling between the words “ Yes” and “ No” using the corresponding soft key and then pressing the “ OK” soft key. Selecting “... -
Page 42: Test Setup
Setup Sys. Cal Alert No change Cal Date No change Cal Due No change Alert No change Date m/d/y No change Time No change 4.3. Test Setup 1. From the Perform Tests screen, press the “ Menu” soft key. The Main Menu screen will now be displayed. - Page 43 DID YOU KNOW? Ramp Dn: The length of time that is allowed for the test voltage to decay from programmed test voltage to 0. Associated Research, Inc provides detailed Arc Sense: The maximum allowable threshold for whitepapers and articles arcing.
-
Page 44: Default Test Parameters
4.3.3. Default Test Parameters Each of the test types (ACW, DCW and IR) have specific default test parameters that automatically load when test type is selected from the Test Parameters Review screen. The following table is a listing of the default parameters for each of the different types of tests that the Hypot III can perform. - Page 45 AC Withstand parameters will now be loaded into the currently selected memory and step. Press the “ Enter” soft key to accept the parameters or press the “ Esc” soft key return to exit without saving. From the AC Withstand Parameter Review screens the following parameters may be selected for editing: Voltage, Max-Limit, Min-Limit, Ramp Up, Dwell Time, Ramp Down, Arc Sense, Frequency, Arc Detect (ON/OFF), Continuity selection (ON/OFF), Continuity Max-Limit, Continuity Min-Limit, and Continuity Offset.
- Page 46 To manually set the Offset use the “ +” and “ -” soft keys to increase and decrease the resistance value. Press the “ Enter” soft key to accept the new value or press the “ Esc” soft key to return to the previous screen without saving. To automatically set an Offset value, set the output voltage, current, and frequency to the values that will be used on the DUT and connect the test cables and all test fixturing to the instrument.
-
Page 47: Operating Instructions
5. OPERATING INSTRUCTIONS 5.1. Instrument Connections The test leads and the adaptor box may be connected to the jacks located on the front or back of Hypot III. These receptacles are wired in parallel and either set can be used depending on the specific application. 5.1.1. -
Page 48: Interlock Connector
5.1.3. Interlock Connector Hypot III is equipped with a Remote Interlock feature. Remote Interlock utilizes a set of closed contacts to enable the instrument’ s output. If the Remote Interlock contacts are open the output of the instrument will be disabled. To disable the Remote Interlock feature connect the Interlock Key into the Signal Input port located on the back of the tester. -
Page 49: Test Metering
Pressing the “ +” soft key will increase the output voltage and pressing the “ -” soft key will decrease the output voltage. Manual voltage adjustment temporarily overrides the voltage setting and only remains in effect until the test is terminated by Pass, Fail, or Abort conditions. -
Page 50: Error Messages
NOTE: For multi-step tests, use the “ ∧” and “ ∨” soft keys to scroll through the results. 5.5. Error Messages While performing tests a number of messages will be displayed to indicate the test state or test results. These messages are displayed in the status area of the screen located on the first line at the top of the LCD. - Page 51 Arc-Fail: This message appears on the display if the DUT arcing current exceeds the Arc Sense limit and Arc function is active (Arc Sense = 1… 9) during the AC/DC Withstand test. Short: This message appears on the display if the instrument detects a short circuit condition Breakdown: This message appears on the display if the DUT current is well beyond the metering range of the test and the arcing condition is beyond the arc sense limit.
-
Page 52: Connection Of Remote I/O
6. CONNECTION OF REMOTE I/O Two 9 pin D-type connectors mounted on the rear panel provide REMOTE- INPUT-OUTPUT control and information. These connectors mate with a standard 9 pin D-type subminiature connector provided by the user. The output mates to a male (plug) connector while the input mates to a female (receptacle) connector. -
Page 53: Signal Inputs Of Remote I/O And Memory Access
125 VAC (0.5 ADC / 30 VDC). The signal outputs are provided on the 9 pin female D-type connector. Below is a list that indicates what conditions activate each pin. When a terminal becomes active the relay closes thereby allowing the external voltage to operate an external device. - Page 54 remains active even when a remote reset switch is connected so that high voltage can be shut down from either location. The Remote File Select function gives the user the capability to quickly change parameters and initiate a test remotely. Three internal memory programs can be accessed by connecting terminals 7, 8, and 9 in different combinations.
- Page 55 If the Remote Interlock contacts are opened during a test, the pop-up message will be displayed and the test will abort. The hardware and has been configured to provide the interlock connections on pins 4 and 5 of the Remote Interface, Signal Input port.
-
Page 56: Bus Remote Interface
7. BUS REMOTE INTERFACE This section provides information on the proper use and configuration of bus remote interface. The RS-232 remote interface is standard on all 3700 series models. 7.1. RS-232 Interface This interface is standard on Hypot III. This interface provides all of the control commands and parameter setting commands. -
Page 57: Rs-232 Command List
Receiving Data When requesting data from the instrument it will automatically send the data back to the controller input buffer. The controller input buffer will accumulate data being sent from the instrument, including the ACK and NAK response strings, until it has been read by the controller. - Page 58 Select step number 1-3 Step Add ACW test Step Add DCW test Step Add IR test SALL<memory+step,type,p1,p2,p3… > Add all Parameters of a Test MSS<memory number step number> Load a file by memory and step number. The first digit is the memory number and the second digit is the step number.
-
Page 59: Test Parameter Editing Commands
Frequency Continuity (ON/OFF) Continuity (ON/OFF) Continuity Max Limit 10 Continuity Max Limit Continuity Min Limit 11 Continuity Min Limit Continuity Offset 12 Continuity Offset Connect (ON/OFF) 13 Connect (ON/OFF) 7.2.3. Test Parameter Editing Commands These commands are used to modify the test parameter within each step. These commands require a parameter value to be included with the command. -
Page 60: System Parameter Editing Commands And Companion Queries52
Query *IDN? Read the instrument identification string. Company = Associated Research Inc. Read the active data being displayed on the LCD display while the test is in process. It will also read the last data taken when the test sequence has completed. Each parameter is separated by commas and includes step number, test type, test status, and metering. -
Page 61: Query Commands And Displayed Messages
mA are used on the display, the command response will always indicate the current in uA for example 2.0mA will respond with 2000uA. RD <step number>? Read the results for an individual step. The step number is the actual step number that has been saved within the file, not the order of which the steps were executed. - Page 62 Displayed Example Query Response Message Meter 2 Memory- Test Meter 1 Meter 3 Status (Leakage Step Type (Voltage) (Timer) Current) Dwell M1-1 Dwell 0.30kV 0.296mA 0.5s Dwell M1-2 Dwell 1.00kV Dwell M1-3 Dwell 0.50kV For example, if a 3700 unit running an ACW test at 3800V and reading 2.3mA leakage current was queried with the TD? command 1.2sec into the dwell cycle, it would respond with: M1-1,ACW,Dwell,3.80,2.30,1.2...
-
Page 63: Options
8. OPTIONS Introduction This section contains descriptions of available factory installed options at the time of this printing. The list of options contains an option code number that can be referenced on the data plate on the rear panel of the unit. Option Label On the rear panel of the instrument, you will find a label that contains the option code. -
Page 64: Calibration Procedure
INSULATION RESISTANCE TEST MODE Maximum Limit Range: 0.0 , 1.0 – 999.9 MΩ (0 = Off) Resolution 0.1 MΩ Range 1000 – 9999 MΩ Resolution 1 MΩ Accuracy Same as Resistance display Minimum Limit Range: 1.0 – 999.9 MΩ Resolution 0.1 MΩ... - Page 65 NOTE: For Continuity, the instrument should be calibrated to a standard 5.0 resistor rather than a 1.0 resistor. This change is reflected on the display during calibration of continuity. All other items in the Calibration Procedure remain unchanged. Please refer to the section 9.
-
Page 66: Verification Initialization
9. INSTRUMENT VERIFICATION Verification is the process by which an instrument’ s failure detectors are proven to be functioning properly by performing basic tests in open and short circuit conditions. Verifying the failure detection circuitry of the electrical safety tester is required by safety agencies such as CSA, UL, and TÜV. -
Page 67: Continuity Verification
9.2.1. Continuity Verification From the Verification screen, press the “ ∧” and “ ∨” soft keys to select “ Continuity.” Then press the “ Select” soft key. An instructional prompt will now be displayed. The prompt will appear as follows: Follow the instructions given in the prompt and then press TEST to begin the verification process. -
Page 68: Ac Hipot Verification
9.2.2. AC Hipot Verification From the Verification screen, press the “ ∧” and “ ∨” soft keys to select “ AC Hipot.” Then press the “ Select” soft key. An instructional prompt will now be displayed. The prompt will appear as follows: Follow the instructions given in the prompt and then press TEST to begin the verification process. -
Page 69: Dc Hipot Verification
9.2.3. DC Hipot Verification (Models 3765 and 3770 only) From the Verification screen, press the “ ∧” and “ ∨” soft keys to select “ DC Hipot.” Then press the “ Select” soft key. An instructional prompt will now be displayed. The prompt will appear as follows: Follow the instructions given in the prompt and then press TEST to begin the verification process. -
Page 70: Ir Verification
9.2.4. IR Verification (Model 3770 only) From the Verification screen, press the “ ∧” and “ ∨” soft keys to select “ IR.” Then press the “ Select” soft key. An instructional prompt will now be displayed. The prompt will appear as follows: Follow the instructions given in the prompt and then press TEST to begin the verification process. -
Page 71: Calibration Procedure
Associated Research, Inc. offers a standard one-year manufacturer’ s warranty. This warranty can be extended an additional four years provided that the instrument is returned each year to Associated Research, Inc. for its annual recertification. In order to be eligible for the extended warranty instruments must be returned to Associated Research, Inc. -
Page 72: Warranty Requirements
Associated Research, Inc. offers a standard 1-Year manufacturer’ s warranty. This warranty can be extended an additional (4) years provided that the instrument is returned each year to Associated Research, Inc. for its annual recertification. In order to be eligible for the extended warranty instruments must be returned to Associated Research, Inc. - Page 73 that describes the necessary load and connection information for the parameter being calibrated. The following is a list of the calibration parameters and an example of the Prompt screen with the details that will be displayed for each parameter (screen shown at left).
- Page 74 Calibration of AC Current 99.99mA range (3780 Only) Calibration of AC Current 3.50mA range Calibration of DC Current 7.50mA range...
- Page 75 Calibration of DC Current 3.50mA range Calibration of DC Current 350µA range Calibration of IR 999.9MΩ and 9999MΩ Ranges...
- Page 76 Calibration of Continuity, Step 1 Calibration of Continuity, Step 2 Calibration of Continuity, Step 3...
-
Page 77: Replacement Parts List
11. REPLACEMENT PARTS LIST ECO: 5570, 5588 Rev.G 10-9-2012 Part Reference Qty. Description Number Designator 38787 3U Rack Mount Handle 38788 3U Rack Mount Bracket 39714 Screw for Rack Mount Handle/Bracket 35999 Black Banana Jacks 37497 Reset Switch, Red 37555 Power Switch 2P 10A/250V 37571 Earth Connector... - Page 78 38288 Output High Voltage Transformer 39277 Output High Voltage Transformer 38320 128 x 64 Graphic Display 04040A- High Voltage Output cable 02100A- Return cable 3705, 3765, 3770 Only 3780 Only 3705, 3765, 3770 Firmware 1.04 and below...
-
Page 79: Schematic Index
12. SCHEMATIC INDEX Drawing Reference Description Pages Number Designator S03705 Wiring Diagram 3705 S03770 Wiring Diagram 3765, 3770 S03780 Wiring Diagram 3780 S38367 Main Control Board CON 3670 S38264 High Voltage Board HV 3670 S39268 High Voltage Board 3780 HV 3670 S38265 HV Relay Board 3765, 3770 HRY 3670... - Page 80 Index AC Withstand ....................36, 37, 41 Adapter Box ..................9, 19, 20, 23, 39, 69 Arc ..................3, 8, 13, 16, 35, 36, 37, 43 Breakdown ......................3, 4, 43 Calibration ........10, 18, 22, 24, 31, 32, 56, 57, 63, 64, 65, 66, 67, 68 Calibration Alert Alert Date .........................
- Page 81 Parameters System Parameters ..................... 28, 29, 34 Test Parameters ..................18, 26, 28, 35, 36 PLC ....................8, 28, 29, 33, 34, 45 Power ........................4, 6, 11 Power Factor......................... 4 Programming ......................26 Ramping ........................8 Rear Panel Controls ....................11, 21 Receptacle ..................
Need help?
Do you have a question about the hypot III 3705 and is the answer not in the manual?
Questions and answers