Table of Contents
Advertisement
Quick Links
For the following models:
7620
7650
S
FETYCHECKLIST
KEEP unqualified/unauthorized personnel away from test area
RR NGE test stations in a safe and orderly manner
NEVER touch products or connections during a test
TURN OFF high voltage first in the event of a problem
DISCH RGE item tested with DC before touching connections
NEVER perform a test on energized circuitry or equipment
BE SURE to always connect the return test lead first
H NDLE test clips by insulation only, never touch clips directly
W RNING: THIS GUIDE W S CRE TED
FOR OPER TORS H VING SOME
F MILI RITY WITH HIPOT ND ELECTRIC L S FETY
TESTING.
HIPOT TESTER PRODUCES VOLT GES
ND CURRENTS TH T C N C USE H RMFUL OR
F T L ELECTRIC SHOCK. TO PREVENT CCIDENT L
INJURY OR DE TH, THESE S FETY PROCEDURES
MUST BE STRICTLY OBSERVED WHEN H NDLING
ND USING
TEST INSTRUMENT.
Advertisement
Table of Contents

Related Manuals for Associated Research HYPOTULTRA III 7620


Summary of Contents for Associated Research HYPOTULTRA III 7620
- Page 1 For the following models: 7620 7650 FETYCHECKLIST KEEP unqualified/unauthorized personnel away from test area RR NGE test stations in a safe and orderly manner NEVER touch products or connections during a test TURN OFF high voltage first in the event of a problem DISCH RGE item tested with DC before touching connections NEVER perform a test on energized circuitry or equipment BE SURE to always connect the return test lead first...
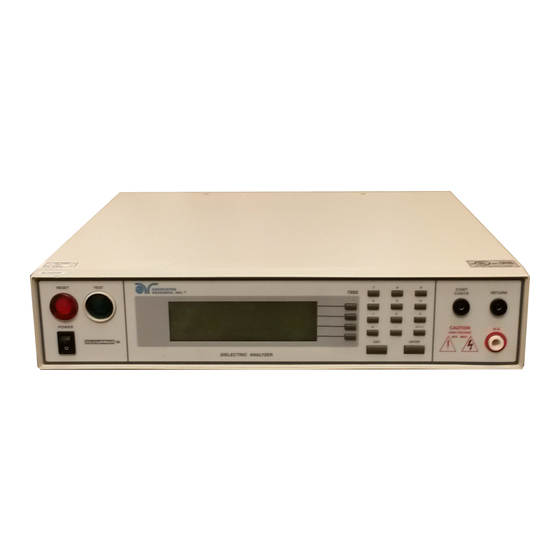
- Page 2 FRONTP NELCONTROLS RESET BUT TON: Red momentary contact switch used to reset the instrument in case of a failure or to proceed to the next test. lso serves as an abort signal to stop any test in progress. TEST BUT TON: Green momentary contact switch used to start tests. GRAPHIC LCD: 240 x 64 monographic LCD.
- Page 3 NELCONTROLS BUS INTERFACE: Standard connector for interconnection to the USB/RS-232 Bus interface. Optional IEEE–488 interface or Ethernet Interface may be substituted for the USB/RS-232. CALIBRATION BUT TON: Used to put the instrument into calibration mode. REMOTE SIGNAL INPUT: 9-Pin D sub-miniature male connector for remote control of test, reset, and interlock functions, as well as remote program memory selection.
- Page 4 INSTRUMENTSETUP W RNING: LOC TE SUIT BLE TESTING RE WITH THREE- PRONG, GROUNDED OUTLET. BE SURE TH T YOUR THREE-PRONG OUTLET H S BEEN TESTED FOR PROPER WIRING. LSO, M KE SURE YOU RE D THE S FETY CHECKLIST OF THIS GUIDE BEFORE ST RTING TO TEST. 1.
- Page 5 (Figure 2. Test Parameters Screen) CH NGING SYSTEM SETTINGS From the Perform Test screen press the “More” soft key. second set of selections will now be displayed. Press the “System” soft key. t the Setup System Menu you may highlight the parameter you wish to edit by using the “...
- Page 6 N MING MEMORY From the Perform Test screen, press the “Memory” soft key. The Memory Recall screen will now be displayed. t the Memory Recall screen, press the “Name” soft key. The character map will now be displayed. Use the “ rrow” soft keys ( ), to select the desired character.
- Page 7 Plug the black cord from the adapter box into the Continuity Check terminal and the cord with a white connector from the adapter box into the High Voltage terminal located on the front panel. Plug one of the black ground return leads into the Return terminal also on the front panel of the instrument.
- Page 8 RESULTS VIEWING TEST RESULTS From the Perform Test screen, press the “More” soft key. second set of selections will now be displayed. Press the “Result” soft key to view results. (See Figure 5.) SELECTING THE RESULTS SETTING From the Perform Test screen, press the “More” soft key. second set of selections will now be displayed.
Need help?
Do you have a question about the HYPOTULTRA III 7620 and is the answer not in the manual?
Questions and answers