Omron M7 Intelli IT Instruction Manual
Hide thumbs
Also See for M7 Intelli IT:
- Instruction manual (422 pages) ,
- Manual (20 pages) ,
- Instruction manual (47 pages)

Subscribe to Our Youtube Channel
Related Manuals for Omron M7 Intelli IT


Summary of Contents for Omron M7 Intelli IT
- Page 1 English Français Deutsch Italiano Español Nederlands Automatic Upper Arm Blood Pressure Monitor M7 Intelli IT (HEM-7322T-E) Türkçe Instruction Manual IM-HEM-7322T-E-01-12/2015 3100061-5B...
- Page 3 H A E H A F...
-
Page 4: Table Of Contents
Contents Thank you for purchasing the OMRON M7 Intelli IT Automatic Upper Arm Blood Pressure Monitor. The OMRON M7 Intelli IT is a compact, fully automatic upper arm blood pressure monitor, operating on the oscillometric principle. It measures your blood pressure and pulse rate simply and quickly. -
Page 5: Important Safety Information
Important Safety Information Warning: Indicates a potentially hazardous situation which, if not avoided, could result in death or serious injury. (General Usage) DO NOT adjust medication based on measurement results from this blood pressure monitor. Take medication as prescribed by your physician. Only a physician is qualified to diagnose and treat high blood pressure. Consult your physician before using the device for any of the following conditions: common arrhythmias such as atrial or ventricular premature beats or atrial fibrillation, arterial sclerosis, poor perfusion, diabetes, age, pregnancy, pre-eclampsia, renal diseases. - Page 6 Important Safety Information (AC Adapter (optional) Usage) Do not use the AC adapter if the device or the power cord is damaged. Turn off the power and unplug the power cord immediately. Plug the AC adapter into the appropriate voltage outlet. Do not use in a multi-outlet plug. Never plug in or unplug the power cord from the electric outlet with wet hands.
- Page 7 Wipe any dust off of the power plug. Unplug the monitor when not in use. Disconnect the power plug before cleaning. Use only an OMRON AC adapter designed for this device. Use of unsupported adapters may damage and/or may be hazardous to the device.
- Page 8 Important Safety Information (Battery Usage) Do not insert the batteries with their polarities incorrectly aligned. Use only 4 “AA” alkaline or manganese batteries with this device. Do not use other types of batteries. Do not use new and used batteries together. Remove the batteries if the device will not be used for three months or more.
-
Page 9: Know Your Device
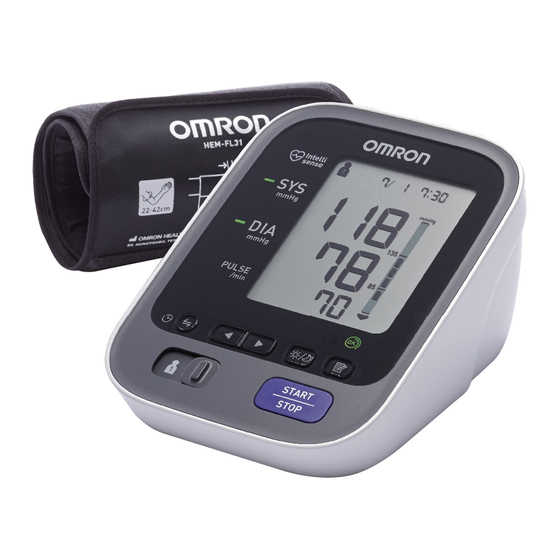
1. Know Your Device Open the rear cover page to read the following: The letter identifiers on the rear cover page correspond to those in the body of this page. Monitor Average value symbol Display Systolic blood pressure Cuff wrap guide lamp Diastolic blood pressure Memory button Connection symbol... -
Page 10: Display Symbols
1. Know Your Device 1.1 Display Symbols Irregular Heartbeat Symbol ( Normal Heartbeat When the monitor detects an irregular rhythm two or more times during Pulse the measurement, the irregular heartbeat symbol will appear on the Blood pressure display with the measurement values. An irregular heartbeat rhythm is defined as a rhythm that is 25% less or Irregular Heartbeat 25% more than the average rhythm detected while the monitor is... -
Page 11: Before Taking A Measurement
1. Know Your Device Blood Pressure Level Indicator (Colour) If your Systolic Blood Pressure is 135 mmHg or above and/or the Diastolic Blood Pressure is 85 mmHg or above, the blood pressure level indicator (colour) will light in orange when the measurement result is displayed. If the measurements are within the standard range, the blood pressure level indicator (colour) will light in green. -
Page 12: Preparation
2. Preparation 2.1 Battery Installation Remove the battery cover. Insert 4 “AA” batteries as indicated, into the battery compartment. Replace the battery cover. Notes: • When the depleted battery symbol ( ) appears on the display, turn the monitor off and remove all the batteries. -
Page 13: Pairing This Monitor With A Smartphone
2. Preparation 2.2 Pairing this Monitor with a Smartphone To begin using the “OMRON connect” app for the first time, please visit www.omronconnect.com/setup for the initial set-up instructions. List of Compatible Smartphones at: www.omronconnect.com/devices For details, visit: www.omronconnect.com Download and install the free “OMRON connect” app on your smartphone. - Page 14 2. Preparation Press the connection button for more than 2 seconds. The connection symbol ( ) and the “P” flashes on the display of the monitor. Follow the pairing instructions shown on your smartphone, while the connection symbol is flashing on the display of the monitor.
- Page 15 2. Preparation Confirm if the monitor is connected successfully. When the monitor is connected successfully to the smartphone, OK symbol ( ) and the display shown on the right will flash. The monitor will automatically turn off without any operations. The date and time setting of your monitor will automatically sync with your smartphone when paired.
- Page 16 2. Preparation To Set the Date and Time Manually The date and time will be automatically set when paired with your smartphone. To set manually, follow the instructions below. Press the connection button once. The connection symbol ( ) and the “ ”...
-
Page 17: Using The Device
• The blood pressure can differ between the right arm and the left arm, and the measured blood pressure values can be different. OMRON recommends to always use the same arm for measurement. If the values between both arms differ substantially, please check with your physician as to which arm to use... -
Page 18: How To Sit Correctly
3. Using the Device 3.2 How to Sit Correctly To take a measurement, you need to be relaxed and comfortably seated, at a comfortable room temperature. • Sit in a chair with your legs uncrossed and your feet flat on the floor. •... -
Page 19: Taking A Measurement
3. Using the Device 3.3 Taking a Measurement Check if the date and time are correct on the display before taking the measurement. If the date and time settings are necessary, refer to “To Set the Date and Time Manually” in section 2.2. Notes: •... - Page 20 3. Using the Device Press the [START/STOP] button. The arm cuff will automatically start to inflate. START INFLATING DEFLATING COMPLETED What to do if your systolic pressure is more than 210 mmHg After the arm cuff starts to inflate, press and hold the [START/STOP] button until the monitor inflates 30 to 40 mmHg higher than your expected systolic pressure.
- Page 21 3. Using the Device To Transfer the Data After the measurement is complete, you can transfer the data (measurement results of blood pressure and pulse rate). Notes: • The stored data can be transferred all at once. • The date and time settings of your smartphone will sync with the monitor when transferred. Sync occurs if the time between smartphone and monitor differs more than 10 minutes.
- Page 22 3. Using the Device If “Err” appears, refer to “Connection failure. / Data cannot be sent.” in section 4.2 for more detail. Note: If the data transfer does not start, press the connection button. When the connection symbol ( ) and the “ ”...
- Page 23 3. Using the Device To Use the Guest Mode The monitor stores measurement values for 2 users in the memory. The guest mode can be used to take a single measurement for another user. No measurement values are stored in the memory when the guest mode is selected. Press and hold the [START/STOP] button for more than 3 seconds.
-
Page 24: Using The Memory Function
3. Using the Device 3.4 Using the Memory Function The monitor automatically stores the results up to 100 sets for each user (1 and 2). It can also calculate an average value based on the last 3 measurement values taken within 10 minutes. Notes: •... - Page 25 3. Using the Device Press the button to view the values stored in the memory. : To view the older values : To view the more recent values To View the Average Value Select your USER ID (1 or 2). Press and hold the button for more than 3 seconds.
- Page 26 3. Using the Device To View the Weekly Average Value The monitor calculates and displays weekly averages for the measurements taken in the morning and evening within 8 weeks for each user. Note: The week begins Sunday at 2:00. Select your USER ID (1 or 2). Press the button.
- Page 27 3. Using the Device Note: If there are no measurement values stored in the memory, the screen to the right is displayed. Morning Weekly Average Measurements of the morning This is the average for the Sunday Monday Tuesday Wednesday Thursday Friday Saturday 4:00...
-
Page 28: Deleting All Values Stored In Memory
3. Using the Device To Delete All the Values Stored in Memory The values stored in the memory are deleted by USER ID. Select your USER ID (1 or 2). Press the Memory button. The memory symbol ( ) appears. While holding the button down, press the [START/STOP]... -
Page 29: Turning "Off" The Bluetooth
3. Using the Device 3.5 Turning “OFF” the Bluetooth ® ® Turn off the Bluetooth of the monitor in the following areas where use of wireless equipment is prohibited. • On an aircraft • In hospitals • While abroad Make sure that the power has been off before starting the instructions below. Press and hold the connection button for more than 10 seconds. - Page 30 3. Using the Device ® To turn “ON” the Bluetooth Make sure that the power has been off before starting the instructions below. Press and hold the connection button for more than 10 seconds. Release the button when “ON” appears on the display. Press the [START/STOP] button to turn the monitor off.
-
Page 31: Initial Setting Of The Monitor
3. Using the Device 3.6 Initial Setting of the Monitor To delete all the information stored in your monitor, follow the instructions below. Make sure that the power of the monitor has been off. While holding the button down, press the [START/STOP] button for more than 5 seconds. -
Page 32: Error Messages And Troubleshooting
Refer to section 2.1. Immediately replace the 4 batteries with new ones. The batteries are depleted. Refer to section 2.1. Refer to “Connection failure. / Communication failed. Data cannot be sent.” in section 4.2. Contact your OMRON retail outlet or Device error. distributor. - Page 33 4. Error Messages and Troubleshooting Display Cause Solution Insert the air plug securely. Air plug is disconnected. Refer to section 3.1. Apply the arm cuff tighter. Arm cuff is applied too loosely. Refer to section 3.1. Replace the arm cuff with a new one. Air is leaking from the arm cuff.
-
Page 34: Troubleshooting
4. Error Messages and Troubleshooting 4.2 Troubleshooting Problem Cause Solution Apply the arm cuff tighter. Arm cuff is applied too loosely. Refer to section 3.1. Remain still and do not talk during Movement or talking during measurement. The measurement result is measurement. - Page 35 If the “Err” symbol still lights after checking the application, contact your OMRON retail outlet or distributor. • Press the [START/STOP] button and repeat measurement. Other problems. • Replace the batteries with new ones. If the problem continues, contact your OMRON retail outlet or distributor.
-
Page 36: Maintenance And Storage
• Use a soft dry cloth, or a soft cloth moistened with neutral soap to clean on the monitor and the arm cuff. • Changes or modification not approved by the manufacturer will void the user warranty. Do not disassemble or attempt to repair the device or components. Consult your OMRON retail outlet or distributor. Calibration and Service •... -
Page 37: Storage
5. Maintenance and Storage 5.2 Storage Keep the device in its storage case when not in use. Unplug the air plug from the air jack. Gently fold the air tube into the arm cuff. Note: Do not bend or crease the air tube excessively. Place the monitor and the arm cuff in the storage case. -
Page 38: Optional Medical Accessories
5. Maintenance and Storage 5.3 Optional Medical Accessories (within the scope of EC Medical Device Directive 93/42/EEC) Arm cuff AC adapter Arm circumference 22-42 cm HEM-FL31 AC ADAPTER-S AC ADAPTER-UK (60240HW5SW) (60240H7000SW) - Page 39 5. Maintenance and Storage To Use the Optional AC Adapter If the optional AC adapter is used without batteries and, after measurement, unplugged from the electrical outlet, the date and time are reset. Please keep the batteries in your monitor all the time when you use the optional AC adapter. Note: Make sure to use an easily accessible power socket in which to connect and disconnect the AC adapter.
-
Page 40: Specifications
6. Specifications Product category Electronic Sphygmomanometers Product description Automatic Upper Arm Blood Pressure Monitor Model (code) M7 Intelli IT (HEM-7322T-E) Display LCD digital display Measurement method Oscillometric method Transmission method ® Bluetooth Version 4.0 (Low Energy support) Wireless communication Frequency range: 2.4 GHz (2400 - 2483.5 MHz) Modulation: GFSK Effective radiated power: <20 dBm... - Page 41 Part 1: General Requirements and Part 3: Supplementary requirements for electromechanical blood pressure measuring systems. • This OMRON device is produced under the strict quality system of OMRON HEALTHCARE Co., Ltd., Japan. The core component for OMRON devices, which is the...
- Page 42 6. Specifications Symbols description Need for the user to consult the Marker on the cuff to be positioned instruction manual above the artery Applied part - Type BF Identifier of cuffs compatible for the Degree of protection against device electric shock (leakage current) Class II equipment.
- Page 43 Product before using this Product or do not use this Product around the other wireless devices. Hereby, OMRON HEALTHCARE Co., Ltd., declares that this M7 Intelli IT is in compliance with the essential requirements and other relevant provisions of Directive 1999/5/EC.
- Page 44 6. Specifications Correct Disposal of This Product (Waste Electrical & Electronic Equipment) This marking shown on the product or its literature, indicates that it should not be disposed of, with other household wastes at the end of its working life. To prevent possible harm to the environment or human health from uncontrolled waste disposal, please separate this from other types of wastes and recycle it responsibly to promote the sustainable reuse of material resources.
-
Page 45: Trademark
The Bluetooth Smart word mark and logos are registered trademarks owned by Bluetooth SIG, Inc. and any use of such marks by OMRON HEALTHCARE Co.,Ltd. is under license. Other trademarks and trade names are those of their respective owners. Apple and the Apple logo are trademarks of Apple Inc., registered in the U.S. and other countries. -
Page 46: Warranty
This product is guaranteed by OMRON for a period of 3 years after the date of purchase. The proper construction, workmanship and materials of this product is guaranteed by OMRON. During this period of guarantee OMRON will, without charge for labour or parts, repair or replace the defect product or any defective parts. -
Page 47: Some Useful Information About Blood Pressure
9. Some Useful Information about Blood Pressure What is Blood Pressure? Blood pressure is a measure of the force of blood flowing against the walls of the arteries. Arterial blood pressure is constantly changing during the course of the heart’s cycle. The highest pressure in the cycle is called the Systolic Blood Pressure;... - Page 48 9. Some Useful Information about Blood Pressure How is Hypertension related to Stroke? Hypertension (high blood pressure) is the key risk factor for Stroke. It is estimated that amongst hypertensive patients, effective treatment would prevent 1 in 4 haemorrhagic strokes (bleeding around the brain). Hypertension guidelines have endorsed the use of Home Blood Pressure Monitoring in addition to the measurements in physicians’...
- Page 51 Check following components! Vérifier les composants suivants ! Controleer de volgende onderdelen! Prüfen Sie folgende Teile des Lieferumfangs! Controllare i componenti indicati di seguito! ¡Compruebe los siguientes componentes!
- Page 52 Vertegenwoordiging in de EU Scorpius 33, 2132 LR Hoofddorp, THE NETHERLANDS EU-Repräsentant www.omron-healthcare.com Representante en la UE AB temsilcisi OMRON HEALTHCARE MANUFACTURING VIETNAM CO., LTD. Production facility Stabilimento di produzione No.28 VSIP II, Street 2, Vietnam-Singapore Industrial Park II, Site de production Productiefaciliteit Binh Duong Industry-Services-Urban Complex, Produktionsstätte...
Need help?
Do you have a question about the M7 Intelli IT and is the answer not in the manual?
Questions and answers
what is error codeE5