
Related Manuals for KKT KOLBE EB8401ED


Summary of Contents for KKT KOLBE EB8401ED
- Page 1 User’s manual for your built-in electric oven Model: EB8401ED Version: 1.0 / 140707...
-
Page 2: Safety Instructions
Safety instructions This icon indicates a hazardous situation. Dispose of the dishwasher packaging material cor- rectly. You‘ll find it especially with all descriptions of the steps that All packaging materials can be recycled. might cause danger to persons arising. Observe these safety instructions and behave accordingly ca- Plastic parts are marked with the standard international reful. -
Page 3: Safety Precautions
Safety precautions Warning • When the oven is first switched on, it may give off an • Care should be taken to avoid touching heating ele- unpleasant smell. This is due to the bonding agent ments inside the oven. used for the insulating panels within the oven. This is •... -
Page 4: Dear Customer
Thank you! Dear customer, thank you for the trust placed in us and for the purchase of this KKT KOLBE device. Your new ap- pliance is designed for the requirements in your- household. Please read this user’s and instruction manual ca- refully, which describes the capabilities and opera- tion of your KKT KOLBE-mounted device. -
Page 5: Table Of Contents
Table of content 1. Using the device 1.1 Control panel 1.2 Energy saving tips 1.3 Types of heating / functions 2. The oven interior 2.1 Construction 2.2 Telescopic runners 2.3 Device fan 3. Application 3.1 Roast 3.2 Grilling & baking 3.3 Baking 3.4 Boiling down 3.5 Unfreezing... -
Page 6: Using The Device
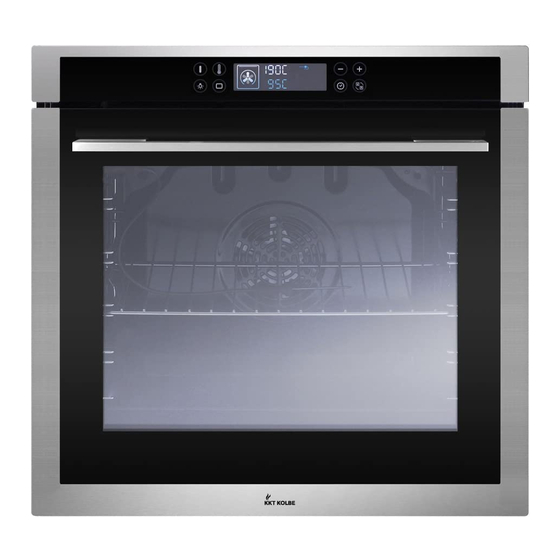
Using the device Control panel 1. Power-button 2. Oven function 3. Temperature button 4. Display 5. Time options 7. Decrease/Increase 8. Light Energy saving tips • If possible, use dark black finished or silicone-coated ena- melled tins, because they absorb the oven heat particularly well. -
Page 7: Types Of Heating / Functions
Types of heating Types of heating Oven light The oven light may be turned on with no further function. Top heat + convection Default temperature: 190 °C This setting can be used for example if you want on the grid to bake a cake in the upper part of the fur- nace and eg in the lower part want to bake cookies, which should be well browned and crispy. - Page 8 Types of heating Top-/ bottom heat Default Temperature: 200 °C The top and bottom work together to provide convectional cooking. The temperature can be set within the range of 50-250OC. The default tempera- ture is 220OC. This is optional function that can be work with rotis- serie motor.
-
Page 9: Inside The Oven
Inside the oven Inside the oven 1 Hook-in racks with rack levels 2 Lighting 3 Fan with ring heater 4 Grill heating element 5 Top element 6 Bottom heat radiator (under the oven floor) Shelf levels for shelf unit, baking tray or roasting pan. Ple- ase note that the numbering of the rack levels from bottom to top. -
Page 10: Application
Application Roasting Baking For roasting the top and bottom heat or hot air can be For baking, the top and bottom or the hot air may be used. used. If in the baking table no special pastries types are specified, select the information to a similar pastry or •... -
Page 11: Application Table
Application Defrost By air circulation at room temperature, thawing of food gets accelerated. Use the defrost function. • To thaw, cream and butter cream cakes, pies and pastries, bread and rolls, frozen fruits are suitable. • For a uniform thawing, rotate or stir defrosted in between. Application table Food Insertion... -
Page 12: Programming
Programming Clock setting Delayed start Once you have connected the device to the power supply, If you go at 8 clock out of the house to come back 12:30 the display shows „00:00“ on. Without setting the oven is clock during which time a cake to be baked, you can set: not working. - Page 13 Using the temperature probe Using the temperature probe • Insert the meat probe into the food (eg roasts, cakes). • Insert the meat probe into the socket top left in the oven (see figure). • If the temperature sensor is positioned correctly, it is visible Plug on the display (icon appears).
-
Page 14: Care And Cleaning
Care and cleaning Care and cleaning Oven • The oven is easier to clean when it is still slightly warm. Simple remove grease splashes with rinse water. • For cleaning, don’t use steam cleaners. • Use conventional oven cleaner for stubborn or severe •... -
Page 15: Telescopic Runners
Care and cleaning Remove the hook in racks Remove accessories such as rust and baking sheet. Hook in racks at the clamping point slightly push down (2 in figure) and the oven wall down. Swivel hook in racks inside and unhook at the top (1 in figure) Insert hook in racks Insert the siderails up in the holes and swing it down. -
Page 16: Troubleshooting
Troubleshooting Oven door The oven door is fitted with three successive positioned glass panes. For cleaning the inner and middle glass plate can be removed. • Whenever the door of the oven is removed, the clips should be opened. Rinse the glasses with warm water and special glass cleaner. - Page 17 Troubleshooting Accessoires Grill grid Roast grid • Grills • for frying • Cake mold • Griddle Universal baking tray Deep baking tray • Great cake • For gravy and sauces • biscuits • Frozen foods • Fat / juice collection pan Baking sheet trays •...
-
Page 18: What To Do In Case Of Problems
Troubleshooting What to do in case of problems? Unqualified persons should perform the repairs on this unit because of electric shock and short circuit hazard. Repairs ge- nerally only be carried out by a licensed professional. The oven doesn’t heat up. Device fuse tripped in the house installation? Temperature controller and the function selector switch set correctly? -
Page 19: Installation And Connection Of The Device
Installation and connection of the device Installation in a floor cabinet The device may only be connected by a qua- Phase lified person. The furnace must be installed according to the instructions. Remove the Ground protective strip from the door. After installing, remove the protective strip from the interior Neutral surfaces of the oven. - Page 20 Troubleshooting Installation in a wall cabinet 1. Pay attention to the requirements for the minimum distance. 2. Secure the device to the cabinet with screws on both sides.
- Page 21 Installation and connection of the device Connection to the power supply Foll owing cable types are suitable for the device: phase H05 RR-F , Min 1.1m 3x 2.5mm ground During this operation, the appliance must be neutral disconnected from the mains! •...
-
Page 23: General Information
General information Data sheet Manufacturer KKT KOLBE Model EB8401ED Mains voltage 220-240V ~50/60Hz or 50Hz Volume 67 L = big 2.750 W – 3.300 W Power consumption Energy efficiency class* Weight 38,0 kg 41,8 kg – with packaging Dimensions (B x H x T) outside 594.5 x 594.5 x 566 mm... - Page 24 Thank you for reading. We wish you much success and joy with your device. Version: 1.0 / 140626...
Need help?
Do you have a question about the EB8401ED and is the answer not in the manual?
Questions and answers