Cochlear Kanso CP950 User Manual
Hide thumbs
Also See for Kanso CP950:
- User manual (100 pages) ,
- User manual (116 pages) ,
- Quick reference (21 pages)
Table of Contents
Advertisement
Advertisement
Table of Contents

Related Manuals for Cochlear Kanso CP950


Summary of Contents for Cochlear Kanso CP950
- Page 1 Kanso Sound Processor ™ User Guide CP950...
- Page 2 This guide is intended for Cochlear implant recipients and their carers using the Cochlear Kanso Sound Processor ™ ™ (model number: CP950). The processor works with your implant to transfer sound to your ear. it is a self-contained unit that contains the processing unit, microphones, magnet and batteries.
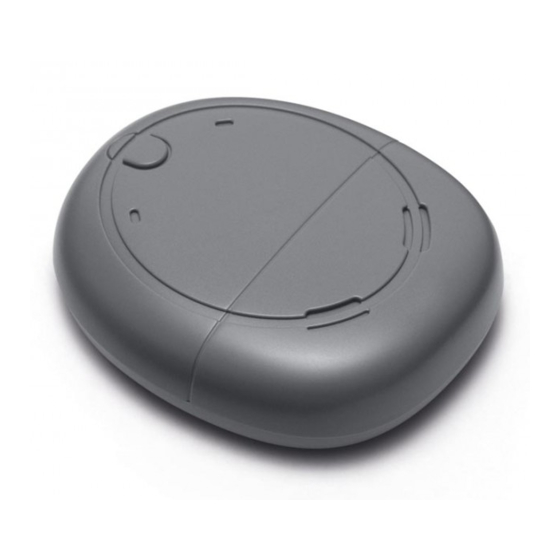
- Page 3 Kanso Sound Processor ™ Front THIS WAY UP indicator light Control button Microphone ports Kanso Top Cover Kanso Battery Cover Air slots Back Safety Line attachment points Battery cover lock KANSO ™ SOUND PROCESSOR USER GUiDE...
-
Page 4: Table Of Contents
Contents Power Batteries ......Battery life ......Lock/unlock the battery cover . - Page 5 Care Regular care ......Storage ......Change microphone protectors .
-
Page 6: Batteries
NOTE You will need to use other battery types only when you are using the Cochlear Nucleus Aqua+ for Kanso accessory. Please see its user guide for details. Battery life Batteries should be replaced as needed just as you would with any other electronic device. -
Page 7: Lock/Unlock The Battery Cover
Lock/unlock the battery cover The battery cover has a tamper resistant lock to help prevent children opening the battery cover. 1. To lock, turn the locking screw clockwise with the battery cover locking tool until it is horizontal. LOCKED 2. To unlock, turn the locking screw anticlockwise until it is vertical. -
Page 8: Change The Batteries
Change the batteries 1. if the battery cover is locked, turn the lock screw anticlockwise to unlock it. 2. Remove the battery cover. Use your fingers on the sides to pull off the cover. The cover is a secure fit, so pull firmly. - Page 9 4. Remove the new batteries from the packet, and let them stand for a few seconds. See Batteries on page 4. 5. insert the batteries into the battery holder with the side with holes on it (positive terminal) facing out. 6.
-
Page 10: Turn On And Off
Turn on and off 1. Press the button to turn on. 2. To turn off, press and hold the button until the light is a steady orange. NOTE Your sound processor will also turn off automatically after being off your implant for two minutes. KANSO ™... -
Page 11: Pair With Remotes
iNDiCATOR LiGHTS WHAT iT MEANS Turning on processor. The number of flashes indicates the number of the current program. Green flashes Processor is off the implant. Orange flashes Processor flashes while receiving … sound from microphones Quick green flashes (Child mode only). Pair with remotes You need to pair your sound processor to your CR210 Remote Control or CR230 Remote Assistant to use... -
Page 12: Change Program
Change program You can choose between programs to change the way your sound processor deals with sound, e.g. in noisy or quiet places. Usually two programs are all you need, but your clinician can give you up to four programs. 1. -
Page 13: Change Volume And Sensitivity
Change volume and sensitivity if set up by your clinician, you can control the levels of volume or sensitivity (if available) using your CR210 Remote Control or CR230 Remote Assistant. Please see your remote’s user guide for details. NOTE You need to pair your sound processor with your remote first. See your remote’s user guide for details. -
Page 14: Stream Audio
Your clinician can enable Telecoil if you want to listen to room hearing loops. NOTE Telecoil is not recommended for phone use with the Kanso Sound Processor. We recommend you use the Cochlear Wireless Phone Clip. Wireless accessories ™ Cochlear True Wireless... -
Page 15: To Control Streaming
To control streaming You can also use your remote to control streaming audio. See its user guide for details. Each time you press the sound processor button, you cycle through the available audio sources in order: PRESS TELECOiL ENABLED NO TELECOiL Telecoil Wireless accessory 1 Wireless accessory 1... -
Page 16: Wear Your Processor
Wear your processor Place the processor on your implant with the button/light facing up and battery compartment facing down. CAUTION it is important to position your processor correctly to get the best performance, and so it does not fall off the implant. Button/light facing up Battery... -
Page 17: For Users With Two Implants
For users with two implants Ask your clinician to give you coloured stickers (red for right, blue for left) to make identifying left and right processors easier. CAUTION if you have two implants, you must use the correct sound processor for each implant. NOTE Your sound processor will recognise the implant’s iD, so it will not work on the wrong implant. -
Page 18: Attach A Softwear Pad
Attach a SoftWear pad ™ The Cochlear SoftWear pad is optional. if you experience discomfort when wearing your processor, you can attach this adhesive pad to the back of your processor. NOTE You may need to change to a stronger magnet after attaching a SoftWear pad. - Page 19 3. Peel off the two semicircle backing covers on the cushion side of the pad. 4. Wear your processor as usual. NOTE The SoftWear pad may affect your sound processor’s performance. if you notice any change, contact your clinician. KANSO ™...
-
Page 20: Attach A Safety Line
To reduce the risk of losing your processor, you can attach a Safety Line that clips onto your clothing: • Nucleus Safety Line–standard length • Cochlear Safety Line (Long). 1. Pinch the loop on the end of the line between your finger and thumb. - Page 21 3. Pass the clip through the loop and pull the line tight. 4. Lift the tab to open the clip. 5. Place the clip on your clothing and press down to close. 6. Place your processor on your implant. WARNING Retention lines longer than the Safety Line (standard length) are not recommended for use by children as they may present a risk of strangulation.
-
Page 22: Safety Line-Short Double Loop
Safety Line–Short Double Loop To reduce the risk of losing your processor, you can attach a Safety Line that clips into your hair: 1. Pinch the loop on one end of the line between your finger and thumb. 2. Pass the loop throught the attachment hole in the hair clip. - Page 23 4. Pass the other loop through the attachment hole in the processor from front to back. Use the attachment hole that will be at the rear of the processor when it is on your head. 5. Pass the clip through the loop and pull the line tight.
-
Page 24: Wear The Headband
Wear the Headband The Cochlear Headband is an optional accessory that holds the processor in place on your implant. This is useful for children or for physical activities. Headband sizing To choose a Headband, measure your head circumference: SiZE CiRCUMFERENCE... - Page 25 3. insert your processor/s in the correct pocket/s: • the left processor in the left-side pocket, the right processor in the right-side pocket • the top of the processor at the top of the pocket • the side of the processor that fits onto your implant is facing up towards you.
-
Page 26: Change The Magnet
Change the magnet if your Kanso Magnet is too weak the processor may fall off, or if it is too strong it may cause discomfort. Magnet strength ranges from ½ (weakest) to 6 (strongest). NOTE if your clinician has provided you with a Kanso Magnet Reverse Polarity, use it as described here for a normal magnet. - Page 27 5. Use another magnet to pull the magnet from the processor. 6. insert the new magnet in the processor, with the side tabs in the square notches in the processor case. 7. Press down with your finger and turn the magnet clockwise to lock the tab on the magnet under the processor’s case.
-
Page 28: Sport And Exercise
NOTE if you want to use your processor while bathing, swimming or showering, ask your clinician about the Cochlear Aqua+ for Kanso. 1. Use accessories such as the Safety Line or Cochlear Headband to help hold your processor in place when you play sport or exercise. -
Page 29: Travel
Travel NOTE Visit www.cochlear.com/clinic-finder to find the nearest clinic in places you are travelling. • Take a printout from your clinician of your most recent program in case you need help with your processor. • if you have a backup sound processor, check that it is programmed correctly and take it with you. -
Page 30: Regular Care
Regular care CAUTIONS • Do not use cleaning agents or alcohol to clean your processor. • Turn your processor off before cleaning or performing maintenance. Every day • Check all parts and any accessories you use (e.g. SoftWear pad, Safety Line) for dirt and moisture. Wipe the processor with a soft dry cloth. -
Page 31: Storage
30. Storage Dry aid kit Store your processor at night in the dry aid kit provided by Cochlear. Store the processor fully assembled for 8 hours for optimal drying effect. Storage case For long term storage,... -
Page 32: Change Microphone Protectors
Change microphone protectors Replace your microphone protectors every three months, or if they look dirty or you notice any loss in sound quality. Always replace both microphone protectors at the same time, using the Kanso Microphone Protector Kit. Step 1: Remove microphone protectors Microphone protectors 1. - Page 33 4. Firmly push the tip of the removal tool into the middle of the microphone protector. 5. Firmly push, and then turn the tool 90° clockwise. 6. Lift out the used microphone protector. 7. Pull the used microphone protector from the tool and discard.
- Page 34 Step 2: insert new microphone protectors 1. Pull the microphone protector applicator out of its sleeve. 2. With the microphone protectors facing down, lay the applicator over the processor, with protectors over the microphones. 3. Press the microphone protectors down with your finger.
-
Page 35: Water, Sand And Dirt
Replace the microphone protectors and place your processor in the dry aid kit provided by Cochlear for 8 hours. See Change the batteries on page 6. See Change microphone protectors on page 30. if sand or dirt ever enter the... -
Page 36: Lights
Lights Your clinician can set up your processor to show some or all of the following light indications. Turning on and off LiGHT WHAT iT MEANS Processor flashes while receiving sound … from microphones (Child mode only). Quick green flashes Turning on and changing programs. -
Page 37: Audio Sources
Audio sources LiGHT WHAT iT MEANS Processor flashes when pairing to wireless accessory is successful. Quick blue flash Processor flashes while receiving audio from … an audio source (Child mode only). Quick blue flashes KANSO ™ SOUND PROCESSOR USER GUiDE... -
Page 38: Beeps
Beeps Your clinician can set up your processor so you can hear the following beeps. The beeps are only audible to the recipient. Turning on and off BEEP WHAT iT MEANS Changing the program. The number of beeps indicates the number of the selected program. - Page 39 Alerts BEEP WHAT iT MEANS Processor batteries are low. Replace batteries. 2 Short low beeps Batteries are empty and processor is turning off. Short low beeps for 4 seconds Replace batteries. General fault. Consult your clinician. 4 long low beeps over 4 seconds Adjusting bass and treble * BEEP WHAT iT MEANS...
-
Page 40: Troubleshoot
Troubleshoot Contact your clinician if you have any concerns regarding the operation or safety of your sound processor. PROBLEM RESOLUTiON Processor will not Try turning the processor on again. See turn on/button Turn on and off on page 8. will not respond Replace the batteries. - Page 41 PROBLEM RESOLUTiON You are not sure See Lights on page 34 and Beeps on page what processor beeps or light flashes mean You want to Check the light on the top of the confirm your processor (if enabled). See Lights on processor is page 34.
- Page 42 PROBLEM RESOLUTiON You do not hear Try a different program. See Change sound or sound is program on page 10. intermittent Replace the batteries. See Change the batteries on page 6. Make sure the sound processor is properly oriented on your head, see Wear your processor on page 14.
- Page 43 PROBLEM RESOLUTiON You hear Check for sources of interference such as intermittent radio and TV transmission towers (within sound, a buzzing approximately 1.6 km or 1 mile), sound or distorted shopping centres, airport security speech systems and mobile phones. Try moving away from any source of magnetic or electronic interference.
- Page 44 Dry the processor with a soft cloth, change the microphone protectors and place it in the dry aid kit provided by Cochlear for 8 hours. See Water, sand and dirt on page 33 Batteries are not Clean the battery contacts carefully lasting as long as without bending them.
-
Page 45: Cautions
(e.g. table or chair). impact to the sound processor may cause damage to the processor or its parts. impact to the head in the area of the Cochlear implant could damage it and result in its failure. • Most patients can benefit from electrical stimulation levels that are considered safe, based on animal experimental data. -
Page 46: Warnings
Warnings For parents and carers • Removable parts of the system (e.g. microphone protectors, batteries, magnets, battery cover, Safety Line) can be lost or may be a choking or strangulation hazard. Keep out of reach of children or lock the tamper-proof screw on the battery cover. -
Page 47: Processors And Parts
• Each processor is programmed specifically for each implant. Never wear another person’s processor or lend yours to another person. • Use your Cochlear implant system only with approved devices and accessories. • if you experience a significant change in performance, remove your processor and contact your clinician. - Page 48 • if you need to adjust the volume often, or if adjusting volume ever causes discomfort, consult your clinician. • Do not place the processor or parts in any household devices (e.g. microwave oven, dryer). • Do not use a dry aid kit that has an Ultra Violet C (UVC) lamp (e.g.
- Page 49 1-4 m (~3-12 ft), to a digital mobile telephone in use. • For Cochlear Nucleus cochlear implant recipients only, the maximum diving depth is 40 m (~131 ft). Seek medical advice before diving to ensure you do not have any conditions that might make diving contraindicated (e.g.
-
Page 50: Batteries
Batteries • Use only Cochlear supplied or recommended 675 (PR44) zinc air batteries for everyday use. Other batteries may only be used with the Aqua+ for Kanso accessory (see its user guide for details). • insert batteries in the correct orientation. -
Page 51: Medical Treatments
Full MRi safety information is available at www.cochlear.com/warnings or by calling your regional Cochlear office (contact numbers available at the end of this document). if the patient is implanted with other implants, consult the manufacturer’s instructions before performing MRi. - Page 52 Medical treatments generating induced currents, heat and vibration Having a cochlear implant means extra care must be taken when receiving some medical treatments. Before starting medical treatment, the information in this section should be discussed with the recipient’s physician. The sound processor must be removed before starting any of the medical treatments listed in this section.
- Page 53 Monopolar electrosurgical instruments must not be used on the head or neck of an implant patient as induced currents could cause damage to cochlear/neural tissues or permanent damage to the implant. When using bipolar electrosurgical instruments on the head and neck of a patient, the cautery electrodes must not contact the implant and should be kept more than 1 cm (½...
-
Page 54: Other Information
Other information Physical configuration The processing unit comprises: • Two omni-directional microphones for receiving sound. • An internal telecoil for receiving magnetic fields radiated by room loops. • Custom analogue and digital integrated circuits with digital signal processing (DSP) and bi-directional wireless communication capabilities. -
Page 55: Environmental Conditions
Wireless communication link The remote control/remote assistant wireless communication link operates in the 2.4 GHz iSM band using GFSK (Gaussian frequency shift keying) on 5 channels. The link uses a proprietary bi-directional communication protocol and operates over a distance of up to 2 metres from the processor. When interference is present, the wireless communication link switches between the 5 channels to find a channel where the interference least affects the operation of the link. -
Page 56: Operating Characteristics
Remote communication range Up to 2 m Batteries Two PR44 (zinc air) button cell batteries, 1.45V (nominal) each Cochlear recommends 675 zinc air batteries designed for cochlear implant KANSO ™ SOUND PROCESSOR USER GUiDE... -
Page 57: Environmental Protection
Electromagnetic compatiblity (EMC) WARNING Portable RF communications equipment (including peripherals such as antenna cables and external antennas) should be used no closer than 30 cm (12 in.) to any part of your Kanso Sound Processor, including cables specified by the manufacturer. Otherwise, degradation of the performance of this equipment could result. - Page 58 Changes or modifications made to this equipment not expressly approved by Cochlear Limited may void the FCC authorisation to operate this equipment. This equipment has been tested and found to comply with the limits for a Class B digital device, pursuant to Part 15 of the FCC Rules.
- Page 59 This equipment generates, uses and can radiate radio frequency energy and, if not installed and used in accordance with the instructions, may cause harmful interference to radio communications. However, there is no guarantee that interference will not occur in a particular installation. if this equipment does cause harmful interference to radio or television reception, which can be determined by turning the equipment off and on, the user is encouraged to try to correct...
- Page 60 R 202-LSD 0 88 Radio compliance for Korea 1. Equipment name/model name: 2. Registration number: MSIP-CRM-COH-CP950 3. Company name: Cochlear Limited 4. Manufactured date: 2015 5. Manufacturer/Country of Origin: Cochlear Limited/Australia WARNING This radio equipment has the possibility of radio interference during operation.
-
Page 61: Labelling Symbols
Labelling symbols The following symbols may appear on your processor or remote components and/or packaging: Refer to instruction manual Specific warnings or precautions associated with the device, which are not otherwise found on the label Manufacturer Model number Authorised representative in the European Community Catalogue number Serial number Batch code... -
Page 62: Legal Statement
During the process of receiving a Cochlear device, personal information about the user/recipient or their parent, guardian, carer and hearing health professional will be collected for use by Cochlear and others involved in care with regard to the device. For more information please read Cochlear’s Privacy Policy on www.cochlear.com or request a copy from Cochlear at the... - Page 64 Cochlear Deutschland GmbH & Co. KG Karl-Wiechert-Allee 76A, 30625 Hannover, Germany Tel: +49 511 542 770 Fax: +49 511 542 7770 Cochlear Europe Ltd 6 Dashwood Lang Road, Bourne Business Park, Addlestone, Surrey KT15 2HJ, United Kingdom Tel: +44 1932 26 3400 Fax: +44 1932 26 3426 Cochlear Benelux NV Schaliënhoevedreef 20 i, B-2800 Mechelen, Belgium...
Need help?
Do you have a question about the Kanso CP950 and is the answer not in the manual?
Questions and answers