Table of Contents
Advertisement
Available languages
Available languages
Quick Links
215.035 / 215.036 / 215.037
Bedienungsanleitung
Elektrische Hähnchengrillgeräte
D/A/CH
Seite 2 bis 6
Instruction manual
Electric chicken-spits
GB/UK
from page 7 to 11
Mode d'emploi
Rôtissoires électriques
F/B/CH
de page 12 à page 16
Gebruiksaanwijzing
Elektrische kippengrills
NL/B
blz. 17 t/m 21
Instrukcja obsługi
Elektryczny opiekacz do kurczaków
PL
strony od 22 do 26
Advertisement
Table of Contents

Related Manuals for Bartscher E-6p


Summary of Contents for Bartscher E-6p
- Page 1 215.035 / 215.036 / 215.037 Bedienungsanleitung Elektrische Hähnchengrillgeräte D/A/CH Seite 2 bis 6 Instruction manual Electric chicken-spits GB/UK from page 7 to 11 Mode d’emploi Rôtissoires électriques F/B/CH de page 12 à page 16 Gebruiksaanwijzing Elektrische kippengrills NL/B blz. 17 t/m 21 Instrukcja obsługi Elektryczny opiekacz do kurczaków strony od 22 do 26...
- Page 2 Elektro-Hähnchengrills mit übereinander Einzelspießensbewegung Mod. E-6P Mod. E-8P-S2 Mod. E-12P-S3 INSTALLATIONS,- BEDIENUNGS- UND WARTUNGSANWEISUNGEN...
-
Page 3: Installation
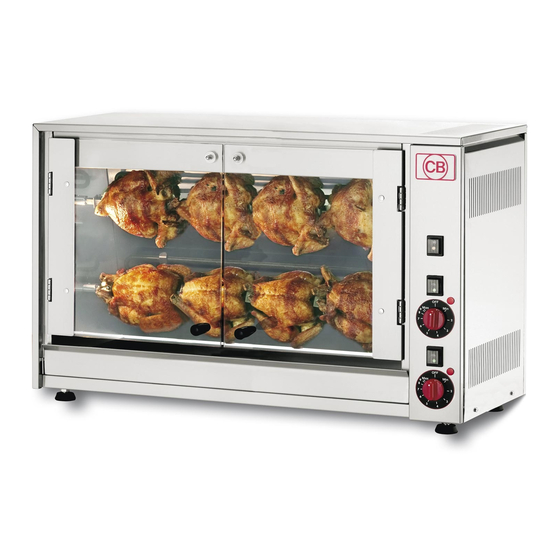
ABBILDUNG DES GERÄTES Abb. 1 MERKMALE Modell Spiesse Hähnchen Breite Tiefe Höhe Spannung Leistung E-6P 700 mm 360 mm 530 mm 230V~ 2800 W E-8P-S2 880 mm 470 mm 530 mm 230V~ 3500 W 230V 3~ E-12P-S3 880 mm 470 mm... - Page 4 GEBRAUCHSANWEISUNG Die Installation und die erste Kontrolle des Hähnchengrills dürfen nur von qualifiziertem Fachpersonal ausgeführt werden. Um ein gutes Abb. Funktionieren zu garantieren, muss folgendes beachtet werden : Mit dem Beleuchtungsschalter (A) wird die Innenbeleuchtung des Hähnchengrills angezündet. Die Getriebemotorschalter (B) aktivieren, um die Rotationsmotoren für die Spiesse in Bewegung zu setzen.
-
Page 5: Reinigung Und Wartung
Ersatzkabel muss folgende Eigenschaften aufweisen : es darf nicht leichter als Typ H07 RN-F sein es muss einen mindesten Querschnitt der Leitungen wie folgt aufweisen : Modell 230V~ 230V 3~ 400V 3N~ E-6P 3x1,5 mm E-8P-S2 3x2,5 mm E-12P-S3 4x4 mm 5x2,5 mm Beim Anschliessen ist darauf zu achten, dass die Erdleitung länger als die anderen Leitungen ist, damit sich... -
Page 6: Auswechseln Der Lampe
AUSWECHSELN DER LAMPE Das Gerät ausschalten. Das Schutzglas entfernen. Die Lampe abschrauben und durch eine gleichartige ersetzen. Das Schutzglas wieder aufschrauben. ELEKTRO-SCHEMA Siehe beigefügte Schaltpläne. ANWEISUNG Das Gerät entsprechend den nationalen Entsorgungsrechtsvorschriften entsorgen. Das Gerät gegen Eingriffe von nicht berechtigtem Personal immer schützen. DER HERSTELLER LEHNT JEGLICHE VERANTWORTUNG AB, FALLS DIE VORLIEGENDEN ANWEISUNGEN NICHT STRIKT BEFOLGT WERDEN. - Page 7 Electrical chicken-spits with superposed single spits movement Mod. E-6P Mod. E-8P-S2 Mod. E-12P-S3 INSTRUCTIONS FOR INSTALLATION, USE AND MAINTENANCE...
- Page 8 DRAWING OF THE EQUIPMENT Fig. 1 CHARACTERISTICS Model Spits Chickens Width Depth Height Voltage Power E-6P 700 mm 360 mm 530 mm 230V~ 2800 W E-8P-S2 880 mm 470 mm 530 mm 230V~ 3500 W 230V 3~ E-12P-S3 880 mm...
- Page 9 INSTRUCTIONS FOR USE It is advisable that the initial installation and setting up of the chicken-spit is carried out by a reliable engineer. It is important to Fig. follow the setting up procedure exactly : Press switch A to light the cooking chamber. Press the gear-motors switches (B) to start them for the spits rotation.
-
Page 10: Cleaning And Maintenance
: it must not be lighter than the type H07 RN-F it must have a conductors section of at least : Model 230V~ 230V 3~ 400V 3N~ E-6P 3x1,5 mm E-8P-S2 3x2,5 mm E-12P-S3 4x4 mm 5x2,5 mm During the connection pay attention that the round wire must be longer than the other ones; in fact, in case of strong wire traction or rupture of cable connection it must be disconnected after the live conductors. -
Page 11: Light Replacement
LIGHT REPLACEMENT Unplug the appliance. Remove the glass protection. Unscrew the bulb and replace the light with a new one having the same features; plug the protection back on. ELECTRICAL CONNECTION See enclosed wiring diagrams. WARNING Get rid of the machine in a proper way following the national disposal rules. Always protect the machine from the interventation of not authorized persons. - Page 12 Rôtissoires électriques verticales à broches indépendantes Mod. E-6P Mod. E-8P-S2 Mod. E-12P-S3 NOTICE D'INSTALLATION, D'EMPLOI ET D'ENTRETIEN...
- Page 13 REPRESENTATION DES EQUIPEMENTS Fig. 1 CARACTERISTIQUES Modèle Broches Poulets Largeur Profondeur Hauteur Tension Puissance E-6P 700 mm 360 mm 530 mm 230V~ 2800 W E-8P-S2 880 mm 470 mm 530 mm 230V~ 3500 W 230V 3~ E-12P-S3 880 mm 470 mm...
- Page 14 INSTRUCTIONS D'USAGE Il est indispensable que l'installation et le premier contrôle du rôtissoire soient effectuées par du personnel qualifié. Pour garantir Fig. un fonctionnement parfait, il faut suivre attentivement la procédure suivante : Pour l' éclairage intérieur actionner l'interrupteur lampe A. Actionner les interrupteurs moto-réducteurs (B) pour enclencher les moto-réducteurs pour la rotation des broches.
-
Page 15: Nettoyage Et Entretien
: il ne doit pas être plus léger que le type H07 RN-F il doit avoir une section des conducteurs d'au moins : Modèle 230V~ 230V 3~ 400V 3N~ E-6P 3x1,5 mm E-8P-S2 3x2,5 mm E-12P-S3 4x4 mm 5x2,5 mm Pendant le raccordement faire attention que le conducteur de terre soit plus long que les autres. -
Page 16: Remplacement De La Lampe
REMPLACEMENT DE LA LAMPE Débrancher l'appareil du réseau électrique. Enlever la protection en vitre. Enlever la lampe et la changer avec une autre ayant les mêmes caractéristiques et monter de nouveau la protection en vitre. SCHEMA ELECTRIQUE Voir schèmes électriques ci-joint. AVERTISSEMENT écouler l' appareil de manière adéquate respectant les normes nationales en matière de déchets. - Page 17 Elektrische kippengrills met afzonderlijk aangedreven, boven elkaar geplaatste spiesen Mod. E-6P Mod. E-8P-S2 Mod. E-12P-S3 AANWIJZINGEN VOOR INSTALLATIE, BEDIENING EN ONDERHOUD...
-
Page 18: Afbeelding Van Het Apparaat
AFBEELDING VAN HET APPARAAT Afb. 1 EIGENSCHAPPEN Model spiesen Kippen Breedte Diepte Hoogte Spanning Vermogen E-6P 700 mm 360 mm 530 mm 230V~ 2800 W E-8P-S2 880 mm 470 mm 530 mm 230V~ 3500 W 230V 3~ E-12P-S3 880 mm... - Page 19 GEBRUIKSAANWIJZING Laat gekwalificeerde vaklui de installatie en de eerste ingebruikname Afb. van het apparaat uitvoeren. Om ervoor te zorgen dat het apparaat op de juiste manier werkt, moet u het volgende in acht nemen: verlichtingsschakelaar schakelt binnenverlichting va de kippengrill in. Met de schakelaar voor de aandrijfmotor (B) schakelt u de rotatiemotoren voor de spiesen in.
-
Page 20: Reiniging En Onderhoud
H07 RN-F de doorsneden van de draden moeten overeenkomen met de hieronder weergegeven gegevens: Model 230V~ 230V 3~ 400V 3N~ E-6P 3x1,5 mm E-8P-S2 3x2,5 mm E-12P-S3 4x4 mm 5x2,5 mm Let er bij de aansluiting op dat de aardedraad langer is dan de overige draden, zodat bij het afscheuren van de kabel of het lostrekken uit de klemmen door te grote spanning, eerst de spanningsleidingen losgaan. -
Page 21: Vervangen Van Het Lampje
VERVANGEN VAN HET LAMPJE Schakel het apparaat uit. Verwijder het beschermende kapje. Draai het lampje los en vervang het door een lampje van hetzelfde type. Het beschermende kapje weer bevestigen. ELEKTRISCH SCHEMA Zie het bijgevoegde elektrische schema AANBEVELINGEN Verwijder het apparaat volgens de nationale en Europese voorschriften. Bescherm het apparaat tegen ingrepen van ongeautoriseerd personeel. - Page 22 Elektryczne grille do kurczaków z oddzielnie napędzanymi, rozmieszczonymi w pionie prętami Mod. E-6P Mod. E-8P-S2 Mod. E-12P-S3 WSKAZÓWKI DOTYCZĄCE INSTALACJI OBSŁUGI I KONSERWACJI...
- Page 23 ILUSTRACJA URZĄDZENIA il. 1 CECHY Model Pręty Kurczaki Szerokość Głębokość Wysokość Napięcie E-6P 700 mm 360 mm 530 mm 230V~ 2800 W E-8P-S2 880 mm 470 mm 530 mm 230V~ 3500 W 230V 3~ E-12P-S3 880 mm 470 mm 710 mm...
- Page 24 INSTRUKCJA OBSŁUGI Instalację oraz pierwsze uruchomienie grilla do kurczaków naleŜy zlecić wykwalifikowanemu personelowi specjalistycznemu. Aby zapewnić prawidłowe działanie urządzenia naleŜy wiedzieć Ŝe: pomocą włącznika oświetlenia włącza się wewnętrzne oświetlenie grilla do kurczaków. UŜywając włącznika silnika przekładniowego (B) włącza się napędy powodujące obrót prętów. Regulatory (D) słuŜą...
-
Page 25: Czyszczenie I Konserwacja
Kabel zastępczy musi posiadać następujące właściwości: nie moŜe wykazywać wartości mniejszych niŜ typ H07 RN-F przekroje Ŝył muszą być zgodne w z podanymi poniŜej: Model 230V~ 230V 3~ 400V 3N~ E-6P 3x1,5 mm E-8P-S2 3x2,5 mm E-12P-S3 4x4 mm 5x2,5 mm Podczas podłączania naleŜy mieć... -
Page 26: Schemat Elektryczny
WYMIANA śARÓWKI Wyłączyć urządzenie. Zdjąć klosz ochronny. Odkręcić Ŝarówkę i zastąpić Ŝarówką takiego samego typu Ponownie zamontować klosz ochronny. SCHEMAT ELEKTRYCZNY Patrz załączone schematy połączeń. ZALECENIE Urządzenie naleŜy zutylizować zgodnie z normami krajowymi i europejskimi. Urządzenie naleŜy chronić przed ingerencją osób nieupowaŜnionych. PRODUCENT NIE PONOSI śADNEJ ODPOWIEDZIALNOŚCI W PRZYPADKU BRAKU ŚCISŁEGO PRZESTRZEGANIA ZALECEŃ...
Need help?
Do you have a question about the E-6p and is the answer not in the manual?
Questions and answers