Table of Contents
Advertisement
Available languages
Available languages
Quick Links
Download this manual
See also:
User Manual
Classic
D Kurzanleitung
G Quick Reference
I Istruzioni sommarie
Die ausführliche Bedienungsanleitung finden Sie
im Internet. / A detailed version of the operating
instruction manual is available in the Internet. /
Le istruzioni d'uso complete sono disponibili su
internet.
http://www.olympiavertrieb.de/support
R
Advertisement
Table of Contents

Related Manuals for Olympia Classic


Summary of Contents for Olympia Classic
-
Page 1: Quick Reference
Classic D Kurzanleitung G Quick Reference I Istruzioni sommarie Die ausführliche Bedienungsanleitung finden Sie im Internet. / A detailed version of the operating instruction manual is available in the Internet. / Le istruzioni d’uso complete sono disponibili su internet. http://www.olympiavertrieb.de/support... - Page 3 Sicherheitshinweise Sicherheitshinweise Bewahren Sie sich vor körperlichen Schäden und beachten Sie die Hinweise! Warnung: Es besteht die Gefahr eines elektrischen Schlags! Niemals selbst Gerät und Zubehör öffnen oder reparieren. Niemals blanke Kontakte mit metallischen Gegenständen berühren. Niemals mit nassen Händen den Ladeadapter stecken oder lösen. Warnung: Es besteht Erstickungsgefahr! Von Kindern fernhalten! Halten Sie Verpackungs- und Schutzfolien von Kindern fern.
- Page 4 Sicherheitshinweise Vorsicht: Explosionsgefahr durch unsachgemäßes Austauschen oder Entnehmen der Lithium-Batterie! Ersetzen Sie die Lithium-Batte rie nur durch einen vom Hersteller freigegebenen Typ. Vorsicht: Schädigung des Gehörs möglich! Der Rufton wird über den Lautsprecher wiedergegeben. Nehmen Sie zuerst den Anruf an und halten Sie dann das Mobiltelefon an das Ohr.
- Page 5 Sicherheitshinweise Vermeiden Sie Sachschäden an Ihrem Gerät und beachten Sie die Hinweise! Schützen Sie Ihr Gerät gegen Nässe, Staub, Flüssigkeiten, Chemikalien, Dämpfe, Hitze und direkte Sonneneinstrahlung. Ihr Mobiltelefon ist nicht wasserdicht, halten Sie es trocken. Verwenden Sie ausschließlich das Originalzubehör. Schließen Sie nur vom Hersteller freigegebenes Zubehör an.
-
Page 6: Bestimmungsgemäße Verwendung
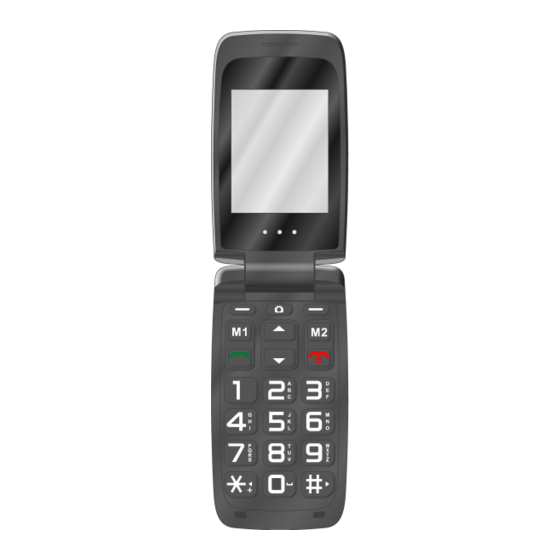
Bestimmungsgemäße Verwendung Schützen Sie die Umwelt durch achtsamen Umgang und beachten Sie die Hin weise! Vermeiden Sie unnötigen Stromverbrauch. Entfernen Sie den Ladeadapter bei Nichtbenutzung aus der Steckdose. Laden Sie Ihr Gerät nicht an ungenutz ten Computern. Akku enthält Lithium-Batterien. Verbrauchte Lithium-Batterien nicht im Haus müll entsorgen. - Page 7 Übersicht Übersicht Die Abbildung zeigt Ihnen die einzelnen Bedienelemente Ihres Mobiltelefons.
- Page 8 Übersicht Kamera Tastatur Schalter Taschenlampe Navigationstasten Taschenlampe (LED) Softkey (Abbrechen, Zurück) microUSB-Anschlussbuchse Favorit (M2) Hörmuschel Taste Auflegen Display SOS-Taste (Notruf) Taste Kamera Akkufachabdeckung Softkey (Bestätigen) Kopfhörer-Anschlussbuchse Favorit (M1) Tasten Lautstärke lauter / leiser Taste Annehmen...
-
Page 9: Erste Schritte
Erste Schritte Erste Schritte Lesen Sie die Bedienungsanleitung aufmerksam und gehen Sie wie beschrieben vor. So können Sie alle Funktionen zu Ihrer Zufriedenheit nutzen. Lieferumfang Prüfen Sie den Lieferumfang Ihres Mobiltelefons, bevor Sie es in Betrieb nehmen. Sollte etwas fehlen oder beschädigt sein, wenden Sie sich an unseren Service. 1 Mobiltelefon 1 Ladeadapter 1 Lithium-Ionen-Akku... - Page 10 2. Setzen Sie Ihre SIM-Karte in den Steckplatz SIM 1 ein. Achten Sie dabei auf die Ausrichtung der SIM-Karte. Möchten Sie zwei SIM-Karten verwenden, beachten Sie die Hinweise zur Dual-SIM-Funktion Ihres Mobiltelefons in der ausführlichen Bedienungsanleitung unter www.olympia-vertrieb.de. SIM-Karte einlegen...
- Page 11 Erste Schritte microSD-Speicherkarte einlegen Optional können Sie eine microSD-Speicherkarte (nicht im Lieferumfang enthalten) mit bis zu 8 GB Speicher in Ihr Mobiltelefon einlegen. Diese erhöht die Menge an Daten, die auf dem Mobiltelefon gespeichert werden können. 1. Schieben Sie die Metallspange mit leichtem Druck nach links.
- Page 12 Erste Schritte Akku einlegen Bevor Sie Ihr Mobiltelefon verwenden können, müssen Sie den mitgelieferten Akku in Ihr Mobiltelefon einlegen. 1. Legen Sie den Akku wie abgebildet ein. Achten Sie dabei auf die Ausrichtung des Akkus. 2. Setzen Sie die Akkufachabdeckung auf. Die Akkufach abdeckung rastet hörbar ein.
- Page 13 Erste Schritte Mobiltelefon einschalten 1. Drücken Sie die Taste Auflegen für 3 Sekunden. Ihr Mobiltelefon wird eingeschaltet. Nach kurzer Zeit zeigt das Display den Startbildschirm. Mobiltelefon ausschalten 1. Drücken Sie die Taste Auflegen für 3 Sekunden. Ihr Mobiltelefon wird ausgeschaltet. Das Display er lischt.
- Page 14 Erste Schritte Akku aufladen mit Ladeadapter 1. Schließen Sie das Netzteil des Ladeadapters an eine ordnungsgemäß installierte Steckdose an. 2. Schließen Sie den microUSB-Stecker an die microUSB-Anschlussbuchse Ihres Mobiltelefons an. Der microUSB-Stecker ist verpolungssicher. Hinweis: Entfernen Sie den Akku nicht, während das Mo biltelefon geladen wird.
- Page 15 Erste Schritte Akku aufladen mit Ladeschale 1. Schließen Sie das Netzteil des Ladeadapters an eine ordnungsgemäß installierte Steckdose an. 2. Schließen Sie den microUSB-Stecker an die microUSB-Anschlussbuchse der Ladeschale an. Der microUSB-Stecker ist verpolungssicher. 3. Stellen Sie das Mobiltelefon wie abgebildet in die La deschale.
- Page 16 Bedienen Bedienen Hinweise zur Bedienung Drücken Sie die Softkeys (links oder rechts), die Tasten Annehmen Auflegen sowie die Navigationstasten , um durch die Menüs Ihres Mobiltelefons zu navigieren und Aktionen durchzuführen. Anruf annehmen Drücken Sie die Taste Annehmen , um einen eingehenden Anruf anzunehmen.
-
Page 17: Uhrzeit Und Datum Einstellen
Bedienen Rufnummern und Zeichen eingeben Drücken Sie die Tasten , um Rufnummern / Zeichen einzugeben. Drücken Sie die Softkey-Taste (rechts), um Eingaben zu löschen. Sprache einstellen 1. Navigieren Sie zum Menüpunkt Menü à Einstellungen à Telefoneinstellungen à Sprache . 2. Wählen Sie Ihre Sprache aus. Uhrzeit und Datum einstellen 1. - Page 18 Bedienen Anrufen 1. Geben Sie die Rufnummer ein. Drücken Sie die Softkey-Taste (rechts), um Eingaben zu löschen. Tipp: 2. Drücken Sie die Taste Annehmen . Die Rufnummer wird gewählt. Lautstärke während eines Gesprächs einstellen Drücken Sie die Navigationstaste während eines Gesprächs, um die Laut stärke des Gesprächs zu erhöhen.
- Page 19 Bedienen Kontakte zum Telefonbuch hinzufügen Speichern Sie bis zu 300 Kontakte in Ihrem Telefonbuch. 1. Navigieren Sie zum Menüpunkt Menü à Telefonbuch à Neuen Kontakt hinzufügen à OK . 2. Wählen Sie einen Speicherort Zu SIM1 / Zum Telefon . 3.
- Page 20 Bedienen Bildwahl Weisen Sie bis zu acht Ihrer favorisierten Kontakte Bilder zu. Diese Bilder werden im Bildwahl-Menü angezeigt. Durch Auswählen dieser Bilder wird die dem Kontakt zugeordnete Rufnummer angewählt. Kontakt zur Bildwahl hinzufügen 1. Drücken Sie auf Bildw . 2. Drücken und halten Sie die Taste, der Sie einen Bildwahl-Kontakt hinzufügen möchten.
- Page 21 Bedienen Bild zu Bildwahl-Kontakt hinzufügen Wenn Sie einem Bildwahl-Kontakt ein Bild hinzufügen möchten, können Sie entweder die Kamera Ihres Mobiltelefons verwenden oder ein Bild von Ihrem Computer auf Ihr Mobiltelefon übertragen. Dafür benötigen Sie eine microSD- Speicherkarte. Weitere Informationen entnehmen Sie der ausführlichen Bedienungsanleitung. 1.
- Page 22 Bedienen Über Bildwahl anrufen 1. Drücken Sie auf Bildw . 2. Wählen Sie den gewünschten Bildwahl-Kontakt. 3. Drücken Sie die Taste Annehmen . Die Rufnummer wird gewählt.
- Page 23 Bedienen SOS-Taste (Notruf-Funktion) Sie können mit der SOS-Taste einen Notruf auslösen. Zuerst ertönt ein Alarmsi gnal. Dann werden Notruf-SMS an die für diesen Zweck gespeicherten Rufnum mern gesendet. Anschließend werden diese im Freisprechmodus nacheinander angerufen. Speichern Sie bis zu 4 Rufnummern, die Sie der Notruf-Funktion zu weisen möchten.
- Page 24 Richtlinie wird durch das auf dem Gerät be findliche CE-Zeichen bestätigt. Für die komplette Konformitätserklärung nutzen Sie bitte den kostenlosen Down load von unserer Website www.olympia-vertrieb.de. Pflegehinweise Reinigen Sie die Gehäuseoberflächen mit einem weichen und fusselfreien Tuch. Hinweis: Verwenden Sie keine Reinigungs- oder Lösungsmittel.
- Page 25 Anhang Garantie Die Garantiezeit beträgt 24 Monate. Die Garantiezeit beginnt ab Kaufdatum. Bei Problemfällen wenden Sie sich an unsere Hotline: 0180 5 007514 (Kosten aus dem dt. Festnetz bei Drucklegung: 14 ct/Min., maximal 42 ct/Min. aus dem Mobilfunknetz) Ist Ihr Problem telefonisch nicht zu beheben, können Sie Ihr Gerät in Originalver packung mit beigefügtem Kaufbeleg an folgende Anschrift senden: Service Center Hattingen Zum Kraftwerk 1...
- Page 26 Anhang Entsorgung Wollen Sie Ihr Gerät entsorgen, bringen Sie es zur Sammelstelle Ihres kommunalen Entsorgungsträgers (z. B. Wertstoffhof). Nach dem Elektro- und Elektronikgerätege setz sind Besitzer von Altgeräten gesetzlich verpflichtet, alte Elektro- und Elektro nikgeräte einer getrennten Abfallerfassung zuzuführen. Das Symbol bedeutet, dass Sie das Gerät auf keinen Fall in den Hausmüll werfen dürfen! Gefährdung von Gesundheit und Umwelt durch Akkus und Batterien! Akkus und Batterien nie öffnen, beschädigen, verschlucken oder in die Umwelt gelangen...
- Page 27 Anhang Technische Eigenschaften Merkmal Wert Frequenzband GSM 850/900/1800/1900 MHz Quadband Abmessungen (H x B x T) 104 x 53 x 18 mm Gewicht ca. 91 g inkl. Akku Stromversorgung Eingang: 100 - 240 V, 50 - 60 Hz, 0,40 A Ausgang: 5 V, 500 mA Akku 3,7 V, 600 mAh, Ladedauer: ca.
-
Page 28: Safety Instructions
Safety Instructions Safety Instructions Pay attention to the information to prevent any personal injuries! Warning: Risk of electric shock! Never attempt to open and repair the device or accessories yourself. Never touch bare contacts with metallic objects. Never plug-in or unplug the charging adapter when your hands are wet. - Page 29 Safety Instructions Caution: Risk of explosion through improper replacement or removal of the lithium battery! Only replace the lithium battery by a type ap proved by the manufacturer. Caution: Risk of hearing damage! The ringing tone is issued via the loudspeaker. Take an incoming call first and then hold the mobile phone to your ear.
- Page 30 Safety Instructions Avoid the risk of property damage to your device and observe the information! Protect the device from moisture, dust, liquids, chemicals, vapours, heat and direct sunlight. The phone is not waterproof; therefore, keep it dry. Only use original accessories. Only connect accessories approved by the manufacturer.
-
Page 31: Intended Use
Intended Use Protect the environment by acting responsibly and observing the following informa tion! Avoid any unnecessary consumption of power. Remove the charging adapter from the power socket when the phone is not in use. Do not charge the device on computers which are not in use. The power pack contains lithium batteries. - Page 32 Overview Overview The diagram below illustrates the individual operating elements on the mobile phone.
- Page 33 Overview Camera Keypad Torch switch Navigation keys Torch lamp (LED) Softkey (cancel, back) MicroUSB connection port Favourite (M2) Earpiece On-hook key Display SOS key (emergency call) Camera key Battery compartment cover Softkey (confirm) Headphone connection port Favourite (M1) Volume key, increase / decrease Call key...
-
Page 34: First Steps
First Steps First Steps Read the operating manual carefully and proceed as described. This will enable you to use all the functions to your full satisfaction. Scope of Delivery Before starting up the mobile phone, check the equipment supplied. If anything is missing or shows signs of damage, contact our Service department. - Page 35 SIM card is aligned correctly. If you want to use two SIM cards, pay attention to the information on the dual SIM function of the mobile phone provided in the operating manual available at www.olympia-vertrieb.de. Insert the SIM card...
- Page 36 First Steps Inserting the MicroSD Memory Card A microSD memory card (not included in the equipment supplied) with a memory of up to 8 GB can be inserted, as an option, in the mobile phone. This increases the quantity of data which can be stored on the mobile phone.
- Page 37 First Steps Inserting the Battery Before you can use the mobile phone, you must insert the battery supplied in the mobile phone. 1. Insert the battery as illustrated. Pay attention the bat tery is aligned correctly. 2. Replace the battery compartment cover. The battery compartment cover latches audibly into place.
- Page 38 First Steps Switching On the Mobile Phone 1. Press the On-hook key for 3 seconds. The mobile phone is switched on. The start screen appears in the display after a short time. Switching Off the Mobile Phone 1. Press the On-hook key for 3 seconds.
- Page 39 First Steps Charging the Battery With the Charging Adapter 1. Connect the power adapter plug on the charging adapter to a properly installed power socket. 2. Connect the microUSB plug to the microUSB connec tion port on the mobile phone. The microUSB plug is protected against reverse polarity.
- Page 40 First Steps Charging the Battery With the Charging Cradle 1. Connect the power adapter plug on the charging adapter to a properly installed power socket. 2. Connect the microUSB plug to the microUSB connec tion port on the charging cradle. The microUSB plug is protected against reverse polarity.
-
Page 41: Operation
Operation Operation Information on Navigation and On-hook Press the softkeys (left or right), Call keys as well as the Navigation keys to navigate through the menus and execute vari ous functions. Taking a Call Press the Call key to take an incoming call. Ending a Call Press the On-hook key when a call is in progress in order to end the call. -
Page 42: Setting The Time And Date
Operation Entering Phone Numbers and Characters Press the keys to enter phone numbers / characters. Press the softkey (right) to delete entries. Setting the Language 1. Navigate to the Menu à Settings à Phone settings à Language menu option. 2. Select the required language. Setting the Time and Date 1. - Page 43 Operation Making a Call 1. Enter the required phone number. Press the softkey key (right) to delete incorrect input. Tip: 2. Press the Call key. The phone number is dialled. Adjusting the Volume During a Call Press the Navigation up key while a call is in progress to increase the volume of the caller.
- Page 44 Operation Dialling Contacts from the Phone Book 1. Navigate to the Menu à Phonebook menu option. Note: Alternatively, press the Navigation down key to open the phone book. 2. Select the required contact. 3. Press the Call key. The phone number is dialled.
- Page 45 Operation Dialling Via Pictures You can assign a picture to each of your eight favourite contacts. These pictures are then displayed in the picture selection menu. On selecting a picture, the phone number of the contact assigned to the picture is dialled. Adding Contacts for Picture Selection 1.
- Page 46 Operation Adding a Picture to the Picture Selection Contacts When you want to assign a picture to a picture dialling contact, you can either use the camera integrated in the mobile phone or transfer a picture stored on your computer to the mobile phone. In this case, you need a microSD memory card. Further information is available in the detailed operating manual.
- Page 47 Operation Dialling Via the Picture Selection Menu 1. Press the Pic. key. 2. Select the required picture contact. 3. Press the Call key. The phone number is dialled.
- Page 48 Operation SOS Key (Emergency Call Function) You can initiate an emergency call by using the SOS key. An acoustic alarm signal is issued first of all. Then the SOS text is sent to the phone numbers saved for this purpose. These numbers are then dialled in succession in Handsfree mode. You can store up to 4 phone numbers which can be assigned to the emergency call function.
- Page 49 Conformity with the above mentioned directive is confirmed by the CE mark on the device. To view the complete Declaration of Conformity, please refer to the free download available on our website www.olympia-vertrieb.de. Care Instructions Clean the housing surfaces with a soft, fluff-free cloth.
- Page 50 Appendix Guarantee Dear Customer, we are pleased that you have chosen this equipment. In the case of a defect, please return the device together with the receipt and original packing material to the point-of-sale.
- Page 51 Appendix Disposal In order to dispose of your device, take it to a collection point provided by your local public waste authorities (e.g. recycling centre). According to laws on the disposal of electronic and electrical devices, owners are obliged to dispose of old electronic and electrical devices in a separate waste container.
- Page 52 Appendix Technical Properties Feature Value Frequency band GSM 850/900/1800/1900 MHz quad band Dimensions (H x W x D) 104 x 53 x 18 [mm] Weight Approx. 91 g incl. battery Power supply Input: 100 - 240 V, 50 - 60 Hz, 0.40 A Output: 5 V, 500 mA Battery 3.7 V, 600 mAh, charging time: approx.
-
Page 53: Indicazioni Di Sicurezza
Indicazioni di sicurezza Indicazioni di sicurezza Evitare lesioni fisiche e osservare le indicazioni! Avviso: Pericolo di scosse elettriche! Non aprire o riparare mai apparecchi o accessori in modo autonomo. Non sfiorare mai i contatti a nudo con oggetti metallici. Non introdurre mai mani bagnate nell’adattatore di carica, né scolle garlo mai con mani bagnate. - Page 54 Indicazioni di sicurezza pacemaker cardiaco. Spegnere subito il telefono appena si doves sero avvertire o presumere alterazioni di qualsiasi tipo. Attenzione: Pericolo di esplosione dovuto a sostituzione o estrazione non corretta della batteria al litio! Sostituire la batteria al litio solo con un tipo di batteria consigliato dal produttore.
- Page 55 Indicazioni di sicurezza Attenzione: Non affidarsi unicamente al funzionamento del telefonino per assicurare possibili interventi d’emergenza! Per motivi tecnici non è possibile garantire un corretto collegamento in qualsiasi cir costanza e situazione. Evitare danni materiali all’apparecchio ed osservare le indicazioni! Proteggere l'apparecchio da umidità, polvere, liquidi, sostanze chimiche, vapori, calore e raggi solari diretti.
-
Page 56: Impiego Conforme Agli Usi Previsti
Impiego conforme agli usi previsti Proteggere l’ambiente e osservare le indicazioni! Evitare qualsiasi spreco di energia elettrica. Se non utilizzato, scollegare l’adattatore di carica dalla presa di corrente. Evitare di caricare l’apparecchio collegandolo ad un computer non in uso. La batteria ricaricabile è una batteria al litio. Le batterie al litio esaurite non vanno smaltite assieme ai rifiuti domestici. -
Page 57: Vista Generale
Vista generale Vista generale La figura mostra i singoli elementi di comando del proprio telefonino. - Page 58 Vista generale Fotocamera Tastiera Interruttore per torcia Tasti di navigazione Torcia (LED) Softkey (Annulla / Indietro) Presa per microUSB Preferiti (M2) Ricevitore Tasto Riagganciare Display Tasto SOS (emergenza) Tasto fotocamera Copertura del vano batteria Softkey (Conferma) Presa per auricolare Preferiti (M1) Tasti volume alto / basso Tasto Accettare...
-
Page 59: Primi Passi
Primi passi Primi passi Leggere attentamente e osservare le istruzioni d'uso. In questo modo sarà possibi le usufruire di tutte le funzioni in modo soddisfacente. Oggetto di fornitura Verificare il contenuto della confezione del proprio telefonino prima di metterlo in funzione. - Page 60 5. Inserire la scheda SIM nello slot SIM 1. Tenere in parti colare conto dell’orientamento della scheda SIM. Se si volessero utilizzare due schede SIM, osservare le indicazioni relative alla funzione Dual SIM del telefonino nelle istruzioni dettagliate su www.olympia-vertrieb.de. Inserire la scheda SIM...
- Page 61 Primi passi Inserire la scheda memoria microSD Il telefonino prevede l’inserimento di una scheda memoria microSD supplementare (non inclusa nella confezione) con fino a 8 GB di memoria. Il suo uso aumenta la capa cità di archiviazione di dati sul proprio telefonino. 1.
- Page 62 Primi passi Inserire la batteria Prima di poter utilizzare il telefonino è necessario inserire nel telefonino la batteria fornita in dotazione. 1. Inserire la batteria come raffigurato. Tenere in partico lare conto dell’orientamento della batteria. 2. Applicare il coperchio del vano batteria. Il coperchio del vano batteria scatta in posizione in maniera udibile.
- Page 63 Primi passi Accendere il telefonino 1. Premere il tasto Riagganciare per 3 secondi. Il telefonino viene inserito. Poco dopo il display visualizza la schermata iniziale. Spegnere il telefonino 1. Premere il tasto Riagganciare per 3 secondi. Il telefonino viene disinserito. Il display si spegne. : La funzione di chiamata d’emergenza Suggerimento (tramite il tasto SOS sul retro del proprio...
- Page 64 Primi passi Caricare la batteria con adattatore di carica 1. Collegare l’alimentatore dell’adattatore di carica ad una presa elettrica installata correttamente. 2. Collegare il connettore microUSB ad una porta mi croUSB del proprio telefonino. Il connettore microUSB è realizzato in modo da escludere un’inversione della polarità.
- Page 65 Primi passi Caricare la batteria con basetta di ricarica 1. Collegare l’alimentatore dell’adattatore di carica ad una presa elettrica installata correttamente. 2. Collegare il connettore microUSB alla porta microUSB della basetta di ricarica. Il connettore microUSB è rea lizzato in modo da escludere un’inversione della polari tà.
- Page 66 Esercizio Esercizio Indicazioni sulla navigazione Premere i softkey (sinistra o destra), i tasti Accettare , Riagganciare e i tasti di navigazione per navigare nei menu del proprio telefoni no ed eseguire funzioni. Accettare la chiamata Premere il tasto Accettare per accettare una chiamata in arrivo. Concludere la chiamata Premere il tasto Riagganciare durante la chiamata in corso per concludere...
- Page 67 Esercizio Inserire numeri telefonici e segni Premere i tasti per inserire numeri telefonici / segni. Premere il tasto softkey (destra) per cancellare le immissioni. Impostare la lingua 1. Navigare alla voce di menu Menu à Impostazioni à Impostazioni telefono à Lingua . 2.
- Page 68 Esercizio Effettuare telefonate 1. Inserire il numero di chiamata. Premere il tasto softkey (destra) per cancellare le immissioni. Suggerimento: 2. Premere il tasto Accettare . Il numero di chiamata è selezionato. Impostare il volume con chiamata in corso Premere con chiamata in corso il tasto di navigazione per aumentare il volu...
- Page 69 Esercizio Aggiungere contatti alla rubrica Salvare fino a 300 contatti nella propria rubrica. 1. Navigare alla voce di menu Menu à Rubrica telefonica à Aggiungi nuovo contatto à OK . 2. Selezionare una posizione di memoria A SIM1 / A telefono . 3.
- Page 70 Esercizio Chiamata contatto con foto Abbinare una foto a un massimo di 8 dei propri contatti preferiti. Le foto abbinate sono quindi visualizzate nel menu Chiamata contatto con foto. Alla selezione di queste foto corrisponde la selezione del numero telefonico abbinato al contatto. Aggiungere il contatto per la chiamata contatto con foto 1.
- Page 71 Esercizio Aggiungere la foto alla funzione di chiamata contatto con foto In caso si volesse usufruire della funzione di chiamata contatto con foto, è possibi le riprendere una foto con la fotocamera del proprio telefonino oppure trasferire una foto dal proprio PC sul telefonino. In tal caso è necessario ricorrere ad una scheda memoria microSD.
- Page 72 Esercizio Chiamare il contatto con foto 1. Premere Immagine . 2. Selezionare il contatto desiderato selezionando la rispettiva foto. 3. Premere il tasto Accettare . Il numero di chiamata è selezionato.
- Page 73 Esercizio Tasto SOS (funzione di chiamata d’emergenza) Premendo sul tasto SOS è possibile lanciare una chiamata d’emergenza. Prima si avverte un segnale di allarme. Il telefonino invia quindi un SMS d’emergenza ai numeri telefonici precedentemente salvati a tale scopo. I numeri telefonici memorizzati sono chiamati uno dopo l’altro con vivavoce inserito.
- Page 74 è confermata dal mar chio CE applicato sul dispositivo. Per la dichiarazione di conformità completa si prega di usufruire del download gra tuito dal nostro sito web www.olympia-vertrieb.de. Consigli per la cura Pulire le superfici degli apparecchi con un panno morbido e antipelucchi.
- Page 75 Appendice Garanzia Caro cliente, ci congratuliamo con Lei per aver scelto questo apparecchio. In caso di difetti la preghiamo di ritornare l'apparecchio, completo di imballo originale e scontrino di acquisto, al punto vendita dove è stato effettuato l'acquisto.
- Page 76 Appendice Smaltimento Procedere allo smaltimento dell'apparecchio esaurito consegnandolo presso un pun to di raccolta istituito dalla propria società di smaltimento rifiuti comunale (ad es. centro di riciclo materiali). Secondo quanto previsto dalla legge sugli apparecchi elettrici ed elettronici, i proprietari di apparecchi esauriti sono per legge tenuti alla consegna di tutti gli apparecchi elettrici ed elettronici presso un centro di rilievo rifiuti in raccolta differenziata.
- Page 77 Appendice Dati tecnici Caratteristica Valore Banda di frequenza GSM 850/900/1800/1900 MHz Quadband Dimensioni (H x L x P) 104 x 53 x 18 mm Peso ca. 91 g inclusa batteria Alimentazione elettrica Entrata: 100 - 240 V, 50 - 60 Hz, 0,40 A Uscita: 5 V, 500 mA Batteria 3,7 V, 600 mAh, durata di carica: ca.
- Page 78 Notizen / Notes / Annotazioni Notizen / Notes / Annotazioni...
- Page 79 Notizen / Notes / Annotazioni Notizen / Notes / Annotazioni...
- Page 80 Wir behalten uns inhaltliche und technische Änderungen vor. All rights reserved. Con riserva di modifiche tecniche e al contenuto.
Need help?
Do you have a question about the Classic and is the answer not in the manual?
Questions and answers